Welcome to my crafty corner where you can find and buy current Stampin' Up! products. I look forward to sharing my paper crafting experience and creations with all of you. I offer classes for beginners and card buffets for the more avid crafter. All of my creations sell for $5 each plus mailing. Click on each tab for more details. Don't forget to follow my blog, facebook, pinterest, instagram, and you tube channel. Happy Stamping!
Pages
▼
Monday, April 2, 2018
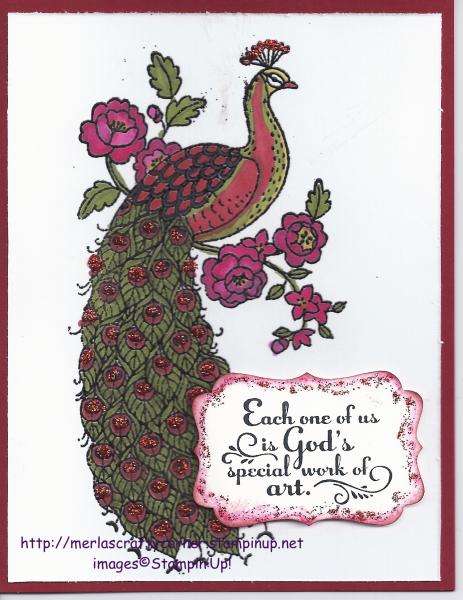
Glittering Perfect Peacock
I
should have named this card The Dazzling Peacock. Either way, it is a
card to fit any occasion. Supplies that you will need
to duplicate this project are:
Stamp Sets: Perfect Peacock, Trust God Paper: Cherry Cobbler A-2, Whisper White 5 1/4 X 4 Ink: Cherry Cobbler, Blendabilities: Night of Navy, Cherry Cobbler,
Melon Mambo, Daffodil Delight, Old Olive, Versamark Techniques: Heat Embossing, Sponging Accessories: Cherry Cobbler Dazzling Details, Decorative Label Punch, Black Embossing Powder, Sponge, Dimensionals
In
retrospect, I should have stamped the peacock a bit more to the left to
allow more room for the sentiment. In order to do this, I will use the
stamp-a-ma-jig in the future. I also will use the embossing buddy to
powder my paper so that I don't make a mess of it with the black
embossing powder. The card is fairly easy to make. I just pointed out
the two errors I made that hopefully I will correct the next time I make
this card. In case you need a step by step instruction, you may
continue to read.
After
cutting the Whisper White card stock, I inked my peacock with the Versamark and stamped the image. You will cut your card stock, brush it
with the embossing buddy, and then stamp it using your Versamark. Apply
your black embossing powder and remove the excess. Apply heat with
your heat gun. I then colored the peacock using my blendabilities: Night of Navy, Cherry Cobbler, Old Olive, and Daffodil
Delight were used on the peacock. I used Cherry Cobbler, Melon Mambo,
Old Olive, and Daffodil Delight on the flowers. I then applied Cherry
Cobbler Dazzling Details to the head feathers and the eyes or circles of
the peacock's tail. I then set it aside to dry. Using the Decorative Label punch I stamped and punched out my sentiment. I sponged the edges
of the label with Cherry Cobbler and placed the Cherry Cobbler Dazzling Details around it also. Once both of these were dry, I adhered the
peacock to the Cherry Cobbler card stock using my favorite adhesive. I
used dimensionals to place the label on the card. Done!
I hope
you enjoy making this card and use your own creativity to change it up
and make your own colorful peacock. Now go and spread your feathers.
No comments:
Post a Comment