Thursday, June 30, 2022

Sympathy Moments

A beautiful serene scene is all that is needed for a sympathy card. I believe in letting the paper do most of the work. Thoughts?


Sympathy Moments


Stamps:
   Peaceful Moments

Paper:
   Balmy Blue A-2
   Feels Like Frost DSP 5-1/2 x 3
   Vellum 1-3/4 x 5-1/4
   Basic White Strips 1/2 x 5-1/2 (2), 5-1/4 x 4 (Inside)

Ink:
   Night of Navy

Technique:
   CAS

Accessories:
   Glittery Clear Epoxy Shapes
   Tear & Tape
   Adhesive

First, I adhered a Basic White strip on each side of the designer series paper (DSP) panel. You can easily place the DSP panel onto a Basic White panel that measures 3-1/4 x 5-1/2. I chose to use strips because I have many left-over ones from cutting panels for other cards.

Next, I stamped my sentiment onto the center of a vellum panel. I allowed the panel to dry for a few minutes. 

I then wrapped the vellum around the panel and adhered it to the back, using strips of tear and tape. Any strong adhesive will do the job.

I then adhered this panel onto the Balmy Blue card front.

Lastly, I added glittery clear epoxy shapes and adhered the Basic White panel to the inside of the card.

Here is another card with the sentiment on the upper part of the card:


Sympathy Moments Too


Thank you so very much for being here. I appreciate you taking the time to glance at my work. Please Contact Me if I can be of service.

Are you interested in Stampin' Up! products to make your own cards? Shop Now and have a look-see. I placed a HOST CODE for you to use if you do not earn your own rewards. It is sitting in the right sidebar.

Do you like surprises? Subscribe to our Paper Pumpkin and receive all you need to complete the monthly project. The cost is less than $25. Check it out.

Join Me and become privy to everything Stampin' Up! Receive a discount on all of your personal orders. Personally, I love SALES!

Please share, like, pin, tweet, or comment. Do not forget to FOLLOW and SUBSCRIBE to my blog.

HAPPY STAMPING!

Wednesday, June 29, 2022

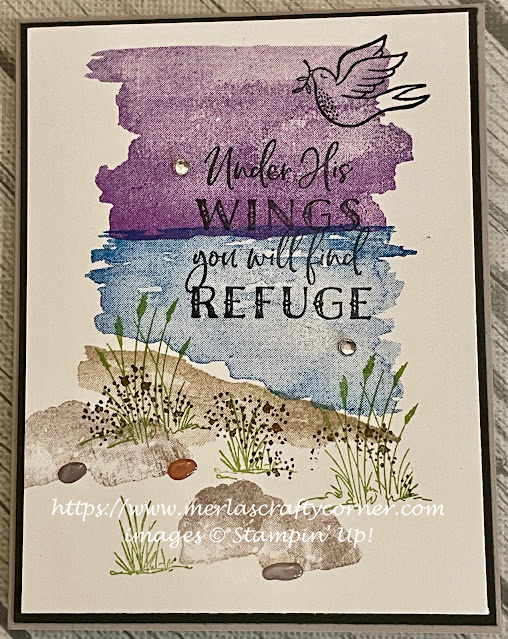
Under His Wings

Pairing up the Hope & Prayer stamp set with the Oceanfront stamp set was one of the best decisions I made this week. What do you think?


Stamps:
   Hope & Prayer
   Oceanfront

Paper:
   Gray Granite A-2
   Basic Black 5-3/8 x 4-1/8
   Basic White 5-1/4 x 4 (2)

Ink:
   Crumb Cake
   Gorgeous Grape
   Gray Granite
   Pacific Point
   Pear Pizzazz
   Soft Suede
   Tuxedo Black Memento

Technique:
   CAS

Accessories:
   Pebbles Enamel Shapes
   Basic Rhinestone Jewels
   Adhesive

First, I stamped the sky using Gorgeous Grape.

I then added the water with Pacific Point.

I stamped the sand, using Crumb Cake.

Added a bit of gritty sand with Soft Suede.

Next, I stamped the grasses with Pear Pizzazz. I added a couple of tall grasses and a few small ones.

I then stamped the boulders, using Gray Granite.

I then stamped the dove and sentiment from the Hope & Prayer stamp set, using Tuxedo Black Memento.

I adhered the panel to a Basic Black matte and then adhered it onto the Gray Granite card front.

Lastly, I added a few pebbles, rhinestones, and adhered the other Basic White panel to the inside of the card.

Thank you so much for spending time with me here. Contact Me if you have any questions.

Shop Now and take a look at all of our new products and current promotions. Please use the HOST CODE sitting in the right sidebar if you did not earn your own rewards.

Subscribe to Paper Pumpkin and keep your monthly cost below $25! Join Me and become my newest team member.

Either way, please share, like, pin, tweet, or comment. Do not forget to FOLLOW and SUBSCRIBE to my blog.

HAPPY STAMPING!

Tuesday, June 21, 2022

Mossy Grove

This stamp set is ideal for creating masculine scenes as well as having an appeal for all who cherish the outdoors. Thoughts? 


Mossy Grove


Stamps:
Grassy Grove

Paper:
   Soft Sea Foam A-2, Scraps
   Simply Marbleous DSP 5-1/4 x 4
   Basic White 5-1/4 x 4 (Inside), Scraps

Ink:
   Cinnamon Cider
   Mossy Meadow

Technique:
   Die Cutting

Accessories:
   Grove Dies
   2020-2022 In-Color Enamel Dots
   Dimensionals
   Adhesive

First, I stamped and die cut the tall pines using Mossy Meadow on Soft Sea Foam card stock.

I then stamped and die cut a deer. I used Cinnamon Cider on a scrap of Basic White card stock.

Next, I stamped and die cut the grove using Mossy Meadow ink on Mossy Meadow card stock.

I adhered the DSP panel to the Soft Sea Foam card front. I attached the grove with dimensionals. I then adhered the trees and the deer with adhesive.

Lastly, I stamped the sentiment and added a couple of enamel dots. I adhered the Basic White panel to the inside of the card.

Here is another card using the same products, but a different layout:

Mossy Grove Too


Stamps:
   Grassy Grove

Paper:
   Soft Sea Foam A-2
   Simply Marbleous DSP 5-1/4 x 2
   Basic White 5-1/4 x 4 (2), Scraps

Ink:
   Cinnamon Cider
   Mossy Meadow

Technique:
   Die Cutting

Accessories:
   Grove Dies
   2020-2022 In-Color Enamel Dots
   Dimensionals
   Adhesive

First, I stamped and die cut three sections of grass, using Cinnamon Cider on scraps of Basic White.

I then stamped and die cut a deer, using Cinnamon Cider on a scrap of Basic White card stock.

I then stamped and die cut the trees using Mossy Meadow on a scrap of Basic White cardstock.

Next, I adhered the strip of DSP onto the left side of a Basic White panel.

I then attached the three sections of grass using dimensionals. I snipped off the grass section that went past the panel on the left. 

I adhered the deer and the trees using adhesive.

Lastly, I stamped the sentiment and added a few enamel dots. I adhered the other Basic White panel to the inside of the card.

Thank you so much for stopping by here and taking a quick look-see. If you have any questions or need my assistance, Contact Me.

Shop Now and take a look at all of our new products and current promotions. Please use the HOST CODE sitting in the right sidebar if you did not earn your own rewards.

If you want to craft, but keep your costs below $25 a month, check out Paper Pumpkin. It just might be what you are looking for at the moment.

Join Me and become the newest member of my team. Remember there are no hidden agendas or penalties for giving it a go. Don't pass this opportunity to save.

You've come this far, so please share, like, pin, tweet, or comment. I appreciate your time and efforts. Let me know your thoughts and leave all of your questions behind. Do not forget to FOLLOW and SUBSCRIBE to my blog.

HAPPY STAMPING!

Monday, June 20, 2022

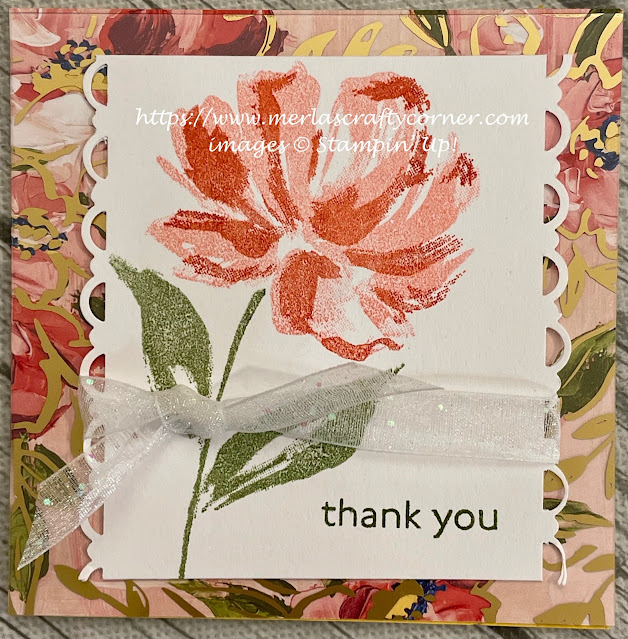
Thank You Floral 4x4

These 4" square cards make full use of your beautiful 12 x 12 designer sheets. They also fit nicely into a regular A-2 card size envelope. Thoughts? 


Stamps:
   Art Gallery

Paper:
   Bumblebee 4 x 8 scored @ 4"
   Fine Art Floral DSP 4" Sq.
   Golden Garden Designer Acetate 4" Sq.
   Basic White 3-1/4 x 3-1/2, 3-3/4" Sq. (Inside)

Ink:
   Flirty Flamingo
   Mossy Meadow
   Powder Pink

Technique:
   Punching

Accessories:
   Scalloped Border Punch
   Glittered Organdy Ribbon
   Glue Dots
   Adhesive

First, I adhered the acetate to the designer series paper, using glue dots in the center where the image would be mounted. This way, they are invisible to everyone.

I then stamped my image and sentiment. I used Powder Pink for the base of the flower and Flirty Flamingo as the accent color. The leaves, stem, and sentiment are stamped using Mossy Meadow.

Next, I used the scalloped border punch on the sides of the image. In retrospect, I should have punched strips and adhered them under the image to give it a more even look. Still, this is what makes it quite unique. Mistakes and all...

I wrapped a bit of glittered organdy ribbon around the image and tied a bow.

Lastly, I adhered the designer series paper and acetate panel to the Bumblebee card front and attached the image panel to the center. I adhered the 3-3/4" square of Basic White to the inside of the card.

Thank you so much for stopping by here and spending a few minutes of your day with me. I appreciate your time. Contact Me if you have any questions, need a demonstrator, or just want to stamp or share ideas.

Shop Now and enjoy browsing products and promotions. I have a HOST CODE in the right sidebar in case you did not earn your own rewards.

Do not miss the opportunity to Join Me and become the newest member of my team.

Paper Pumpkin should not be ignored. I enjoy putting my kit together monthly.

Take a few more minutes and share, like, pin, tweet, or comment. I would love to see what you really think. Do not forget to FOLLOW and SUBSCRIBE to my blog.

HAPPY STAMPING!

Sunday, June 19, 2022

Merry Merlot Gallery

Sponging along the tear accentuates the image. I also like that the color sprays onto more of the white paper. Thoughts?


Stamps:
   Art Gallery

Paper:
   Old Olive A-2
   Fine Art Floral DSP 5-1/4 x 4
   Golden Garden Designer Acetate 5-1/4 x 4
   Basic White 3-1/4 x 4, 5-1/4 x 4 (Inside)

Ink:
   Mossy Meadow
   Merry Merlot
   Flirty Flamingo

Technique:
   Tearing
   Sponging
   Punching

Accessories:
   Dragonflies Punch
   Basic Rhinestone Jewels
   Sponge
   Glue Dots
   Adhesive

First, I adhered the acetate to the designer series paper, using glue dots in spots that were not noticeable.

I then stamped my image and sentiment on the smaller piece of Basic White. I used Flirty Flamingo for the first step on the flower, and then I applied Merry Merlot as the accent color. I used Mossy Meadow for the stem, leaves and sentiment.

Next, I tore around the image and sentiment. I tore the paper toward me and then sponged the edges using Flirty Flamingo.

I adhered the designer series paper with the acetate panel onto the Old Olive card front.

I then added the image to the center of the card.

I attached a dragonfly that was left-over from a previous project to the card. You can use the Dragonflies punch to create some. 

Lastly, I added a few rhinestones and adhered the Basic White panel to the inside of the card.

Thank you so much for dropping by here. Contact Me if you have any questions.

Click on all of the tabs above and explore products, promotions, and opportunities.

Please take the time to share, like, pin, tweet, or comment. Do not forget to FOLLOW and SUBSCRIBE to my blog.

HAPPY STAMPING!

Saturday, June 18, 2022

Powdered Pink Floral

Sponging along the tear accentuates the image. Many are using blending brushes now for this technique, but I still turn to my overly used sponges. Thoughts?


Stamps:
   Art Gallery

Paper:
   Flirty Flamingo A-2
   Fine Art Floral DSP 5-1/4 x 4
   Golden Garden Designer Acetate 5-1/4 x 4
   Basic White 3-1/4 x 4, 5-1/4 x 4 (Inside)

Ink:
   Old Olive
   Powder Pink
   Flirty Flamingo

Technique:
   Tearing
   Sponging

Accessories:
   In-Color Itty Bitty Bows
   Basic Rhinestone Jewels
   Sponge
   Glue Dots
   Adhesive

First, I adhered the acetate to the designer series paper. I placed glue dots in places that would not be noticeable.

I then stamped the image and the sentiment. I used Powder Pink and then Flirty Flamingo as the accent color. The stem, leaves and sentiment were stamped in Old Olive.

Next, I tore the paper around the image and sentiment. I tore the paper toward me. 

I then sponged it using Powder Pink.

I adhered it to the acetate using glue dots.

Next, I adhered the DSP panel onto the Flirty Flamingo card front.

Lastly, I added rhinestones, a bow, and adhered the Basic White panel to the inside of the card.

Thank you so very much for taking the time to stop and glance at my work. If you have any questions or suggestions, please Contact Me. I do appreciate your time.

If you need any supplies, or you are curious to know just how much these products cost, click on Shop Now and satisfy your curiosity. A HOST CODE is available for you to use in case you did not earn your own rewards. You can find it in the right sidebar.

Do you want the best value for your buck? Join Me and reap all of the rewards. I will be more than happy to assist you. Check it out and note that there are no hidden agendas.

Wait! Don't leave. If you just want to try it and see, then subscribe to Paper Pumpkin. You will receive a kit with everything you need to create a project. Check out the Kit Collection for more choices.

I would love for you to take a minute to share, like, pin, tweet, or comment. Please FOLLOW and SUBSCRIBE to my blog. Let me know what you think below in the comments. 

HAPPY STAMPING!

Friday, June 17, 2022

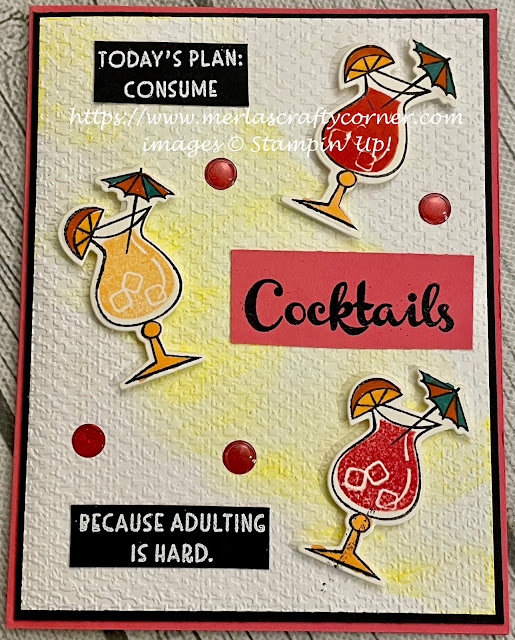
Cocktails

Sometimes you just need a break or a drink. De-stressing is a necessity. I turn to my paper therapy. What do you think?


Stamps:
   Nothing's Better Than

Paper:
   Strawberry Slush A-2, Scrap
   Basic Black 5-3/8 x 4-1/8, Scraps
   Basic White 5-1/4 x 4 (2), Scraps

Ink:
   Apricot Appeal
   Strawberry Slush
   Tuxedo Black Memento
   Watermelon Wonder
   Yo-Yo Yellow

Markers:
   Lost Lagoon
   Mango Melody
   Pale Papaya
   Tangelo Twist

Technique:
   Dry Embossing
   Heat Embossing
   Die Cutting
   Sponging

Accessories:
   Love You More Than Dies
   Tasteful Textile 3D Embossing Folder
   White Embossing Powder
   Black Embossing Powder
   Embossing Buddy
   VersaMark
   Pop-Up Stickers
   Water Mister
   Sponge
   Dimensionals
   Adhesive

First, I sponged my Basic White panel with Yo-Yo Yellow, misted it with a bit of water, and dry embossed it with the Tasteful Textile 3D embossing folder.

I then adhered this onto the Basic Black matte and then onto the Strawberry Slush card front.

Next, I stamped the cocktails. This is a two-step stamp set. So, first, I stamped the frames using Tuxedo Black Memento on scraps of Basic White. I then filled them with Strawberry Slush, Watermelon Wonder, and Pale Papaya.

I then die cut them using the matching dies.

I colored the umbrellas, fruit slice, and stems, using markers. I attached them onto the card front using dimensionals.

I then rubbed the Black and Strawberry Slush scraps with the embossing buddy to get them ready for heat embossing.

Next, I stamped the sentiments using VersaMark on two Basic Black scraps and one Strawberry Slush scrap. I added black embossing powder to "Cocktails" and white embossing powder to the other two pieces. I then heat embossed them.

I arranged them onto the card front and adhered them with adhesive.

Lastly, I added a few pop-up stickers from my stash and adhered the other Basic White panel to the inside of the card.

Thank you for checking out my blog. I so appreciate your time. Contact Me if you have any questions or concerns regarding Stampin' Up!

Are you curious about what is trending, the cost of materials and other products, or do you just feel like shopping? Click on Shop Now and have some fun.

Subscribe to Paper Pumpkin or check out the Kits Collection if you want to stay on a budget or just keep it all low-key.

Join Me and reap all of the benefits of becoming a part of the Stampin' Up! family. Check it out and gain the best value for your money.

Share, like, pin, tweet, or comment. Don't forget to FOLLOW and SUBSCRIBE to my blog.

HAPPY STAMPING!

Thursday, June 16, 2022

A Little Wine

The squeaky wheel does get oiled, and the one who complains the loudest and the most usually gets their way. What do you think? 


Stamps:
   A Little Cheesy

Paper:
   Early Espresso A-2
   Sweet Sugarplum Glitter 5-1/4 x 4
   Basic White 3-1/4 x 4, 5-1/4 x 4 (Inside)

Ink:
   Tuxedo Black Memento

Markers/Blends:
   Blushing Bride
   Rococo Rose (Light & Dark)

Technique:
   CAS

Accessories:
   Share What You Love Artisan Pearls
   Glue Dots
   Adhesive

First, I stamped my image and sentiment on the smaller Basic White panel.

I then colored the image, using a marker and blends.

Next, I adhered the glitter paper onto the card front.

I added the image to the center of the glitter paper.

Lastly, I added a few pearls and adhered the Basic White panel to the inside of the card.

I am so excited that you stopped to read and check out my work. Thank you from the bottom of my heart. Contact Me and let me know if there is anything I can answer for you.

Do you have some time to browse? You do not want to pass up the opportunity to shop some quality products and see what is trending. Shop Now and take a peek. If you decide to place an order, I have included a HOST CODE in the right sidebar if you do not earn any rewards on your own. Thanks in advance.

Are you undecided? Subscribe to Paper Pumpkin and give it a go. Let the products speak for themselves. The cost is less than $25 and you are completely in control. No small print for you to miss. Try it.

Join Me and gain the best value for your hard-earned money. Check it out now.

Share, like, pin, tweet, or comment. Come on, I dare you. Don't forget to FOLLOW and SUBSCRIBE to my blog.

HAPPY STAMPING!