Showing posts with label Rooted in Nature. Show all posts

Saturday, September 14, 2024

Paper Trees

Anytime I create, using a special technique, I make more than what I intend to use. So, I actually used a leftover strip from another project that called for a shaving cream technique. I think it worked here. What do you think? 


Stamps:
   Rooted in Natue

Paper:
   Very Vanilla A-2
   Basic White 5-1/4 x 4 (2)
   First Edition DSP 2-3/4 x 5-1/4
   Shaving Cream Leftover Strip 1-1/4 x 5-1/4

Ink:
   Call Me Clover
   Merry Merlot

Re-Inkers:
   Various Colors

Technique:
   Shaving Cream

Accessories:
   Shaving Cream
   Adhesive

First, I adhered the First Edition DSP to the bottom of a Basic White panel.

I then adhered the leftover shaving cream strip above it.

Next, I stamped the trees directly onto the panel, using Call Me Clover ink.

I then stamped the sentiment, using Merry Merlot.

Lastly, I adhered the panel onto a Very Vanilla card front and added a Basic White panel to the inside of the card.

Thank you so much for stopping by here. Contact Me if you have any questions.

Shop Now and buy your supplies to make your own cards. Place an order today for your favorites before they run out of stock.

Join Me and become my new team member. Enjoy the best savings and opportunity offered today!

Subscribe to Paper Pumpkin and craft monthly for $25. Don't forget to take a look at the All-Inclusive Kits!

If you liked my card, please share, like, pin, tweet, or comment. I would love for you to FOLLOW and SUBSCRIBE to my blog. Let me know what you think in the comments below.

HAPPY STAMPING!

Thursday, September 12, 2024

Rooted Always

This simple layout can be used for any sentiment that you need. Thoughts? 


Stamps:
   Rooted in Nature

Paper:
   Tranquil Tide A-2
   Cajun Craze 5-1/4 x 4
   Nature's Poem DSP 4 x 4-1/2 cut @ 1-1/2 twice
   Basic White 3" Sq., 5-1/4 x 4 (Inside)

Ink:
   Petal Pink
   Tranquil Tide

Technique:
   Fussy Cut

Accessories:
   Jute Twine 25"
   Dimensionals
   Adhesive


First, I stamped the log, using Petal Pink ink. I stamped it on the 3" square of Basic White.

I then fussy cut around it and stamped the sentiment in the center, using Tranquil Tide ink.

Next, I adhered the three panels of Nature's Poem DSP onto the Cajun Craze panel. I kept the panels in order and spaced them as evenly as possible.

I then wrapped the Jute Twine around the bottom of the panel and tied a knot to keep it together.

Next, I adhered the panel onto the Tranquil Tide card front.

Lastly, I added the log to the top center of the card, using dimensionals and adhered a Basic White panel to the inside of the card.

Thank you so very much for being here. I appreciate you taking the time to glance at my work. Please Contact Me if I can be of service.

Are you interested in Stampin' Up! products to make your own cards? Shop Now and have a look-see. I placed a HOST CODE for you to use if you do not earn your own rewards. It is sitting in the right sidebar.

Do you like surprises? Subscribe to our Paper Pumpkin and receive all you need to complete the monthly project. The cost is $25. Check it out.

Join Me and become privy to everything Stampin' Up! Receive a discount on all of your personal orders. Personally, I love SALES!

Please share, like, pin, tweet, or comment. Do not forget to FOLLOW and SUBSCRIBE to my blog.

HAPPY STAMPING!

Wednesday, June 26, 2024

Rain Tree

Create an interesting watercolor background, using this technique. Just allow a few water droplets to fall on your watercolored panel and let it work on its own. Thoughts? 


Stamps:
   Rooted in Nature

Paper:
   Almost Amethyst A-2
   Basic Black 5-3/8 x 4-1/8
   Watercolor 5-1/4 x 4
   Basic White 5-1/4 x 4 (Inside)

Ink:
   Soft Sky
   Almost Amethyst
   River Rock
   Tuxedo Black Memento

Technique:
   Watercolor

Accessories:
   Water Painters/Aqua Painters
   MISTI/Stamparatus/Stamp-a-ma-jig
   Adhesive

First, I watercolored the background, using Soft Sky on top, Almost Amethyst in the center, and River Rock on the bottom.

I then randomly let water droplets fall on the panel. A few ran down the panel, creating an elongated splotch. Oops.

Next, I let the panel dry completely. 

I then used my Stamparatus to stamp my image and sentiment on the panel. It is not necessary, but I wanted to make sure I would get a nice dark image.

Next, I adhered the panel onto a Basic Black matte and then added it to an Almost Amethyst card front.

Lastly, I adhered a Basic White panel to the inside of the card.

Thank you for stopping to take a peek. Contact Me if you have any questions.

Click on Shop Now and browse through all things Stampin' Up! Start your wish list or order your favorites today. I included a HOST CODE for you to use if you like. Use it only if your product total is less than $150. You can find it in the right sidebar.

Join Me and get the best bang for your buck.

Do you want everything at your fingertips without having to look for it? Subscribe to Paper Pumpkin. Want more choices? Check out the Kits Collection.

One last thing, share, like, pin, tweet, and comment. Don't forget to FOLLOW and SUBSCRIBE to my blog. Okay, that was more than one thing.

HAPPY STAMPING!

Friday, August 25, 2023

Pearly Slider

Don't forget to use those discontinued items sitting on your shelves. If you are like me, your shelves, stacks, or boxes of discontinued or retired items is much LARGER than the current, available while supplies last, hot trendy items. So, although I am a current Stampin' Up! demonstrator, I like to use everything in my craft room, including the discontinued items. I think there are still some of you out there who have these same items and want some ideas on using them. What do you think of this one? 


Stamps:
   Rooted in Nature

Paper:
   Groovy Guava A-2
   Chocolate Chip 5-3/8 x 4-1/8
   Afternoon Tea DSP 5-1/4 x 4
   Whisper White 3-3/4 x 3-1/4, 5-1/4 x 4 (Inside)

Ink:
   Chocolate Chip

Technique:
   Die Cutting

Accessories:
   Antique Brass Hodgepodge Hardware
   Basic Pearl Jewels
   Stitched Labels Framelits Dies
   1/4" Chocolate Chip Ribbon
   Dimensionals
   Glue Dot
   Fast Fuse
   Adhesive

First, I stamped and die cut my sentiment, using Chocolate Chip ink and the Stitched Labels Framelits Dies.

I then adhered the DSP panel onto a Chocolate Chip matte. 

Next, I threaded the Chocolate Chip ribbon through an Antique Brass slider, and wrapped the ribbon around the panel, making sure the slider landed in the center of the panel. I adhered the ribbon to the back of the panel, using Fast Fuse.

I then attached the panel to the Groovy Guava card front.

Next, I added the die cut sentiment to the top part of the card front, using dimensionals.

Lastly, I added a pearl in the center of the slider with a glue dot and adhered a Whisper White panel to the inside of the card. If the slider is moving, you can add a glue dot underneath it to hold it in place.

Howdy and thank you for dropping by here. Contact Me if you need anything.

Shop Now and take a look at items that are Exclusively On-Line! You do not want to miss them. 

Did you know that Paper Pumpkin and the Kits Collection make the perfect gift? Heck, I say, gift yourself one today! Check them out.

Join Me and become part of my team. Take a look at today's offering and see if it is for you.

Please share, like, pin, tweet, or comment. Do not forget to FOLLOW and SUBSCRIBE to my blog.

HAPPY STAMPING!

Sunday, January 16, 2022

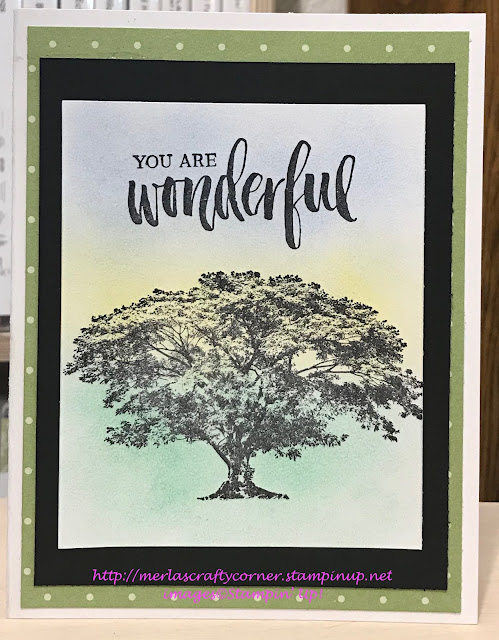
Wonderful Tree

I like the softness of the background colors. What do you think?


Stamps:
   Rooted in Nature

Paper:
   Basic White A-2, 4-1/4 x 4, 5-1/4 x 4 (Inside)
   Basic Black 3-3/4 x 4-3/4
   Green Dotted DSP 5-1/4 x 4

Ink:
   Archival Basic Black

Watercolor Pencils:
   Blue
   Yellow
   Green

Technique:
   Blended Pencil Shavings by guneauxdesign

Accessories:
   Pencil Sharpener
   Adhesive

I learned this technique through a fellow stamper who challenged us to try it. You can find her explanation HERE. 

For those of you who do not want to take a peek here is a condensed version. 

Using a hand-held pencil sharpener, drop the shavings of a color pencil onto a white panel. 

Rub it in using your index finger until you have the tone you want. 

You can blend the colors with Gamsol and a paper stump. I did not do this step.

I then stamped my tree and sentiment using Archival Basic Black.

Lastly, I adhered the layers together as shown above. I also adhered a Basic White panel on the inside of the card.

Thank you so much for giving me a bit of your time. Please Contact Me if I can return the favor.

Check out all of the options by clicking on the headers above.

Do not forget to FOLLOW and SUBSCRIBE to my blog. Please share, like, pin, tweet, or comment. I look forward to reading your thoughts and possible ideas for improvements. 

HAPPY STAMPING!

Monday, September 6, 2021

Be You

I like how the variations of color cause this designer series paper (DSP) to appear vintage or worn and old. The hardware blends right in too. I probably should have toned down the white a bit by sponging. What do you think?


Stamps:
   Rooted in Nature

Paper:
   Groovy Guava A-2
   Afternoon Tea DSP 2-3/8 x 3-1/4 (2)
   Chocolate Chip2-1/2 x 3-3/8 (2)
   Whisper White 1-1/4" Sq., 5-1/4 x 4 (Inside)

Ink:
   Chocolate Chip
   Groovy Guava

Technique:
   Punching

Accessories:
   1-1/4" Square Punch
   Antique Brass Hodgepodge Hardware
   Fast Fuse
   Dimensionals
   Adhesive

First, I cut the two panels of DSP and adhered them to two panels of Chocolate Chip.

Next, I stamped and punched out the sentiment, using Chocolate Chip ink and the 1-1/4" square punch. 

I added a clip on each of the DSP panels as shown above. I then adhered the top left panel using Fast Fuse. The bottom panel was added using dimensionals.

I adhered the sentiment to the top left corner of the bottom panel.

Lastly, I stamped a leaf on the top-right and bottom-left of the card base. I also adhered the Whisper White panel to the inside of the card.

Thank you so much for stopping by here and spending a few minutes of your day with me. I appreciate your time. Contact Me if you have any questions, need a demonstrator, or just want to stamp or share ideas.

Shop Now and enjoy browsing products and promotions. I have a HOST CODE in the right sidebar in case you did not earn your own rewards.

Do not miss the opportunity to Join Me and become the newest member of my team.

Paper Pumpkin should not be ignored. I enjoy putting my kit together monthly.

Take a few more minutes and share, like, pin, tweet, or comment. I would love to see what you really think. Do not forget to FOLLOW and SUBSCRIBE to my blog.

HAPPY STAMPING!

Friday, July 2, 2021

Wonderful You

 Do you remember these colors from the past? They are retired, but my stash is not. So, I made this positive card to add to my box of cards. Who would be your lucky recipient?


Stamps:
   Rooted in Nature

Paper:
   Groovy Guava A-2
   Chocolate Chip Strips 5-1/2 x 1/8 (2)
   Afternoon Tea DSP 5-1/2 x 2-3/8
   Whisper White 3-3/4 x 3-1/4, 5-1/4 x 4 

Ink:
   Chocolate Chip

Technique:
   Die Cutting

Accessories:
   1/4" Chocolate Chip Ribbon
   Basic Pearl Jewels
   Stitched Labels Framelits Dies
   Dimensionals
   Fine Tip Glue Pen
   Glue Dots
   Adhesive

First, I stamped and die cut my sentiment that will be the focus of my card.

I then adhered the designer series paper onto the center of my card front.

I placed a Chocolate Chip strip on each side of the designer series paper.

I added the sentiment using dimensionals.

I placed three pearls on it and added a piece of ribbon with a glue dot.

Lastly, I adhered the other Whisper White panel to the inside of the card.

Thank you for visiting. I do love company. Feel free to Contact Me if you have any questions.

Explore current products, promotions, and all of the opportunities. Just click on Shop Now. A HOST CODE is available in the right sidebar for those of you who do not earn your own rewards.

For those of you who like kits with everything you need to complete a project, we offer Paper Pumpkin. Your monthly cost is less than $25.

Join Me and become my newest team member. I look forward to meeting you.

Please take a minute to share, like, pin, tweet, or comment. Do not forget to FOLLOW and SUBSCRIBE to my blog.

HAPPY STAMPING!


Wednesday, June 23, 2021

Green Leaves

It is time to focus on the POSITIVE! The world around us accentuates the negative. The media tells us that if something isn't wrong then it is not newsworthy. Look at a newspaper and all the headlines point to disaster. So, let's change it! SMILE and be positive. It is contagious. Thoughts?


Stamps:
   Rooted in Nature

Paper:
   Whisper White A-2, 4 x 3-1/4, 5-1/4 x 4
   Early Espresso 5-1/4 x 4
   Call Me Clover 5 x 3-3/4

Ink:
   Archival Basic Black
   Early Espresso
   Call Me Clover

Acrylic Paint:
   Orange
   Blue

Technique:
   Gel Press

Accessories:
   Boxwood Wreaths
   Brayer
   Glue Dots
   Fast Fuse
   Adhesive

The background for my image was created a while back using my gel press, acrylic paint and my brayer. Basically, I poured a few drops of acrylic paint onto my gel press. I then used my brayer to spread the paint. I then placed my white paper on it and gave it a press. I created several backgrounds. This one was one of the last that was used to pick up the very last of the ink.

I stamped my tree and then my sentiment directly on top of the background.

I adhered this panel onto the Call Me Clover panel, and then onto the Early Espresso. This was then adhered to the Whisper White card base. The other Whisper White panel was adhered to the inside of the card.

Lastly, I added the Boxwood Wreath to the bottom of the tree. I straighten out the wreath and spread the leaves. This is where I used my Fast Fuse. You can use any strong adhesive that you have on hand.

Here is another picture of the card:


Thank you so much for spending time with me here. Contact Me if you have any questions.

Shop Now and take a look at all of our new products and current promotions. Please use the HOST CODE sitting in the right sidebar if you did not earn your own rewards.

Subscribe to Paper Pumpkin and keep your monthly cost below $25! Join Me and become my newest team member.

Either way, please share, like, pin, tweet, or comment. Do not forget to FOLLOW and SUBSCRIBE to my blog.

HAPPY STAMPING!

Tuesday, March 30, 2021

Chocolate Slider

Sometimes we have to combine the new with the old. Or maybe we just need to use up some of the items in our stash. Otherwise, there is no room to add more new things! What do you think?


Stamps:
   Rooted in Nature

Paper:
   Groovy Guava A-2
   Chocolate Chip 5-3/8 x 4-1/8
   Afternoon Tea DSP 5-1/4 x 4
   Whisper White 3-3/4 x 3-1/4, 5-1/4 x 4 (Inside)

Ink:
   Chocolate Chip

Technique:
   Die Cutting

Accessories:
   Antique Brass Hodgepodge Hardware
   Basic Pearl Jewels
   Stitched Labels Framelits Dies
   1/4" Chocolate Chip Ribbon
   Dimensionals
   Glue Dots
   Fast Fuse
   Adhesive

First, I stamped and die cut my sentiment on Whisper White. The sentiment is from the Rooted in Nature Stamp Set, and the die cut is from the Stitched Labels Framelits Dies. These are my new items.

I then chose some discontinued designer series paper and cut a 5-1/4 x 4 inch panel. I matched up some ribbon, cardstock, and embellishments. 

Next, I slid the chocolate chip ribbon through the slider and attached it to the bottom of the designer series paper.

I adhered this panel to a Chocolate Chip panel and then onto a Groovy Guava card base.

I added the sentiment using dimensionals.

Lastly, I added a few pearls and adhered the Whisper White panel to the inside of the card.

Thank you so much for stopping by here and taking a quick look-see. If you have any questions or need my assistance, Contact Me.

Shop Now and take a look at all of our new products and current promotions. Please use the HOST CODE sitting in the right sidebar if you did not earn your own rewards.

If you want to craft, but keep your costs below $25 a month, check out Paper Pumpkin. It just might be what you are looking for at the moment.

Join Me and become the newest member of my team. Remember there are no hidden agendas or penalties for giving it a go.

You've come this far, so please share, like, pin, tweet, or comment. I appreciate your time and efforts. Let me know your thoughts and leave all of your questions behind. Do not forget to FOLLOW and SUBSCRIBE to my blog.

HAPPY STAMPING!