Showing posts with label Art Gallery. Show all posts

Friday, March 1, 2024

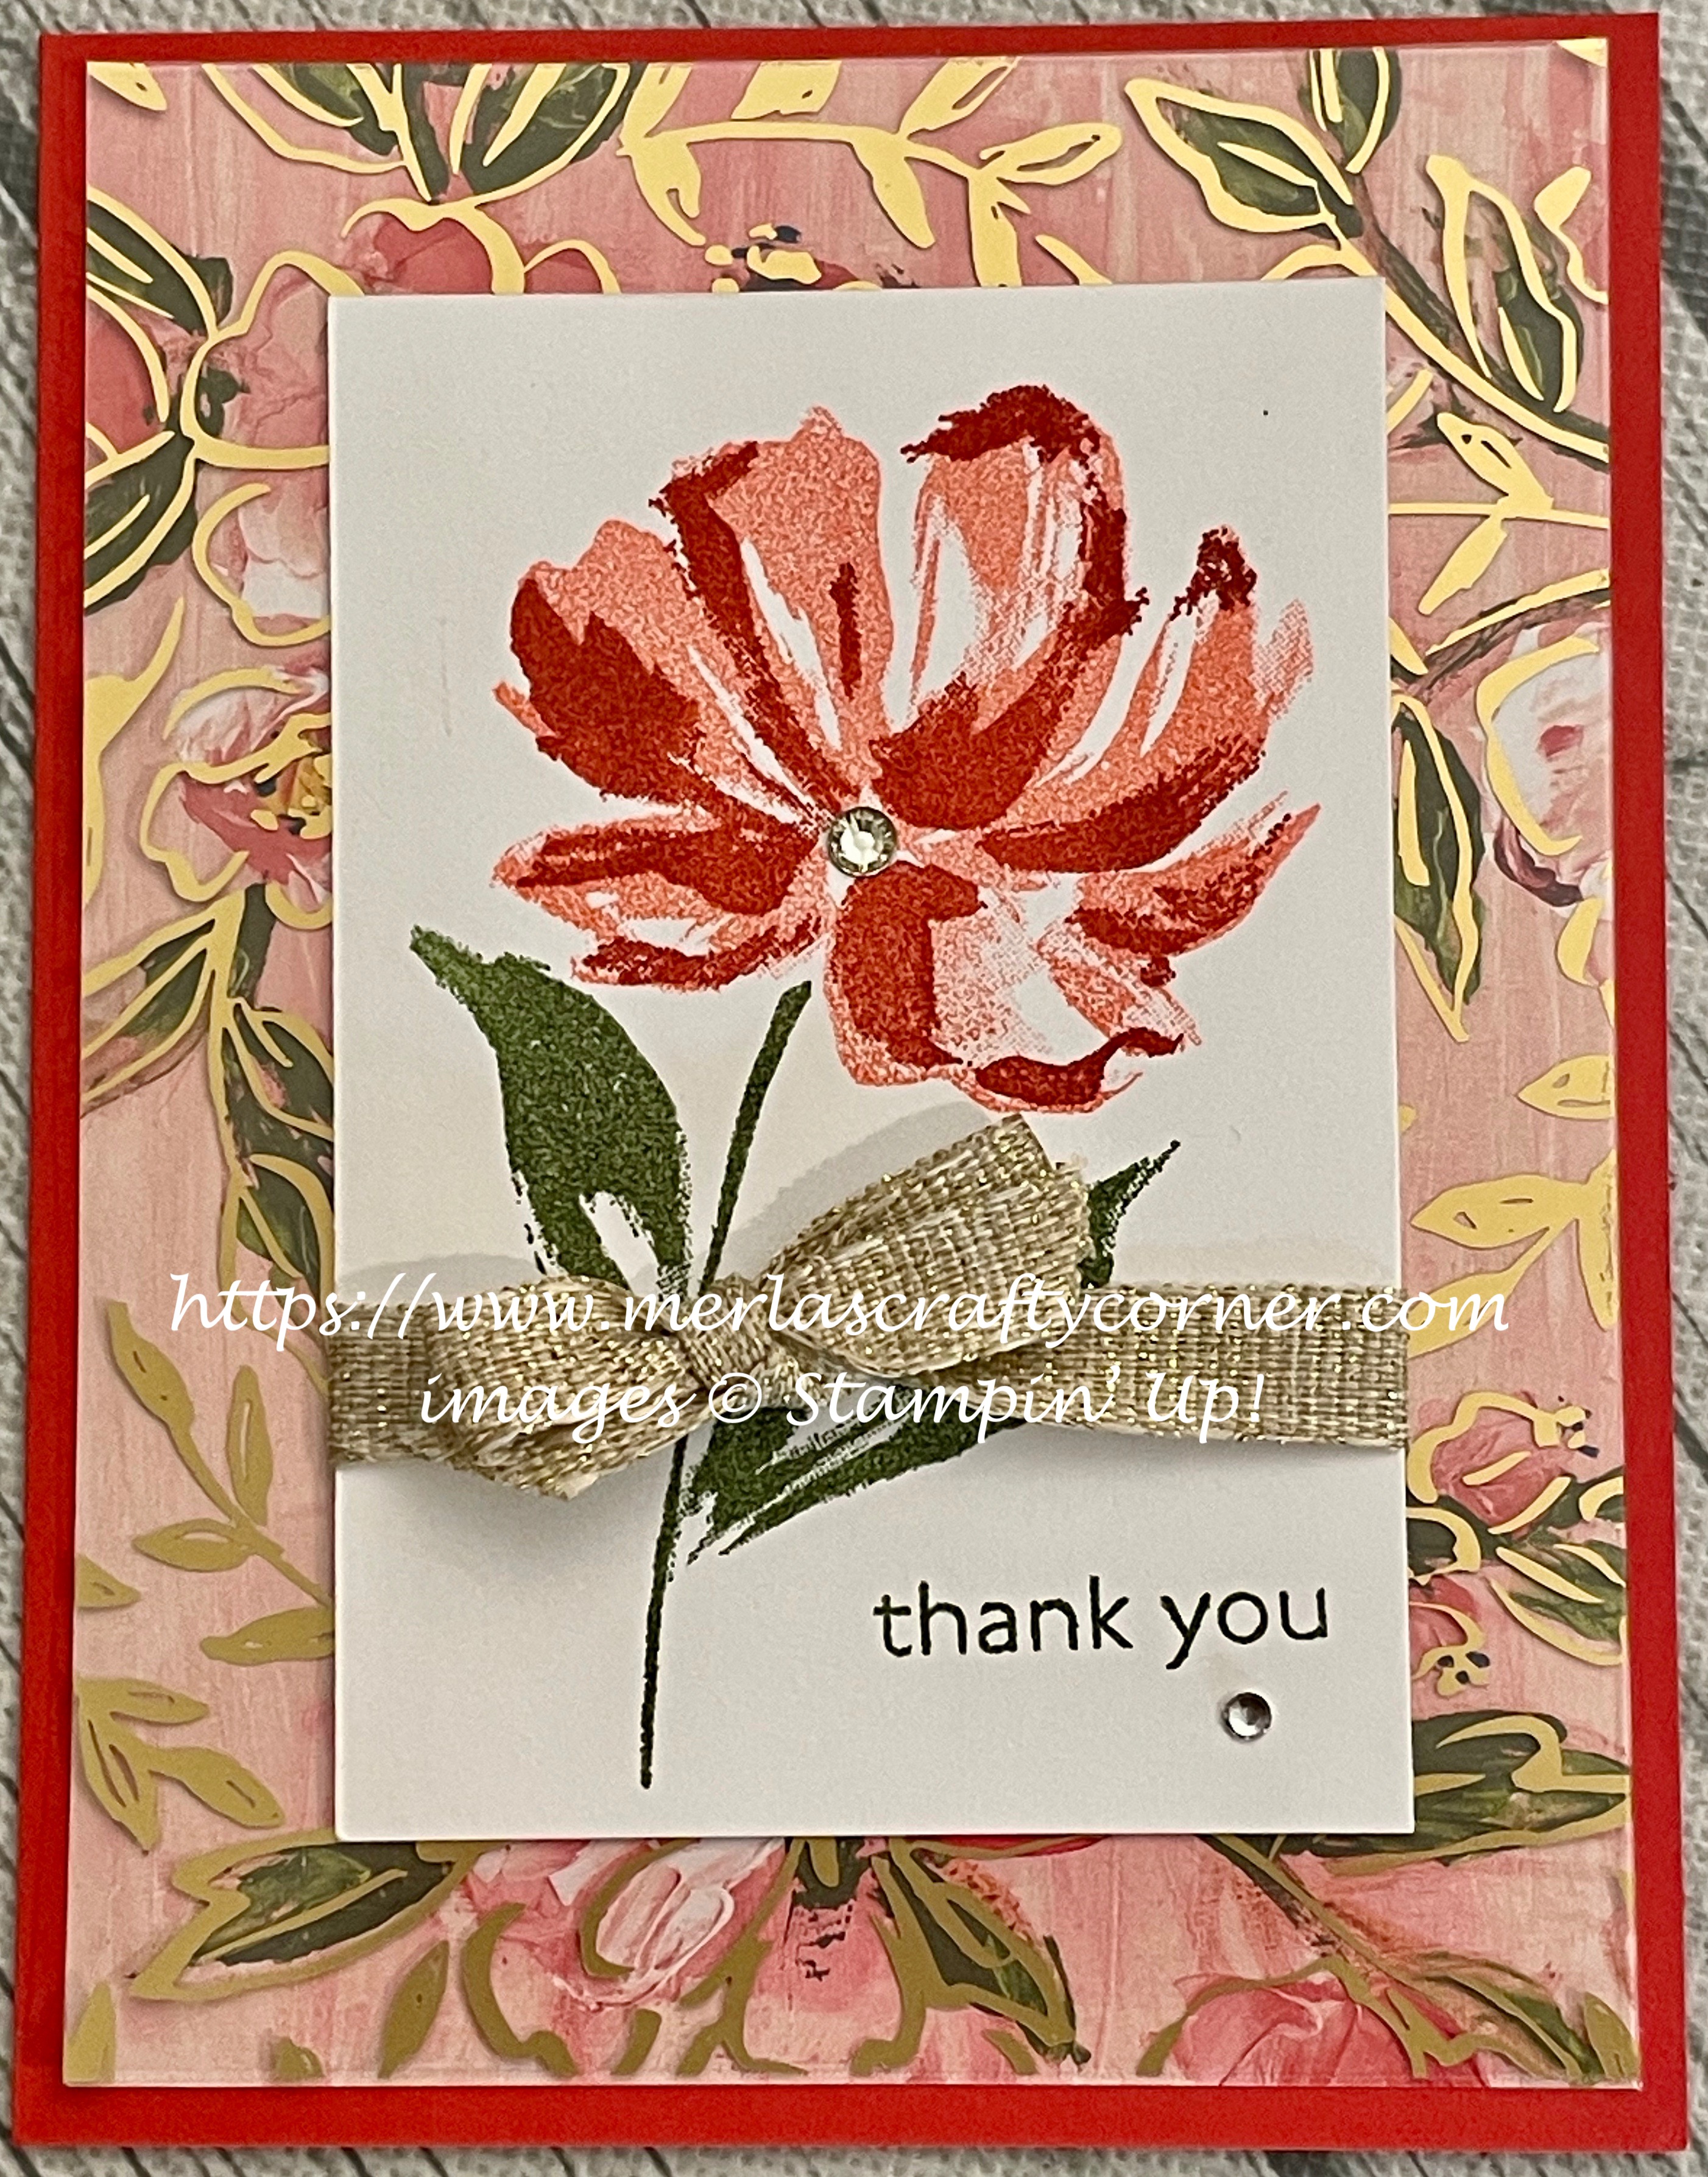
Fine Art Gallery

Add a strip of Basic White and you can make four card bases out of a 12 x 12 sheet of cardstock. How cool is that? Thoughts? 


Stamps:
   Art Gallery

Paper:
   Blue Bayou 12 x 12 - 6 x 5-1/2 score at 4-1/4
   Basic White 5-1/4 x 4 (Inside), 2-3/4 x 5-1/2
   Fine Art Floral DSP 1-5/8 x 5-3/8 (4)

Ink:
   Pumpkin Pie
   Terracotta Tile
   Pool Party
   Night of Navy
   Poppy Parade
   Merry Merlot

Technique:
   2-Step Stamping

Accessories:
   Brights Enamel Shapes
   Tear & Tape
   Adhesive

First, I cut and scored my card bases from the 12 x 12 sheet. Cut the sheet in half at 6". Then cut lengthwise at 5-1/2. (Each 6" strip will yield 2 card bases.) Score the 6" side at 4-1/4.

I then added a strip of DSP to the flap. I wanted the card base to frame the DSP, so it is cut a tad shorter all around. Note the measurements above.

Next, I added a strip of tear & tape to the strip of Basic White. I adhered this to the back of the card front panel.

I then stamped the sentiment and added the flower. The colors are listed as I grouped them. The Pumpkin Pie was used with the Terracotta Tile and the Poppy Parade was used with the Merry Merlot, etc.

Lastly, I added a few embellishments and adhered the Basic White panel to the inside of the card.

Here is a closer look at each card.

Fine Art Gallery


Fine Art Gallery Too


Thank you for visiting. I do love company. Feel free to Contact Me if you have any questions.

Explore current products, promotions, and all of the opportunities. Just click on Shop Now. A HOST CODE is available in the right sidebar for those of you who do not earn your own rewards.

For those of you who like kits with everything you need to complete a project, we offer Paper Pumpkin. Your monthly cost is less than $25. Also, you might want to look at the new Kits Collection!

Join Me and become my newest team member. I look forward to meeting you.

Please take a minute to share, like, pin, tweet, or comment. Do not forget to FOLLOW and SUBSCRIBE to my blog.

HAPPY STAMPING!

Thursday, July 7, 2022

Thank You 4x4

The golden acetate overlay gives the card an added pizzazz. What do you think? 


Stamps:
   Art Gallery

Paper:
   Bumblebee 4 x 8 scored @ 4"
   Fine Art Floral DSP 4" Sq.
   Golden Garden Designer Acetate 4" Sq.
   Basic White 3-3/4" Sq. (Inside)

Ink:
   Mossy Meadow

Technique:
   CAS

Accessories:
   Glittered Organdy Ribbon 21"
   Glue Dots
   Adhesive

First, I stamped a left-over Paper Pumpkin tag, using Mossy Meadow ink.

I then adhered the Golden Garden Designer acetate square to its matching Fine Art Floral DSP square. I used glue dots under the gold so they would stay hidden.

I then adhered the panel to the Bumblebee card front.

I wrapped the Glittered Organdy Ribbon around the left side of the card and tied a bow. 

Lastly, I adhered the tag to the center of the panel and added the Basic White panel to the inside of the card.

I am so excited that you stopped to read and check out my work. Thank you from the bottom of my heart. Contact Me and let me know if there is anything I can answer for you.

Do you have some time to browse? You do not want to pass up the opportunity to shop some quality products and see what is trending. Shop Now and take a peek. If you decide to place an order, I have included a HOST CODE in the right sidebar if you do not earn any rewards on your own. Thanks in advance.

Are you undecided? Subscribe to Paper Pumpkin and give it a go. Let the products speak for themselves. The cost is less than $25 and you are completely in control. No small print for you to miss. Try it.

Join Me and gain the best value for your hard-earned money. Check it out now.

Share, like, pin, tweet, or comment. Come on, I dare you. Don't forget to FOLLOW and SUBSCRIBE to my blog.

HAPPY STAMPING!

Monday, June 20, 2022

Thank You Floral 4x4

These 4" square cards make full use of your beautiful 12 x 12 designer sheets. They also fit nicely into a regular A-2 card size envelope. Thoughts? 


Stamps:
   Art Gallery

Paper:
   Bumblebee 4 x 8 scored @ 4"
   Fine Art Floral DSP 4" Sq.
   Golden Garden Designer Acetate 4" Sq.
   Basic White 3-1/4 x 3-1/2, 3-3/4" Sq. (Inside)

Ink:
   Flirty Flamingo
   Mossy Meadow
   Powder Pink

Technique:
   Punching

Accessories:
   Scalloped Border Punch
   Glittered Organdy Ribbon
   Glue Dots
   Adhesive

First, I adhered the acetate to the designer series paper, using glue dots in the center where the image would be mounted. This way, they are invisible to everyone.

I then stamped my image and sentiment. I used Powder Pink for the base of the flower and Flirty Flamingo as the accent color. The leaves, stem, and sentiment are stamped using Mossy Meadow.

Next, I used the scalloped border punch on the sides of the image. In retrospect, I should have punched strips and adhered them under the image to give it a more even look. Still, this is what makes it quite unique. Mistakes and all...

I wrapped a bit of glittered organdy ribbon around the image and tied a bow.

Lastly, I adhered the designer series paper and acetate panel to the Bumblebee card front and attached the image panel to the center. I adhered the 3-3/4" square of Basic White to the inside of the card.

Thank you so much for stopping by here and spending a few minutes of your day with me. I appreciate your time. Contact Me if you have any questions, need a demonstrator, or just want to stamp or share ideas.

Shop Now and enjoy browsing products and promotions. I have a HOST CODE in the right sidebar in case you did not earn your own rewards.

Do not miss the opportunity to Join Me and become the newest member of my team.

Paper Pumpkin should not be ignored. I enjoy putting my kit together monthly.

Take a few more minutes and share, like, pin, tweet, or comment. I would love to see what you really think. Do not forget to FOLLOW and SUBSCRIBE to my blog.

HAPPY STAMPING!

Sunday, June 19, 2022

Merry Merlot Gallery

Sponging along the tear accentuates the image. I also like that the color sprays onto more of the white paper. Thoughts?


Stamps:
   Art Gallery

Paper:
   Old Olive A-2
   Fine Art Floral DSP 5-1/4 x 4
   Golden Garden Designer Acetate 5-1/4 x 4
   Basic White 3-1/4 x 4, 5-1/4 x 4 (Inside)

Ink:
   Mossy Meadow
   Merry Merlot
   Flirty Flamingo

Technique:
   Tearing
   Sponging
   Punching

Accessories:
   Dragonflies Punch
   Basic Rhinestone Jewels
   Sponge
   Glue Dots
   Adhesive

First, I adhered the acetate to the designer series paper, using glue dots in spots that were not noticeable.

I then stamped my image and sentiment on the smaller piece of Basic White. I used Flirty Flamingo for the first step on the flower, and then I applied Merry Merlot as the accent color. I used Mossy Meadow for the stem, leaves and sentiment.

Next, I tore around the image and sentiment. I tore the paper toward me and then sponged the edges using Flirty Flamingo.

I adhered the designer series paper with the acetate panel onto the Old Olive card front.

I then added the image to the center of the card.

I attached a dragonfly that was left-over from a previous project to the card. You can use the Dragonflies punch to create some. 

Lastly, I added a few rhinestones and adhered the Basic White panel to the inside of the card.

Thank you so much for dropping by here. Contact Me if you have any questions.

Click on all of the tabs above and explore products, promotions, and opportunities.

Please take the time to share, like, pin, tweet, or comment. Do not forget to FOLLOW and SUBSCRIBE to my blog.

HAPPY STAMPING!

Saturday, June 18, 2022

Powdered Pink Floral

Sponging along the tear accentuates the image. Many are using blending brushes now for this technique, but I still turn to my overly used sponges. Thoughts?


Stamps:
   Art Gallery

Paper:
   Flirty Flamingo A-2
   Fine Art Floral DSP 5-1/4 x 4
   Golden Garden Designer Acetate 5-1/4 x 4
   Basic White 3-1/4 x 4, 5-1/4 x 4 (Inside)

Ink:
   Old Olive
   Powder Pink
   Flirty Flamingo

Technique:
   Tearing
   Sponging

Accessories:
   In-Color Itty Bitty Bows
   Basic Rhinestone Jewels
   Sponge
   Glue Dots
   Adhesive

First, I adhered the acetate to the designer series paper. I placed glue dots in places that would not be noticeable.

I then stamped the image and the sentiment. I used Powder Pink and then Flirty Flamingo as the accent color. The stem, leaves and sentiment were stamped in Old Olive.

Next, I tore the paper around the image and sentiment. I tore the paper toward me. 

I then sponged it using Powder Pink.

I adhered it to the acetate using glue dots.

Next, I adhered the DSP panel onto the Flirty Flamingo card front.

Lastly, I added rhinestones, a bow, and adhered the Basic White panel to the inside of the card.

Thank you so very much for taking the time to stop and glance at my work. If you have any questions or suggestions, please Contact Me. I do appreciate your time.

If you need any supplies, or you are curious to know just how much these products cost, click on Shop Now and satisfy your curiosity. A HOST CODE is available for you to use in case you did not earn your own rewards. You can find it in the right sidebar.

Do you want the best value for your buck? Join Me and reap all of the rewards. I will be more than happy to assist you. Check it out and note that there are no hidden agendas.

Wait! Don't leave. If you just want to try it and see, then subscribe to Paper Pumpkin. You will receive a kit with everything you need to create a project. Check out the Kit Collection for more choices.

I would love for you to take a minute to share, like, pin, tweet, or comment. Please FOLLOW and SUBSCRIBE to my blog. Let me know what you think below in the comments. 

HAPPY STAMPING!

Friday, May 27, 2022

Fine Art Parade

Sometimes you just have to let the image shine on its own. Thoughts?


Stamps:
   Art Gallery

Paper:
   Poppy Parade A-2
   Fine Art Floral DSP 5-1/4 x 4
   Golden Garden Designer Acetate 5-1/4 x 4
   Basic White 3-1/4 x 4, 5-1/4 x 4 (Inside)

Ink:
   Mossy Meadow
   Poppy Parade
   Flirty Flamingo

Technique:
   2-Step Stamping
   CAS

Accessories:
   Fine Art Ribbon
   Basic Rhinestone Jewels
   Glue Dots
   Adhesive

First, I adhered the acetate to the DSP, adding glue dots where they would not be noticed. Under the image panel is a perfect place.

I then stamped my image and sentiment. I used Flirty Flamingo and Poppy Parade as the accent color on the petals. I then used Mossy Meadow on the leaves and stem as well as the sentiment.

Next, I wrapped a ribbon around the panel and tied it off in a bow.

I adhered the panel to the center of the acetate/DSP panel and then onto the card front.

Lastly, I added a couple of rhinestones and adhered the Basic White panel to the inside of the card.

Thank you for checking out my blog. I so appreciate your time. Contact Me if you have any questions or concerns regarding Stampin' Up!

Are you curious about what is trending, the cost of materials and other products, or do you just feel like shopping? Click on Shop Now and have some fun.

Subscribe to Paper Pumpkin or check out the Kits Collection if you want to stay on a budget or just keep it all low-key.

Join Me and reap all of the benefits of becoming a part of the Stampin' Up! family. Check it out and gain the best value for your money.

Share, like, pin, tweet, or comment. Don't forget to FOLLOW and SUBSCRIBE to my blog.

HAPPY STAMPING!

Thursday, May 26, 2022

Glittered Ribbon

The glittered ribbon and golden acetate overlay definitely adds beauty to this card. What do you think?


Stamps:
   Art Gallery

Paper:
   Flirty Flamingo A-2
   Golden Garden Designer Acetate 5-1/4 x 4
   Fine Art Floral DSP 5-1/4 x 4
   Basic White 5-1/4 x 4 (Inside)
   Tag - Paper Pumpkin Scrap

Ink:
   Mossy Meadow

Technique:
   Acetate Overlay
   CAS

Accessories:
   Glittered Organdy Ribbon 21"
   Basic Rhinestone Jewels
   Glue Dots
   Adhesive

First, I adhered the acetate to the designer series paper, using glue dots in places that would go unnoticed. For example, under the placement of the tag or ribbon.

I then stamped the sentiment on a left-over Paper Pumpkin tag and adhered it to the acetate, using glue dots.

Next, I wrapped the ribbon around the panel and tied it into a bow.

I then attached the panel to the card front.

Lastly, I added a few rhinestones and adhered the Basic White panel to the inside of the card.

I am so excited that you stopped to read and check out my work. Thank you from the bottom of my heart. Contact Me and let me know if there is anything I can answer for you.

Do you have some time to browse? You do not want to pass up the opportunity to shop some quality products and see what is trending. Shop Now and take a peek. If you decide to place an order, I have included a HOST CODE in the right sidebar, if you do not earn any rewards on your own. Thanks in advance.

Are you undecided? Subscribe to Paper Pumpkin and give it a go. Let the products speak for themselves. The cost is less than $25 and you are completely in control. No small print for you to miss. Try it.

Join Me and gain the best value for your hard-earned money. Check it out now.

Share, like, pin, tweet, or comment. Come on, I dare you. Don't forget to FOLLOW and SUBSCRIBE to my blog.

HAPPY STAMPING!

Wednesday, May 25, 2022

Expressions of Thanks

This designer series paper is truly an art piece. You can see brush strokes vividly. Thoughts? 


Stamps:
   Art Gallery (None)

Paper:
   Bumblebee A-2
   Fine Art Floral DSP 5-1/4 x 4
   Basic Black 4 x 1-1/4, 3-1/4 x 1-1/4
   Basic White 5-1/4 x 4 (Inside)

Ink:
   None

Technique:
   Die Cutting

Accessories:
   Amazing Thanks Dies
   Fine Art Ribbon 21"
   Basic Rhinestone Jewels
   Glue Dots
   Adhesive

First, I die cut the sentiment using scraps of Basic Black.

I then adhered the die cuts to the DSP panel, using glue dots.

Next, I wrapped the Fine Art ribbon around the panel and tied a bow.

I then adhered the panel to the card front.

Lastly, I added a few rhinestones and adhered the Basic White panel to the inside of the card.

Although I did not use any stamps from the Art Gallery stamp set, I mentioned it in case someone wants to match the stamp set to the floral images. 

Thank you for stopping to take a peek. Contact Me if you have any questions.

Click on Shop Now and browse through all things Stampin' Up! Start your wish list or order your favorites today. I included a HOST CODE for you to use if you like. Use it only if your product total is less than $150. You can find it in the right sidebar.

Join Me and get the best bang for your buck.

Do you want everything at your fingertips without having to look for it? Subscribe to Paper Pumpkin. Want more choices? Check out the Kit Collection.

One last thing, share, like, pin, tweet, and comment. Don't forget to FOLLOW and SUBSCRIBE to my blog. Okay, that was more than one thing.

HAPPY STAMPING!

Wednesday, April 6, 2022

Waving Congratulations

The movement shown on the designer series paper really highlights the motion of the wave on the forefront. I decided to use glimmer paper to aid the wave's presence. What do you think?


Stamps:
   Art Gallery

Paper:
   Pacific Point A-2
   Basic Black 5-3/8 x 4-1/8
   Basic white 5-1/4 x 4 (Inside), 3/4 x 3-1/4
   Soft Sky 5-1/4 x 4
   Waves of the Ocean DSP 5-1/4 x 2-1/2
   Myths & Magic Glimmer 5-1/4 x 2-1/2 (2)

Ink:
   Night of Navy
   Pacific Point

Technique:
   Die Cutting
   Blending/Sponging

Accessories:
   Waves Dies
   Rhinestone Waves Basic Jewels
   Blending Brush/Sponge
   Dimensionals
   Glue Dots
   Adhesive

First, I die cut the waves and the birds.

Next, I stamped and die cut the sentiment.

I adhered the waves to the strip of DSP. I used adhesive for the bottom wave on the DSP, and added the top wave using glue dots.

I then adhered the DSP to the Soft Sky as shown.

I matted this panel with Basic Black and then adhered it to the Pacific Point card front.

I used a blending brush to add a bit of blue to the sentiment. You can use a sponge if you do not have a blending brush. I then attached it to the card front using dimensionals.

Next, I added the birds with a bit of adhesive.

Lastly, I added a couple of rhinestones and the basic white panel to the inside of the card.

Thank you so much for spending time with me here. Contact Me if you have any questions.

Shop Now and take a look at all of our new products and current promotions. Please use the HOST CODE sitting in the right sidebar if you did not earn your own rewards.

Subscribe to Paper Pumpkin and keep your monthly cost below $25! Join Me and become my newest team member.

Either way, please share, like, pin, tweet, or comment. Do not forget to FOLLOW and SUBSCRIBE to my blog.

HAPPY STAMPING!