Showing posts with label Positive. Show all posts

Tuesday, November 12, 2024

Four at a Time

Make four different cards at one time. Simply choose four colors, patterns, and sentiments that can work together. Thoughts?


Praying for You Now

Welcome

You're So Sweet

Just Because 4

Stamps:
   Circle Circus

Paper:
   Strawberry Slush A-2 (2)
   Pistachio Pudding A-2 (2)
   Basic White 5-1/4 x 4 (4 for Stamping & 4 for Inside), Scraps

Ink:
   Coastal Cabana
   Crisp Cantaloupe
   Pistachio Pudding
   Strawberry Slush
   Tuxedo Black Memento

Technique:
   CAS

Accessories:
   Swirls Embossing Folder (Cuttle Bug)
   Fancy Fan Embossing Folder
   Square Lattice Embossing Folder
   Petals a Plenty Embossing Folder
   Hodgepodge Hardware (Vanilla, Silver, Antique)
   Adhesive

I chose a stamp set that had circles with various patterns on them to stamp my backgrounds. I chose one color for each pattern. I stamped the 4 Basic White panels, using a stamp from the Circle Circus stamp set and one color from those listed above. I covered the entire panel with that pattern and color. 

I also wanted a different texture to each panel. So, I ran each panel through the die cutting and embossing machine, using a different embossing folder for each. They are listed above under accessories.

Next, I cut each panel exactly the same and then exchanged the cut panels so that each card had a piece from each of the other cards. 
    First cut was to cut one inch from the four inch side of each panel. 
    Second cut was to cut 1-3/4 off the 5-1/4" side of each 3 x 5-1/4" panel.
    Third cut was to cut 2" off the 5-1/4" side of each 1 x 5-1/4" panel.

I then found four sentiments that fit inside each of the Hodgepodge Hardware frames. I stamped them on scraps of Basic White, using Tuxedo Black Memento ink.

Next, I traced the frame for each one and fussy cut it to fit securely into each frame. You can also just add a glue dot behind it and then place the frame to fit directly on top of it.

I then added a sentiment and frame to each of the 3 x 3-1/2" panels and secured them with their matching brads. 

Next, I arranged each of the pieces onto 4 card bases as shown above. I chose to use only two of the colors as card bases.

Lastly, I adhered each panel onto the card front and added a Basic White panel to the inside of each card.

Thank you for taking the time to read this. I try my best to keep it short and sweet. Contact Me if you have questions or need anything Stampin' Up! 

Shop Now and take a peek at quality products. There is a HOST CODE if your product total is less than $150. You do not have to use it, but I would appreciate it. It is located in the right sidebar.

Join Me and become part of my team. I will be as involved as you like. Check out the advantages.

Are you curious, but undecided? Subscribe to Paper Pumpkin and try it. The kit will include everything you need, and it won't break the bank. Check out the Kit Collection for more all-inclusive kit choices.

Please share, like, pin, tweet, or comment. I would love for you to FOLLOW and SUBSCRIBE to my blog.

HAPPY STAMPING!

Sunday, November 3, 2024

Live Well

Cutting two designer series paper panels at the same time, makes this technique a cinch. Thoughts? 


Stamps:
   Oh My Goodies
   Hello Life

Paper:
   Basic Black A-2
   Stacked With Love DSP 3-1/4 x 4-1/2 (2)
   Basic White 5-1/4 x 4 (2), Scraps

Ink:
   Tuxedo Black Memento

Technique:
   Starburst 

Accessories:
   Deco Labels Collection Framelits
   1/4" Black Grosgrain Ribbon 5-1/2"
   Dimensionals
   Adhesive

First, I cut two sheets of designer series paper together to be able to alternate colors. Each pattern is to face up so that every other triangle is switched between panels. I cut from the center of the panel outward to the edge, keeping the corners intact.

I then placed the triangles on the Basic White panel as shown above, creating the starburst effect. I adhered each piece to the Basic White panel. Trim off any excess.

Next, I added some black ribbon to hide the seam of the pattern paper and the Basic White panel.

I then stamped and punched the sentiment, using the Deco Labels Collection Framelits.

Next, I attached the sentiment using dimensionals.

Lastly, I stamped the heart doodle on the bottom of the card and adhered a Basic White panel to the inside of the card.

Thank you so much for dropping by here. Contact Me if you have any questions.

Click on all of the tabs above and explore products, promotions, and opportunities.

Please take the time to share, like, pin, tweet, or comment. Do not forget to FOLLOW and SUBSCRIBE to my blog.

HAPPY STAMPING!

Wednesday, October 30, 2024

Seasonal Latte

I like having a hot beverage on a wintry day. What about you? 


Seasonal Latte

Stamps:
   Latte Love
   Peaceful Season

Paper:
   Calypso Coral/Pool Party A-2, 3 x 2-3/4
   Basic White 2-1/2 x 2-3/4, 5-1/4 x 4 (Inside)
   A Little Latte DSP 5-1/4 x 4

Ink:
   Calypso Coral
   Early Espresso
   Pecan Pie
   Pool Party

Markers:
   Calypso Coral/Pool Party

Technique:
   Die Cutting

Accessories:
   Peaceful Season Dies
   Adhesive-Backed Swirl Dots
   Dimensionals
   Adhesive

First, I stamped and die cut the sentiment, using the Peaceful Season Dies and the Early Espresso ink.

I then stamped the cup and colored it, using a marker.

Next, I adhered the Little Latte DSP panel onto the card front.

I then adhered the stamped cup panel on the left side of the card.

Next, I attached the sentiment, using dimensionals.

Lastly, I added a few adhesive-backed swirl dots and adhered a Basic White panel to the inside of the card.

I made another card, using Pool Party as the card base. What do you think?

Seasonal Latte Too

Thank you for being here! Contact Me if you have questions or need anything that is Stampin' Up! related.

Check out each of the headers above and see the fabulousness that is Stampin' Up! If you become a buyer, there is a HOST CODE located in the right sidebar for your use.

Please take a minute to share, like, pin, tweet, or comment. Plus, you want to take the time to FOLLOW and SUBSCRIBE to my blog.

HAPPY STAMPING!

Saturday, October 26, 2024

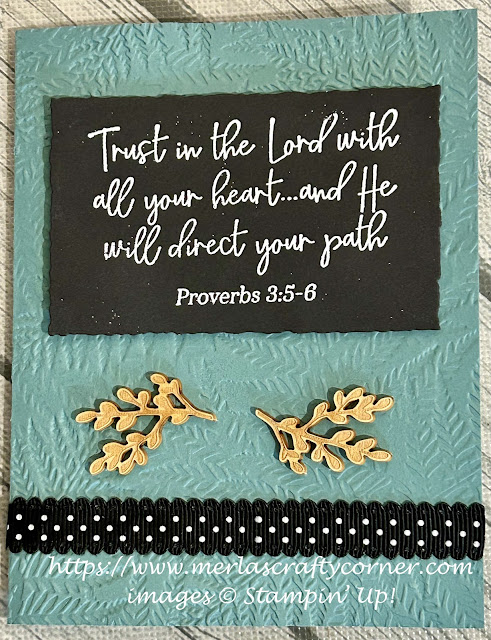
Proverbs

There are many techniques that can be used to make a card. My favorite is embossing. So, I heat and dry embossed on this card. What do you think? 


Stamps:
   You Are Beautiful

Paper:
   Lost Lagoon A-2
   Basic Black 2-1/2 x 3-7/8
   Basic White 5-1/4 x 4 (Inside)

Ink:
   VersaMark

Technique:
   Dry Embossing
   Heat Embossing

Accessories:
   White Embossing Powder
   Deckled Rectangles Dies
   Fern 3D Embossing Folder
   In Good Taste Elements
   Black Polka Dot Scalloped Ribbon 4-1/4"
   Embossing Buddy
   Dimensionals
   Mini Glue Dots
   Adhesive

First, I dry embossed the Lost Lagoon card front, using the Fern 3D Embossing Folder.

I then heat embossed the proverb on the Basic Black panel.
  1.    I rubbed down the panel with my embossing buddy.
  2.    I stamped the proverb, using VersaMark.
  3.    I applied white embossing powder to the panel.
  4.    I shook off the excess.
  5.    I applied heat with my heat tool.
  6.    I set it down to cool for a minute.

Next, I attached the heat embossed panel to the top of my card front, using dimensionals.

I then adhered the ribbon to the bottom of the card, using a strong adhesive. 

Next, I attached a couple of In Good Taste Elements, using glue dots.

Lastly, I added a Basic White panel to the inside of the card.

Thank you for stopping by here. Contact Me if you have questions or need anything Stampin' Up! related.

If you have a few minutes, Shop Now, and take a look at quality products and deals that may be happening today! There is a HOST CODE in the right sidebar, if you are interested.

If you like kits at your fingertips, then check out Paper Pumpkin and/or the Kits Collection. You will not regret it.

Want some company? Join Me and become a member of my team. I can't wait to meet you.

Please share, like, pin, tweet, or comment. Make sure you FOLLOW and SUBSCRIBE to my blog. This way you won't miss a thing! 

HAPPY STAMPING!

Tuesday, October 22, 2024

Lovely Thank You

Having designer paper that matches a stamp set makes card making easy and fun. Thoughts? 


Lovely Thank You


Stamps:
   Oh So Eclectic
   Keeping Tabs

Paper:
   Peekaboo Peach A-2
   Naturally Eclectic DSP 5-1/4 x 4
   Night of Navy 4-1/2 x 2-1/2, 1-1/4" Circle
   Basic White 2" Sq., 1" Circle, 5-1/4 x 4 (Inside)

Ink:
   Night of Navy
   Peekaboo Peach
   Soft Sky

Technique:
   2-Step Stamping
   Die Cutting
   Punching

Accessories:
   Eclectic Layers Thinlits Dies
   1" & 1-1/4" Circle Punch
   Clear Faceted Gems
   2016-2018 In Color Enamel Shapes
   Dimensionals
   Adhesive

First, I stamped and die cut all of the pieces:
   Peekaboo Peach Floral (2)
   Night of Navy Floral (1)
   Night of Navy Geometric Background
   Night of Navy Circle (1-1/4")
   Sentiment on Basic White circle (1") with Night of Navy ink.

I then adhered the Naturally Eclectic DSP panel onto the Peekaboo Peach card front.

Next, I attached the Night of Navy geometric background lattice to the card front.

I then attached the two Peekaboo Peach florals and the Night of Navy floral, using Dimensionals.

Next, I adhered the Basic White circle onto the Night of Navy circle and attached it to the card front, using dimensionals.

Lastly, I added a Clear Faceted Gem to each floral, an Enamel Shape to the sentiment, and adhered a Basic White panel to the inside of the card.

Here is another card using the same products, but with a different sentiment:

Lovely

Thank you for taking a peek. Please Contact Me for further information on Stampin' Up! or if you have questions.

Shop Now and browse our current products and promotions. There is a Host Code located in the right sidebar if your order is less than $150. Of course, you do not have to use it, but I would appreciate it.

Do you have the crafting bug? Subscribe to Paper Pumpkin and receive a monthly dose. The cost is $25, and you can buy it, skip it, or stop it. I must warn you. It can be addictive! I can't seem to stop!

Join Me and become a member of my team. Check out the benefits and gain the best value for your money. 

Don't forget to share, like, pin, tweet, or comment. Make sure to FOLLOW and SUBSCRIBE to my blog.

HAPPY STAMPING!

Monday, September 23, 2024

Be Strong Today

Sometimes we need to let someone know that we are there for support and empathize with them. Thoughts? 


Stamps:
   Love & Strength

Paper:
   Berry Burst A-2
   Basic Black 5-3/8 x 4-1/8
   2024-2026 In Color 6x6 DSP 5-1/4 x 4
   Granny Apple Green 1-1/2 x 3-1/2
   Basic White 3-1/4 x 2, 5-1/4 x 4 (Inside)

Ink:
   Berry Burst
   Granny Apple Green
   Pretty in Pink

Technique:
   CAS

Accessories:
   Adhesive

First, I randomly stamped a leaf on the Granny Apple Green strip, using Granny Apple Green ink.

I then stamped the sentiment and two hearts on the Basic White strip, using Berry Burst ink.

Next, I filled the strip with Pretty in Pink splatter.

I then tore both ends of the Granny Apple Green strip and one end of the Basic White strip as shown above.

Next, I adhered the In Color DSP panel onto a Basic Black matte and then onto the Berry Burst card front.

I then adhered the Granny Apple Green strip onto the DSP panel followed by the Basic White strip on top of it, as shown above.

Lastly, I adhered a Basic White panel to the inside of the card.

Thanks so much for reading through my blog today. Contact Me if I can answer anything for you, or if you would like to buy any of my cards.

If you would like to buy your own products and make your own cards click on Shop Now and browse current merchandise. I have placed a HOST CODE for you to use if you do not earn any rewards on your own. It is located in the right sidebar.

Our monthly subscription to Paper Pumpkin is affordable and flexible. The cost is $25 monthly. Check out the Kits Collection for more options at varying prices.

Join Me and become part of a team. Check out the benefits and decide if it is for you.

Please share, like, pin, tweet, or comment. Don't forget to FOLLOW and SUBSCRIBE to my blog.

HAPPY STAMPING!

Saturday, September 21, 2024

Whispy Dreams

Sometimes, I make a card simply to meet a challenge. This challenge called for me to use acrylic paint. I grabbed three of my favorite colors and created the background. What do you think? 


Stamps:
   Blue Skies by Verve

Paper:
   Fresh Fig A-2
   Watercolor 5-1/4 x 4
   Basic White 5-1/4 x 4 (Inside)

Ink:
   Tuxedo Black Memento
   Fresh Fig
   Whisper White Craft

Acrylic Paint:
   Bright Yellow
   Bright Blue
   Purple

Technique:
   Acrylic Paint

Accessories:
   Basic Rhinestone Jewels
   Adhesive

I painted the watercolor panel with the acrylic paints: Bright Yellow, Bright Blue, Purple.

After it was completely dry (it doesn't take long at all), I stamped the butterfly and the sentiment, using Tuxedo Black Memento.

I stamped some swirls in different directions to fill in the background. I used Fresh Fig, Whisper White Craft, Bright Yellow, and Bright Blue. To me, the swirls give the card movement and makes me think of wind. 

Next, I added some Basic Rhinestone Jewels to the butterfly and adhered the panel onto the Fresh Fig card front.

Lastly, I added a Basic White panel to the inside of the card.

Thank you so very much for taking the time to stop and glance at my work. If you have any questions or suggestions, please Contact Me. I do appreciate your time.

If you need any supplies, or you are curious to know just how much these products cost, click on Shop Now and satisfy your curiosity. A HOST CODE is available for you to use in case you did not earn your own rewards. You can find it in the right sidebar.

Do you want the best value for your buck? Join Me and reap all of the rewards. I will be more than happy to assist you. Check it out and note that there are no hidden agendas.

Wait! Don't leave. If you just want to try it and see, then subscribe to Paper Pumpkin. You will receive a kit with everything you need to create a project. Check out the Kit Collection for more choices.

I would love for you to take a minute to share, like, pin, tweet, or comment. Please FOLLOW and SUBSCRIBE to my blog. Let me know what you think below in the comments.

HAPPY STAMPING!

Friday, September 20, 2024

High Note

Note cards are fun and easier to fill. The smaller canvas somehow makes it all seem rather cute. One stamp can take up the entire front if you let it. Thoughts? 


Stamps:
   High Tide

Paper:
   Whisper White Note Card 5 x 3-1/2, 4-3/4 x 3-1/4 (2)
   Night of Navy 4-7/8 x 3-3/8

Ink:
   Night of Navy
   Pacific Point
   Soft Suede
   So Saffron

Technique:
   Stamp-Off

Accessories:
   Adhesive

First, I stamped the sand at the bottom of the Whisper White panel, using Soft Suede. I stamped-off to get a lighter shade of Soft Suede.

I then stamped the lighthouse, using Pacific Point. This is a two-step stamp, so I inked up the full lighthouse with Pacific Point, but I stamped-off on scratch paper first, and then stamped the white panel. I then took the detailed image of the light house and stamped it over the first image with a full strength of Pacific Point. You may want to play with this on a scratch paper before stamping your panel.

Next, I stamped the sentiment, using Night of Navy on the right side of the lighthouse.

I then added a beam of light with So Saffron ink.

Next, I stamped the birds, using Soft Suede and added gritty sand to the beach. I did NOT stamp-off for these.

I then adhered the panel onto a Night of Navy matte, and then onto the front of the Note Card.

Lastly, I adhered a panel to the inside of the note card. 

Thank you for checking out my blog. I so appreciate your time. Contact Me if you have any questions or concerns regarding Stampin' Up!

Are you curious about what is trending, the cost of materials and other products, or do you just feel like shopping? Click on Shop Now and have some fun.

Subscribe to Paper Pumpkin or check out the Kits Collection if you want to stay on a budget or just keep it all low-key.

Join Me and reap all of the benefits of becoming a part of the Stampin' Up! family. Check it out and gain the best value for your money.

Share, like, pin, tweet, or comment. Don't forget to FOLLOW and SUBSCRIBE to my blog.

HAPPY STAMPING!

Saturday, September 14, 2024

Paper Trees

Anytime I create, using a special technique, I make more than what I intend to use. So, I actually used a leftover strip from another project that called for a shaving cream technique. I think it worked here. What do you think? 


Stamps:
   Rooted in Natue

Paper:
   Very Vanilla A-2
   Basic White 5-1/4 x 4 (2)
   First Edition DSP 2-3/4 x 5-1/4
   Shaving Cream Leftover Strip 1-1/4 x 5-1/4

Ink:
   Call Me Clover
   Merry Merlot

Re-Inkers:
   Various Colors

Technique:
   Shaving Cream

Accessories:
   Shaving Cream
   Adhesive

First, I adhered the First Edition DSP to the bottom of a Basic White panel.

I then adhered the leftover shaving cream strip above it.

Next, I stamped the trees directly onto the panel, using Call Me Clover ink.

I then stamped the sentiment, using Merry Merlot.

Lastly, I adhered the panel onto a Very Vanilla card front and added a Basic White panel to the inside of the card.

Thank you so much for stopping by here. Contact Me if you have any questions.

Shop Now and buy your supplies to make your own cards. Place an order today for your favorites before they run out of stock.

Join Me and become my new team member. Enjoy the best savings and opportunity offered today!

Subscribe to Paper Pumpkin and craft monthly for $25. Don't forget to take a look at the All-Inclusive Kits!

If you liked my card, please share, like, pin, tweet, or comment. I would love for you to FOLLOW and SUBSCRIBE to my blog. Let me know what you think in the comments below.

HAPPY STAMPING!