Showing posts with label Brusho Crystal Colour. Show all posts

Monday, March 18, 2024

Brushed Florals

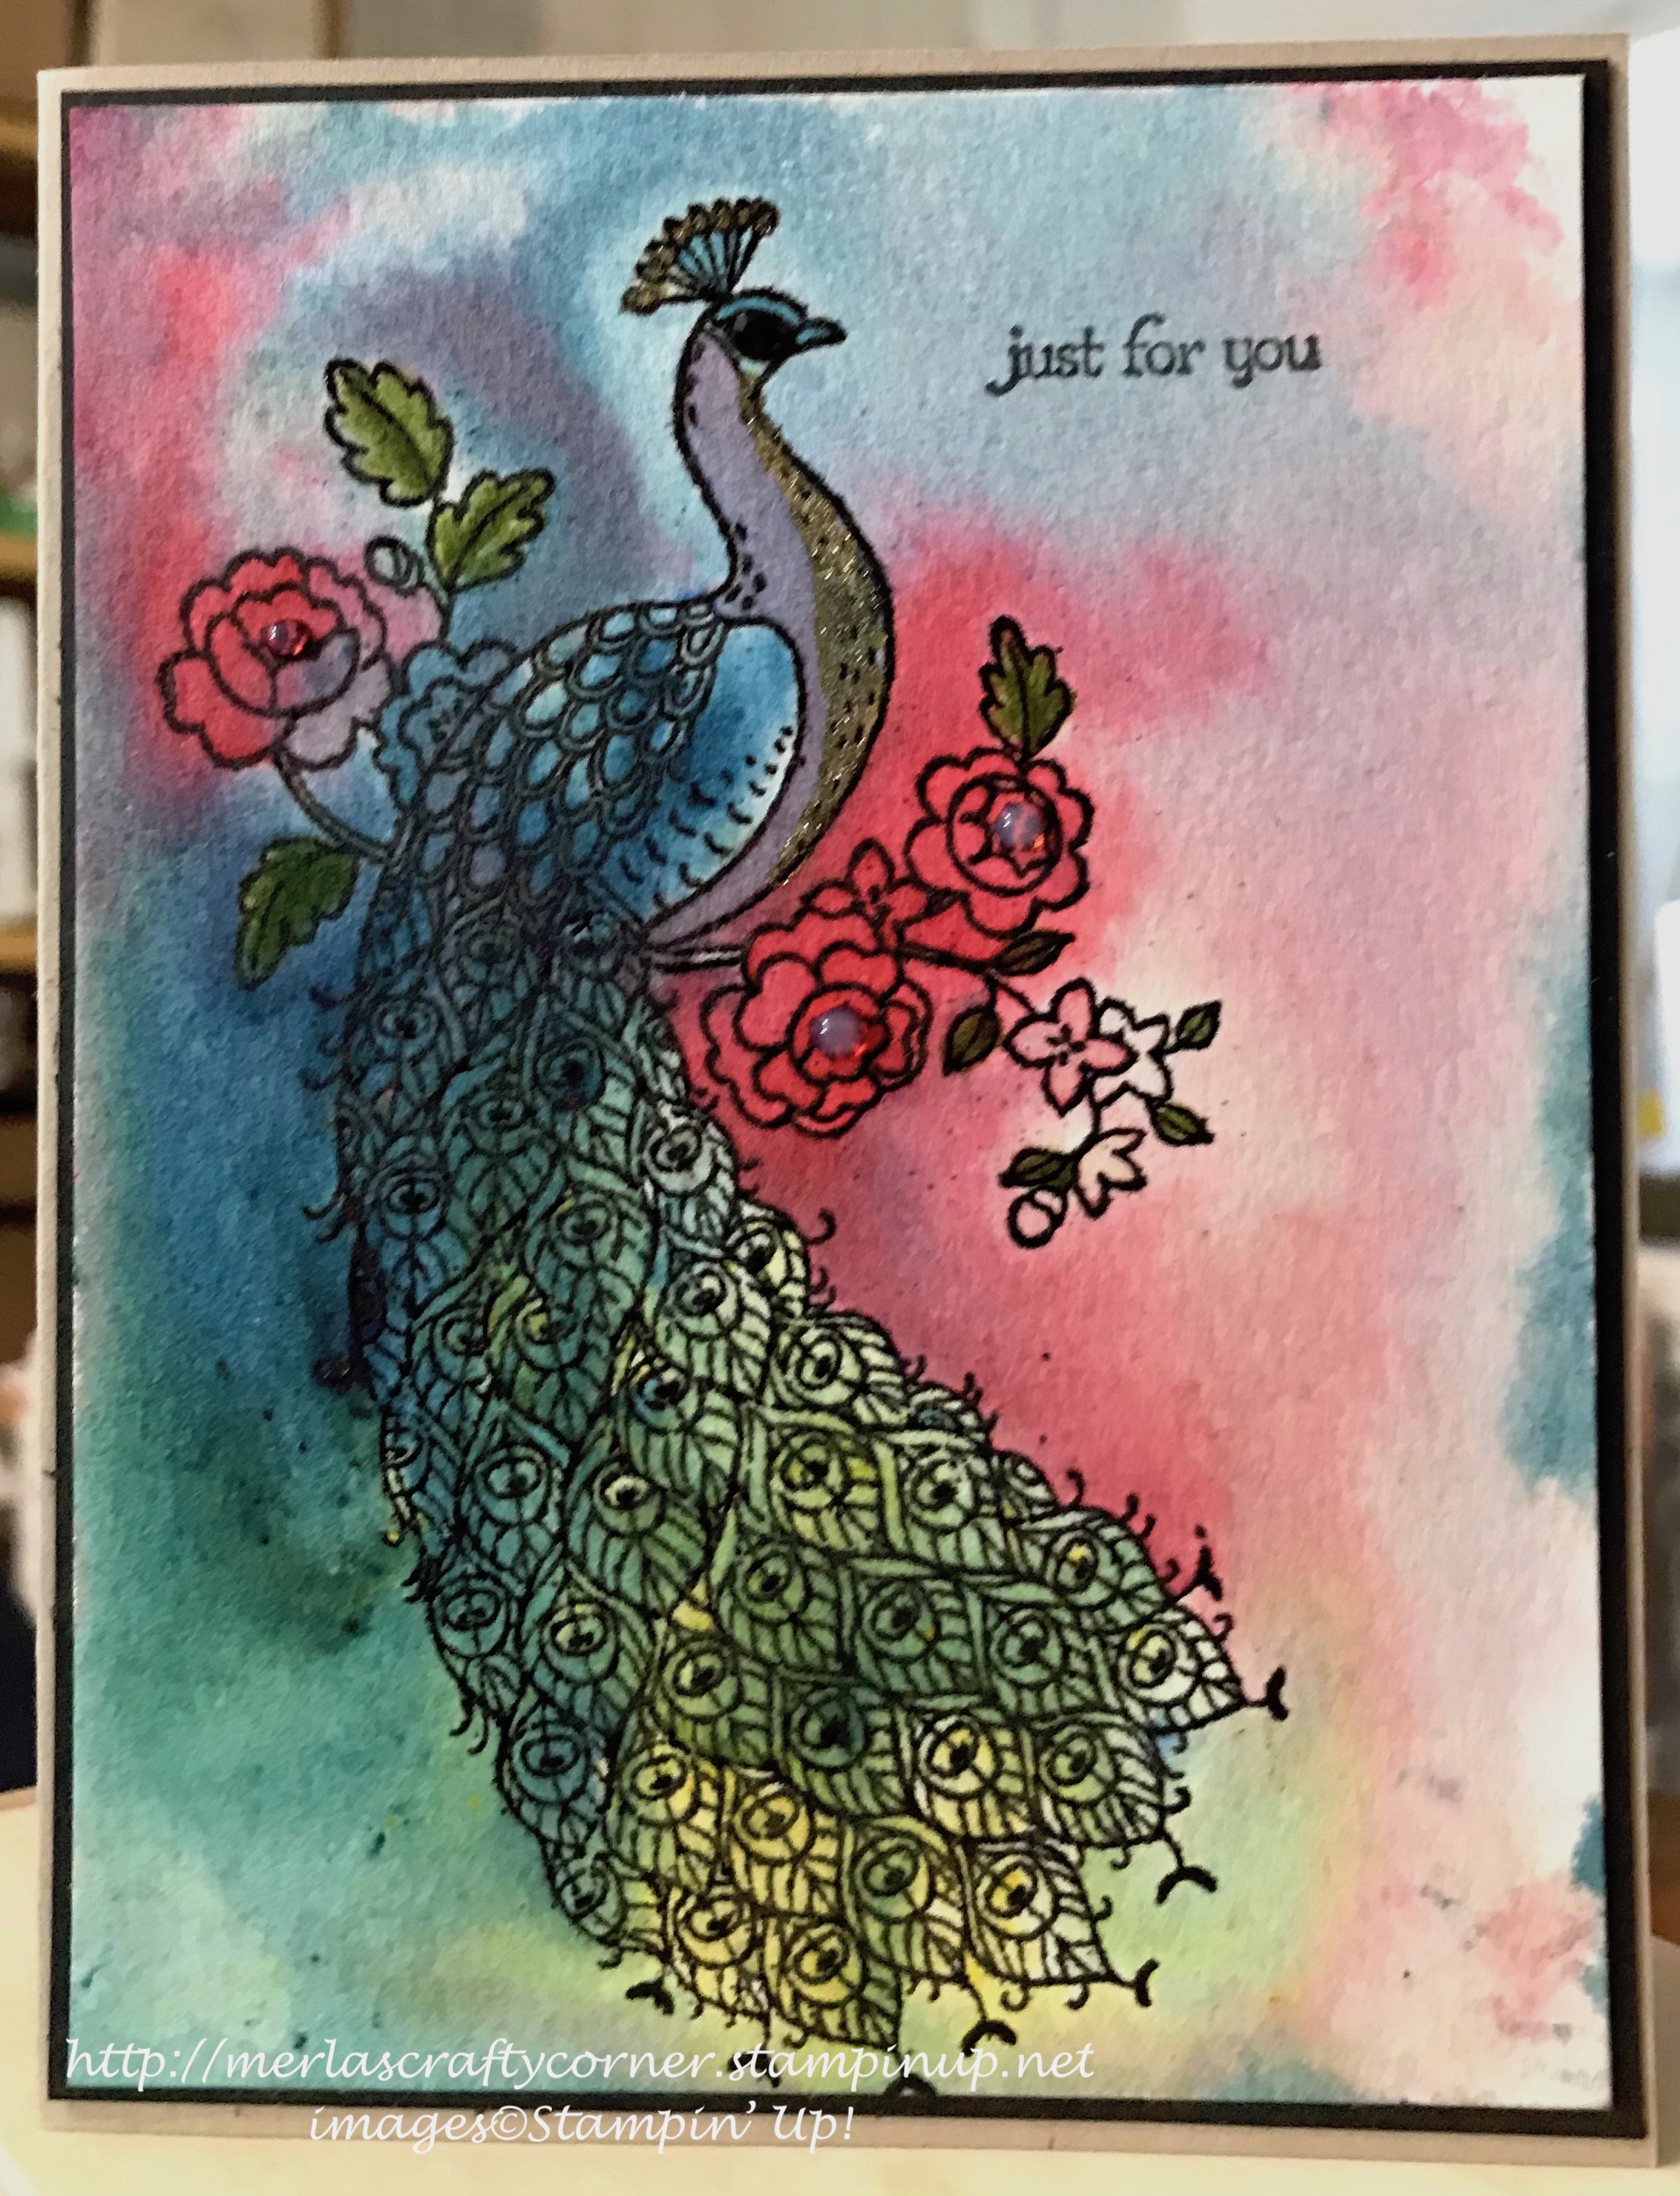
Watercolor crystals will always yield surprising results. Sometimes, I am a bit disappointed, especially if some of the colors run together to create a muddy presence. Still, beauty is in the eye of the beholder. Thoughts? 


Brushed Florals


Brushed Florals Too


Brushed Florals Tre


Stamps:
   Happy & Heartfelt

Paper:
   Melon Mambo A-2, Scrap
   Granny Apple Green A-2, Scrap
   Daffodil Delight A-2, Scrap
   Basic Black 5-3/8 x 4-1/8
   Irresistibly Floral DSP 5-1/4 x 4
   Basic White 5-1/4 x 4 (Inside)

Ink:
   Tuxedo Black Memento

Brusho Crystal Colour:
   Gamboge
   Yellow
   Moss Green
   Brilliant Red

Pigment Watercolor Sprinkles:
   Melon Mambo
   Granny Apple Green
   Daffodil Delight

Technique:
   Punching
   CAS

Accessories:
   Washi Label Punch
   Gold Glitter Washi Tape
   Bright's Enamel Shapes
   Glitter Ribbon
   Dimensionals
   Adhesive

As you can see, I went a bit overboard in creating these cards. It is so easy and fun to play with watercolor crystals. I used the Brusho Crystal Colours on the first card and the Pigment Watercolor Sprinkles on the other two cards.

First, I sprinkled the DSP panel with some watercolor crystals or sprinkles.

I then spritzed the panel with water, and let the crystals or sprinkles do their thing. I did keep a paper towel close by to dab here and there. The muddy look happens when too many of the colors run together. Oops.

I let the panels dry for a bit.

Next, I stamped the sentiments on scraps of matching cardstock.

I punched them out, using the Washi Label Punch. 

Next, I adhered the dried panels onto a Basic Black matte and then onto a matching card front.

I then adhered a bit of Gold Glitter Ribbon to the card front and attached the sentiment, using dimensionals.

Lastly, I added some Enamel Shapes and adhered a Basic White panel to the inside of the card.

I am so excited that you decided to pay me a visit. Please Contact Me if I can be of service.

Shop Now and enjoy looking at new products made especially for card making! There is a HOST CODE located in the right sidebar, if you care to use it.

If you are into kits, check out Paper Pumpkin and the Kits Collection. I am sure one of those will be right up your alley.

Still undecided? Join Me and find out what all the fuss is about. Check it out today.

Please share, like, pin, tweet, or comment. FOLLOW and SUBSCRIBE to my blog.

HAPPY STAMPING!

Tuesday, July 25, 2023

Butterfly Brusho Flower

Anytime you use Brusho Crystal Colour, you will create a unique card front. Brushos are activated by water. So, the amount, number of times, and even how you apply water will have an effect on your result. Let's not forget the amount of crystals that you begin with have the most effect on your result. Here are a couple of cards I made, using Brusho Crystal Colours. What do you think? 


Butterfly Brush


Stamps:
   Beautiful Day

Paper:
   Berry Burst A-2
   Basic Black 5-3/8 x 4-1/8
   Watercolor 5-1/4 x 4
   Basic White 5-1/4 x 4 (Inside)

Ink:
   Archival Basic Black

Brusho Crystal Colour:
   Prussian Blue
   Yellow
   Gamboge

Technique:
   Watercolor/Brushos

Accessories:
   Basic Rhinestone Jewels
   Adhesive

Here is another card I created, using Brushos:

Brusho Flower


Stamps:
   Beautiful Day

Paper:
   Sweet Sugarplum A-2
   Basic Black 4-3/4 x 3-3/4
   Watercolor 3-1/2 x 4-1/2
   Basic White 5-1/4 x 4 (Inside)

Ink:
   Archival Basic Black

Brusho Crystal Colour:
   Prussian Blue
   Yellow
   Gamboge

Technique:
   Watercolor/Brushos

Accessories:
   Basic Rhinestone Jewels
   Adhesive

I started with a watercolor panel. I sprinkled Brusho Colour flakes onto the watercolor panel. Sprayed water on it, and set it aside to dry.

I then stamped my image and sentiment. 

I adhered the panel to a Basic Black matte and then onto the card front.

Lastly, I added a few rhinestones and adhered the Basic White panel to the inside of the card.

SCS has various techniques on using watercolor powders. You can find and explore them HERE.

I thank you so much for stopping by here and checking out my cards today. I do hope you liked them. Contact Me if you need more information.

If you would like to Shop Now, Stampin' Up is always offering something special, especially for on-line shoppers. There are items that are advertised only on-line, so check it out. You don't want to miss out on these wonderful items.

The Kits Collection is always exciting. New kits are introduced on-line and are available while supplies last. Prices vary, depending on the kit. You don't want to miss Paper Pumpkin. It is what I enjoy each month. Take a peek!

Join Me and cash in for the best deal available. No fine print to miss. Check it out and see if it may be for you.

Please take a few more minutes to share, like, pin, tweet, or comment. Don't forget to FOLLOW and SUBSCRIBE to my blog.

HAPPY STAMPING!

Monday, September 19, 2022

God is Love

I used Brusho Crystal Colour on the following four cards. Since the crystals react with water, each card is unique. The general statement on the card front will be made more personal by the sender's message expressed inside. Thoughts?


God is Love


God is Love Too


God is Love Tre


God is Love Quad


Stamps:
   Hold on to Hope

Paper:
   Basic White or Dapper Denim A-2
   Basic Black 5-3/8 x 4-1/8
   Shimmery White 5-1/4 x 4
   Basic White 5-1/4 x 4 (Inside), 1-1/4 x 3-1/4
   Gold Foil 2 x 3

Ink:
   Tuxedo Black Memento

Brusho Crystal Colour:
   Prussian Blue
   Yellow

Technique:
   Die Cutting
   Brushos/Watercolor

Accessories:
   Cross of Hope Framelits
   Water Mister
   Glue Dots
   Dimensionals
   Adhesive

First, I sprinkled Prussian Blue Brusho Crystals on the outer edges of my Shimmery White panel and yellow in the center.

I then sprayed water on the panel, dabbing the excess with a paper towel. I added more crystals or water until I was happy with the panel. I set it off to the side to dry.

I then die cut my gold foil cross, using the Cross of Hope Framelits.

Next, I stamped and die cut the sentiment: God Is Love. I used Tuxedo Black Memento.

Once the brusho panel was dry, I adhered it to a Basic Black matte. I then adhered it to either a Basic White or Dapper Denim card front.

I added the gold foil cross using micro glue dots.

The sentiment was attached with dimensionals.

Lastly, I adhered the Basic White panel to the inside of the card.

Thank you so much for stopping by here and spending a few minutes of your day with me. I appreciate your time. Contact Me if you have any questions, need a demonstrator, or just want to stamp or share ideas.

Shop Now and enjoy browsing products and promotions. I have a HOST CODE in the right sidebar in case you did not earn your own rewards.

Do not miss the opportunity to Join Me and become the newest member of my team.

Paper Pumpkin should not be ignored. I enjoy putting my kit together monthly.

Take a few minutes and share, like, pin, tweet, or comment. I would love to see what you really think. Do not forget to FOLLOW and SUBSCRIBE to my blog.

HAPPY STAMPING!


Sunday, September 11, 2022

Peacock For You

When you want unique watercolor, Brusho Crystal Colour guarantees it. Tap out the flakes and see where they land. Add some water, and watch them come alive. Have FUN!


Stamps:
   Perfect Peacock
   Teeny Tiny Wishes

Paper:
   Kraft A-2
   Basic Black 5-3/8 x 4-1/8
   Watercolor 5-1/4 x 4
   Basic White 5-1/4 x 4 (Inside)

Ink:
   Tuxedo Black Memento
   VersaMark

Markers:
   Old Olive

Brushos:
   Prussion Blue
   Yellow
   Brilliant Red

Technique:
   Heat Embossing
   Watercolor

Accessories:
   Black Embossing Powder
   Gold Wink of Stella
   Crystal Effects
   Black Rhinestones
   Adhesive

First, I created my background panel. I sprinkled brusho crystals on my panel. Added water and let them come alive. I continued this process, until I was happy with the result. I did use my heat tool to speed up the drying process, and some of the ink did accumulate on the sides, but all in all, I was happy.

Once the panel was dry, I stamped the peacock image using VersaMark and added Black Embossing Powder. I then heat embossed the image.

I colored the leaves with an Old Olive marker, and added some Gold Wink of Stella on the neck of the peacock.

Next, I stamped my sentiment using Tuxedo Black Memento.

I then adhered the panel to a Basic Black panel and then onto the card front. I adhered the Basic White panel to the inside of the card.

Lastly, I added a black rhinestone for the eye, and dabbed the center of the large roses with crystal effects. I left the card to dry overnight.

Thank you so much for giving me a bit of your time. Please Contact Me if I can return the favor.

Check out all of the options by clicking on the headers above.

Do not forget to FOLLOW and SUBSCRIBE to my blog. Please share, like, pin, tweet, or comment. I look forward to reading your thoughts and possible ideas for improvements.

HAPPY STAMPING!

Friday, October 8, 2021

Thank You Lines

Use your watercolor powders, such as Brushos, to create this card. I followed a tutorial found on SplitCoastStampers (SCS). It is called Stamping with Watercolor Powders. Have a look and give it a try. What do you think?


Stamps:
   Lilypad Lake
   Abstract Impressions

Paper:
   Lemon Lime Twist A-2
   Whisper White 5-1/4 x 4 (2)

Ink:
   Archival Basic Black
   Brushos

Technique:
   Watercolor Powders
   Stamparatus - Hinge Method

Accessories:
   Water Mister
   Stamparatus/MISTI
   Adhesive

I used my Stamparatus because I did not have a background stamp that would work for this technique. The stamp I chose was only about 3/4" in width. So, after I stamped it, I would bring down the panel one step. This aligned it for the next color. I think it worked well.

Thank you for visiting. I do love company. Feel free to Contact Me if you have any questions.

Explore current products, promotions, and all of the opportunities. Just click on Shop Now. A HOST CODE is available in the right sidebar for those of you who do not earn your own rewards.

For those of you who like kits with everything you need to complete a project, we offer Paper Pumpkin. Your monthly cost is less than $25. Also, you might want to look at the new Kits Collection!

Join Me and become my newest team member. I look forward to meeting you.

Please take a minute to share, like, pin, tweet, or comment. Do not forget to FOLLOW and SUBSCRIBE to my blog.

HAPPY STAMPING!

Monday, September 27, 2021

Mother's Blended Bloom

Flowers help us express our feelings toward others. Whether we are expressing sorrow, pain, regret, or joy, love, and congratulations, we use flowers as a medium. Here is a beautiful bloom for Mother on Mother's Day. What do you think?


Stamps:
   Blended Bloom
   Teeny Tiny Wishes

Paper:
   Rich Razzleberry A-2
   Irresistibly Yours DSP 5-3/8 x 1-5/8
   Watercolor 3-1/2" Sq.
   Basic White 5-1/4 x 4 (Inside)

Ink:
   Tuxedo Black Memento
   Rich Razzleberry

Markers:
   Cherry Cobbler
   Daffodil Delight
   Rich Razzleberry

Brushos:
   Various - Personal Choice

Technique:
   Watercolor (Brushos)
   Sponging
   Punching

Accessories:
   Gold Glimmer Washi Tape
   Basic Rhinestone Jewels
   Word Window Punch
   Aqua Painter
   Sponge
   Water Mister
   Dimensionals
   Adhesive

First, I sprinkled Brusho Flakes onto the DSP. I misted it with water and let the brushos do the work. I set it aside to let it dry.

Next, I stamped my bloom and colored it using markers and blends. I fussy cut it using my paper snips.

I then stamped, punched, and sponged my sentiment.

Next, I placed the strips of Gold Glimmer Washi Tape on the card front. I used the DSP strip to measure the distance between the strips. The DSP is an odd size because it is a left-over piece that I wanted to use. 

I then adhered the DSP on top of the gold glimmer washi tape, making sure it showed on both ends. 

I added the bloom and the sentiment with dimensionals.

Lastly, I added rhinestones to the center of the bloom and the Basic White panel to the inside of the card.

Thank you so much for stopping by here and spending a few minutes of your day with me. I appreciate your time. Contact Me if you have any questions, need a demonstrator, or just want to stamp or share ideas.

Shop Now and enjoy browsing products and promotions. I have a HOST CODE in the right sidebar in case you did not earn your own rewards.

Do not miss the opportunity to Join Me and become the newest member of my team.

Paper Pumpkin should not be ignored. I enjoy putting my kit together monthly.

Take a few more minutes and share, like, pin, tweet, or comment. I would love to see what you really think. Do not forget to FOLLOW and SUBSCRIBE to my blog.

HAPPY STAMPING!

Saturday, March 27, 2021

Make Me Happy

 This card can be given to someone for Valentine's Day or just because they cause you to smile and feel joyful. Don't you agree?


Stamps:
   Happy Wishes

Paper:
   Elegant Eggplant A-2
   Watercolor 2-1/4 x 4-1/4
   Red Glitter 1/2 x 4-1/4
   Whisper White 5-1/4 x 4 (Inside)

Markers:
   Basic Black
   Real Red
   Melon Mambo
   Old Olive
   Always Artichoke
   Elegant Eggplant
   Perfect Plum 

Brushos:
   Yellow
   Gamboge
   Brilliant Red

Technique:
   Watercolor
   Markering
   Punching

Accessories:
   White Tea Lace Doilies
   Hearts Border Punch
   Basic Rhinestone Jewels
   Water Spritzer
   Adhesive

I began with my watercolor background. I sprinkled on some brushos and then spritzed the panel with water. I dabbed it with a paper towel here and there. I may have added a bit more flakes along with water. I then set it aside to dry.

I then took the large happy stamp and my markers. I colored in the happy with Basic Black and used the other markers on the flowers below.

Once the watercolor panel was dry, I breathed on the stamp to re-activate the ink and then stamped my panel.

I then added the words above the happy.

I chose to add a bit of glimmer. In looking through my envelope of Red Glitter paper, I found the strip that I had used to punch out hearts. So, I decided to just place it on the bottom of the card as a border. This is why I don't like to throw away my scraps. (I also sometimes punch these pieces to create fillers for my shaker cards.)

The two panels looked a bit bland to me. So, I grabbed one of my doilies and placed it underneath. I think it is just what the card needed. I adhered the layers onto the card. 

Lastly, I added rhinestones and the other panel to the inside of the card.

Thank you so much for stopping by here. Contact Me if you have any questions.

Shop Now and buy your supplies to make your own cards.

Join Me and become my new team member.

Subscribe to Paper Pumpkin and craft monthly for under $25.

If you liked my card, please share, like, pin, tweet, or comment. I would love for you to FOLLOW and SUBSCRIBE to my blog. Let me know what you think in the comments below.

HAPPY STAMPING!