Showing posts with label Crazy for Cupcakes. Show all posts

Thursday, September 25, 2025

Button Birthday

If you have an overflow of buttons in your embellishment pile, here is an easy way to use a few of them. I thought a birthday balloon card adorned with buttons would be fun. What do you think? What else could you use? 


Stamps:
   Crazy for Cupcakes
   Sassy Salutations

Paper:
   Tempting Turquoise A-2
   Basic Black 5-3/8 x 4-1/8
   Basic White 5-1/4 x 4 (2)

Ink:
   Tuxedo Black Memento

Technique:
   CAS

Accessories:
   Regals Button Collection
   Glue Dots
   Adhesive

First, I stamped the sentiment in the top center of a Basic White panel in landscape mode.

I then stamped balloon shapes around and below the sentiment.

Next, I adhered the panel onto a Basic Black matte and then onto a Tempting Turquoise card front.

Lastly, I attached buttons to the balloon shapes, using glue dots, and adhered a Basic White panel to the inside of the card.

Thank you for being here and taking the time to look at my blog entry. Contact Me if you need anything related to Stampin’ Up! 

If you would like to Shop Now, you can check out all that is new, current, and on-sale! 

Notice that we offer a monthly subscription called Paper Pumpkin. Check it out and see if it is for you. The Kits Collection also offers a variety of kits at varying prices. 

In order to get the most value for your dollar, you will want to Join Me and become part of my team. Click on the link and see if you are interested. 

I would love for you to take a few minutes and share, like, pin, tweet, or comment. Don’t forget to FOLLOW and SUBSCRIBE to my blog.

HAPPY STAMPING!

Saturday, January 1, 2022

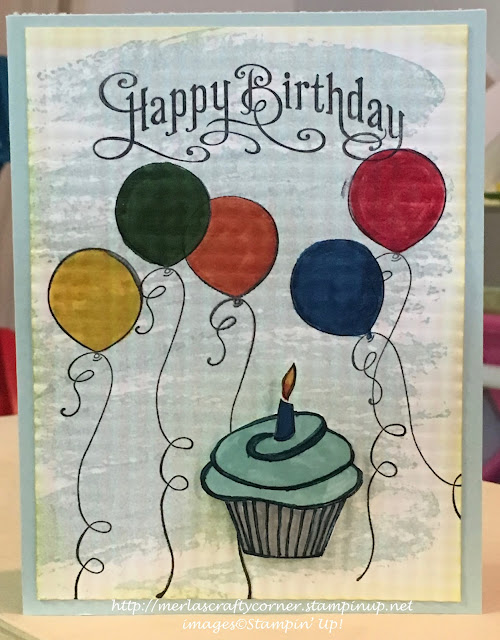
Balloons & Cupcake

Birthdays call for balloons and cupcakes at any age. Using a crimper on the front panel before adhering it to the card base really set this card apart. What do you think? 


Stamps:
   Wagon Full of Fun
   Crazy for Cupcakes
   Perfectly Penned
   Watercolor Wash

Paper:
   Soft Sky A-2
   Basic White 5-1/4 x 4 (2), Scraps

Ink:
   Soft Sky
   Archival Basic Black
   Daffodil Delight

Markers:
   Various - Personal Choice

Technique:
   Crimper
   Sponging
   Fussy Cutting

Accessories:
   Crimper
   Dimensionals
   Paper Snips
   Sponge
   Adhesive

First, I stamped my Basic White panel using the Watercolor Wash background stamp. I applied Soft Sky ink. If you do not own this background stamp, create your own watercolor wash using a brush and watercolor ink. 

I then stamped some balloons and colored them using various markers. I did not take the time to mask off any balloons. So, I used a dark color for the balloon that overlapped one of the others.

Next, I stamped the sentiment across the top of the panel.

I ran the panel through the crimper both vertically and horizontally. 

I then stamped, colored, and fussy cut a cupcake. I attached the cupcake to the lower part of the card front using dimensionals.

Lastly, I adhered the panel to the card front and added the other Basic White panel to the inside of the card.

Thank you so very much for taking the time to stop and glance at my work. If you have any questions or suggestions, please Contact Me. I do appreciate your time.

If you need any supplies, or you are curious to know just how much these products cost, click on Shop Now and satisfy your curiosity. A HOST CODE is available for you to use in case you did not earn your own rewards.

Do you want the best value for your buck? Join Me and reap all of the rewards. I will be more than happy to assist you. Check it out and note that there are no hidden agendas.

Wait! Don't leave. If you want to try it and see, then subscribe to Paper Pumpkin. You will receive a kit with everything you need to create a project. Check out the Kit Collection for more choices.

I would love for you to take a minute to share, like, pin, tweet, or comment. Please FOLLOW and SUBSCRIBE to my blog. Let me know what you think below in the comments.

HAPPY STAMPING!

Monday, October 12, 2020

Cupcakes

 It seems like more people are celebrating with cupcakes instead of cakes nowadays. On the upside, there is less cleanup, and everyone gets the same amount. There is no more fighting for the corner piece or the one with the flower on top. So, everyone get the same, but is treated like an individual with their own serving. 


Stamps:
   Crazy for Cupcakes
   Something to Celebrate

Paper:
   Crushed Curry A-2
   Whisper White 5-1/4 x 4, 3-1/2 x 2-1/2
   Cherry on Top DSP 5-1/4 x 4
   Pool Party 3-3/4 x 2-3/4

Ink:
   Archival Basic Black

Markers:
   Real Red
   Bermuda Bay
   Cucumber Crush
   Watermelon Wonder

Technique:
   CAS

Accessories:
   Dimensionals
   Adhesive

I stamped my cupcakes using Archival Basic Black. I then colored them using the markers listed above.

I stamped the sentiment on the bottom, and added it to the Pool Party panel. I attached it to the card base panel using dimensionals. 

The Cherry on Top DSP was added to the card base before the cupcake panel.

Thank you so much for dropping by here. Contact Me if you have any questions.

Click on all of the tabs above and explore products, promotions, and opportunities.

Please take the time to share, like, pin, tweet, or comment. Do not forget to FOLLOW and SUBSCRIBE to my blog. 

HAPPY STAMPING!
Thursday, September 3, 2020

Chocolate Cupcake

 One candle and one cupcake for any age. When your age should be kept a secret, or the number might start a huge fire, it is best to revert back to that first birthday and have just one candle and one small bite. Of course, if you are going to indulge go for what you love and crave the most. Mine in CHOCOLATE! What's yours?


Stamps:
   Crazy for Cupcakes
   Bring on the Cake

Paper:
   Calypso Coral A-2
   Seaside Spray 5-1/4 x 4
   Daffodil Delight 5 x 3-3/4
   Whisper White 4-3/4 x 3-1/2, 5-1/4 x 4 

Ink:
   Archival Basic Black

Markers:
   Calypso Coral
   Daffodil Delight
   Seaside Spray
   Chocolate Chip
   Soft Suede
   Basic Black

Technique:
   Doodle a Frame

Accessories:
   Adhesive


So, to highlight this delicious cupcake, I doodled a frame around it and blackened it with a black marker. I know it looks like a five year old did this, but in reality I did. I think a five year old could probably do a better job. Still, it is a unique card that has its own character.

Thank you so much for stopping by here and taking a quick peek. Contact Me if you have any questions or need my assistance.

Shop Now for our current products and promotions. Check out the new look on our storefront and leave your feedback. We genuinely want to hear about your experience and your ideas.

Please use the HOST CODE waiting in the right sidebar if you did not earn your own rewards.

Be sure to click on the other buttons and take advantage of some wonderful opportunities.

Please take the time to share, like, pin, tweet, and comment. I appreciate your time and your thoughts. Do not forget to FOLLOW and SUBSCRIBE to my blog.

HAPPY STAMPING!