Monday, January 17, 2022

Father's Galore

Using an image from the days of yore does not imply that your father is ancient, but that he is older than you and always will be! Laugh and celebrate the wonderful memories that you share. What do you think? 


Stamps:
   Feeling Sentimental
   All Year Cheer II

Paper:
   Gable Green A-2, 3-3/4 x 4
   Green Galore 5-1/4 x 4
   Basic White 5-1/4 x 4 (Inside)

Ink:
   Archival Basic Black
   Green Galore

Technique:
   Dry Embossing
   Sponging

Accessories:
   1/2" Green & Blue Ribbon (2)
   Sizzix Ellison Embossing Folder
   Stamp-a-ma-jig
   Archival Black Pen 005
   Sponge
   Adhesive

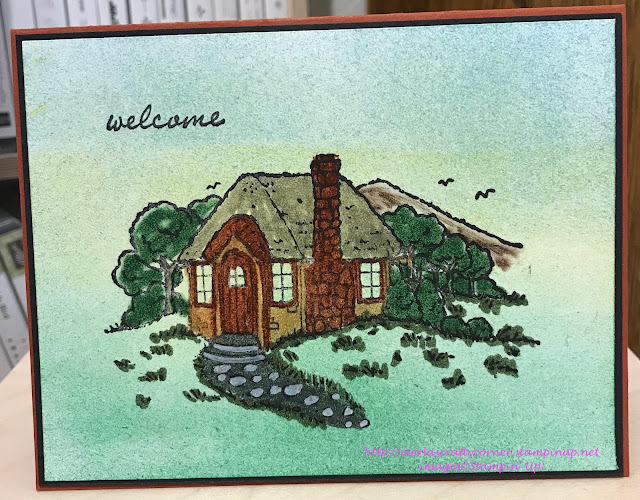
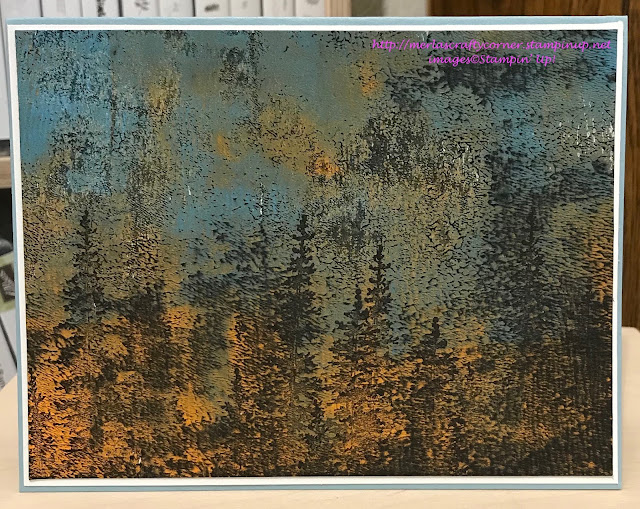
First, I dry embossed the bottom of the Green Galore panel.

I then sponged it to accentuate the embossing.

I drew a black line on the top of the embossing to represent a road.

Next, I used a stamp-a-ma-jig to align my stamp for a precise placement. I stamped the image and then the sentiment.

I added ribbon on the top and bottom of the panel.

I then adhered the panel onto the card base, and added the Basic White panel to the inside of the card.

Thank you immensely for your time. I know how precious it can be. Please Contact Me if you need anything Stampin' Up! or if you have any questions.

Click on Shop Now and take a look at some quality products. Investing in your craft is a no-brainer. I have included a HOST CODE for those of you who enjoy ordering only one or two items. It is located in the right sidebar. Of course, if your product total is more than $150, enjoy your rewards.

Of course, the best value for your dollar is joining the Stampin' Up! family. Just click on Join Me and check out the benefits.

Let's not forget Paper Pumpkin. If you want to craft on the go or you like to keep things small and low-key, check it out. The kit includes all you need.

Please take a minute or two to share, like, pin, tweet, or comment. Don't forget to FOLLOW and SUBSCRIBE to my blog.

HAPPY STAMPING!

Sunday, January 16, 2022

Wonderful Tree

I like the softness of the background colors. What do you think?


Stamps:
   Rooted in Nature

Paper:
   Basic White A-2, 4-1/4 x 4, 5-1/4 x 4 (Inside)
   Basic Black 3-3/4 x 4-3/4
   Green Dotted DSP 5-1/4 x 4

Ink:
   Archival Basic Black

Watercolor Pencils:
   Blue
   Yellow
   Green

Technique:
   Blended Pencil Shavings by guneauxdesign

Accessories:
   Pencil Sharpener
   Adhesive

I learned this technique through a fellow stamper who challenged us to try it. You can find her explanation HERE

For those of you who do not want to take a peek here is a condensed version. 

Using a hand-held pencil sharpener, drop the shavings of a color pencil onto a white panel. 

Rub it in using your index finger until you have the tone you want. 

You can blend the colors with Gamsol and a paper stump. I did not do this step.

I then stamped my tree and sentiment using Archival Basic Black.

Lastly, I adhered the layers together as shown above. I also adhered a Basic White panel on the inside of the card.

Thank you so much for giving me a bit of your time. Please Contact Me if I can return the favor.

Check out all of the options by clicking on the headers above.

Do not forget to FOLLOW and SUBSCRIBE to my blog. Please share, like, pin, tweet, or comment. I look forward to reading your thoughts and possible ideas for improvements. 

HAPPY STAMPING!

Saturday, January 15, 2022

Broken Fences

This designer series paper did all of the work for me. I added some simple stamping in one color and two die cuts. This was truly easy to make. Yet, it turned out amazingly beautiful. What do you think? 


Stamps:
   On The Horizon

Paper:
   Pale Papaya A-2
   Basic Black 5-3/8 x 4-1/8
   Wood Textures DSP 2 x 3-1/4
   Garden Green 1-1/4 x 3
   Basic White 5-1/4 x 4 (Inside)

Ink:
   Tuxedo Black Memento

Technique:
   Die Cutting

Accessories:
   Horizon Dies
   Pebbles Enamel Shapes
   Adhesive

First, I stamped the trees on the right side of the horizon.

I then stamped the sentiment on the top of the card.

Next, I randomly stamped birds across the sky.

I then die cut the fence and placed it unevenly and somewhat lopsided as if it was falling.

I die cut a bit of grass and adhered it to the bottom right corner.

I then assembled the card. I adhered the DSP panel onto the Basic Black and then onto the card front. I added a Basic White panel to the inside of the card.

Lastly, I placed a few pebbles on the card.

Thank you so much for stopping by here. Contact Me if you have any questions.

Shop Now and buy your supplies to make your own cards. Take a peek today and find out what you can grab for FREE!

Join Me and become my new team member. Enjoy the best savings and opportunity offered today!

Subscribe to Paper Pumpkin and craft monthly for under $25. Don't forget to take a look at the All-Inclusive Kits!

If you liked my card, please share, like, pin, tweet, or comment. I would love for you to FOLLOW and SUBSCRIBE to my blog. Let me know what you think in the comments below.

HAPPY STAMPING!

Friday, January 14, 2022

Lovely Autumn

Here are a few colors from the past: More Mustard, Chocolate Chip, Really Rust. These are such beautiful fall colors. I still have paper, inks, and markers. So, they may have been discontinued by Stampin' Up!, but they will live on as long as my supplies last. What color from the past do you miss the most? Thoughts? 


Stamps:
   Good Greetings

Paper:
   More Mustard A-2, Scraps
   Autumn Vine DSP 5-1/4 x 4
   Basic White Scraps, 5-1/4 x 4 (Inside)
   Delicate Dots DSP Scraps
   Chocolate Chip Scraps
   Real Red Scrap
   Basic Black Scrap

Ink:
   Archival Basic Black
   More Mustard

Markers:
   Really Rust

Technique:
   Sponging
   Die Cutting
   Punching

Accessories:
   Owl Builder Punch
   Layering Ovals Framelits Dies
   1/4" Chocolate Chip Ribbon
   Sponge
   Dimensionals
   Glue Dots
   Adhesive

First, I punched out all of the pieces of the owl and put him together. I used scraps and the Owl Builder Punch. Chocolate Chip (Body), DSP (Belly), More Mustard, Chocolate Chip and Basic Black (Eyes), Real Red (Heart).

Next, I stamped my sentiment, die cut it, and sponged it. I adhered it to a slightly larger scalloped oval and added Really Rust dots with my marker.

I then took a bit of Chocolate Chip ribbon and tied a bow.

Lastly, I put the card together. I adhered the DSP panel onto the card front and the Basic White panel to the inside of the card, using liquid adhesive. I attached the owl and sentiment with dimensionals and added the bow with a glue dot.

Thank you for visiting. I do love company. Feel free to Contact Me if you have any questions.

Explore current products, promotions, and all of the opportunities. Just click on Shop Now. A HOST CODE is available in the right sidebar for those of you who do not earn your own rewards.

For those of you who like kits with everything you need to complete a project, we offer Paper Pumpkin. Your monthly cost is less than $25. Also, you might want to look at the new Kits Collection!

Join Me and become my newest team member. I look forward to meeting you.

Please take a minute to share, like, pin, tweet, or comment. Do not forget to FOLLOW and SUBSCRIBE to my blog. 

HAPPY STAMPING!

Thursday, January 13, 2022

Embossed Christmas

Are you looking for inspiration? Look around you. Anything and everything around you can inspire you to create. You can even draw from prior experiences or past events. I thought of the movie, "A Christmas Story," to make this card. Thoughts? 


Stamps:
   Season of Joy
   Flurry of Wishes

Paper:
   Basic White A-2, 5-1/4 x 4 (Inside)
   Cherry Cobbler 2-1/4 x 3-1/3
   Warmth & Cheer DSP 2-1/2 x 4-1/4

Ink:
   Archival Basic Black
   White Craft Ink

Technique:
   Heat Embossing
   Dry Embossing

Accessories:
   White Embossing Powder
   Embossing Buddy
   Fire Circles Rhinestone Brads
   Frosted Sequins
   Fancy Frosted Sequins
   White Glitter Tape
   Cable Knit Embossing Folder
   Dimensionals
   Adhesive

First, I dry embossed my DSP panel using the Cable Knit Embossing Folder. 

I then stamped and heat set the tree image on the Cherry Cobbler panel.

I adhered the DSP panel to the bottom of the card front and added a strip of glitter tape on the seam. You can use a black strip or other ribbon if you choose.

I stamped the sentiment on the top-center of the card.

Next, I attached the Cherry Cobbler panel to the card front using dimensionals.

Lastly, I added some sequins and adhered the Basic White panel to the inside of the card.

Thank you so very much for being here. I appreciate you taking the time to glance at my work. Please Contact Me if I can be of service.

Are you interested in Stampin' Up! products to make your own cards? Shop Now and have a look-see. I placed a HOST CODE for you to use if you do not earn your own rewards. It is sitting in the right sidebar.

Do you like surprises? Subscribe to Paper Pumpkin and receive all you need to complete the monthly project. The cost is less than $25. Check it out.

Join Me and become privy to everything Stampin' Up! Receive a discount on all of your personal orders. Personally, I love SALES!

Please share, like, pin, tweet, or comment. Do not forget to FOLLOW and SUBSCRIBE to my blog.

HAPPY STAMPING!

Wednesday, January 12, 2022

Marbleous Birthday

Can you believe that I did nothing special to this bear to make it look great? I merely inked the stamp using Early Espresso and then stamped the designer series paper once. Amazing! What do you think? 


Stamps:
   Wildlife Wonder
   Beauty of Friendship

Paper:
   Basic Gray A-2
   Crumb Cake 3-1/2 x 2
   Simply Marbleous DSP 5-1/4 x 4
   Basic White 5-1/4 x 4 (Inside)

Ink:
   Crumb Cake
   Early Espresso
   Tuxedo Black Memento

Technique:
   Die Cutting
   Stamp-Off

Accessories:
   Beautiful Trees Dies
   Star Designer Elements
   Dimensionals
   Adhesive

First, I selected the gray marbled sheet from the Simply Marbleous DSP pack and cut it down to size.

Next, I stamped the trees and ground, using Crumb Cake. I stamped-off a couple of times on the ground cover.

I then stamped the bear with Early Espresso.

I chose the birthday sentiment for this card and used Tuxedo Black Memento to stamp it.

Next, I stamped and die cut one tree to add a bit of dimension to the card. I used the Beautiful Trees Dies and the Beauty of Friendship stamp set for this.

Lastly, I added a couple of stars to draw attention to the sentiment, and also adhered the basic white panel to the inside of the card.

Thank you so much for spending time with me here. Contact Me if you have any questions.

Shop Now and take a look at all of our new products and current promotions. Please use the HOST CODE sitting in the right sidebar if you did not earn your own rewards.

Subscribe to Paper Pumpkin and keep your monthly cost below $25! Join Me and become my newest team member.

Either way, please share, like, pin, tweet, or comment. Do not forget to FOLLOW and SUBSCRIBE to my blog.

HAPPY STAMPING!

Tuesday, January 11, 2022

Summer Cottage

Did you know that you can completely change the look and feel of a card simply by changing the medium that you choose for adding color? You can even get wild and choose various mediums on the same card. For example, you might want to use watercolors and a few markers to add color to a large image. Using a sponge to add color will yield a different look than a watercolor wash. There is no right or wrong in creating. The main thing is to have fun and relax. What do you think? 


Stamps:
   Cozy Cottage

Paper:
   Cajun Craze A-2
   Basic Black 5-3/8 x 4-1/8
   Basic White 5-1/4 x 4 (2)

Ink:
   Archival Basic Black
   Balmy Blue
   Call Me Clover
   Pineapple Punch

Markers:
   Various - Personal Choice

Technique:
   Sponging
   Brayer

Accessories:
   Sponge Brayer
   Chalk Marker
   Adhesive

First, I used a sponge brayer to add color to the background. I used Balmy Blue at the top, followed by Pineapple Punch in the middle, and Call Me Clover at the bottom.

I then stamped my image, a few birds, and the sentiment using Archival Basic Black.

I then proceeded to color my cabin using various markers.

I used a white chalk marker on the windows, and I grabbed the white and gray markers for the stones on the walkway. 

Thank you so much for stopping by here and taking a quick look-see. If you have any questions or need my assistance, Contact Me.

Shop Now and take a look at all of our new products and current promotions. Please use the HOST CODE sitting in the right sidebar if you did not earn your own rewards.

If you want to craft, but keep your costs below $25 a month, check out Paper Pumpkin. It just might be what you are looking for at the moment.

Join Me and become the newest member of my team. Remember there are no hidden agendas or penalties for giving it a go. Don't pass this opportunity to save.

You've come this far, so please share, like, pin, tweet, or comment. I appreciate your time and efforts. Let me know your thoughts and leave all of your questions behind. Do not forget to FOLLOW and SUBSCRIBE to my blog.

HAPPY STAMPING!

Monday, January 10, 2022

Charlie

In today's technological world, penmanship is no longer valued. Many do not even know how to read or write in cursive. Even signatures are done electronically. Yet, some of my most valued mementos are bits of handwritten letters, journals, and recipes from those who are no longer with us. Of course, since paper will not last forever, I have digitally recorded (photographed) them all to share with the rest of the clan. Still, there is nothing like the original. So, here is a card to record my grandson's handwriting and his thoughts. What do you think? 


Stamps:
   Sophisticated Serifs
   I Love Soccer

Paper:
   Very Vanilla A-2, 5-1/4 x 4 (Inside)

Ink:
   Archival Basic Black

Technique:
   CAS

Accessories:
   Happy Haunting Washi Tape
   Adhesive

First, I stamped the large M in the center of the card.

I then stamped the C on the upper-left corner of the M, followed by the W on the lower-right corner of the M.

Next, I stamped a soccer ball on opposite corners to even out the stamping.

Lastly, I added some black and white washi tape to balance out the card. I also added the Very Vanilla panel to the inside of the card. This panel is optional, but I like to add it as a finishing touch.

Another idea for this card is to include it on a scrapbook page and have the scrapbooker or a parent journal about the child. 

Thank you so much for stopping by here and spending a few minutes of your day with me. I appreciate your time. Contact Me if you have any questions, need a demonstrator, or just want to stamp or share ideas.

Shop Now and enjoy browsing products and promotions. I have a HOST CODE in the right sidebar in case you did not earn your own rewards.

Do not miss the opportunity to Join Me and become the newest member of my team.

Paper Pumpkin should not be ignored. I enjoy putting my kit together monthly.

Take a few more minutes and share, like, pin, tweet, or comment. I would love to see what you really think. Do not forget to FOLLOW and SUBSCRIBE to my blog.

HAPPY STAMPING!

Sunday, January 9, 2022

Floral Note

I do like the idea of making a card in a particular shape. Using die cuts makes the whole process quite easy. You only need to remember to keep one end intact in order to open it. What do you think? 


Stamps:
  Flourishing Phrases

Paper:
  Daffodil Delight 5 x 11 scored @ 5-1/2, 2-1/4 Sq.
  All Abloom DSP 4-1/2 Sq.

Ink:
  Archival Basic Black

Technique:
  Die Cutting

Accessories:
  Floral Frames Collection Dies
  2015-2017 In-Color Blossom Collection
  Basic Rhinestone Jewels
  Basic Pearl Jewels
  Dimensionals
  Glue Dots
  Adhesive

Die cut the card base with one of the larger dies from the Floral Frames Collection Dies. Note that the left edge is uncut and folded. I just made sure the die was past that edge so it would not cut it. You may have to pass your card a couple of times through your machine because you are cutting through two sheets. 

Next, I cut the DSP, using a smaller die cut from the collection. I adhered this piece onto the card front.

I then stamped and die cut the center of the flower. I attached it, using dimensionals.

I added a flower embellishment with a glue dot.

Lastly, I added a few rhinestones and pearls. You can die cut a white panel for the inside of the card if you wish. The Daffodil Delight is light enough to write on it. The choice is yours.

Thank you so much for dropping by here. Contact Me if you have any questions.

Click on all of the tabs above and explore products, promotions, and opportunities.

Please take the time to share, like, pin, tweet, or comment. Do not forget to FOLLOW and SUBSCRIBE to my blog.

HAPPY STAMPING!

Saturday, January 8, 2022

The Woods

Gel press printing yields a unique and sometimes surprising print. This is a print that was more than halfway to the trash. It was dark, splotchy, and plain ugly. Still, I hate to throw away anything. So, I held onto it. Lo and behold, I decided to stamp trees on it in order to meet a sunrise or sunset challenge. I think it worked. What are your thoughts? 


Stamps:
   Wonderland

Paper:
   Baja Breeze A-2
   Basic White 5-3/8 x 4-1/8, 5-1/4 x 4 (2)

Ink:
   Archival Basic Black

Acrylic Paint:
   Blue
   Orange

Technique:
   Gel Press Printing

Accessories:
   Gel Press
   Brayer 
   Adhesive

First, I added acrylic paint to my gel plate. I used a hard brayer to spread the paint and then pressed a white panel onto it. I then set it aside to dry. This print was sitting in my stash for months. It did seem to brighten a bit over time.

I then took the print and stamped trees from the Wonderland stamp set. 

I adhered the print onto a Basic White panel and then onto a Baja Breeze card front.

The other Basic White panel was adhered to the inside of the card.

Thank you so much for taking the time to stop and glance at my work. If you have any questions or suggestions, please Contact Me. I do appreciate your time.

If you need any supplies, or you are curious to know just how much these products cost, click on Shop Now and satisfy your curiosity. A HOST CODE is available for you to use in case you did not earn your own rewards.

Do you want the best value for your buck? Join Me and reap all of the rewards. I will be more than happy to assist you. Check it out and note that there are no hidden agendas.

Wait! Don't leave. If you want to try it and see, then subscribe to Paper Pumpkin. You will receive a kit with everything you need to create a project. Check out the Kit Collection for more choices.

I would love for you to take a minute to share, like, pin, tweet, or comment. Please FOLLOW and SUBSCRIBE to my blog. Let me know what you think below in the comments.

HAPPY STAMPING!