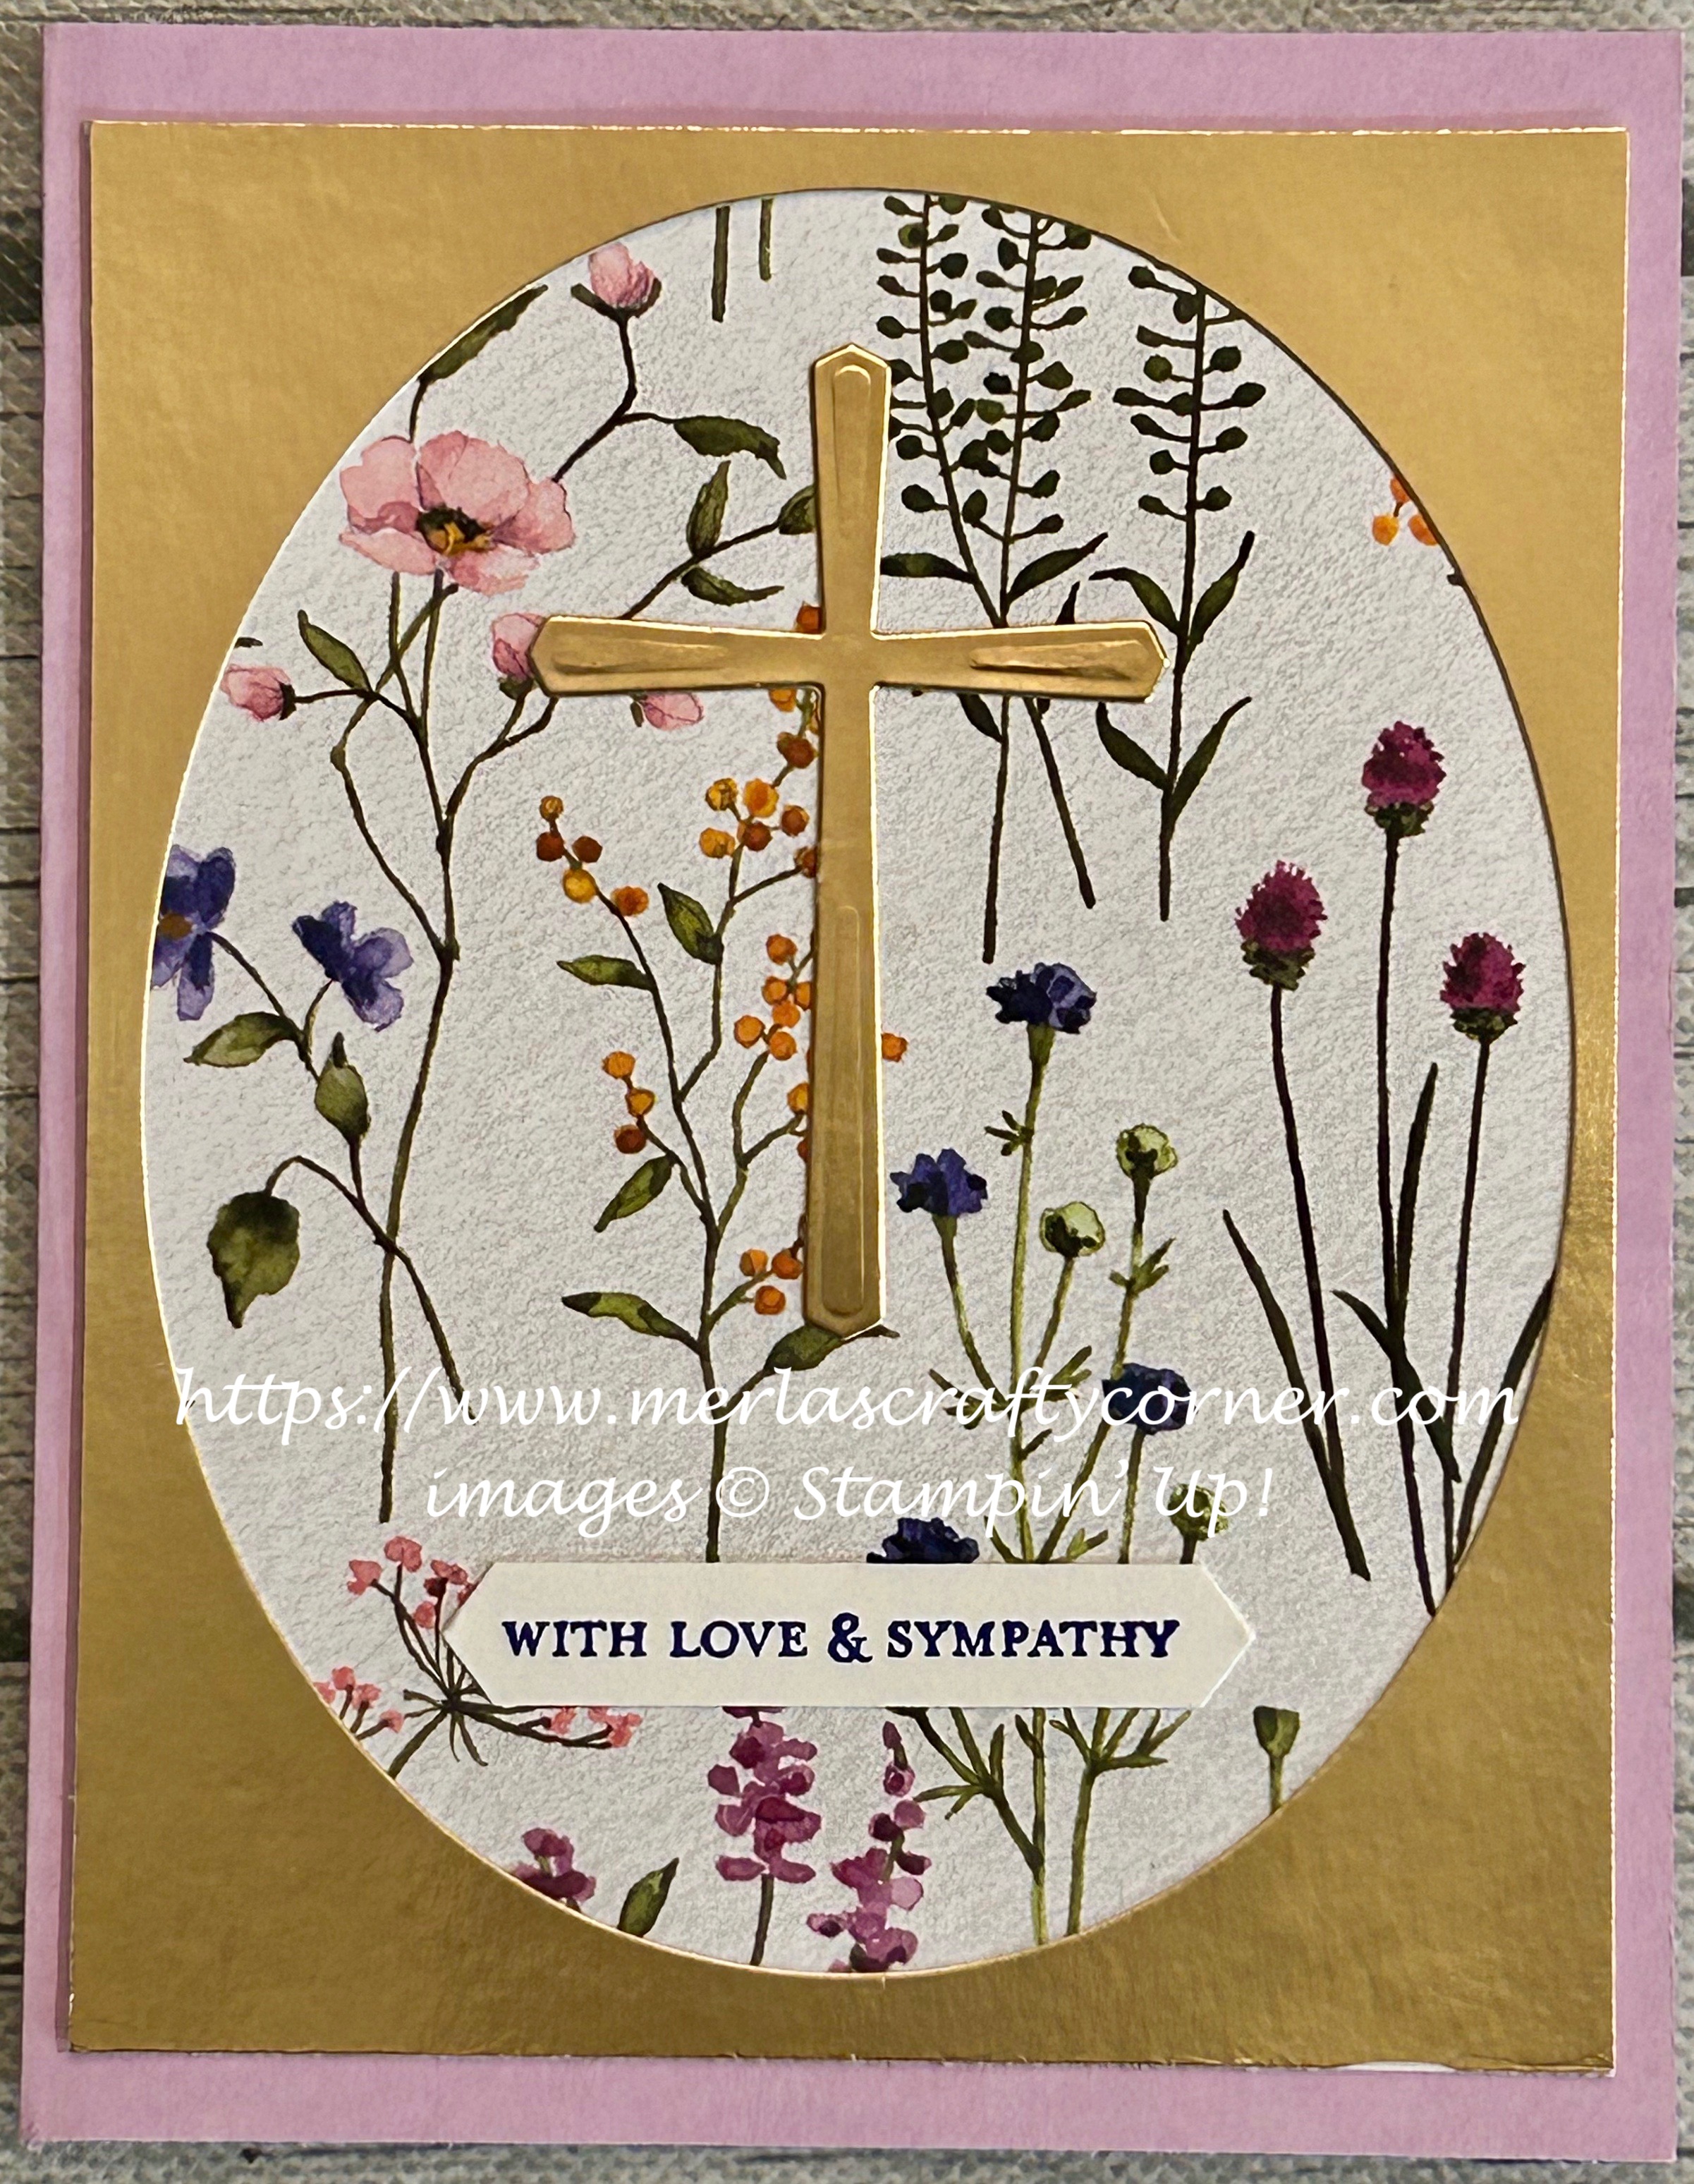
Monday, May 29, 2023

Fernly Thank You

I like to use those extra 1/4" left-over strips as accents on my card. What do you think? 


Stamps:
   Forever Fern
   Abstract Impressions

Paper:
   Pear Pizzazz A-2
   Forever Greenery 5-1/4 x 4
   Basic White 2-1/4" Circle, 5-1/4 x 4 (Inside)
   Pretty Peacock 1/4 x 4-1/4

Ink:
   Pear Pizzazz
   Pretty Peacock

Technique:
   Punching

Accessories:
   2-1/4" Circle Punch
   Basic Rhinestone Jewels
   Adhesive

First, I stamped the leaf image, using Pear Pizzazz ink, on Basic White card-stock.

I then stamped the sentiment with Pretty Peacock ink and punched it out, using the 2-1/4" circle punch.

Next, I adhered it to the DSP panel and then onto the Pear Pizzazz card front.

I then adhered the 1/4" strip of Pretty Peacock across the card front and added a few rhinestones.

Lastly, I adhered the Basic White panel to the inside of the card.

Thanks so much for reading through my blog today. Contact Me if I can answer anything for you, or if you would like to buy any of my cards.

If you would like to buy your own products and make your own cards, click on Shop Now and browse current merchandise. I have placed a HOST CODE for you to use if you do not earn any rewards on your own. It is located in the right sidebar.

Our monthly subscription to Paper Pumpkin is affordable and flexible. The cost is less than $25 monthly. Check out the Kits Collection for more options at varying prices.

Join Me and become part of a team. Check out the benefits and decide if it is for you.

Please share, like, pin, tweet, or comment. Don't forget to FOLLOW and SUBSCRIBE to my blog.

HAPPY STAMPING!

Sunday, May 28, 2023

Ageless Owl

When stamping on a sleek or glossy paper, you have to allow time for the ink to dry before continuing to color or stamp. This beautiful printed paper is very sleek and quite striking. I decided to stamp a birthday owl right on the branch. What do you think?


Ageless Owl


Stamps:
   Adorable Owls 

Paper:
   Basic Gray A-2
   Papers Best Real Tree DSP 5-1/4 x 4
   Basic White 5-1/4 x 4 (Inside)

Ink:
   Tuxedo Black Memento

Markers:
   Basic Gray 
   Crumb Cake 
   Pacific Point 
   Pumpkin Pie 
   Real Red 
   Smoky Slate

Technique:
   Coloring

Accessories:
   Googlie Eyes
   Glue Dots
   Adhesive

First, I stamped the owl on the branch, and the sentiment above him.

I left the panel overnight to make sure it would be completely dry before I colored it.

The following day, I colored the image and adhered the panel to the Basic Gray card front.

The Basic White panel was added to the inside of the card.

I attached the googlie eyes, using glue dots.

Here is another card I made using the same products:

Ageless Owl Too

Note that the printed paper is NOT from Stampin' Up! 

Thank you so much for stopping by here. Please Contact Me if you have any questions regarding Stampin' Up!

Take a few moments and Shop Now or click on any of the headers above for more information.

Don't forget to share, like, pin, tweet, or comment. I would appreciate it if you chose to FOLLOW or SUBSCRIBE to my blog.

HAPPY STAMPING!

Saturday, May 27, 2023

Card-Again

This is such a fun way to say hello to someone, or to just send a quick note of some kind. This is sure to bring a smile to someone's face. Thoughts? 


Stamps:
   Forever Friendship

Paper:
   Delightful Dijon A-2
   Basic Black 5-3/8 x 4-1/8
   Warmth & Cheer DSP 5-1/4 x 4, 2-3/4" Circle
   Basic White 5-1/4 x 4 (Inside)
   Paper Pumpkin Tag Dec. 2019

Ink:
   Tuxedo Black Memento

Technique:
   Distressing

Accessories:
   Adhesive-Backed Snowflakes
   Distressing Tool
   Adhesive

First, I stamped the sweater image directly onto the center of a 2-3/4" circle of Warmth & Cheer DSP. 

I then stamped the sentiment on a left-over tag from the December, 2019 Paper Pumpkin kit.

Next, I distressed the edges of the DSP pieces.

I adhered the DSP panel onto the Basic Black matte and then onto the Delightful Dijon card front.

I then adhered the sentiment and the image to the front of the card, and added a few snowflakes.

Lastly, I adhered the Basic White panel to the inside of the card.

Thank you so very much for taking the time to stop and glance at my work. If you have any questions or suggestions, please Contact Me. I do appreciate your time.

If you need any supplies, or you are curious to know just how much these products cost, click on Shop Now and satisfy your curiosity. A HOST CODE is available for you to use in case you did not earn your own rewards. You can find it in the right sidebar.

Do you want the best value for your buck? Join Me and reap all of the rewards. I will be more than happy to assist you. Check it out and note that there are no hidden agendas. 

Wait! Don't leave. If you just want to try it and see, then subscribe to Paper Pumpkin. You will receive a kit with everything you need to create a project. Check out the Kit Collection for more choices.

I would love for you to take a minute to share, like, pin, tweet, or comment. Please FOLLOW and SUBSCRIBE to my blog. Let me know what you think below in the comments.

HAPPY STAMPING!

Friday, May 26, 2023

Birthday Cross

Don't throw away your negative or left-over pieces from your die cuts. This gold oval was a left-over piece from the Heirlooms Frames & Dies. I have held on to it for months, and finally decided to use it today. I think it is a perfect background for my Smoky Slate cross. Thoughts?


Stamps:
   Teeny Tiny Wishes

Paper:
   Smoky Slate A-2, 2 x 3
   Basic Black 5-3/8 x 4-1/8
   Best Year Ever DSP 1 x 5-1/4 (2)
   Simply Marbleous DSP 2 x 5-1/4
   Gold Foil Paper Oval
   Basic White 5-1/4 x 4 (2), 1/2 x 2-1/4 or Scrap

Ink:
   Gorgeous Grape

Technique:
   Die Cutting

Accessories:
   Cross of Hope Framelits
   Heirlooms Frames & Dies
   Stitched Shapes Framelits (Largest Oval)
   Classic Label Punch
   Basic Pearl Jewels
   Adhesive

First, I die cut the Smoky Slate Cross, using the Cross of Hope Framelits.

I then adhered it to a left-over Gold Foil Paper oval from my stash. It was the center from the Heirlooms Frames & Dies that I used on another card. If you do not have this die set, you can use the largest oval from the Stitched Shapes Framelits. 

Next, I stamped and punched out the sentiment, using Gorgeous Grape ink, the Classic Label Punch, and a scrap of Basic White card-stock.

I then assembled the card:

   I adhered the the two Crushed Curry strips of DSP and the Gorgeous Grape Simply Marbleous DSP onto a Basic White panel.
   This panel was then adhered to a Basic Black matte, and then onto the Smoky Slate card front.
   Next, I adhered the Gold Foil oval with the Smoky Slate Cross onto the upper-center of the card.
   I added the sentiment below it and adhered a pearl on each end of the sentiment.
   Lastly, I adhered the other Basic White panel to the inside of the card.

Thank you for checking out my blog. I so appreciate your time. Contact Me if you have any questions or concerns regarding Stampin' Up!

Are you curious about what is trending, the cost of materials and other products, or do you just feel like shopping? Click on Shop Now and have some fun.

Subscribe to Paper Pumpkin or check out the Kits Collection if you want to stay on a budget or just keep it all low-key.

Join Me and reap all of the benefits of becoming a part of the Stampin' Up! family. Check it out and gain the best value for your money.

Share, like, pin, tweet, or comment. Don't forget to FOLLOW and SUBSCRIBE to my blog.

HAPPY STAMPING!

Thursday, May 25, 2023

Thank You Nature

Use natural elements to express thanks. I decided to add some wooden elements to my card. I had some tiny flowers, a cross, and a leaf. I think they work well with the die cut wreath and golden cross. What do you think? 


Stamps:
   Nature's Prints

Paper:
   Coastal Cabana A-2
   Basic Black 5-3/8 x 4-1/8
   Pretty Prints DSP 5-1/4 x 4
   Shaded Spruce 4 x 4-1/4
   Basic White 5-1/4 x 4 (Inside)
   Gold Foil Paper Scraps

Ink:
   Shaded Spruce

Technique:
   Die Cutting

Accessories:
   Natural Prints Dies
   Cross of Hope Framelits
   In Good Taste Elements
   Basic Pearl Jewels
   Glue Dots
   Adhesive

First, I die cut my wreath, using Natural Prints Dies and a piece of Shaded Spruce card-stock.

I then took a scrap of Gold Foil and die cut a small cross, using Cross of Hope Framelits.

Next, I adhered the DSP panel to the Basic Black matte and then onto the Coastal Cabana card front.

I arranged the wreath and cross on my card front, and adhered them with some liquid adhesive.

I then loosely arranged the wooden elements on the card front. I stamped the sentiment in place, and then adhered the wooden elements, using glue dots.

Lastly, I added the small wooden cross in the center of the gold foil cross and adhered the Basic White panel to the inside of the card.

I am so excited that you stopped to read and check out my work. Thank you from the bottom of my heart. Contact Me and let me know if there is anything I can answer for you. 

Do you have some time to browse? You do not want to pass up the opportunity to shop some quality products and see what is trending. Shop Now and take a peek. If you decide to place an order, I have included a HOST CODE in the right sidebar if you do not earn any rewards on your own. Thanks in advance.

Are you undecided? Subscribe to Paper Pumpkin and give it a go. Let the products speak for themselves. The cost is less than $25 and you are completely in control. No small print for you to miss. Try it.

Join Me and gain the best value for your hard-earned money. Check it out now.

Share, like, pin, tweet, or comment. Come on, I dare you. Don't forget to FOLLOW and SUBSCRIBE to my blog.

HAPPY STAMPING!

Wednesday, May 24, 2023

His Love

As you savor that chocolate bunny, think of the reason you are celebrating Easter. Here is a clean and simple card to remind you of the true reason to celebrate. Thoughts?


Stamps:
   Rejoice in Him

Paper:
   Pool Party A-2
   Basic White 5-3/8 x 4-1/8, 5-1/4 x 4 (2)
   Texture Chic DSP 3/4 x 4 (2)
   Soft Succulent 2-1/2 x 1-1/2 

Ink:
   Pool Party
   Evening Evergreen
   Tuxedo Black Memento

Technique:
   Brushing/Sponging

Accessories:
   Brushes/Sponges
   Adhesive
   Dimensionals
   Paper Snips

First, I stamped the image of Jesus in the center of a Basic White panel, using Tuxedo Black Memento ink.

I then stamped the leaves, using Evening Evergreen ink.

Next, I brushed some Pool Party ink around the Jesus image, leaving white surrounding him. You can sponge the ink on with a sponge, if you do not have a brush. 

I then adhered a strip of Texture Chic DSP to the top and the bottom of the Basic White panel.

This was then adhered to the 5-3/8 x 4-1/8 Basic White matte, and then onto the Pool Party card front.

Next, I stamped the sentiment onto a piece of Soft Succulent card-stock, using Tuxedo Black Memento ink. Using my paper snips, I cut around the sentiment to get rid of any straight edge and to add a bit of interest to it. 

Lastly, I adhered the sentiment with dimensionals and added the other Basic White panel to the inside of the card.

Thank you for stopping to take a peek. Contact Me if you have any questions.

Click on Shop Now and browse through all things Stampin' Up! Start your wish list or order your favorites today. I included a HOST CODE for you to use if you like. Use it only if your product total is less than $150. You can find it in the right sidebar.

Join Me and get the best bang for your buck.

Do you want everything at your fingertips without having to look for it? Subscribe to Paper Pumpkin. Want more choices? Check out the Kit Collection.

One last thing, share, like, pin, tweet, and comment. Don't forget to FOLLOW and SUBSCRIBE to my blog. Okay, that was more than one thing.

HAPPY STAMPING!

Tuesday, May 23, 2023

Sympathy Prints

Sympathy cards are a must have on hand item. Unfortunately, the older we get, the more we need them. This one came together quite easily, since I let the paper do all of the work for me. With all of the different hues of blue, the gold cross really glows on this one. Thoughts?


Stamps:
   Something Fancy

Paper:
   Pacific Point A-2
   Starry Sky 5-3/8 x 4-1/8
   Sun Prints DSP 5-1/4 x 4
   Basic White 5-1/4 x 4 (Inside), 2-1/2 x 1-1/2
   Gold Foil Scrap 1-1/4 x 3/4

Ink:
   Starry Sky

Technique:
   Die Cutting

Accessories:
   Cross of Hope Framelits
   Something Fancy Dies
   Left-Over Paper Pumpkin Gold Thread
   2022-24 In-Color Matte Decorative Dots
   Dimensionals
   Adhesive

First, I stamped and die cut the sentiment, using Starry Sky ink on Basic White card-stock.

I then cut a matte for the sentiment using the next larger die cut. I used the center of the Starry Sky panel to die cut it, since it will be covered by the DSP panel. I adhered this die cut to the Basic White sentiment.

Next, I adhered the DSP panel to the Starry Sky matte and then onto the Pacific Point card front.

I then added a few dimensionals to the back of the sentiment panel and adhered some gold thread to it. I then attached this to the card front.

The gold die cut cross was added to the top of the card with some liquid adhesive.

Lastly, I added 3 matte decorative dots to the sentiment and adhered the Basic White panel to the inside of the card.

Thank you for taking the time to read this. I try my best to keep it short and sweet. Contact Me if you have questions or need anything Stampin' Up!

Shop Now and take a peek at quality products. There is a HOST CODE if your product total is less than $150. You do not have to use it, but I would appreciate it. It is located in the right sidebar.

Join Me and become part of my team. I will be as involved as you like. Check out the advantages.

Are you curious, but undecided? Subscribe to Paper Pumpkin and try it. The kit will include everything you need, and it won't break the bank. Check out the Kit Collection for more all-inclusive kit choices.

Please share, like, pin, tweet, or comment. I would love for you to FOLLOW and SUBSCRIBE to my blog.

HAPPY STAMPING!

Monday, May 22, 2023

Morning Cross

These beautiful magnolias are perfect for any occasion. What do you think?


Stamps:
   Good Morning Magnolia

Paper:
   Petal Pink A-2, 1" Circle
   Basic Black 5-3/8 x 4-1/8
   Magnolia Lane DSP 5-1/4 x 4
   Basic White 5-1/4 x 4 (Inside), Scrap
   Gold Foil Paper Scrap

Ink:
   StazOn Jet Black

Markers:
   Petal Pink
   Mossy Meadow
   Soft Suede

Technique:
   Die Cutting
   Punching

Accessories:
   Magnolia Memory Dies
   Cross of Hope Framelits
   1" Circle Punch
   Natural Finish Ribbon 6"
   Basic Pearl Jewels
   Fine Tip Glue Pen
   Glue Dots
   Dimensionals
   Adhesive
   Stampin' Seal+

First, I cut 6" of the Natural Finish Ribbon and stamped the sentiment using StazOn Jet Black ink. I set it aside to make sure it dried completely. (It dries very quickly, but I didn't want to take any chances.)

Next, I stamped and colored a magnolia, using markers. I then used the Magnolia Memory Dies to cut it. I set this aside next to the ribbon.

I then used a scrap of Gold Foil Paper to die cut a cross with the Cross of Hope Framelits. I actually used the frame around the die cut cross for this card. The solid gold frame, I used on another card.

To accent the cross and make sure it did not get lost among the magnolias, I punched a 1" circle of Petal Pink card-stock and adhered the cross frame, using the Fine Tip Glue Pen.

My next step was to assemble my card. 

I added a few glue dots to the back of the stamped Natural Finish Ribbon and adhered it to the bottom portion of my Magnolia Lane DSP. I added some Stampin' Seal+ to the back of the DSP panel and wrapped the rest of the ribbon to the back of it. I adhered this panel to the Basic Black matte with some liquid adhesive.

I then adhered the Petal Pink circle with the cross to the top portion of the panel and added the die cut magnolia next to the sentiment with some dimensionals.

I adhered this panel to the Petal Pink card front and added the Basic White panel to the inside of the card.

Lastly, I added a Basic Pearl Jewel to the Magnolia.

Thank you immensely for your time. I know how precious it can be. Please Contact Me if you need anything Stampin' Up! or if you have any questions.

Click on Shop Now and take a look at some quality products. Investing in your craft is a no-brainer. I have included a HOST CODE for those of you who enjoy ordering only one or two items. It is located in the right sidebar. Of course, if your product total is more than $150, enjoy your rewards.

Of course, the best value for your dollar is joining the Stampin' Up! family. Just click on Join Me and check out the benefits.

Let's not forget Paper Pumpkin. If you want to craft on the go, or you like to keep things small and low-key, check it out. The kit includes all you need.

Please take a minute or two to share, like, pin, tweet, or comment. Don't forget to FOLLOW and SUBSCRIBE to my blog.

HAPPY STAMPING!

Saturday, May 20, 2023

Crushed Sympathy

I like the simplicity of this card. Sometimes less is more. Thoughts? 


Stamps:
   Rose Wonder

Paper:
   Starry Sky A-2
   Crushed Curry 5-1/4 x 4-1/8
   Dainty Flowers DSP 5 x 4
   Basic White 5-1/4 x 4 (Inside)

Ink:
   Starry Sky

Technique:
   CAS

Accessories:
   Crushed Curry Baker's Twine 14" & 6"
   2022-24 Matte Decorative Dots
   Glue Dots
   Adhesive

First, I stamped the sentiment in the center of the printed wreath, which is in the center of the designer series paper.

I then took the 14" of twine and wrapped it around three of my fingers. I grabbed the center and held it between my fingers.

I then took the 6" of twine and wrapped it around the twine I was holding. I tied a double knot toward the back of the twine. I then spread all of the other loops of twine to fill it out. 

I then attached it to the bottom of the sentiment, using a glue dot. 

Next, I adhered some matte decorative dots to the top of the sentiment.

Lastly, I adhered the panels together: DSP onto the Crushed Curry and then onto the Starry Sky card front. The Basic White panel was adhered to the inside of the card.

Thank you so much for stopping by here. Contact Me if you have any questions.

Shop Now and buy your supplies to make your own cards. Place an order today for your favorites before they run out of stock.

Join Me and become my new team member. Enjoy the best savings and opportunity offered today!

Subscribe to Paper Pumpkin and craft monthly for under $25. Don't forget to take a look at the All-Inclusive Kits!

If you liked my card, please share, like, pin, tweet, or comment. I would love for you to FOLLOW and SUBSCRIBE to my blog. Let me know what you think in the comments below.

HAPPY STAMPING!