Showing posts with label Happiness. Show all posts

Monday, October 7, 2024

Cloudy Flowers

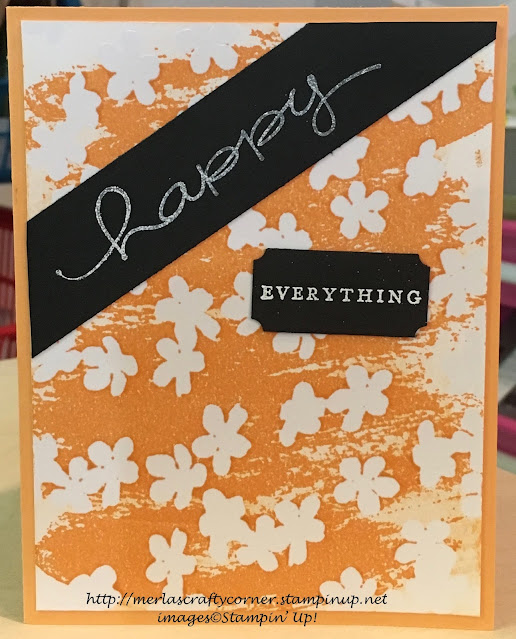
Blur your lines by stamping on watercolor paper and quickly misting the image with water. Let the colors run and blend into each other. Thoughts? 


Stamps:
   Flower Shop
   Apple Blossoms

Paper:
   Peekaboo Peach A-2
   Watercolor 5-1/4 x 4
   Basic White 5-1/4 x 4 (Inside)

Ink:
   Tuxedo Black Memento
   Berry Burst
   Lemon Lime Twist
   Peekaboo Peach

Technique:
   Watercolor

Accessories:
   Flower Brads
   Water Mister
   Adhesive

First, I stamped the flowers, using Berry Burst, Peekaboo Peach, and Lemon Lime Twist.

I quickly misted them with water and allowed the ink to spread and blur the lines.

I let the panel dry completely.

Next, I stamped the sentiment at the top of the panel, using Tuxedo Black Memento ink.

I then added some flower brads to the center of each of the flowers.

Next, I adhered the panel onto a Peekaboo Peach card front.

Lastly, I added a Basic White panel to the inside of the card.

Thank you so much for stopping by here and spending a few minutes of your day with me. I appreciate your time. Contact Me if you have any questions, need a demonstrator, or just want to stamp or share ideas.

Shop Now and enjoy browsing products and promotions. I have a HOST CODE in the right sidebar in case you did not earn your own rewards.

Do not miss the opportunity to Join Me and become the newest member of my team.

Paper Pumpkin should not be ignored. I enjoy putting my kit together monthly.

Take a few more minutes and share, like, pin, tweet, or comment. I would love to see what you really think. Do not forget to FOLLOW and SUBSCRIBE to my blog.

HAPPY STAMPING!

Tuesday, August 6, 2024

Happy Friend

Here are some die cut images that will complement any sentiment imaginable. Thoughts? 


Stamps:
   Winterly Tree Tops

Paper:
   Misty Moonlight A-2
   Basic Gray 5-3/8 x 3-7/8
   Basic White 4-1/4" Sq., 5-1/4 x 4 (Inside)
   Gray Granite 4 x 3/4 (I used Basic Gray, oops)

Ink:
   Tuxedo Black Memento

Watercolor Pencils:
   Balmy Blue
   Night of Navy
   Crushed Curry
   Cajun Craze
   Cherry Cobbler

Technique:
   Die Cutting

Accessories:
   Winterly Tree Tops Dies
   Mini Glue Dots
   Dimensionals
   Adhesive

First, I stamped and die cut the images, including the background frame. 

I then colored the bird and the branches, using watercolor pencils: Crushed Curry for the Bird and Cajun Craze for the accents on the bird, Cherry Cobbler for the berries on the branches, Balmy Blue for the open leaves on the branches and Night of Navy for the closed pointy leaves on the branches.

Next, I added the background frame to the card front, using dimensionals.

I then stamped and adhered the sentiment to the bottom left of the frame, leaving a bit of the bottom branches showing. I used dimensionals on the bottom of the sentiment to attach it. This allows me room to add the branches and the bird next.

Next, I added the branches to land behind the sentiment. I used dimensionals on the back of the branches.

I then added a glue dot to the front of the bird's feet and a dimensional to the back of his head and attached him to the back of the sentiment and over the leaves.

Lastly, I adhered a Basic White panel to the inside of the card.

I thank you so much for stopping by here and checking out my card today. I do hope you liked it. Contact Me if you need more information.

If you would like to Shop Now, Stampin' Up! is always offering something special, especially for online shoppers. There are items that are advertised Exclusively Online, so check it out. You don't want to miss out on these wonderful items.

The Kits Collection is always exciting. New Kits are introduced online and are available while supplies last. Prices vary, depending on the kit. You don't want to miss Paper Pumpkin. It is what I enjoy each month. Take a peek!

Join Me and cash in for the best deal available. No fine print to miss. Check it out and see if it may be for you.

Please take a few more minutes to share, like, pin, tweet, or comment. Don't forget to FOLLOW and SUBSCRIBE to my blog.

HAPPY STAMPING!

Friday, May 10, 2024

Happy for You

I know this came out a bit messy, but I like it anyway. I think it adds character. What do you think? 


Stamps:
   Happy Celebrations

Paper:
   Bermuda Bay A-2
   Cherry On Top DSP 1 x 5 (2)
   Basic White 2-7/8 x 5, 5-1/4 x 4 (Inside)

Ink:
   Tuxedo Black Memento
   Bermuda Bay
   Watermelon Wonder
   Cucumber Crush

Technique:
   Dry Embossing

Accessories:
   Celebrations Duo Embossing Folder
   Basic Rhinestone Jewels
   Dimensionals
   Adhesive

First, I chose colors that were found on the Cherry On Top DSP.

I then stamped the color directly onto the embossing folder.

Next, I carefully placed the Basic White panel inside the folder and embossed it. 

I then added the rest of the sentiment, using Tuxedo Black Memento ink.

Next, I adhered the DSP strips to the top and bottom of the Bermuda Bay card front.

I then attached the embossed image to the center of the card front, using dimensionals.

Lastly, I added a few Basic Rhinestone Jewels and adhered a Basic White panel to the inside of the card.

Thank you kindly for stopping by here. Contact Me if I can be of service.

Take a quick look and Shop Now for new products and current sales. There is a HOST CODE in the right sidebar for your use, if you like.

If you just want a quick crafty fix, check out the Kits Collection or get a consistent dose with a Paper Pumpkin subscription.

Join Me and create a new friendship. We already have crafting in common!

Please take a few minutes to share, like, pin, tweet, or comment. Plus, you don't want to forget to FOLLOW and SUBSCRIBE to my blog.

HAPPY STAMPING!

Sunday, February 18, 2024

Happy Abroad

Imagine a nice cool breeze as you sit and enjoy a delicious cup of coffee, tea, or chocolate right outside your favorite cafe. The aroma of freshly baked bread is in the air. You can't resist the urge to inhale and sigh as you sit back in your chair relaxed and happy. Here is a card that brings those images to mind. Thoughts? 


Stamps:
   Mediterranean Moments

Paper:
   Very Vanilla A-2
   Playful Palette DSP 3-1/2 x 4-1/4
   Watercolor Paper 2-1/4 x 2-7/8
   Basic Black 2-1/2 x 3-1/8, Scraps

Ink:
   Jet Black StazOn
   Watercolor Pencils
   Blender Pen

Technique:
   Watercoloring
   Die Cutting

Accessories:
   Hello You Thinlits 
   Dimensionals
   Fine Tip Glue Pen
   Snail Adhesive

First, I stamped and colored my image on watercolor paper, using watercolor pencils and a blender pen. Choose your favorite colors on your image. I colored the image completely with watercolor pencils and then went over it with a blender pen. Make sure to clean off the pen between colors. 

I then adhered the image to a Basic Black matte.

Next, I adhered the Playful Palette DSP to the top of the very vanilla card front and added the image, using dimensionals.

I then die cut the sentiment, using the Hello You Thinlits, and adhered it to the bottom of the Very Vanilla card front, using the Fine Tip Glue Pen.

Lastly, I adhered a Very Vanilla panel to the inside of the card.

Thanks for stopping by and taking a quick peek. Contact Me for more information on my cards or Stampin' Up!

Click on the headers above and satisfy your curiosity.

Please share, like, pin, tweet, or comment. Please take the time to FOLLOW or SUBSCRIBE to my blog.

HAPPY STAMPING!

Tuesday, August 29, 2023

Relaxing Chairs

Relax and mellow out on one of these chairs. Sit by the pool or on a sandy beach and enjoy the cool breeze. When was the last time you sat down and relaxed? 


Stamps:
   Colorful Seasons 

Paper:
   Pixie Pink A-2
   Basic White 5-1/4 x 4 (2)
   Night of Navy Scrap

Ink:
   Soft Suede
   Real Red
   Pacific Point
   Orchid Opulence

Technique:
   Watercolor
   Die Cutting

Accessories:
   Seasonal Layers Thinlits Dies
   Adhesive

First, I watercolored a Basic White panel using Pacific Point and Orchid Opulence. I set it aside for a bit to dry.

I then die cut a chair out of a scrap of Night of Navy.

I took the watercolored panel and laid the blue chair on the left side, while I stamped the sentiment above it, using Real Red.

I then stamped the frame of the chair on the right side, using Soft Suede. I stamped the inside of the chair with Real Red.

Next, I adhered the die cut chair to the watercolored panel.

I then adhered the panel onto the Pixie Pink card front and adhered the other Basic White panel to the inside of the card.

Thank you so much for stopping by here and taking a quick look-see. If you have any questions or need my assistance, Contact Me.

Shop Now and take a look at all of our new products and current promotions. Please use the HOST CODE sitting in the right sidebar if you did not earn your own rewards.

If you want to craft, but keep your costs below $25 a month, check out Paper Pumpkin. It just might be what you are looking for at the moment.

Join Me and become the newest member of my team. Remember there are no hidden agendas or penalties for giving it a go. Don't pass this opportunity to save.

You've come this far, so please share, like, pin, tweet, or comment. I appreciate your time and efforts. Let me know your thoughts and leave all of your questions behind. Do not forget to FOLLOW and SUBSCRIBE to my blog.

HAPPY STAMPING!

Monday, January 3, 2022

Happy Everything

The watercolor wash background stamp works great on this designer series paper. Of course, if you do not own this stamp, you can easily apply your own watercolor brush strokes on this embossed resist paper. Thoughts? 


Stamps:
   Happy Everything
   Watercolor Wash

Paper:
   Peekaboo Peach A-2
   Irresistibly Yours DSP 5-1/4 x 4
   Basic Black 5-1/4 x 1, 1 x 1-3/4
   Basic White 5-1/4 x 4 (Inside)

Ink:
   Peekaboo Peach
   Whisper White Craft

Technique:
   Heat Embossing
   Punching

Accessories:
   White Embossing Powder
   Embossing Buddy
   Ticket Duo Builder Punch
   Paper Snips
   Adhesive

First, I stamped the embossed resist designer series paper, using Peekaboo Peach. I wiped the paper with a paper towel after stamping to pick up any ink left on the embossed resist parts.

Next, I wiped the Basic Black pieces with my embossing buddy. I then stamped them using the Whisper White Craft ink. I added the White Embossing Powder, shook off the excess, and then heat set them. 

Once they cooled, I punched out "EVERYTHING."

I adhered the happy to the top and angled it. I trimmed it down, using my paper snips.

Lastly, I adhered "EVERYTHING," and added the Basic White panel to the inside.

Thank you immensely for your time. I know how precious it can be. Please Contact Me if you need anything Stampin' Up! or if you have any questions.

Click on Shop Now and take a look at some quality products. Investing in your craft is a no-brainer. I have included a HOST CODE for those of you who enjoy ordering only one or two items. It is located in the right sidebar. Of course, if your product total is more than $150, enjoy your rewards.

Of course, the best value for your dollar is joining the Stampin' Up! family. Just click on Join Me and check out the benefits.

Let's not forget Paper Pumpkin. If you want to craft on the go or you like to keep things small and low-key, check it out. The kit includes all you need.

Please take a minute or two to share, like, pin, tweet, or comment. Don't forget to FOLLOW and SUBSCRIBE to my blog.

HAPPY STAMPING!

Thursday, October 14, 2021

Happy Summer

Who would like to take this kitty's place and have a seat? He sure does look well rested. Of course, that is his job. Sleep and rest. Thoughts?


Stamps:
   Mediterranean Moments
   So Very
   Season by Season

Paper:
   Blush Blossom A-2
   Watercolor 5-1/4 x 4
   Basic White 5-1/4 x 4 (Inside)

Ink:
   Tuxedo Black Memento
   Melon Mambo
   Emerald Envy

Markers:
   Personal Choice

Technique:
   Watercolor

Accessories:
   Aqua Painter
   Adhesive

I grabbed a watercolored panel that I had on hand. I used light pinks and blues on the background. Pink Pirouette? Sky Blue? These are usually my favorites.

I stamped my image in the center using Tuxedo Black Memento. 

The "Happy" was stamped using Melon Mambo, and the "Summer" was stamped using Emerald Envy.

I then colored in my image using various markers. Choose your own color scheme or use your favorites.

Lastly, I adhered the watercolored panel onto the Blush Blossom card front, and the Basic White panel onto the inside of the card.

Thank you so very much for being here. I appreciate you taking the time to glance at my work. Please Contact Me if I can be of service.

Are you interested in Stampin' Up! products to make your own cards? Shop Now and have a look-see. I placed a HOST CODE for you to use if you do not earn your own rewards. It is sitting in the right sidebar.

Do you like surprises? Subscribe to our Paper Pumpkin and receive all you need to complete the monthly project. The cost is less than $25. Check it out.

Join Me and become privy to everything Stampin' Up! Receive a discount on all of your personal orders. Personally, I love SALES!

Please share, like, pin, tweet, or comment. Do not forget to FOLLOW and SUBSCRIBE to my blog.

HAPPY STAMPING!

Monday, September 6, 2021

Be You

I like how the variations of color cause this designer series paper (DSP) to appear vintage or worn and old. The hardware blends right in too. I probably should have toned down the white a bit by sponging. What do you think?


Stamps:
   Rooted in Nature

Paper:
   Groovy Guava A-2
   Afternoon Tea DSP 2-3/8 x 3-1/4 (2)
   Chocolate Chip2-1/2 x 3-3/8 (2)
   Whisper White 1-1/4" Sq., 5-1/4 x 4 (Inside)

Ink:
   Chocolate Chip
   Groovy Guava

Technique:
   Punching

Accessories:
   1-1/4" Square Punch
   Antique Brass Hodgepodge Hardware
   Fast Fuse
   Dimensionals
   Adhesive

First, I cut the two panels of DSP and adhered them to two panels of Chocolate Chip.

Next, I stamped and punched out the sentiment, using Chocolate Chip ink and the 1-1/4" square punch. 

I added a clip on each of the DSP panels as shown above. I then adhered the top left panel using Fast Fuse. The bottom panel was added using dimensionals.

I adhered the sentiment to the top left corner of the bottom panel.

Lastly, I stamped a leaf on the top-right and bottom-left of the card base. I also adhered the Whisper White panel to the inside of the card.

Thank you so much for stopping by here and spending a few minutes of your day with me. I appreciate your time. Contact Me if you have any questions, need a demonstrator, or just want to stamp or share ideas.

Shop Now and enjoy browsing products and promotions. I have a HOST CODE in the right sidebar in case you did not earn your own rewards.

Do not miss the opportunity to Join Me and become the newest member of my team.

Paper Pumpkin should not be ignored. I enjoy putting my kit together monthly.

Take a few more minutes and share, like, pin, tweet, or comment. I would love to see what you really think. Do not forget to FOLLOW and SUBSCRIBE to my blog.

HAPPY STAMPING!

Thursday, June 24, 2021

Just Be Happy

All of us possess the ability to JUST BE HAPPY. Feelings are under our control. We choose to feel happy, sad, confident, confused, bewildered, overwhelmed, etc. All feelings are valid and should be expressed, but 10 out of 10 times, the choice is ours. So, JUST BE HAPPY. Thoughts?


Stamps:
   Crazy About You

Paper:
   Only Orange A-2
   Irresistibly Yours DSP 5-1/4 x 4
   Whisper White Scraps, 5-1/4 x 4 (Inside)

Ink:
   Daffodil Delight
   Garden Green
   Only Orange
   Real Red

Technique:
   Watercolor
   Sponging
   Punching

Accessories:
   Washi Label Punch
   Flower Medallion Punch
   Aqua Painter
   Paper Towel
   Basic Pearl Jewels
   Sponge
   Dimensionals
   Adhesive

First, I watercolored my embossed resist Irresistibly Yours DSP. Daffodil Delight on the top, Only Orange in the middle and Real Red on the bottom.

I let it sit to air dry for a few minutes. Meanwhile, I stamped my flower medallion and sentiment on scraps of Whisper White. Both were stamped using Real Red ink.

I then wiped my background down with a paper towel to remove the ink off of the embossed stripes. I stamped some leaves using Garden Green and then wiped off the excess.

I punched out my flower with the Flower Medallion punch and adhered it using dimensionals.

Next, I punched my sentiment out using the Washi Label Punch and sponged the edges with Daffodil Delight. This was also attached using dimensionals.

Lastly, I added a pearl to the center of the flower and adhered the Whisper White panel to the inside of the card.

Thank you so very much for being here. I appreciate you taking the time to glance at my work. Please Contact Me if I can be of service.

Are you interested in Stampin' Up! products to make your own cards? Shop Now and have a look-see. I placed a HOST CODE for you to use if you do not earn your own rewards. It is sitting in the right sidebar.

Do you like surprises? Subscribe to our Paper Pumpkin and receive all you need to complete the monthly project. The cost is less than $25. Check it out.

Join Me and become privy to everything Stampin' Up! Receive a discount on all of your personal orders. Personally, I love SALES!

Please share, like, pin, tweet, or comment. Do not forget to FOLLOW and SUBSCRIBE to my blog.

HAPPY STAMPING!