Showing posts with label Masculine. Show all posts

Wednesday, June 4, 2025

Wonder

Here is another designer series paper panel that can be used with any sentiment. Thoughts? 


Stamps:
   Rose Wonder

Paper:
   Boho Blue A-2
   Basic Black 5-3/8 x 4-1/8
   Basic White 5-1/4 x 4 (Inside)
   Thoughtful Journey 6x6 DSP 5-1/4 x 4

Ink:
   Tuxedo Black Memento

Technique:
   CAS

Accessories:
   Adhesive

First, I stamped the bible verse on the top-center of the Thoughtful Journey DSP panel, using Tuxedo Black Memento ink.

Next, I adhered the panel onto a Basic Black matte and then onto the Boho Blue card front.

Lastly, I added a Basic White panel to the inside of the card.

You can easily add any embellishments that you wish: jewels, ribbon, die cuts, etc.. I chose to let the verse speak for itself.

Thank you so much for spending time with me here. Contact Me if you have any questions. 

Shop Now and take a look at all of our new products and current promotions.

Subscribe to Paper Pumpkin and keep your monthly cost low! Join Me and become my newest team member.

Either way, please share, like, pin, tweet, or comment. Do not forget to FOLLOW and SUBSCRIBE to my blog.

HAPPY STAMPING!

Thursday, April 17, 2025

Cloudy Thanks

The various blobs of color on the designer series paper reminded me of clouds. What do you think? 


Stamps:
   Greetings by TPC Studio

Paper:
   Just Jade A-2
   Basic Black 5-3/8 x 4-1/8
   Basic White 5-1/4 x 4 (2)
   Butterfly Dijou 6x6 DSP 5-1/4 x 2 

Ink:
   Tuxedo Black Memento

Technique:
   CAS

Accessories:
   2020-2022 In-Color Enamel Dots
   Adhesive

First, I adhered a strip of Butterfly Dijou DSP to the left side of a Basic White panel.

I then stamped my sentiment several times on the right side of the Basic White panel, using Tuxedo Black Memento ink. 

Next, I adhered the panel onto a Basic Black matte and then adhered it to the Just Jade card front.

I then added some enamel dots between the sentiments as shown above.

Lastly, I adhered a Basic White panel to the inside of the card.

Thank you for being here and taking the time to look at my blog entry. Contact Me if you need anything related to Stampin' Up!

If you would like to Shop Now, you can check out all that is new, current, and on-sale!

Notice that we offer a monthly subscription called Paper Pumpkin. Check it out and see if it is for you. The Kits Collection also offers a variety of kits at varying prices.

In order to get the most value for your dollar, you will want to Join Me and become part of my team. Click on the link and see if you are interested.

I would love for you to take a few minutes and share, like, pin, tweet, or comment. Don't forget to FOLLOW and SUBSCRIBE to my blog.

HAPPY STAMPING!

Monday, April 7, 2025

Star Bright

Although I did not use a stamp set, everything on this card coordinates with the "Christmas Gleaming" stamp set. I do my best to use all of my supplies, regardless if they are current or not. If you do not own these products, substitute your own and simply use the layout or colors as inspiration. Thoughts? 


Stamps:
   None

Paper:
   Very Vanilla A-2, 5-1/4 x 4 (Inside)
   Brightly Gleaming DSP 5-1/4 x 4

Ink:
   None

Technique:
   CAS

Accessories:
   Brightly Gleaming Foil Elements
   Classic Weave Ribbon (8")
   Clear Faceted Gems
   Glue Dots
   Stampin' Seal+
   Adhesive

First, I adhered the Classic Weave Ribbon to the bottom of the DSP panel. I used a few glue dots on the back of the ribbon to hold it in place and then adhered it securely on the back of the panel. Note: I cut the ribbon so the sentiment was centered on the bottom.

I then adhered the DSP panel onto the Very Vanilla card front. 

Next, I arranged and attached the foil elements to the front of the card. 

I then added a Clear Faceted Gem to the center of the star.

Lastly, I added a Very Vanilla panel to the inside of the card. This step is optional, but I think it adds strength and a bit more elegance to the card.

Thank you immensely for your time. I know how precious it can be. Please Contact Me if you need anything Stampin' Up! or if you have any questions.

Click on Shop Now and take a look at some quality products. Investing in your craft is a no-brainer.

Of course, the best value for your dollar is joining the Stampin' Up! family. Just click on Join Me and check out the benefits.

Let's not forget Paper Pumpkin. If you want to craft on the go, or you like to keep things small and low-key, check it out. The kit includes all you need.

Please take a minute or two to share, like, pin, tweet, or comment. Don't forget to FOLLOW and SUBSCRIBE to my blog.

HAPPY STAMPING!

Thursday, April 3, 2025

Big Faith

This small image and sentiment together radiate a big and powerful meaning. I chose to keep the card front clean and simple. Thoughts?


Stamps:
   Faith Collection

Paper:
   Lost Lagoon A-2
   Early Espresso 5-3/8 x 4-1/8
   Basic White 5-1/4 x 4 (2)
   Crumb Cake 2-1/4 x 1-3/4
   Gold Foil 1-3/8 x 1

Ink:
   Crumb Cake
   Early Espresso
   Lost Lagoon

Technique:
   Die Cutting
   CAS

Accessories:
   Faith Collection Dies
   Cross of Hope Dies
   Dimensionals
   Adhesive

First, I stamped the background leaves in the center of a Basic White panel, using Lost Lagoon ink.

I then added the sentiment below it, using Early Espresso ink.

Next, I stamped and die cut a cross, using Early Espresso ink on a piece of Crumb Cake cardstock. I die cut it, using the Faith Collection Dies.

I then attached this cross to the center of the card, using dimensionals.

Next, I die cut a small gold cross, using gold foil and the Cross of Hope Dies. 

I adhered the gold cross to the center of the Crumb Cake cross.

Next, I added some rays on each side of the sentiment as shown above.

I then adhered the Basic White panel onto an Early Espresso matte and then onto the Lost Lagoon card front.

Lastly, I adhered a Basic White panel to the inside of the card.

Thank you so very much for being here. I appreciate you taking the time to glance at my work. Please Contact Me if I can be of service.

Are you interested in Stampin' Up! products to make your own cards? Shop Now and have a look-see. 

Do you like surprises? Subscribe to our Paper Pumpkin and receive all you need to complete the monthly project. Check it out. 

Join Me and become privy to everything Stampin' Up! Receive a discount on all of your personal orders. Personally, I love SALES!

Please share, like, pin, tweet, or comment. Do not forget to FOLLOW and SUBSCRIBE to my blog.

Here is a link to the products used above: Big Faith

HAPPY STAMPING!

Saturday, December 14, 2024

Christmas Forest

This is a card that can easily be duplicated. The background designer series paper can also be substituted with any Christmas background, just use what you have on hand. Thoughts? 


Stamps:
   Evergreen Elegance

Paper:
   Cherry Cobbler A-2
   Evening Evergreen 5-3/8 x 4-1/8, 4-5/8 x 3-3/8
   Tidings of Christmas DSP 5-1/4 x 4
   Basic White 4-1/2 x 3-1/4, 5-1/4 x 4 (Inside)

Ink:
   Evening Evergreen
   Cherry Cobbler

Technique:
   Stamp-Off

Accessories:
   Red Rhinestone Basic Jewels
   Dimensionals
   Adhesive

First, I stamped the sentiment, using Cherry Cobbler on the top right of the smaller Basic White panel.

I then stamped the pine trees, using Evening Evergreen and a stamp-off technique. This simply means that I stamped twice before re-inking my stamp. I started with the left side of the panel. I inked the stamp and stamped on the left and then to the right of the same image. I then inked my stamped and repeated the steps. I brought the stamp down a bit each time until the panel was filled.

Next, I adhered the panel onto an Evening Evergreen matte.

I then adhered the Tidings of Christmas DSP onto an Evening Evergreen matte and then onto the Cherry Cobbler card front.

Next, I added the stamped panel, using dimensionals.

Lastly, I added a few red rhinestone jewels and adhered a Basic White panel to the inside of the card.

Thank you for stopping by here. Contact Me if you have questions or need anything Stampin' Up! related.

If you have a few minutes, Shop Now, and take a look at quality products and deals that may be happening today! There is a HOST CODE in the right sidebar, if you are interested.

If you like kits at your fingertips, then check out Paper Pumpkin and/or the Kits Collection. You will not regret it.

Want some company? Join Me and become a member of my team. I can't wait to meet you.

Please share, like, pin, tweet, or comment. Make sure you FOLLOW and SUBSCRIBE to my blog. This way you won't miss a thing! 

HAPPY STAMPING!

Monday, October 28, 2024

Metallic Birthday

I followed a tutorial for this technique. Although I found it easy to do, I was limited by the number of items I had to place on it. It is all covered by aluminum tape, so choices are limited. Thoughts? 


Stamps:
   None

Paper:
   Cajun Craze A-2
   Basic Black 5-3/8 x 4-1/8
   Basic White 5-1/4 x 4 (2)

Ink:
   Cajun Craze

Acrylic Paint:
   Black

Technique:
   Metal Foil Tape Art

Accessories:
   Aluminum Tape
   Wooden Shapes (Arrow, Heart, Triangle)
   Cork Letters (Project Life)
   Magic Mesh
   Stylus
   Sponge
   Paper Towels
   Brush
   Glue Dots
   Adhesive

I followed the video tutorial made by Jane France for Metal Tape Art. Enjoy!

I am so excited that you decided to pay me a visit. Please Contact Me if I can be of service.

Shop Now and enjoy looking at new products made especially for card making! There is a Host Code located in the right sidebar, if you care to use it.

If you are into kits, check out Paper Pumpkin and the Kits Collection. I am sure one of those will be right up your alley.

Still undecided? Join Me and find out what all of the fuss is about. Check it out today.

Please share, like, pin, tweet, or comment. FOLLOW and SUBSCRIBE to my blog.

HAPPY STAMPING!

Wednesday, October 23, 2024

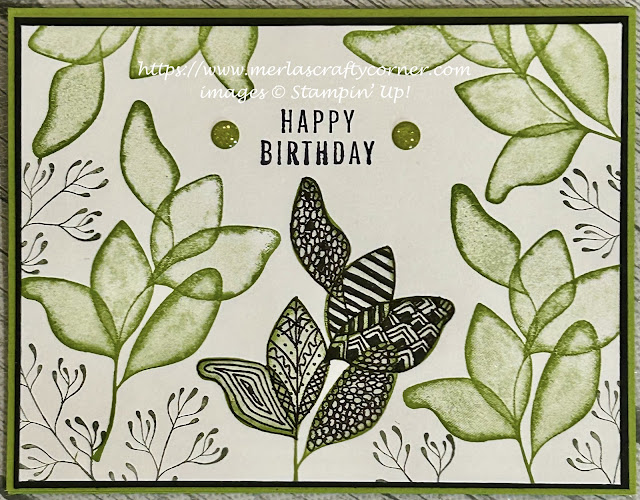
Translucent Zentangle

Zentangling can be fun, but it requires patience. Since you are drawing repetitive patterns, many find it calming, which in turn leads one to achieve a state of "zen." Thoughts? 


Stamps:
   Translucent Florals

Paper:
   Granny Apple Green A-2
   Basic Black 5-3/8 x 4-1/8
   Basic White 5-1/4 x 4 (2)

Ink:
   Granny Apple Green
   Tuxedo Black Memento
   Always Artichoke

Technique:
   Zentangling

Accessories:
   Micron 03 Archival Ink Pen
   Glitter Enamel Dots
   Adhesive

First, I stamped the sentiment, using Tuxedo Black Memento ink.

I then stamped the translucent leaves randomly around the card front, using Granny Apple Green.

Next, I stamped the smaller leaves in the blank spaces, using Always Artichoke ink.

Using the Micron 03 pen, I zentangled one cluster of leaves with different patterns.

Next, I adhered the panel onto a Basic Black matte and then onto the Granny Apple Green card front.

Lastly, I added a couple of Glitter Enamel Dots next to the sentiment and adhered a Basic White panel to the inside of the card.

Thank you so much for stopping by here and taking the time to peek at my latest creation. Contact Me for any further information.

If you have a few minutes, I suggest you Shop Now and check out all of our current deals. You don't want to kick yourself later for passing up the opportunity. There is a Host Code in the right sidebar if you care to use it.

If you want to feed your Crafty Bug that has been going around, subscribe to Paper Pumpkin. Check it out and see if it is for you.

Join Me and become my newest team member. It is the best deal around.

Please take some time to share, like, pin, tweet, or comment. I do appreciate all of your feedback. Don't forget to FOLLOW and SUBSCRIBE to my blog.

HAPPY STAMPING!

Thursday, October 17, 2024

Patriotic Heart

We should never forget to say thank you to the men and women who lay their lives on the line daily for our freedoms. Thoughts? 


Stamps:
   Work of Art

Paper:
   Basic White A-2, 5-1/4 x 4 (Inside)
   Basic Black Scraps

Ink:
   Night of Navy
   Real Red

Technique:
   Die Cutting
   Punching

Accessories:
   Hello You Thinlits Dies
   Itty Bitty Accent Punch Pack
   Fine Tip Glue Pen
   Glue Dots
   Fast Fuse
   Adhesive

First, I colored a chipboard heart from my stash with Night of Navy ink. I pressed it against the ink pad until it was fully covered with ink.

I then punched some Basic White stars and adhered them onto the heart, using glue dots.

Next, I stamped some Real Red stripes onto a Basic White card front, using the Work of Art stamp set. 

I then attached the chipboard heart, using fast fuse and glue dots.

Next, I die cut and adhered a thank you sentiment, using the Hello You Thinlits and a fine tip glue pen.

Lastly, I adhered a Basic White panel to the inside of the card. 

I am so excited that you stopped to read and check out my work. Thank you from the bottom of my heart. Contact Me and let me know if there is anything I can answer for you.

Do you have some time to browse? You do not want to pass up the opportunity to shop some quality products and see what is trending. Shop Now and take a peek. If you decide to place an order, I have included a Host Code in the right sidebar if you do not earn any rewards on your own. Thanks in advance.

Are you undecided? Subscribe to Paper Pumpkin and give it a go. Let the products speak for themselves. The cost is $25 and you are completely in control. No small print for you to miss. Try it.

Join Me and gain the best value for your hard-earned money. Check it out now.

Share, like, pin, tweet, or comment. Come on, I dare you. Don't forget to FOLLOW and SUBSCRIBE to my blog.

HAPPY STAMPING!

Tuesday, October 8, 2024

Circles & Stars

Sketch Challenges are fairly easy to meet. These challenges allow you to flip the sketch if you need and you can use any sentiment you like. So, basically, you just need to find a way to fill the shape and size of the sketch. Thoughts? 


Stamps:
   Apple Blossoms
   Circle Circus

Paper:
   Pumpkin Pie A-2
   Basic White Scraps, 5-1/4 x 4 (Inside)
   Silver Glitter Scraps
   Pumpkin Pie Glitter Scraps
   Basic Black Scraps

Ink:
   Pacific Point

Technique:
   Sponging
   Punching
   Die Cutting

Accessories:
   Stars Framelits Dies
   1-3/4" Circle Punch
   3/4" Circle Punch
   Washi Label Punch
   Triple Banner Punch
   Sponge
   Dimensionals
   Adhesive

First, I stamped and punched the 1-3/4" Circle, using the matching punch and Pacific Point ink.

I then punched a smaller circle (3/4") from a Pumpkin Pie Glitter scrap.

Next, I die cut two silver glimmer stars, using the Stars Framelits Dies and Silver Glimmer Scraps.

I then used the Triple Banner Punch for a Basic Black directional arrow (>).

Next, I stamped, punched, and sponged the sentiment for the card.

I then assembled the card as shown above: the glimmer shapes are attached with dimensionals. 

Lastly, I adhered a Basic White panel to the inside of the card.

Thank you so much for stopping by here and taking a quick look-see. If you have any questions or need my assistance, Contact Me.

Shop Now and take a look at all of our new products and current promotions. Please use the HOST CODE sitting in the right sidebar if you did not earn your own rewards.

If you want to craft, but keep your costs at $25 a month, check out Paper Pumpkin. It just might be what you are looking for at the moment. 

Join Me and become the newest member of my team. Remember there are no hidden agendas or penalties for giving it a go. Don't pass this opportunity to save.

You've come this far, so please share, like, pin, tweet, or comment. I appreciate your time and efforts. Let me know your thoughts and leave all of your questions behind. Do not forget to FOLLOW and SUBSCRIBE to my blog.

HAPPY STAMPING!

Thursday, October 3, 2024

Capital Thank You

I like to cut my coloring book pages and use them as backgrounds on my cards. Obviously, not all of them are worthy to place on a card, but some do make the cut. Thoughts? 


Stamps:
   None

Paper:
   Peekaboo Peach A-2
   Basic Black 5-1/4 x 4, Scraps
   Coloring Book Page 3-7/8 x 4-5/8
   Basic White 5-1/4 x 4 (Inside)

Ink:
   None

Markers:
   Various Colors - Personal Choice

Technique:
   Die Cutting

Accessories:
   Little Letters Thinlits Dies
   Adhesive

First, I die cut the letters on scraps of Basic Black, using the Little Letters Thinlits Dies. 

I then arranged the sentiment, THANK YOU, on the coloring book page and adhered it.

Next, I adhered three left-over strips of Basic Black diagonally and horizontally around the sentiment to accent it. I trimmed off the edges of each strip.

I then adhered the panel onto a Basic Black panel and then onto the Peekaboo Peach panel.

Lastly, I added a Basic White panel to the inside of the card.

Thank you so much for hanging out with me today. Contact Me if I can be of service.

Shop Now and browse some exciting new things. There is a HOST CODE in the right sidebar for you to use if you like.

Paper Pumpkin and the Kits Collection are two ways to get a quick fix for the Crafting Bug. Be careful, it is contagious, especially with family.

Join Me and flourish in the goodness that is Stampin' Up! I know you're thinking about it, or you would not have read this far. Check it out and let me know if you need anything.

Share, like, pin, tweet, or comment. FOLLOW and SUBSCRIBE to my blog.

HAPPY STAMPING!