Showing posts with label Simply Said 2024. Show all posts

Tuesday, September 9, 2025

Delicately Made Collage

Some products do not stay on the market for very long. So, I do have a stash of items that are no longer current. Still, I have to use them or they may ruin. This beautiful specialty paper falls into this category. Here are six cards made from one sheet. What do you think? 


Stamps:
   A Little Snarky by Sweet 'n Sassy
   Sassy Laugh Lines by Art Impressions
   Simply Said (2024)

Paper:
   Mango Melody, Calypso Coral, Powder Pink A-2 (Two of each card base to make six cards)
   Garden Impressions DSP 5-3/8 x 4-1/8 (6)
   Basic Black 3-5/8 x 5-1/8 (6)
   Basic White 3-1/2 x 5 (6), 5-1/4 x 4 (6-Inside)
   Beautifully Detailed Laser-Cut SDSP 3-1/2 x 5

Ink:
   Tuxedo Black Memento

Technique:
   CAS

Accessories:
   Pastel Pearls
   Pearl Basic Jewels
   Fine Tip Glue Pen
   Adhesive

Here is a close up of each card and its name:

Delicately Made


Delicately Made Too


Delicately Made Tre


Delicately Made Quad


Delicately Made Quint


Delicately Made Hexa


All of the products used to make these beauties is listed above. Substitute whatever you have on hand for embellishments and DSP. Just have fun! 

Thank you so much for stopping by here and taking a quick look-see. If you have any questions or need my assistance, Contact Me.

Shop Now and take a look at all of our new products and current promotions. 

If you want to craft, but keep your costs low, check out Paper Pumpkin. It just might be what you are looking for at the moment.

Join Me and become the newest member of my team. Remember there are no hidden agendas or penalties for giving it a go. Don’t pass this opportunity to save.

You've come this far, so please share, like, pin, tweet or comment. I appreciate your time and efforts. Let me know your thoughts and leave all of your questions behind. Do not forget to FOLLOW and SUBSCRIBE to my blog. 

HAPPY STAMPING!

Monday, September 8, 2025

Shady Impressions

If you change the color of your ink and card base to match the colors in the Designer Series Paper, you will have a different card. Thoughts? 


Stamps:
   Simply Said
   Healing Hugs

Paper:
   Melon Mambo A-2
   Garden Impressions DSP 5-1/2 x 3-3/4
   Basic White 2-1/2" Circle, 5-1/4 x 4 (Inside)
   Petal Pink 1-3/4 x 1/2

Ink:
   Melon Mambo
   Shaded Spruce

Technique:
   CAS
   Punching

Accessories:
   2-1/2" Circle Punch
   Gold Buttons
   Basic Rhinestone Jewels
   Glue Dots
   Adhesive

First, I stamped a rose in the center of a Basic White 2-3/4" scrap, using Melon Mambo ink.

I then punched it, using a 2-1/2" Circle Punch.

Next, I stamped the sentiment on a strip of Petal Pink, using Shaded Spruce ink. I snipped the ends to size.

I then adhered the Garden Impressions DSP panel onto the Melon Mambo card front, scooting it to align with the left edge and the top and bottom of the card.

Next, I adhered the stamped Rose on the top portion of the card front and adhered the sentiment below it, as shown above.

I then attached a couple of gold buttons to the lower right side of the card along the seam of the DSP and the card front, using glue dots.

Lastly, I added a few Basic Rhinestone Jewels to the card front and adhered a Basic White panel to the inside of the card.

Thank you so much for stopping by here and spending a few minutes of your day with me. I appreciate your time. Contact Me if you have any questions, need a demonstrator, or just want to stamp or share ideas.

Shop Now and enjoy browsing products and promotions. 

Do not miss the opportunity to Join Me and become the newest member of my team.

Paper Pumpkin should not be ignored. I enjoy putting my kit together monthly. 

Take a few more minutes and share, like, pin, tweet, or comment. I would love to see what you really think. Do not forget to FOLLOW and SUBSCRIBE to my blog. 

HAPPY STAMPING!

Saturday, June 28, 2025

Kinda Simple

You can easily change the sentiment on this card to suit your needs. If you need a masculine card, just leave off the sequins. Thoughts? 


Stamps:
   Simply Said
   Kinda Eclectic

Paper:
   Basic White A-2, 5-1/4 x 4 (Inside), 1/2 x 2 
   Pretty Peacock 1/2 x 2, 1/4 x 5-1/4
   Cajun Craze 1/4 x 5-1/4
   Dusty Durango 1/4 x 5-1/4, 1" Circle 
   Barely Banana 1/4 x 5-1/4

Ink:
   Pretty Peacock

Markers:
   Pretty Peacock

Technique:
   CAS
   Punching

Accessories:
   1" Circle Punch
   Adhesive-Backed Sequins Trio
   Dimensionals
   Adhesive

First, I adhered the (1/4 x 5-1/4) strips of colored card stock to the card front as shown above. 

I then stamped the sentiment, using Pretty Peacock, on the strip of Basic White. 

Next, I added ink to the sunburst stamp from the Kinda Eclectic stamp set, using the Pretty Peacock marker. This way, I only added ink to each ray as I wanted. I varied the length of each one.

I then breathed on the stamp to moisten the ink and stamped it on the top portion of the card front. I stamped half onto the strips of card stock and half onto the Basic White card front.

Next, I punched a 1" circle from a scrap of Dusty Durango and adhered it onto the center of the sunburst, using dimensionals.

I then punched the ends of the sentiment and the Pretty Peacock strip, using the Circle Punch, giving the strips rounded edges.

Next, I adhered the Basic White sentiment on top and slightly upward of the Pretty Peacock strip. I attached these to the lower part of the card front, using dimensionals.

Lastly, I added a few sequins to the card front and adhered a Basic White panel to the inside of the card.

Are you one of those crafty individuals that has very little EXTRA time, money, or room? Join Me, Contact Me, or take the time to Shop Now and check out Paper Pumpkin, the new Kits Collection, and the Online Exclusives. Yup, it is always being changed, depending on inventory and new products. Don't miss a thing.

If you liked my card today, please share, like, pin, tweet, or comment. You also want to FOLLOW and SUBSCRIBE to my blog. 

HAPPY STAMPING!

Thursday, June 26, 2025

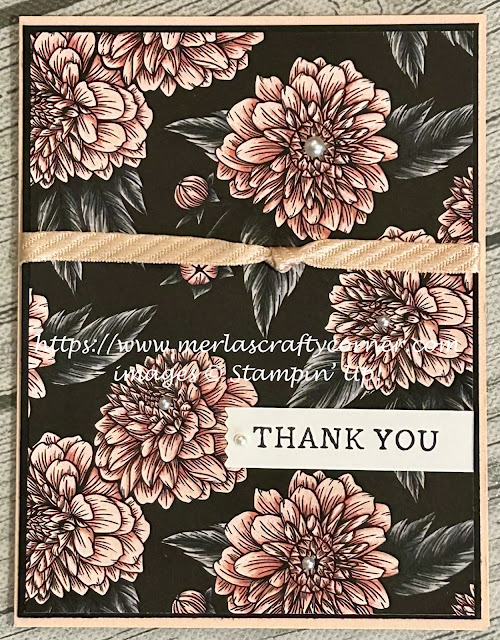
Favored Petals

The black etching on the petals and leaves definitely pulls the onlookers attention. Thoughts? 


Stamps:
   Simply Said

Paper:
   Petal Pink A-2
   Basic Black 5-3/8 x 4-1/8
   Favored Flowers DSP 5-1/4 x 4
   Basic White 2-1/4 x 5/8, 5-1/4 x 4 (Inside)

Ink:
   Tuxedo Black Memento

Technique:
   CAS
   Punching

Accessories:
   Washi Label Punch 
   1/4" Diagonal Trim Combo Pack (8")
   Pearl Basic Jewels
   Glue Dots
   Adhesive

First, I adhered the Favored Flowers DSP panel onto a Basic Black matte.

I then took the ribbon and tied a knot in the center of it. I wrapped it around the panel and secured it on the back with a couple of glue dots. I also used a glue dot under the knot to keep it in place.

Next, I adhered the panel onto the Petal Pink card front.

I then stamped the sentiment on a strip of Basic White, using Tuxedo Black Memento ink.

Next, I used the Washi Label Punch on one end of the strip to add a bit of interest.

I then adhered the sentiment on the bottom portion of the card front, as shown above.

Lastly, I added a pearl to the sentiment and adhered a Basic White panel to the inside of the card.

Thank you so much for hanging out with me today. Contact Me if I can be of service.

Shop Now and browse some exciting new things.

Paper Pumpkin and the Kits Collection are two ways to get a quick fix for the Crafting Bug. Be careful, it is contagious, especially with family.

Join Me and flourish in the goodness that is Stampin' Up! I know you're thinking about it, or you would not have read this far. Check it out and let me know if you need anything.

Please share, like, pin, tweet, or comment. FOLLOW and SUBSCRIBE to my blog.

HAPPY STAMPING!

Wednesday, June 25, 2025

Simple Birthday

This is a nice layout to use some of your smaller leftover designer series paper pieces. Thoughts? 


Stamps:
   Simply Said

Paper:
   Petunia Pop A-2
   Basic Black 3-5/8 x 3-3/4
   2024-2026 In-Color Glimmer Specialty Paper 1-3/4 x 3-1/4
   2024-2026 In-Color DSP 1-5/8 x 2-3/4
   Paper Pumpkin Tag (2x1 rounded edges)
   Basic White 5-1/4 x 4 (Inside)

Ink:
   Shy Shamrock

Technique:
   CAS
   Punching

Accessories:
   1/8" Handheld Hole Punch
   White Baker's Twine
   Modern Oval Punch
   Adhesive

First, I adhered the Basic Black piece to the lower part of the Petunia Pop card front.

I then adhered the glimmer paper at an angle, as shown above.

Next, I added the striped In-Color DSP to the card front, as shown above.

I then took a leftover Paper Pumpkin tag and stamped the sentiment, using Shy Shamrock ink.

I rounded the edges, using the Modern Oval Punch. You have to feed the tag through the bottom of the punch to round each side separately.

Next, I adhered it onto the card front. You can add dimensionals if you wish. I decided to keep it directly onto the other pieces. 

I then punched a small hole on the top of the card front, using the 1/8" Handheld Hole Punch. You want to make sure you are punching through only the top panel.

Next, I fed a leftover piece of Baker's Twine from a Paper Pumpkin kit and tied it off with a bow. 

Lastly, I adhered a Basic White panel to the inside of the card.

Thank you for being here! Contact Me if you have questions or need anything that is Stampin' Up! related.

Check out each of the headers above and see the fabulousness that is Stampin' Up!

Please take a minute to share, like, pin, tweet, or comment. Plus, you want to take the time to FOLLOW and SUBSCRIBE to my blog.

HAPPY STAMPING!

Monday, June 23, 2025

Birthday Refresh

I do like the black etching on the rose petals and leaves. I think it really draws in your attention. What do you think? 


Stamps:
   Simply Said

Paper:
   Fresh Freesia A-2
   Basic Black 5-3/8 x 4-1/8
   Favored Flowers DSP 5-1/4 x 4
   Mossy Meadow 3 x 3/4
   Basic White 2-3/4 x 5/8, 5-1/4 x 4 (Inside)

Ink:
   Tuxedo Black Memento

Technique:
   CAS
   Punching

Accessories:
   Fresh Freesia 3/8" Seam Binding Ribbon
   Adhesive-Backed Sequins & Gems
   Washi Label Punch
   Adhesive

First, I adhered the Favored Flowers DSP onto a Basic Black matte.

I then wrapped the Fresh Freesia Seam Binding Ribbon around the top portion of the panel and tied it off with a bow. 

Next, I adhered the panel onto the Fresh Freesia card front.

I then stamped the sentiment, using Tuxedo Black Memento ink and punched it out with the Washi Label Punch.

Next, I attached it to the Mossy Meadow strip at an angle, using liquid adhesive. 

I then adhered it to the bottom portion of the card front.

Lastly, I added a few sequins and gems to the card front and adhered a Basic White panel to the inside of the card.

I am so excited that you decided to pay me a visit. Please Contact Me if I can be of service.

Shop Now and enjoy looking at new products made especially for card making! 

If you are into kits, check out Paper Pumpkin and the Kits Collection. I am sure one of those will be right up your alley.

Still undecided? Join Me and find out what all of the fuss is about. Check it out today.

Please share, like, pin, tweet, or comment. FOLLOW and SUBSCRIBE to my blog.

HAPPY STAMPING!

Thursday, May 16, 2024

Cheerful Thanks

Do you like daisies? There is usually an abundance of daisies in various types, colors, and sizes. I think they are known as a friendly flower or a friendship flower. I'm not sure. Thoughts? 


Stamps:
   Cheerful Daisies
   Simply Said 2024

Paper:
   Crushed Curry A-2
   Early Espresso 4-5/8 x 3-5/8, 1-7/8" Sq. (2)
   Fresh as a Daisy DSP 4-1/2 x 3-1/2
   Basic White 1-3/4" Sq. (2), 5-1/4 x 4 (Inside)

Ink:
   Copper Clay
   Crushed Curry

Technique:
   2-Step Stamping

Accessories:
   Gold Faceted Gems
   Adhesive

First, I stamped the two Basic White squares. I stamped a small daisy on one, using Copper Clay as an outline and Crushed Curry as the filler. The other was used for the sentiment: thanks. I used the Simply Said stamp set and the same two inks.

I then adhered the Basic White squares to the two Early Espresso mattes.

Next, I adhered the Fresh as a Daisy DSP panel onto an Early Espresso matte and then onto the Crushed Curry card front.

I then adhered the two squares on the top portion of the DSP panel.

Lastly, I added a Gold Faceted Gem to the center of the daisy and adhered a Basic White panel to the inside of the card.

Thank you so much for hanging out with me today. Contact Me if I can be of service.

Shop Now and browse some exciting new things. There is a HOST CODE in the right sidebar for you to use if you like.

Paper Pumpkin and the Kits Collection are two ways to get a quick fix for the Crafting Bug. Be careful, it is contagious, especially with family.

Join Me and flourish in the goodness that is Stampin' Up! I know you're thinking about it, or you would not have read this far. Check it out and let me know if you need anything.

Share, like, pin, tweet, or comment. FOLLOW and SUBSCRIBE to my blog.

HAPPY STAMPING!