Showing posts with label Cable Knit Embossing Folder. Show all posts

Friday, September 27, 2024

Knitted Season

2-Step Stamping allows you to add color quickly to your images. So, what seems to take a long time is accomplished rather quickly. Thoughts? 


Stamps:
   Merry Patterns

Paper:
   Basic White A-2, 2-3/4" Sq., 5-1/4 x 4 (Inside)
   Merry Moments DSP 3 x 4-1/4
   Basic Black 2-7/8" Sq.

Ink:
   Tuxedo Black Memento
   Cherry Cobbler
   Old Olive
   Daffodil Delight

Technique:
   2-Step Stamping
   Dry Embossing
   Die Cutting
   Sponging

Accessories:
   Cable Knit Embossing Folder
   Layering Circles Framelits Dies
   Metallic Sequins
   Sponge
   Adhesive

First, I stamped the candles in the Basic White square, using Tuxedo Black Memento. (Step One)

I then filled in three of the candles, using Cherry Cobbler and the other three, using Old Olive. I used Daffodil Delight on the flames. (Step Two)

Next, I added a bit of greenery underneath the candles, using Old Olive.

I then die cut the circle, using the Layering Circles Framelits Dies. I used the next larger size, and die cut the Basic Black square, using the scalloped circle in the same die set.

Next, I sponged the stamped circle, using Cherry Cobbler ink and adhered it onto the Basic Black scalloped circle.

I then dry embossed the Merry Moments DSP, using the Cable Knit Embossing Folder. I adhered it onto the Basic White card front.

Next, I stamped the sentiment on the top of the Basic White card front, using Tuxedo Black Memento ink. (Step One) I filled it in, using Old Olive. (Step Two)

I then attached the candles, using dimensionals.

Lastly, I added a Metallic Star Sequin and adhered a Basic White panel to the inside of the card.

Thank you kindly for stopping by here. Contact Me if I can be of service.

Take a quick look and Shop Now for new products and current sales. There is a HOST CODE in the right sidebar for your use, if you like.

If you just want a quick crafty fix, check out the Kits Collection or get a consistent dose with a Paper Pumpkin subscription.

Join Me and create a new friendship. We already have crafting in common!

Please take a few minutes to share, like, pin, tweet, or comment. Plus, you don't want to forget to FOLLOW and SUBSCRIBE to my blog.

HAPPY STAMPING! 

Saturday, September 9, 2023

Birthday Sweaters

I really like all of the texture on this card, especially with the dry embossing folder. Thoughts? 


Stamps:
   Balloon Celebration
   Birthday Banners

Paper:
   Dapper Denim A-2
   Marina Mist 5-1/4 x 4
   Basic White Scraps, 5-1/4 x 4 (Inside)

Ink:
   Archival Basic Black
   Cucumber Crush
   Marina Mist
   Real Red

Technique:
   Die Cutting
   Dry Embossing
   Punching
   Sponging

Accessories:
   Balloon Bouquet Punch
   Bunch of Banners Framelits Dies
   Cable Knit 3D Embossing Folder
   1/2" Black Scallop Dots Ribbon 4-1/4"
   Cherry Cobbler Baker's Twine
   Sponge
   Dimensionals
   Glue Dots
   Adhesive

First, I stamped and punched out the balloons, using Cucumber Crush ink, Real Red ink, and the Balloon Bouquet punch.

I then stamped, die cut, and sponged the sentiment. I used the sentiment from the Birthday Banners stamp set and the Archival Basic Black ink to stamp it. I then die cut it, using the Bunch of Banners Framelits dies, and then sponged it with a bit of Marina Mist ink.

Next, I dry embossed the Marina Mist panel with the Cable Knit 3D Embossing Folder. You may want to mist the panel before embossing to prevent any tearing.

I then adhered the Marina Mist panel onto the Dapper Denim card front.

Next, I added the ribbon across the lower front of the card, using glue dots.

I then added the sentiment with a few glue dots.

Next, I attached the balloons, using dimensionals.

I tied the twine into a bow and added it to the balloons with a glue dot.

Lastly, I adhered a Basic White panel to the inside of the card.

Thank you so very much for taking the time to stop and glance at my work. If you have any questions or suggestions, please Contact Me. I do appreciate your time.

If you need any supplies, or you are curious to know just how much these products cost, click on Shop Now and satisfy your curiosity. A HOST CODE is available for you to use in case you did not earn your own rewards. You can find it in the right sidebar.

Do you want the best value for your buck? Join Me and reap all of the rewards. I will be more than happy to assist you. Check it out and note that there are no hidden agendas.

Wait! Don't leave. If you just want to try it and see, then subscribe to Paper Pumpkin. You will receive a kit with everything you need to create a project. Check out the Kit Collection for more choices.

I would love for you to take a minute to share, like, pin, tweet, or comment. Please FOLLOW and SUBSCRIBE to my blog. Let me know what you think below in the comments.

HAPPY STAMPING!

Monday, September 26, 2022

Christmas Sweater

This is a simple, yet elegant Christmas card that is easy to duplicate and send out to everyone on your list. Thoughts? 


Stamps:
   More Merry Messages

Paper:
   Cherry Cobbler A-2
   Warmth & Cheer DSP 2-1/2 x 4-1/4
   Basic Black 4-1/4 x 1/4, 3-1/2 x 2-1/2
   Basic White 5-1/4 x 4 (Inside)

Ink:
   Archival Basic Black

Technique:
   Die Cutting
   Dry Embossing

Accessories:
   Layering Ovals Framelits 
   Cable Knit Embossing Folder
   White Gel Pen
   Dimensionals
   Adhesive

First, I stamped and die cut my sentiment using the Layering Ovals Framelits and Basic White cardstock. 

I then cut the next larger scalloped oval in Basic Black, and placed a white dot on each scallop using a white gel pen.

I adhered these two layers together using liquid adhesive. This was attached to the top of the card front using dimensionals.

Next, I dry embossed the Warmth & Cheer DSP panel using the Cable Knit Embossing Folder. I did spray a bit of water on the DSP to prevent tearing.

I adhered the DSP to the bottom of the card using liquid adhesive.

I added a thin strip of Basic Black to cover the seam and pull the card together.

Lastly, I adhered the Basic White panel to the inside of the card.

You can easily dress this up more by adding rhinestones, pearls, sequins, or snowflakes. 

Thank you immensely for your time. I know how precious it can be. Please Contact Me if you need anything Stampin' Up! or if you have any questions.

Click on Shop Now and take a look at some quality products. Investing in your craft is a no-brainer. I have included a HOST CODE for those of you who enjoy ordering only one or two items. It is located in the right sidebar. Of course, if your product total is more than $150, enjoy your rewards.

Of course, the best value for your dollar is joining the Stampin' Up! family. Just click on Join Me and check out the benefits.

Let's not forget Paper Pumpkin. If you want to craft on the go, or you like to keep things small and low-key, check it out. The kit includes all you need.

Please take a minute or two to share, like, pin, tweet, or comment. Don't forget to FOLLOW and SUBSCRIBE to my blog.

HAPPY STAMPING!

Thursday, January 13, 2022

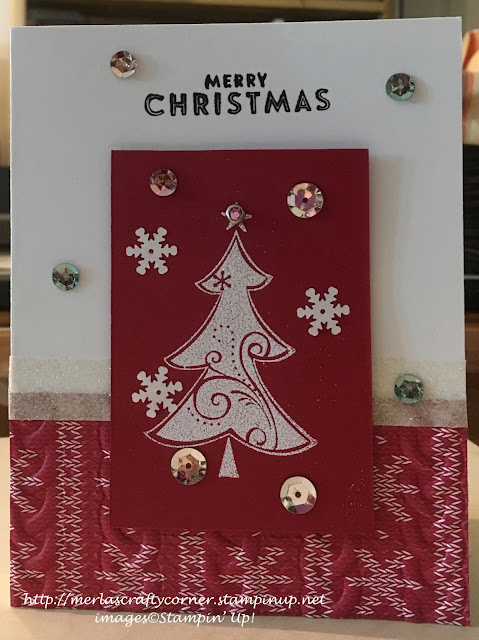
Embossed Christmas

Are you looking for inspiration? Look around you. Anything and everything around you can inspire you to create. You can even draw from prior experiences or past events. I thought of the movie, "A Christmas Story," to make this card. Thoughts? 


Stamps:
   Season of Joy
   Flurry of Wishes

Paper:
   Basic White A-2, 5-1/4 x 4 (Inside)
   Cherry Cobbler 2-1/4 x 3-1/3
   Warmth & Cheer DSP 2-1/2 x 4-1/4

Ink:
   Archival Basic Black
   White Craft Ink

Technique:
   Heat Embossing
   Dry Embossing

Accessories:
   White Embossing Powder
   Embossing Buddy
   Fire Circles Rhinestone Brads
   Frosted Sequins
   Fancy Frosted Sequins
   White Glitter Tape
   Cable Knit Embossing Folder
   Dimensionals
   Adhesive

First, I dry embossed my DSP panel using the Cable Knit Embossing Folder. 

I then stamped and heat set the tree image on the Cherry Cobbler panel.

I adhered the DSP panel to the bottom of the card front and added a strip of glitter tape on the seam. You can use a black strip or other ribbon if you choose.

I stamped the sentiment on the top-center of the card.

Next, I attached the Cherry Cobbler panel to the card front using dimensionals.

Lastly, I added some sequins and adhered the Basic White panel to the inside of the card.

Thank you so very much for being here. I appreciate you taking the time to glance at my work. Please Contact Me if I can be of service.

Are you interested in Stampin' Up! products to make your own cards? Shop Now and have a look-see. I placed a HOST CODE for you to use if you do not earn your own rewards. It is sitting in the right sidebar.

Do you like surprises? Subscribe to Paper Pumpkin and receive all you need to complete the monthly project. The cost is less than $25. Check it out.

Join Me and become privy to everything Stampin' Up! Receive a discount on all of your personal orders. Personally, I love SALES!

Please share, like, pin, tweet, or comment. Do not forget to FOLLOW and SUBSCRIBE to my blog.

HAPPY STAMPING!

Friday, July 23, 2021

Cold Birthday

Making a gift card holder inside an A-2 sized card is not as difficult as you might imagine. I simply cut a couple of slits on the Whisper White panel before I adhered it to the inside of the card. I placed my business card to demonstrate where the gift card would be placed. What do you think?


Stamps:
   B.Y.0.P.

Paper:
   Old Olive A-2
   Cherry on Top DSP 5-1/4 x 4
   Whisper White 5-1/4 x 4 (Inside)

Ink:
   Bermuda Bay
   Crushed Curry

Technique:
   Dry Embossing
   Sponging

Accessories:
   Cable Knit Embossing Folder
   1/8" Bermuda Bay Ribbon
   Pretty Label Punch
   Sponge
   Glue Dots
   Dimensionals
   Adhesive
   Fast Fuse

First, I stamped the Whisper White panel on the top half using Bermuda Bay ink. I then set my business card down and lightly penciled two opposite corners. I then cut a slits to open the corners for my gift card. I erased any pencil marks that were left. I then adhered this panel onto the inside of my card.

I then took my DSP panel and dry embossed it using the Cable Knit Embossing Folder. You can slightly mist the DSP with a bit of water to prevent tearing.

Next, I stamped, punched, and sponged my sentiment. I stamped it using Bermuda Bay and sponged it using Crushed Curry.

I wrapped some Bermuda Bay ribbon around the DSP panel and adhered it to the card front. 

I attached the sentiment using dimensionals.

I added a Bermuda Bay bow with a glue dot.

Always make sure your DSP is facing the right way. I did not focus when I adhered my DSP to the card front. So, my candles are all facing down instead of up. Ugh, this definitely makes it my own creation. 

Thank you for visiting. I do love company. Feel free to Contact Me if you have any questions.

Explore current products, promotions, and all of the opportunities. Just click on Shop Now. A HOST CODE is available in the right sidebar for those of you who do not earn your own rewards.

For those of you who like kits with everything you need to complete a project, we offer Paper Pumpkin. Your monthly cost is less than $25.

Join Me and become my newest team member. I look forward to meeting you.

Please take a minute to share, like, pin, tweet, or comment. Do not forget to FOLLOW and SUBSCRIBE to my blog.

HAPPY STAMPING!
Thursday, December 24, 2020

Hung by the Chimney

 I enjoy die cutting and embossing as much as stamping. I like gluing all of the pieces together to make an item whole. These stockings have to be assembled which means you can change them as much as you like! There is no stamping on this card. What are your thoughts?


Stamps:
   Hang Your Stocking

Paper:
   Crumb Cake A-2
   Warmth & Cheer DSP Scraps
   Basic Black Scrap

Ink:
   Crumb Cake

Technique:
   Dry Embossing
   Die Cutting
   Sponging

Accessories:
   Brick Wall Embossing Folder
   Cable Knit Embossing Folder
   Christmas Stockings Thinlits Dies
   Cherry Cobbler Baker's Twine
   Mini Jingle Bells
   Burlap Ribbon
   Glue Dots
   Sponge
   Dimensionals
   Fast Fuse
   Adhesive

First, I dry embossed my card front using the Brick Wall Embossing Folder. I sponged it with Crumb Cake to give it some dimension and a realistic appearance.

I then die cut my stockings using the Christmas Stockings Thinlits Dies. If you look closely, the stockings are dry embossed using the Cable Knit Embossing Folder. I then pieced them together using the reverse side for the heel, toe, and top.

I then die cut the NOEL for the mantle. I adhered it using some adhesive. I added a strip of burlap underneath it. I attached it using fast fuse.

I then attached the stockings using dimensionals.

I added the jingle bells and the twine using glue dots.

Thank you so very much for being here. I appreciate you taking the time to glance at my work. Please Contact Me if I can be of service.

Are you interested in Stampin' Up! products to make your own cards? Shop Now and have a look-see. I placed a HOST CODE for you to use if you do not earn your own rewards. It is sitting in the right sidebar.

Do you like surprises? Subscribe to Paper Pumpkin and receive all you need to complete the monthly project. The cost is less than $25. Check it out.

Join Me and be privy to everything Stampin' Up! Receive a discount on all of your personal orders. Personally, I love SALES!

Please share, like, pin, tweet, or comment. Do not forget to FOLLOW and SUBSCRIBE to my blog.

HAPPY STAMPING!


Saturday, April 11, 2020

Purple Thanks

You should always have a card to say thank you for that special Christmas gift. I made this card using a nontraditional color for the background and the ornaments. I also used the Cable Knit embossing folder that reminds me of a winter sweater. This is definitely a card that stands out. What do you think?


Stamps:
   Memories of Home
   Itty Bitty Greetings

Paper:
   Highland Heather A-2
   Gorgeous Grape 5-3/8 x 4-1/8
   Gingham Gala 6x6 DSP 5-1/4 x 4
   Whisper White 4-1/2 x 4, 2-1/2 x 1/2

Ink:
   Mint Macaron
   Gorgeous Grape

Markers:
   Gorgeous Grape
   Highland Heather
   Mint Macaron

Technique:
   Dry Embossing
   Sponging

Accessories:
   Cable Knit Embossing Folder
   Classic Label Punch
   Rhinestone Basic Jewels
   Sponge
   Dimensionals
   Adhesive

The Gingham Gala DSP was dry embossed using the Cable Knit Embossing Folder. I misted my DSP with a bit of water to prevent tearing.

The Christmas tree and sentiment were stamped first and then cut or punched. Both are attached with dimensionals.

All of the ornaments were colored with Gorgeous Grape and Highland Heather. 

The sentiment was sponged using Mint Macaron. 

Layers are as follows:
Card Base - Layer 1 = Highland Heather
Layer 2 - Gorgeous Grape
Layer 3 - Gingham Gala DSP
Layer 4 - Christmas Tree & Sentiment

Thank you for dropping by here. Contact me with any questions.

Leave your feedback below in the comments section. I would love to hear what you think. I appreciate your time.

Shop Now, Join Me, Subscribe to Paper Pumpkin

HAPPY STAMPING!