Showing posts with label Go To Greetings. Show all posts

Sunday, June 22, 2025

Blackberry Pansies

Not only can pansies be found in a variety of colors, but they can be seen in many variations within a color family. So, if you are looking for color, choose pansies! Thoughts? 


Stamps:
   Go To Greetings

Paper:
   Blackberry Bliss A-2
   Pansy Petals DSP 5-1/4 x 4
   Calypso Coral 2-1/2 x 7/8
   Fresh Freesia 3/4 x 2-1/4
   Basic White 5-1/4 x 4 (Inside)

Ink:
   Blackberry Bliss

Technique:
   CAS

Accessories:
   Fine Sparkle Adhesive-Backed Gems
   Dimensionals
   Adhesive

First, I adhered the Pansy Petals DSP panel onto the Blackberry Bliss card front.

I then stamped the sentiment, using Blackberry Bliss ink on the Fresh Freesia piece.

Next, I adhered the sentiment onto the Calypso Coral matte and attached it to the center of the card front, using dimensionals.

Lastly, I added a few Fine Sparkle Adhesive-Backed Gems to the card front and adhered a Basic White panel to the inside of the card.

Thanks for stopping by and taking a quick peek. Contact Me for more information on my cards or Stampin' Up!

Click on the headers above and satisfy your curiosity.

Please share, like, pin, tweet, or comment. Please take the time to FOLLOW and SUBSCRIBE to my blog.

HAPPY STAMPING!

Wednesday, July 3, 2024

Rainbow Splotches

I opted to apply some rainbow colors as splotches, rather than the traditional rainbow arch. I think it worked. What do you think? 


Stamps:
   Gorgeous Grunge
   Go To Greetings

Paper:
   Daffodil Delight A-2
   Basic White 5-1/4 x 4 (2)

Ink:
   Tuxedo Black Memento
   Real Red
   Only Orange
   Daffodil Delight
   Garden Green
   Ballet Blue
   Island Indigo
   Elegant Eggplant

Technique:
   CAS

Accessories:
   Basic Rhinestone Jewels
   Adhesive

First, I stamped the sentiment in the center of a Basic White panel, using Tuxedo Black Memento ink.

I then stamped a Real Red splotch on the top left corner of the panel.

Next, I stamped an Only Orange splotch followed by a Daffodil Delight splotch. This took care of three colors on the top of the panel, in a bit of an arch.

I then stamped a Garden Green splotch on either side of the sentiment.

Next, I stamped a splotch of Ballet Blue toward the lower right side of the panel, followed by an Island Indigo splotch to its left.

I then stamped the last splotch of Elegant Eggplant to the left of the Island Indigo.

Next, I adhered the panel onto a Daffodil Delight card front.

Lastly, I added a few Basic Rhinestone Jewels and adhered a Basic White panel to the inisde of the card.

Thank you so much for stopping by here and taking the time to peek at my latest creation. Contact Me for any further information.

If you have a few minutes, I suggest you Shop Now and check out all of our current deals. You don't want to kick yourself later for passing up the opportunity. There is a HOST CODE in the right sidebar if you care to use it.

If you want to feed your Crafty Bug that has been going around, subscribe to Paper Pumpkin. Check it out and see if it is for you.

Join Me and become my newest team member. It is the best deal around.

Please take some time to share, like, pin, tweet, or comment. I do appreciate all of your feedback. Don't forget to FOLLOW and SUBSCRIBE to my blog.

HAPPY STAMPING! 

Wednesday, June 5, 2024

Birthday Rounds

I enjoy creating with this stamp set. I like all of the different patterns and designs on each circle. What do you think? 


Stamps:
   Go To Greetings
   Circle Circus

Paper:
   Bumblebee A-2
   2020-2022 In-Color DSP 5-3/8 x 4-1/8
   Basic White 5-1/4 x 4 (2)

Ink:
   Bumblebee 
   Cinnamon Cider
   Just Jade
   Magenta Madness
   Misty Moonlight

Technique:
   Blending Brush/Sponging

Accessories:
   2020-2022 In-Color Enamel Dots
   Blending Brush/Sponge
   Adhesive

First, I stamped the sentiment in the center of a Basic White panel, using Misty Moonlight.

I then brushed on Bumblebee ink all around the sentiment, using a Blending Brush.

Next, I randomly added circle stamps in various colors.

I then adhered the panel onto a 2020-2022 In-Color DSP matte and then onto a Bumblebee card front.

Lastly, I added a few 2020-2022 In-Color Enamel Dots and adhered a Basic White panel to the inside of the card.

Thank you so much for stopping by here and taking the time to peek at my latest creation. Contact Me for any further information.

If you have a few minutes, I suggest you Shop Now and check out all of our current deals. You don't want to kick yourself later for passing up the opportunity. There is a HOST CODE in the right sidebar if you care to use it. 

If you want to feed your Crafty Bug that has been going around, subscribe to Paper Pumpkin. Check it out and see if it is for you.

Join Me and become my newest team member. It is the best deal around.

Please take some time to share, like, pin, tweet, or comment. I do appreciate all of your feedback. Don't forget to FOLLOW and SUBSCRIBE to my blog.

HAPPY STAMPING!

Monday, June 3, 2024

Lemon Lime Thoughts

I like to stamp the sentiment directly onto the designer series paper whenever possible. Thoughts? 


Stamps:
   Go To Greetings

Paper:
   Lemon Lime Twist A-2
   Basic Black 5-3/8 x 4-1/8
   Masterfully Made DSP 5-1/4 x 4
   Basic White 5-1/4 x 4 (Inside)

Ink:
   Tuxedo Black Memento

Technique:
   CAS

Accessories:
   Gingham Gala Adhesive-Backed Sequins
   Dimensionals
   Adhesive

First, I stamped the sentiment on the top of the Masterfully Made DSP panel, using Tuxedo Black Memento.

I then adhered the DSP panel onto a Basic Black matte and then onto the Lemon Lime Twist card front.

Next, I added a couple of sequins to the card front.

Lastly, I adhered a Basic White panel to the inside of the card.

Thanks so much for reading through my blog today. Contact Me if I can answer anything for you, or if you would like to buy any of my cards.

If you would like to buy your own products and make your own cards click on Shop Now and browse current merchandise. I have placed a HOST CODE for you to use if you do not earn any rewards on your own. It is located in the right sidebar.

Our monthly subscription to Paper Pumpkin is affordable and flexible. The cost is $25 monthly. Check out the Kits Collection for more options at varying prices.

Join Me and become part of a team. Check out the benefits and decide if it is for you.

Please share, like, pin, tweet, or comment. Don't forget to FOLLOW and SUBSCRIBE to my blog.

HAPPY STAMPING!

Monday, May 20, 2024

Blissful Greetings

If you are already going to make a mess, why not make a huge mess. Double the pleasure with this split negative technique. It takes the same amount of time to clean up a small mess as a big mess. Thoughts? 


Stamps:
   Bliss
   Go To Greetings

Paper:
   Blushing Bride A-2, 3 x 4
   Cherry Cobbler 3 x 4
   Moody Mauve 5-3/8 x 4-1/8
   Basic White 5-1/4 x 4 (Inside)

Ink:
   Blushing Bride
   Cherry Cobbler
   Tuxedo Black Memento
   VersaMark

Technique:
   Split Negative Technique

Accessories:
   Cherry Cobbler Embossing Powder
   Blushing Bride Embossing Powder
   Basic Rhinestone Jewels
   Diamond Weave Ribbon 6"
   Stamp-a-ma-jig/Stamparatus/MISTI
   Heat Tool
   Adhesive

There is a tutorial on Split Coast Stampers for the Split Negative Technique that I followed. Take a look. They guide you step by step.

I heat embossed the image on Cherry Cobbler, using Blushing Bride Embossing Powder, and Cherry Cobbler Embossing Powder onto the Blushing Bride panel.

I then cut (split) the image in half and then matched the two different panels next to each other as shown above. 

Next, I adhered the two panels onto the top of a Moody Mauve matte, and stamped the bottom of the Moody Mauve with my sentiments: Happy Birthday and Thank You, both from the Go To Greetings.

I then wrapped a Diamond Weave Ribbon around the panel to conceal the seam. 

Next, I adhered the panel onto the Blushing Bride card front.

Lastly, I added a few Basic Rhinestone Jewels and adhered a Basic White panel onto the inside of the card. 

Thank you so much for dropping by here. Contact Me if you have any questions.

Click on all of the tabs above and explore products, promotions, and opportunities.

Please take the time to share, like, pin, tweet, or comment. Do not forget to FOLLOW and SUBSCRIBE to my blog.

HAPPY STAMPING!

Sunday, March 31, 2024

Pressed Daisies

This card makes me smile. I also like the way it feels. The texture is wonderful. Do you like to use embossing folders on your cards? Thoughts? 


Stamps:
   Daisy Delight
   Go To Greetings

Paper:
   Blushing Bride A-2, 3" Sq. (4)
   Mossy Meadow 3-7/8 x 4-5/8
   All ABloom DSP 3-3/4 x 4-1/2
   Basic White 5-1/4 x 4 (Inside)

Ink:
   Strawberry Slush
   Daffodil Delight
   Tuxedo Black Memento

Technique:
   Faux Pressed Flowers

Accessories:
   Daisy Punch
   Square Lattice Embossing Folder
   Gold Faceted Gems
   Mini Glue Dots
   Adhesive

First, I stamped, punched, and adhered the daisies onto the All ABloom DSP. I used up the four 3" Squares for the daisies, and adhered them together using mini glue dots.

I then dry embossed the panel, using the Square Lattice Embossing Folder.

Next, I adhered the embossed panel onto the Mossy Meadow matte.

I then used dimensionals to attach it to the Blushing Bride card front.

Next, I stamped the sentiment below the panel, using Tuxedo Black Memento.

Lastly, I stamped the center of each daisy with a bit of Daffodil Delight, added a Gold Faceted Gem, and adhered a Basic White panel to the inside of the card.

There is a tutorial on SCS for this technique: Faux Pressed Flowers.

Thank you so much for giving me a bit of your time. Please Contact Me if I can return the favor.

Check out all of the options by clicking on the headers above.

Do not forget to FOLLOW and SUBSCRIBE to my blog. Please share, like, pin, tweet, or comment. I look forward to reading your thoughts and possible ideas for improvements.

HAPPY STAMPING!

Saturday, March 2, 2024

Rococo Pearls

This layout can be used for any occasion. Just find two coordinating designer series papers and you are good to go. Thoughts? 


Stamps:
   Go To Greetings

Paper:
   Shaded Spruce A-2
   Perennial Lavender DSP 5-1/4 x 4, 2 x 5
   Rococo Rose 5-3/8 x 4-1/8, 2-1/8 x 5-1/8, 2-1/2 x 1-1/2
   Basic White 1 x 2, 5-1/4 x 4 (Inside)

Ink:
   Shaded Spruce

Technique:
   Punching

Accessories:
   Double Oval Punch
   Pastel Pearls
   Dimensionals
   Adhesive

First, I adhered the DSP panels to the Rococo Rose mattes.

I then adhered the larger panel to the Shaded Spruce card front.

Next, I adhered the rectangular or smaller panel to the right side of the card front. Note its placement: the tops of the Rococo Rose mattes are even with each other, but slightly to the left of the right edge of the card, leaving a bit of the DSP card front showing on the right and the bottom.

I then stamped and punched the sentiment, and adhered it to the card front.

Lastly, I added a pearl and adhered the Basic White panel to the inside of the card.

I decided to make a few cards with a few Spanish sentiments that I had on hand. What do you think of these:


Rococo Pearls Tambien


Thank you so much for stopping by here. Contact Me if you have any questions.

Shop Now and buy your supplies to make your own cards. Place an order today for your favorites before they run out of stock.

Join Me and become my new team member. Enjoy the best savings and opportunity offered today!

Subscribe to Paper Pumpkin and craft monthly for under $25. Don't forget to take a look at the All-Inclusive Kits!

If you liked my card, please share, like, pin, tweet, or comment. I would love for you to FOLLOW and SUBSCRIBE to my blog. Let me know what you think in the comments below.

HAPPY STAMPING!

Friday, February 23, 2024

Birthday Roses

I used Black and White on a River Rock. Silly, I know. Black ink, white leaves on a window sheet, and all on a card base, whose color is known as "River Rock." Thoughts? 


Stamps:
   Stippled Roses
   Go To Greetings

Paper:
   River Rock A-2
   Naturally Eclectic Card Overlays 1/2 sheet
   Basic White 5-1/4 x 4 (Inside)

Ink:
   Tuxedo Black Memento

Technique:
   CAS

Accessories:
   Black Glitter Washi Tape
   Black Rhinestone Jewels
   Glue Dots
   Adhesive

First, I cut a sheet of the Naturally Eclectic Card Overlay in half. This will make two cards!

I then laid the overlay on top of the River Rock card front, to know where to stamp my sentiment. I made a tiny pencil mark to guide me.

Next, I removed the overlay and stamped my sentiment, using Tuxedo Black Memento ink. I also stamped two roses on the bottom part of the card front. If you are nervous about stamping, you can use a Stamparatus, Stamp-a-ma-jig, or a MISTI to get perfect placement.

I then added glue dots behind a few of the white leaves on the overlay and adhered it to the top of the River Rock card front.

Next, I added a strip of Black Glitter Washi Tape to help hold the overlay in place and to hide the seam.

Lastly, I added a couple of Black Rhinestone Jewels and adhered a Basic White panel to the inside of the card.

Thank you for dropping by here. Contact Me if you need anything.

Shop Now and take a look at items that are Exclusively Online! You do not want to miss them.

Did you know that Paper Pumpkin and the Kits Collection make the perfect gift? Heck, I say, gift yourself one today! Check them out.

Join Me and become part of my team. Take a look at today's offering and see if it is for you.

Please share, like, pin, tweet, or comment. Do not forget to FOLLOW and SUBSCRIBE to my blog.

HAPPY STAMPING!

Sunday, January 14, 2024

Promenade

This picture-perfect floral DSP is excellent as a background for any occasion. Thoughts? 


Stamps:
   Go To Greetings

Paper:
   Blushing Bride A-2, Scrap
   Petal Promenade DSP 5-1/4 x 4
   Basic White 5-1/4 x 4 (Inside)
   Mossy Meadow Scrap

Ink:
   Fresh Fig

Technique:
   Punching

Accessories:
   Double Oval Punch
   2017-2019 In-Color Bitty Bows
   Elegant Faceted Gems
   White Glitter Ribbon (6")
   Stampin' Seal
   Adhesive

First, I adhered the White Glitter Ribbon to the panel of DSP. I used Stampin' Seal to make sure it did not slip. I adhered the panel onto the Blushing Bride card front.

I then stamped my sentiment onto a scrap of Blushing Bride, using Fresh Fig ink. I then used the Double Oval Punch on it.

Next, I grabbed a scrap of Mossy Meadow, and punched the scalloped oval, using the Double Oval Punch. 

I adhered the small oval onto the larger oval and attached it to the card front, using adhesive. You can easily prop it up on dimensionals if you wish.

Lastly, I added a couple of gems and adhered the Basic White panel to the inside of the card.

Thank you so much for stopping by here. Please Contact Me if you have any questions regarding Stampin' Up!

Take a few moments and Shop Now or click on any of the headers above for more information.

Don't forget to share, like, pin, tweet, or comment. I would appreciate it if you chose to FOLLOW or SUBSCRIBE to my blog.

HAPPY STAMPING!

Wednesday, January 3, 2024

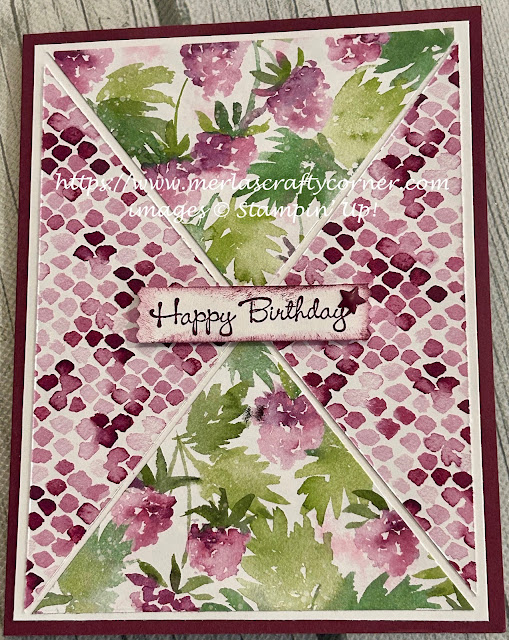
Berry Birthday

Draw attention to your card simply by cutting the designer series paper (DSP) differently. Using two-sided paper makes this even easier because all you have to do is flip two sides. What do you think? 


Stamps:
   Go To Greetings

Paper:
   Rich Razzleberry A-2
   Basic White 5-1/4 x 4 (2), Scrap
   Berry Delightful DSP 5 x 3-3/4

Ink:
   Rich Razzleberry

Technique:
   Sponging
   Punching

Accessories:
   Brights Enamel Shapes
   Washi Label Punch
   Sponge
   Dimensionals
   Adhesive

First, I cut the DSP panel. I lined up two opposite ends of the DSP on the cutting line and cut the paper on the diagonal. This gave me two large triangles.

Keeping the paper together, I slid the paper to the other two opposite corners and diagonally cut the DSP. I now had 4 triangles.

I then flipped over the left and right triangles to give me a view of the other side of the DSP.

Next, I adhered these triangles on to a Basic White panel. I left a little space between the panels as shown above.

I then adhered this panel on to the Rich Razzleberry card front.

Next, I stamped, punched, and sponged the sentiment. You can change this to whatever you need. I adhered it to the center of the card, using dimensionals.

Lastly, I added an enamel star shape to the sentiment, and adhered the other Basic White panel to the inside of the card.

Thank you so much for spending time with me here. Contact Me if you have any questions.

Shop Now and take a look at all of our new products and current promotions. Please use the HOST CODE sitting in the right sidebar if you did not earn your own rewards.

Subscribe to Paper Pumpkin and keep your monthly cost below $25! Join Me and become my newest team member.

Either way, please share, like, pin, tweet, or comment. Do not forget to FOLLOW and SUBSCRIBE to my blog.

HAPPY STAMPING!