Monday, April 2, 2018

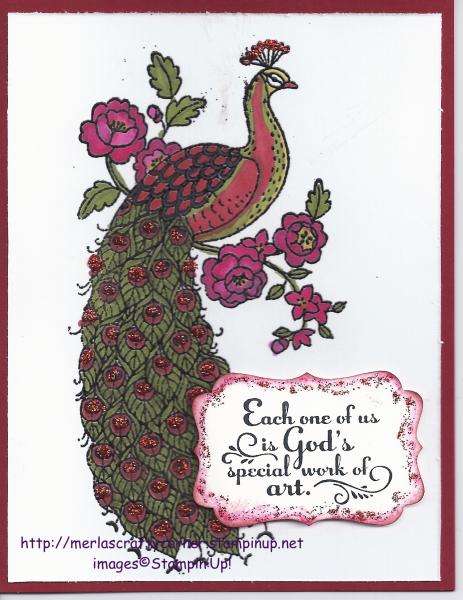
Glittering Perfect Peacock


I should have named this card The Dazzling Peacock. Either way, it is a card to fit any occasion. Supplies that you will need to duplicate this project are:  


Stamp Sets: Perfect Peacock, Trust God
Paper: Cherry Cobbler A-2, Whisper White 5 1/4 X 4
Ink: Cherry Cobbler, Blendabilities: Night of Navy, Cherry Cobbler, Melon Mambo, Daffodil Delight, Old Olive, Versamark 
Techniques: Heat Embossing, Sponging
Accessories: Cherry Cobbler Dazzling Details, Decorative Label Punch, Black Embossing Powder, Sponge, Dimensionals


In retrospect, I should have stamped the peacock a bit more to the left to allow more room for the sentiment. In order to do this, I will use the stamp-a-ma-jig in the future. I also will use the embossing buddy to powder my paper so that I don't make a mess of it with the black embossing powder. The card is fairly easy to make. I just pointed out the two errors I made that hopefully I will correct the next time I make this card. In case you need a step by step instruction, you may continue to read.

After cutting the Whisper White card stock, I inked my peacock with the Versamark and stamped the image. You will cut your card stock, brush it with the embossing buddy, and then stamp it using your Versamark.  Apply your black embossing powder and remove the excess. Apply heat with your heat gun. I then colored the peacock using my blendabilities:  Night of Navy, Cherry Cobbler, Old Olive, and Daffodil Delight were used on the peacock. I used Cherry Cobbler, Melon Mambo, Old Olive, and Daffodil Delight on the flowers. I then applied Cherry Cobbler Dazzling Details to the head feathers and the eyes or circles of the peacock's tail. I then set it aside to dry. Using the Decorative Label punch I stamped and punched out my sentiment. I sponged the edges of the label with Cherry Cobbler and placed the Cherry Cobbler Dazzling Details around it also. Once both of these were dry, I adhered the peacock to the Cherry Cobbler card stock using my favorite adhesive. I used dimensionals to place the label on the card. Done!

I hope you enjoy making this card and use your own creativity to change it up and make your own colorful peacock. Now go and spread your feathers.

Post Card Thank You


Getting back to yesteryear...a time when postage stamps cost two cents? Just the thought of sending a post card today is beyond my expectation. Most people who buy post cards will use them to place in a scrapbook instead of actually mailing them. Today, we just post our pictures on Facebook. Then we have the prices of gasoline constantly on the rise, it is no wonder that more and more of our streets are filled with cyclist on bicycles. Not to mention all the people who are out to feel wonderful by exercising regularly. I know we all have friends and family who do just that. So, here is a card just for them. The sentiment can be changed to fit whatever occasion you need.

Stamp Sets: Post Card, Postage Due, Sassy Salutations, Lovely Little Labels
Paper: Always Artichoke A-2, Whisper White 5 1/4 X 4
Ink: Always Artichoke, Pumpkin Pie, Pistachio Pudding, Markers: Always Artichoke, Pistachio Pudding, Pumpkin Pie
Accessories: Postage Stamp Punch, Little Labels Punch Pack, Dimensionals, 
Stamp-a-ma-jig, Adhesive

When you use the post card background stamp, you want to ink it using your marker rather than an ink pad. This avoids getting ink on the wide empty spaces of the stamp that may transfer to your card stock. The stamp-a-ma-jig is needed to get the right placement of the writing and the bicycle. I stamped an extra bicycle, cut it out, and attached it using dimensionals. I also used dimensionals on the two cent postage stamp. This helped to make these images pop out at you. Have fun, share if you like this, and thanks for looking!


Sunday, April 1, 2018

Mixed Bunch Thank You


A simple, cute card to say thank you. If your time and your supplies are limited, then this is the card for you. You may choose to embellish it further, or even make it more basic. For example, I used dimensionals to raise the flower, yet you may choose to glue it directly onto the card stock. The sentiment can also be placed on any decorative frame that you may have on hand. There is plenty of room on the card. If you wish to step it up more, then you can use rhinestones, or pearls for the center of the flower. You may choose to accent the flower with embossing powder or adding a ribbon to the card. With Stampin' Up! the possibilities are endless. I chose to keep it simple for my stamp camp. Following are the supplies and measurements that I used. Have fun and be creative!
 
Stamp Sets: Mixed Bunch, Lots of Thanks
Paper: Pink Pirouette A-2, Soft Sky 5 1/4 X 4, Melon Mambo 2 3/4 X 2 1/2, Crushed Curry 1 1/4 strip, punch after stamping, Old Olive 5 X 3/4 
Ink: Melon Mambo, Old Olive, Crushed Curry
Accessories: Blossom Punch, 1" Circle Punch, Stylish Stripes Embossing Folder, Dimensionals, Adhesive

This is a fairly simple card to assemble, so I won't bore you with every detail. I will caution you to make sure you stamp before you punch, and that you stamp in the center of your card stock to leave enough room for the punch. You also want to place the flower onto the old olive strip before stamping your sentiment to make sure that it is where you would like to place it. Have fun.

Feel free to post any comments or questions, and I will get back to you as soon as possible. Thanks for spending time with me.
The Open Sea

Need a masculine card?  Here you go. The Open Sea stamp set is very versatile.  Although it is one that can be used for our male population, it will also fit any traveling occasion or new beginning. Any type of new adventure or endeavor can be commemorated with this stamp set. The technique I used here is known as triple layering. I have no idea who came up with this, but I love it and think it is genius! 


First, you cut out your white card stock into the three sizes used. Measurements appear below. Using a dab of temporary glue, you glue the three pieces of white card stock together centering one on top of the other. Using Pacific Point classic ink, stamp the ship in the center of the card stock.  Using Chocolate Chip classic ink, stamp the other images randomly around the ship as you like. Next, you want to dry emboss the white card stock. I used the Square Lattice folder to try to create a choppy kind of background. You may use any folder you deem is fitting, or choose to skip the dry embossing altogether. Now, carefully take the three white card stock pieces apart and affix the two top pieces to their Pacific Point counterparts. Make sure that you are aligning the images together to create that 3-D effect. Take the Cherry Cobbler baker's twine and wrap it around these two pieces.  Insert the twine through the neutral colored button. I used a glue dot to make sure the button would stay in place. Then you double knot the twine and trim it to your liking. You then place these two pieces onto the third and final layer of your card stock, and you are done! If you want your images to pop out more, you can use dimensionals in between the layers. Now, fill in the inside of the card and make someone smile today!

Stamp Set: The Open Sea
Paper: Pacific Point A-2, 4 1/2 X 3 1/4, 3 1/2 X 2 1/4, 
Whisper White 5 3/8 X 4, 3 X 4 1/4, 3 1/4 X 2
Ink: Chocolate Chip, Pacific Point
Technique:  Triple Layering
Accessories: Cherry Cobbler Baker's Twine, Neutral Button, Square Lattice Embossing Folder, Temporary Adhesive, Permanent Adhesive

Saturday, March 31, 2018

Craft Fair Project #1: Valentine's Treat Bag


Stamps: Groovy Love
Paper: White Lunch Bag, Basic Black 4" Sq., 5 x 2 1/2, Whisper White 5 x 2
Ink: Archival Basic Black, Real Red
Techniques: Die Cutting, Sponging
Accessories: Bloomin' Heart Thinlits Dies, Red Ribbons: 5 x 2 1/2 Piece for the front of bag, 16" of a smaller one to tie around the bag, Sponge, Glue Dots, Fast Fuse, Adhesive

The best instruction is to watch the video above to see the front of the bag and how it is all put together. 

My favorite thing about this project is that it can be changed to fit any occasion you need. Whether you are looking for some treat bags for a birthday party, Christmas, Easter, or simply a hostess gift for a workshop. Just change up the stamp and the treat. Have some fun with it. 

If you are trying to sell them at a craft fair, you only need to worry about making a bit of profit on your treat inside. It costs less than a dollar to put the bag together. Good Luck. Let me know what you think and how it goes for you in the comments below.

Thank you for stopping by here. Your feedback is appreciated and encouraged. It may help others who are planning for a craft fair. If you have other projects add the links in the comments please. 

HAPPY STAMPING!