Showing posts with label MISTI. Show all posts

Sunday, August 24, 2025

Birthday Block

I think this Birthday Block stamp fit perfectly in the center of this floral wreath. Thoughts? 


Stamps:
   Birthday Block

Paper:
   Rich Razzleberry A-2
   Blushing Bride 5-1/4 x 4-1/8
   Dainty Flowers DSP 4 x 4-7/8
   Basic White 5-1/4 x 4 (Inside)

Ink:
   Rich Razzleberry

Markers:
   Blushing Bride
   Crushed Curry
   Fresh Freesia
   Old Olive
   Starry Sky

Technique:
   CAS
   Coloring

Accessories:
   Stamp-a-ma-jig
   Basic Rhinestone Jewels
   Adhesive

First, I used my Stamp-a-ma-jig to position my stamp perfectly in the center of the wreath. 

I then stamped it, using Rich Razzleberry ink.

Next, I colored in the image, using the markers listed above. 

I then adhered the panel onto a Blushing Bride panel and then adhered it onto the Rich Razzleberry card front. 

Lastly, I added a few Basic Rhinestone Jewels to the card front and adhered a Basic White panel to the inside of the card.

I used the Stamp-a-ma-jig because my stamp is mounted on a wooden block, but you can use a Stamparatus or a MISTI for cling stamps or nothing for a photopolymer stamp.

Thank you so much for stopping by here. Please Contact Me if you have any questions regarding Stampin’ Up!

Take a few moments and Shop Now or click on any of the headers above for more information.

Don’t forget to share, like, pin, tweet, or comment. I would appreciate it if you chose to FOLLOW or SUBSCRIBE to my blog.

HAPPY STAMPING!

Friday, July 19, 2024

Heart & Soul, Too

I found that acrylic paint dries rather quickly. So, you have to work fast. I was glad to get a few brush strokes on paper. What do you think? 


Heart & Soul


Stamps:
   Good Feelings

Paper:
   Tempting Turquoise A-2
   Basic Black 5-3/8 x 4-1/8
   Mixed Media 5-1/4 x 4
   Basic White 5-1/4 x 4 (Inside)

Ink:
   Tuxedo Black Memento

Acrylic Paint:
   Bright Yellow
   Turquoise
   Purple

Technique:
   Acrylic Paint

Accessories:
   Brights Enamel Shapes
   Stamparatus/MISTI/Stamp-a-ma-jig
   Adhesive
   Brush

First, I brushed on some Bright Yellow acrylic paint over the top of the card. 

I then brushed some Purple underneath it, leaving the natural white space that was not covered by the paint.

Next, I added a line of Turquoise and then finished the front with a bit more of the Bright Yellow.

I then set my panel inside my Stamparatus and stamped it, using the Good Feelings stamp set and a bit of Tuxedo Black Memento. I decided to use the Stamparatus in case I needed to stamp the words more than once. 

Next, I adhered the panel onto a Basic Black matte and then onto the Tempting Turquoise card front.

Lastly, I added some Brights Enamel Shapes and adhered a Basic White panel to the inside of the card.

Since, I painted two panels at the same time, here is the other card, using another stamp from the set:

Heart & Soul Too


Thank you for visiting. I do love company. Feel free to Contact Me if you have any questions.

Explore current products, promotions, and all of the opportunities. Just click on Shop Now. A HOST CODE is available in the right sidebar for those of you who do not earn your own rewards.

For those of you who like kits with everything you need to complete a project, we offer Paper Pumpkin. Your monthly cost is $25. Also, you might want to look at the new Kits Collection!

Join Me and become my newest team member. I look forward to meeting you.

Please take a minute to share, like, pin, tweet, or comment. Do not forget to FOLLOW and SUBSCRIBE to my blog.

HAPPY STAMPING!

Wednesday, June 26, 2024

Rain Tree

Create an interesting watercolor background, using this technique. Just allow a few water droplets to fall on your watercolored panel and let it work on its own. Thoughts? 


Stamps:
   Rooted in Nature

Paper:
   Almost Amethyst A-2
   Basic Black 5-3/8 x 4-1/8
   Watercolor 5-1/4 x 4
   Basic White 5-1/4 x 4 (Inside)

Ink:
   Soft Sky
   Almost Amethyst
   River Rock
   Tuxedo Black Memento

Technique:
   Watercolor

Accessories:
   Water Painters/Aqua Painters
   MISTI/Stamparatus/Stamp-a-ma-jig
   Adhesive

First, I watercolored the background, using Soft Sky on top, Almost Amethyst in the center, and River Rock on the bottom.

I then randomly let water droplets fall on the panel. A few ran down the panel, creating an elongated splotch. Oops.

Next, I let the panel dry completely. 

I then used my Stamparatus to stamp my image and sentiment on the panel. It is not necessary, but I wanted to make sure I would get a nice dark image.

Next, I adhered the panel onto a Basic Black matte and then added it to an Almost Amethyst card front.

Lastly, I adhered a Basic White panel to the inside of the card.

Thank you for stopping to take a peek. Contact Me if you have any questions.

Click on Shop Now and browse through all things Stampin' Up! Start your wish list or order your favorites today. I included a HOST CODE for you to use if you like. Use it only if your product total is less than $150. You can find it in the right sidebar.

Join Me and get the best bang for your buck.

Do you want everything at your fingertips without having to look for it? Subscribe to Paper Pumpkin. Want more choices? Check out the Kits Collection.

One last thing, share, like, pin, tweet, and comment. Don't forget to FOLLOW and SUBSCRIBE to my blog. Okay, that was more than one thing.

HAPPY STAMPING!

Monday, May 20, 2024

Blissful Greetings

If you are already going to make a mess, why not make a huge mess. Double the pleasure with this split negative technique. It takes the same amount of time to clean up a small mess as a big mess. Thoughts? 


Stamps:
   Bliss
   Go To Greetings

Paper:
   Blushing Bride A-2, 3 x 4
   Cherry Cobbler 3 x 4
   Moody Mauve 5-3/8 x 4-1/8
   Basic White 5-1/4 x 4 (Inside)

Ink:
   Blushing Bride
   Cherry Cobbler
   Tuxedo Black Memento
   VersaMark

Technique:
   Split Negative Technique

Accessories:
   Cherry Cobbler Embossing Powder
   Blushing Bride Embossing Powder
   Basic Rhinestone Jewels
   Diamond Weave Ribbon 6"
   Stamp-a-ma-jig/Stamparatus/MISTI
   Heat Tool
   Adhesive

There is a tutorial on Split Coast Stampers for the Split Negative Technique that I followed. Take a look. They guide you step by step.

I heat embossed the image on Cherry Cobbler, using Blushing Bride Embossing Powder, and Cherry Cobbler Embossing Powder onto the Blushing Bride panel.

I then cut (split) the image in half and then matched the two different panels next to each other as shown above. 

Next, I adhered the two panels onto the top of a Moody Mauve matte, and stamped the bottom of the Moody Mauve with my sentiments: Happy Birthday and Thank You, both from the Go To Greetings.

I then wrapped a Diamond Weave Ribbon around the panel to conceal the seam. 

Next, I adhered the panel onto the Blushing Bride card front.

Lastly, I added a few Basic Rhinestone Jewels and adhered a Basic White panel onto the inside of the card. 

Thank you so much for dropping by here. Contact Me if you have any questions.

Click on all of the tabs above and explore products, promotions, and opportunities.

Please take the time to share, like, pin, tweet, or comment. Do not forget to FOLLOW and SUBSCRIBE to my blog.

HAPPY STAMPING!

Monday, March 4, 2024

Seeing Double

Make two cards by splitting the image in two. You definitely need one large image to make this work, but it is a wonderful way to make use of those large stamps sitting on your shelf. Thoughts? 


Stamps:
   Medallion
   Good Feelings

Paper:
   Concord Crush A-2
   Basic White 5-1/4 x 8 - Stamp in the center then cut in two, 5-1/4 x 4 (Inside)

Ink:
   Concord Crush

Technique:
   Split Image

Accessories:
   Stamp-a-ma-jig/Stamparatus/MISTI
   Concord Crush 1/2" Stitched Polyester Ribbon 8"
   Basic Pearl Jewels
   Glue Dots
   Adhesive

First, I stamped the large medallion in the center of the 5-1/4 x 8 Basic White panel.

I then cut the 8" in half. So, I now had two panels, measuring 5-1/4 x 4, each with half a medallion. This works with any large image that can be split in two.

Next, I stamped a sentiment on the lower part of the panel as shown above.

I then knotted an 8" strip of Concord Crush ribbon in the center and wrapped it around to the back of the panel. Note: I added a couple of glue dots under the ribbon to keep it flat and in place on the card.

I then adhered each of the panels to a Concord Crush card front.

Lastly, I added a few Basic Pearls and adhered a Basic White panel to the inside of each card.

Thank you immensely for your time. I know how precious it can be. Please Contact Me if you need anything Stampin' Up! or if you have any questions.

Click on Shop Now and take a look at some quality products. Investing in your craft is a no-brainer. I have included a HOST CODE for those of you who enjoy ordering only one or two items. It is located in the right sidebar. Of course, if your product total is more than $150, enjoy your rewards.

Of course, the best value for your dollar is joining the Stampin' Up! family. Just click on Join Me and check out the benefits.

Let's not forget Paper Pumpkin. If you want to craft on the go, or you like to keep things small and low-key, check it out. The kit includes all you need.

Please take a minute or two to share, like, pin, tweet, or comment. Don't forget to FOLLOW and SUBSCRIBE to my blog.

HAPPY STAMPING!

Wednesday, February 14, 2024

Get Well Flower

This is a magic card. When it is closed, the image appears in black and white, but when you pull on the tab, the image is revealed in color! How cool is that? 


Stamps:
   You've Got This
   Teeny Tiny Wishes

Paper:
   Wild Wasabi A-2
   Basic White 5 x 3-7/8
   Window Sheet 5 x 3-7/8
   Have a Cuppa DSP 5 1/4 x 4 (Window Opening 4-1/4 x 3-7/8

Ink:
   Jet Black StazOn

Blendabilities/Blends/Markers:
   Daffodil Delight
   Melon Mambo
   Wild Wasabi

Technique:
   Magic Card

Accessories:
   Tear & Tape
   1/2" Wild Wasabi Grosgrain Striped Ribbon
   Glue Dots
   Dimensionals
   Snail Adhesive
   Stapler
   Stamp-a-ma-jig/Stamparatus/MISTI

I followed the tutorial on Splitcoast Stamper (SCS). You can find it at: Magic Card

Thank you so much for stopping by here and taking the time to peek at my latest creation. Contact Me for any further information. 

If you have a few minutes, I suggest you Shop Now and check out all of our current deals. You don't want to kick yourself later for passing up the opportunity. There is a HOST CODE in the right sidebar if you care to use it.

If you want to feed your Crafty Bug that has been going around, subscribe to Paper Pumpkin. Check it out and see if it is for you.

Join Me and become my newest member. It is the best deal around.

Please take some time to share, like, pin, tweet, or comment. I do appreciate all of your feedback. Don't forget to FOLLOW and SUBSCRIBE to my blog.

HAPPY STAMPING!

Tuesday, January 2, 2024

Morning Eclipse

This technique does work best in black and white. Plus, I like the effect. Thoughts? 


Stamps:
   Good Morning Magnolia

Paper:
   Smoky Slate A-2
   Basic White 5-1/4 x 4 (5)

Ink:
   Tuxedo Black Memento

Technique:
   Stamped Eclipse

Accessories:
   Florentine Thinlits Dies
   Stamparatus/MISTI/Stamp-a-ma-jig
   Fine Tip Glue Pen
   Adhesive

First, I stamped the image on two panels, using Tuxedo Black Memento. The stamping must be exact on each one, so it's advisable to use a Stamp-a-ma-jig, Stamparatus, or a MISTI tool.

I then took one of the stamped images and die cut it, using the Florentine Thinlit Die. Any large background die will work on this technique.

Next, I die cut another two Basic White panels, using the same die cut.

I then adhered all of the die cut panels together, making sure the stamped die cut ended up on top of the stack. I used the fine tip glue pen for this, but you can use any adhesive, or an adhesive sheet.

I then adhered the die cut stack onto the stamped panel. The images should align perfectly, giving you a stamped eclipse of the images. 

Lastly, I adhered these onto the Smoky Slate card front, and adhered a Basic White panel onto the inside of the card. 

I purposely left off a sentiment, allowing this to be an All-Occasion card. 

Thank you so much for stopping by here and taking a quick look-see. If you have any questions or need my assistance, Contact Me.

Shop Now and take a look at all of our new products and current promotions. Please use the HOST CODE sitting in the right sidebar if you did not earn your own rewards.

If you want to craft, but keep your costs below $25 a month, check out Paper Pumpkin. It just might be what you are looking for at the moment.

Join Me and become the newest member of my team. Remember there are no hidden agendas or penalties for giving it a go. Don't pass this opportunity to save.

You've come this far, so please share, like, pin, tweet, or comment. I appreciate your time and efforts. Let me know your thoughts and leave all of your questions behind. Do not forget to FOLLOW and SUBSCRIBE to my blog.

HAPPY STAMPING!

Wednesday, July 12, 2023

Serenity

Imagine sitting by this lovely stream, right under the tree on the left. You are one with nature. Your surroundings fill your senses with serenity, as long as that one mosquito stays away...


Stamps:
   Peaceful Place

Paper:
   Wisteria Wonder A-2
   Basic Black 5-1/4 x 4
   Glossy White 5 x 3-3/4
   Basic White 5-1/4 x 4 (Inside)

Ink:
   Jet Black StazOn

Blends/Alcohol Markers:
   Coastal Cabana
   Melon Mambo
   Pumpkin Pie
   Wild Wasabi
   Wisteria Wonder

Technique:
   Alcohol Marker Marbling

Accessories:
   Alcohol in Spray Bottle
   Stamparatus/MISTI
   Adhesive

First, I placed a Basic White panel on my table as a template.

I then covered and secured a Ziploc-type plastic bag over it.

Next, I began coloring on the plastic with the alcohol markers. Basically, scribble with various colors. You do want to keep the colors separate, otherwise, you may wind up with a muddy mess.

I then spritzed the colors with alcohol until they looked wet.

Next, I placed the glossy side down on the ink and let it sit for a few seconds to lift up the ink. I carefully lifted it, and there was my background. In hindsight, I should have dabbed the edges with a paper towel. Still, I did like my final background.

I let it dry for a minute and placed it in my Stamparatus. Using StazOn ink, I stamped my image.

You can find a tutorial for this technique at SplitCoastStampers HERE.

Thank you for stopping to take a peek. Contact Me if you have any questions.

Click on Shop Now and browse through all things Stampin' Up! Start your wish list or order your favorites today. I included a HOST CODE for you to use if you like. Use it only if your product total is less than $150. You can find it in the right sidebar.

Join Me and get the best bang for your buck.

Do you want everything at your fingertips without having to look for it? Subscribe to Paper Pumpkin. Want more choices? Check out the Kit Collection.

One last thing, share, like, pin, tweet, or comment. Don't forget to FOLLOW and SUBSCRIBE to my blog. Okay, that was more than one thing.

HAPPY STAMPING!

Saturday, September 24, 2022

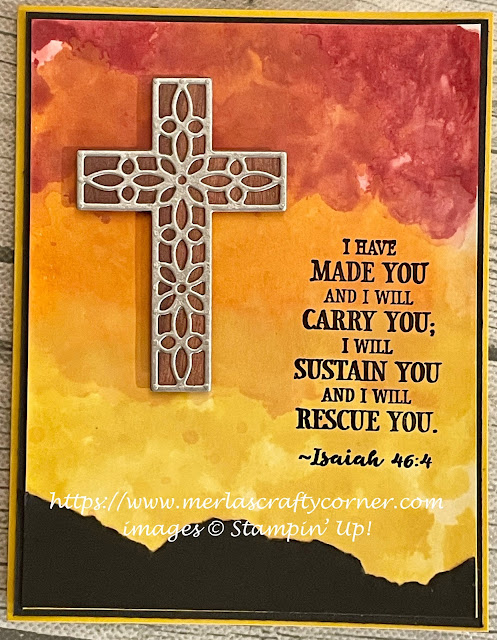
Above the Mountains

This is one of those cards that looks so much better in real life. The background was created using a bit of alcohol and ink, so each turned out to be quite unique. I made four of them, but they all used the same supplies. What do you think? 


Above the Mountains


Above the Mountains Too


Above the Mountains Tre


Above the Mountains Quad


Stamps:
   Hold on to Hope

Paper:
   Crushed Curry A-2
   Basic Black 5-3/8 x 4-1/8, 2-1/4 x 4 
   Glossy white 5-1/4 x 4
   Galvanized Metallic Paper 2 x 3
   Wood Textures DSP 2 x 3
   Basic White 5-1/4 x 4 (Inside)

Ink:
   StazOn Jet Black

Re-Inkers:
   Real Red
   Pumpkin Pie
   Crushed Curry

Technique:
   Polished Stone

Accessories:
   Cross of Hope Framelits
   Fine Tip Glue Pen
   Dimensionals
   Adhesive
   Stamparatus/MISTI

First, I created my background using the Polished Stone Technique found on SCS. Click HERE for instructions. I did not use a sealer on mine.

Once the background was dry, I adhered the Basic Black to the bottom of the panel. I took the Basic Black piece and tore it to give the illusion of mountains in the distance. I placed one half on one card and the other half on another card.

I then die cut the solid cross on a piece of Wood Textures DSP, and the more intricate cross on a piece of Galvanized Metallic Paper. I adhered the crosses together, using a Fine Tip Glue Pen.

Next, I adhered the glossy panel to the Basic Black matte. This helped to keep it flat. 

I then placed it into my Stamparatus and stamped the sentiment. I did have to stamp the sentiment twice to get it nice and dark. The last card moved a tad without my noticing, but I think it looks like shadow stamping. It makes this one VERY unique.

Next, I adhered the panel to the card front and added the cross, using dimensionals.

Lastly, I adhered a Basic White panel to the inside of the card.

Thank you so much for stopping by here. Contact Me if you have any questions.

Shop Now and buy your supplies to make your own cards. Place an order today for your favorites before they run out of stock.

Join Me and become my new team member. Enjoy the best savings and opportunity offered today!

Subscribe to Paper Pumpkin and craft monthly for under $25. Don't forget to take a look at the All-Inclusive Kits!

If you liked my card, please share, like, pin, tweet, or comment. I would love for you to FOLLOW and SUBSCRIBE to my blog. Let me know what you think in the comments below.

HAPPY STAMPING!