Showing posts with label Thread. Show all posts

Tuesday, May 23, 2023

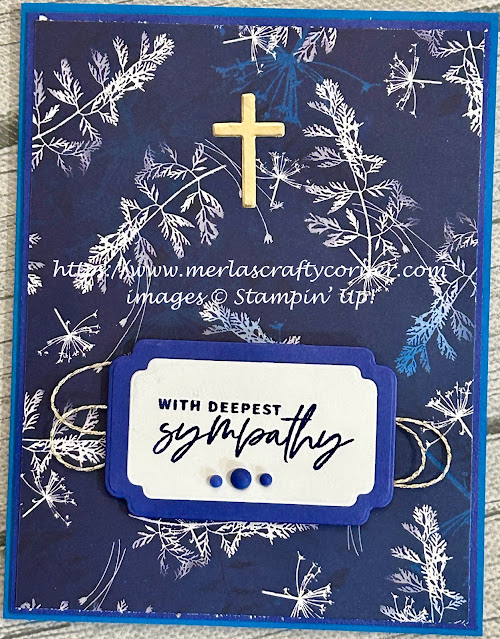
Sympathy Prints

Sympathy cards are a must have on hand item. Unfortunately, the older we get, the more we need them. This one came together quite easily, since I let the paper do all of the work for me. With all of the different hues of blue, the gold cross really glows on this one. Thoughts?


Stamps:
   Something Fancy

Paper:
   Pacific Point A-2
   Starry Sky 5-3/8 x 4-1/8
   Sun Prints DSP 5-1/4 x 4
   Basic White 5-1/4 x 4 (Inside), 2-1/2 x 1-1/2
   Gold Foil Scrap 1-1/4 x 3/4

Ink:
   Starry Sky

Technique:
   Die Cutting

Accessories:
   Cross of Hope Framelits
   Something Fancy Dies
   Left-Over Paper Pumpkin Gold Thread
   2022-24 In-Color Matte Decorative Dots
   Dimensionals
   Adhesive

First, I stamped and die cut the sentiment, using Starry Sky ink on Basic White card-stock.

I then cut a matte for the sentiment using the next larger die cut. I used the center of the Starry Sky panel to die cut it, since it will be covered by the DSP panel. I adhered this die cut to the Basic White sentiment.

Next, I adhered the DSP panel to the Starry Sky matte and then onto the Pacific Point card front.

I then added a few dimensionals to the back of the sentiment panel and adhered some gold thread to it. I then attached this to the card front.

The gold die cut cross was added to the top of the card with some liquid adhesive.

Lastly, I added 3 matte decorative dots to the sentiment and adhered the Basic White panel to the inside of the card.

Thank you for taking the time to read this. I try my best to keep it short and sweet. Contact Me if you have questions or need anything Stampin' Up!

Shop Now and take a peek at quality products. There is a HOST CODE if your product total is less than $150. You do not have to use it, but I would appreciate it. It is located in the right sidebar.

Join Me and become part of my team. I will be as involved as you like. Check out the advantages.

Are you curious, but undecided? Subscribe to Paper Pumpkin and try it. The kit will include everything you need, and it won't break the bank. Check out the Kit Collection for more all-inclusive kit choices.

Please share, like, pin, tweet, or comment. I would love for you to FOLLOW and SUBSCRIBE to my blog.

HAPPY STAMPING!

Thursday, January 6, 2022

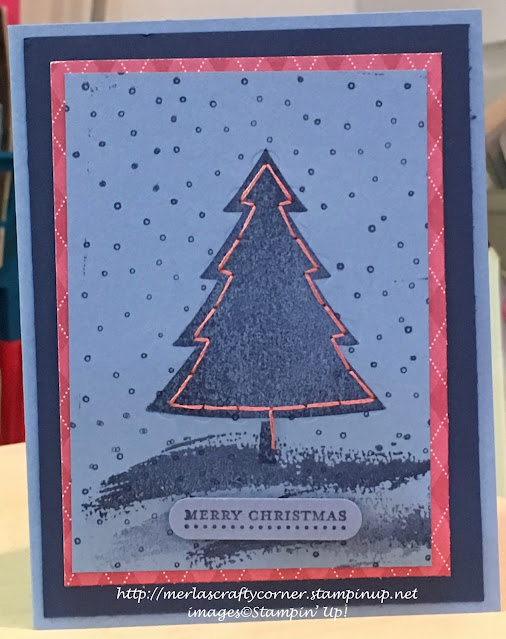
A Tree in Stitches

I was challenged to add some stitches to my card. So, I grabbed a needle and thread. This was the result. What do you think? 


Stamps:
   Festive Season
   Sheltering Tree
   Teeny Tiny Wishes
   Itty Bitty Backgrounds

Paper:
   Brocade Blue A-2, 4-1/2 x 3-1/4, Scraps
   Night of Navy 5-1/4 x 4
   Rose Red DSP 4-3/4 x 3-1/2
   Basic White 5-1/4 x 4 (Inside)

Ink:
   Night of Navy
   Brocade Blue

Technique:
   Die Cutting
   Stitching (Sewing)

Accessories:
   Festive Stitching Thinlits Dies
   Word Window Punch
   Dimensionals
   Thread
   Needle
   Adhesive

To begin, I stamped and sewed on the 4-1/2 x 3-1/4 piece of Brocade Blue. I used 3 strands of x-stitch thread that I had in my stash for the sewing. 

First, I stamped the tree, ground cover, and snow. I used both Night of Navy and Brocade Blue for the snowfall. 

I then used the Festive Stitching Thinlits Dies to make the sewing holes on the tree frame. I added the thread keeping all of the mess on the back of the card and the pretty stitching in the front.

Next, I adhered all of the layers as shown above.

Lastly, I stamped and attached the sentiment using dimensionals, and added the Basic White panel to the inside of the card.

I am so excited that you stopped to read and check out my work. Thank you from the bottom of my heart. Contact Me and let me know if there is anything I can answer for you.

Do you have some time to browse? You do not want to pass up the opportunity to shop some quality products and see what is trending. Shop Now and take a peek. If you decide to place an order, I have included a HOST CODE in the right sidebar if you do not earn any rewards on your own. Thanks in advance.

Are you undecided? Subscribe to Paper Pumpkin and give it a go. Let the products speak for themselves. The cost is less than $25 and you are completely in control. No small print for you to miss. Try it.

Join Me and gain the best value for your hard-earned money. Check it out now.

Share, like, pin, tweet, or comment. Come on, I dare you. Don't forget to FOLLOW and SUBSCRIBE to my blog.

HAPPY STAMPING!

Monday, November 22, 2021

Amazing Silhouettes

The distINKtive ink surrounding the silhouette adds such elegance to the card. There is no need to be an artist. Stampin' Up! shares artistic talents with everyone. So, stamp with this set and create art. Thoughts?


Stamps:
   Amazing Silhouettes
   Through It Together

Paper:
   Tip Top Taupe A-2
   Go Wild DSP 5-1/2 x 4
   Basic White 5-1/2 x 2-1/2, 5-1/4 x 4 (Inside)

Ink:
   Shaded Spruce
   Tip Top Taupe

Technique:
   Sponging
   Distressed Edges

Accessories:
   Linen Thread 28"
   Sponge
   Distressing Tool
   Basic Rhinestone Jewels
   Adhesive

First, I stamped the silhouette using Shaded Spruce on a 5-1/2 x 2-1/2 Basic White panel.

I then sponged the edges using Tip Top Taupe.

I roughed up the edges using a distressing tool.

Next, I wrapped linen thread on the bottom of the panel and tied a bow.

I then adhered it onto the DSP panel and then onto the Tip Top Taupe card front.

I stamped the sentiment, added a few rhinestones, and adhered the other Basic White panel to the inside of the card.

Thank you so much for stopping by here and spending a few minutes of your day with me. I appreciate your time. Contact Me if you have any questions, need a demonstrator, or just want to stamp or share ideas.

Shop Now and enjoy browsing products and promotions. I have a HOST CODE in the right sidebar in case you did not earn your own rewards.

Do not miss the opportunity to Join Me and become the newest member of my team.

Paper Pumpkin should not be ignored. I enjoy putting my kit together monthly.

Take a few more minutes and share, like, pin, tweet, or comment. I would love to see what you really think. Do not forget to FOLLOW and SUBSCRIBE to my blog.

HAPPY STAMPING!

Monday, July 5, 2021

Friendly Rooster

Here I am again using a stamp set that made its debut four years ago. First, let me say that I only buy stamp sets that I really like. I invest in my hobby of card making. So, even though these stamps are no longer current, the images are timeless along with my imagination and creativity. What do you think of this card?


Stamps:
   Wood Words

Paper:
   Calypso Coral A-2, 1-3/4" Sq.
   Crushed Curry 5-1/4 x 4, 1-3/4" Sq.
   Very Vanilla 5 x 3-3/4, 5-1/4 x 4 (Inside)
   Cajun Craze 1-3/4" Sq.
   Tranquil Tide 1-3/4" Sq.
   Adventure Bound DSP 1-5/8 x 5

Ink:
   Cajun Craze
   Calypso Coral
   Crushed Curry
   Tranquil Tide

Technique:
   Die Cutting

Accessories:
   Stitched Shapes Framelits Dies
   Regals Candy Dots
   30" Linen Thread
   Adhesive

First, I stamped my images on scraps of cardstock that were at least 1-3/4" squares. I used the same ink as the cardstock. I then die cut the images using the smallest stitched square: 1-3/8" square.

I adhered the squares onto a strip of designer series paper. You can use a strip of Early Espresso, Chocolate Chip, or even Basic Black if you do not have the designer series paper.

I then adhered this strip of squares onto the lower part of the Very Vanilla panel. I stamped the sentiment, tied some linen thread around the panel, and added some candy dots beneath the sentiment.

Next, I adhered this panel onto the Crushed Curry panel and then onto the Calypso Coral card front.

Lastly, I adhered the other Very Vanilla panel to the inside of the card.

Thank you so much for stopping by here and spending a few minutes of your day with me. I appreciate your time. Contact Me if you have any questions, need a demonstrator, or just want to stamp or share ideas.

Shop Now and enjoy browsing products and promotions. I have a HOST CODE in the right sidebar in case you did not earn your own rewards.

Do not miss the opportunity to Join Me and become the newest member of my team.

Paper Pumpkin should not be ignored. I enjoy putting my kit together monthly.

Take a few more minutes and share, like, pin, tweet, or comment. I would love to see what you really think. Do not forget to FOLLOW and SUBSCRIBE to my blog.

HAPPY STAMPING!

Thursday, January 14, 2021

Leaves on the Wall

Over the years people have collected and pressed leaves. Others have created art while others just enjoy playing in a big pile of leaves. Either way, images of leaves can be used to express just about anything. Check out this one.


Leaves on the Wall


Stamps:
   Vintage Leaves
   Rose Wonder

Paper:
   Crumb Cake A-2
   Basic Black 5-3/8 x 4-1/8
   Whisper White 5-1/4 x 4 (2), Scraps

Ink:
   Crumb Cake
   Pumpkin Pie
   Sweet Sugarplum
   Archival Basic Black

Technique:
   Die Cutting
   Dry Embossing

Accessories:
   Rose Garden Thinlits Dies
   Leaflets Framelits Dies
   Brick Wall Embossing Folder
   Linen Thread 
   Basic Pearl Jewels
   Glue Dots
   Dimensionals
   Adhesive

Did you know that you can take a leaf from a fruit tree and know the fruit it will bear? All you have to do is tear the leaf in half and smell it. The leaf will smell the same as the fruit it will bear. Here is another card with another purpose, but using the same materials. Notice the subtleties that make each card unique.


Leaves on the Wall Too

So, my first step was to ink up my Brick Wall Textured Impressions Embossing Folder with my Sweet Sugarplum Classic Ink Pad. I applied ink to the smooth side of the embossing folder. I then carefully placed my Whisper White panel inside the folder, making sure it did not shift or move. I then ran it through my embossing machine. Make sure you clean your folder when you are done.

Next, I stamped and die cut my leaves. I used Crumb Cake and Pumpkin Pie ink. Using the Vintage Leaves stamp set, I stamped two large leaves and two small ones. I then die cut them using the Leaflits Framelits Dies.

I added linen thread to my large leaf. I used a glue dot to hold the linen thread in place on the back of the leaf. I then just wrapped it around the leaf pulling it around each indentation on the middle section. I added another glue dot to hold the thread on the back. I used about 36" of thread.

I then arranged these leaves and attached them to the brick wall using dimensionals. I tied a bow with linen thread and adhered it with a glue dot where the stems crossed. 

I then stamped my frames and sentiments with my Archival Basic Black Ink Pad. I die cut these using the Rose Garden Thinlits Dies. These were also attached using dimensionals.

I then adhered these panels onto the Basic Black cardstock and then onto the card fronts. I like to add a 5-1/4 x 4" Whisper White panel to the inside of the card as well. So, you actually need 4 panels, instead of 2. 

Lastly, add a few pearls to the sentiment on each card.

Thank you so very much for being here. I appreciate you taking the time to glance at my work. Please Contact Me if I can be of service.

Are you interested in Stampin' Up! products to make your own cards? Shop Now and have a look-see. I placed a HOST CODE for you to use if you do not earn your own rewards. It is sitting in the right sidebar.

Do you like surprises? Subscribe to our Paper Pumpkin and receive all you need to complete the monthly project. The cost is less than $25. Check it out.

Join Me and be privy to everything Stampin' Up! Receive a discount on all of your personal orders. Personally, I love SALES! 

Please share, like, pin, tweet, or comment. Do not forget to FOLLOW and SUBSCRIBE to my blog.

HAPPY STAMPING!


Wednesday, November 18, 2020

Thank You Tassel

 I made three panels from a 1" leftover strip of designer series paper. Since the paper is a floral design, you can cut it anywhere, and it will look beautiful. I used Tranquil Tide as the dominant color, and Gray Granite as the card base. Any thoughts?


Stamps:
   Perfect Punches

Paper:
   Gray Granite A-2
   Whisper White 5-1/4 x 4 (Inside), 2-1/2 x 1-1/2
   Frosted Floral DSP 1 x 3-1/2 (3)
   Tranquil Tide 1-1/4 x 3-3/4 (3)

Ink:
   Soft Suede

Technique:
   Punching

Accessories:
   Scallop Oval Punch
   Mini Tassels Assortment
   White Brad
   Gold Thread
   Dimensionals
   Adhesive

This is a great layout to use for those leftover pieces of designer series paper. You can choose any color from the DSP to mat it, and then choose another for the sentiment and embellishments. Have fun and let your creativity run wild. 

The sentiment is attached using dimensionals. The panels are adhered with liquid adhesive, and the gold thread is sitting on a glue dot.

I attached the tassel with a white brad. I pierced the card base first, and then placed the brad through the hole. 

Thank you so much for spending time with me here. Contact Me if you have any questions.

Shop Now and take a look at all of our new products and current promotions. Please use the HOST CODE sitting in the right sidebar if you did not earn your own rewards.

Subscribe to Paper Pumpkin and keep your monthly cost below $25! Join Me and become my newest team member.

Either way, please share, like, pin, tweet, or comment. Do not forget to FOLLOW and SUBSCRIBE to my blog.

HAPPY STAMPING!