Showing posts with label Santa's Sleigh. Show all posts

Friday, October 11, 2024

Sleigh Ride

I like the intricate detail on this die cut. It adorns the sleigh beautifully. Thoughts? 


Stamps:
   Santa's Sleigh

Paper:
   Very Vanilla A-2, 5-1/4 x 4 (Inside)
   Basic Black 4 x 2-1/2
   Soft Suede 2 x 3
   Red Glimmer 2 x 3

Ink:
   Tuxedo Black Memento
   Soft Suede

Technique:
   Die Cutting

Accessories:
   Santa's Sleigh Framelits Dies
   Baker's Twine Trio Pack (Gold)
   Gold Glimmer Tape
   Dimensionals
   Fine Tip Glue Pen
   Adhesive

First, I die cut the sleigh in Basic Black, using Santa's Sleigh Framelits.

I then die cut the decorative details of the sleigh in Red Glimmer Paper. I adhered the Red Glimmer Paper onto the Basic Black Sleigh, using the Fine Tip Glue Pen.

Next, I stamped and die cut the reindeer in Soft Suede.

I then adhered some Gold Glimmer Tape to the bottom of the Very Vanilla card front. This makes up the road or runway for Santa's Sleigh and reindeer.

Next, I adhered the sleigh to the card front and attached the deer, using dimensionals.

I then tied the Gold Baker's Twine from the reindeer to the sleigh.

Lastly, I stamped a sentiment to the top center of the card front and adhered a Very Vanilla panel to the inside of the card.

Thank you for visiting. I do love company. Feel free to Contact Me if you have any questions.

Explore current products, promotions, and all of the opportunities. Just click on Shop Now. A Host Code is available in the right sidebar for those of you who do not earn your own rewards.

For those of you who like kits with everything you need to complete a project, we offer Paper Pumpkin. Your monthly cost is $25. Also, you might want to look at the new Kits Collection!

Join Me and become my newest team member. I look forward to meeting you.

Please take a minute to share, like, pin, tweet, or comment. Do not forget to FOLLOW and SUBSCRIBE to my blog.

HAPPY STAMPING!

Saturday, December 25, 2021

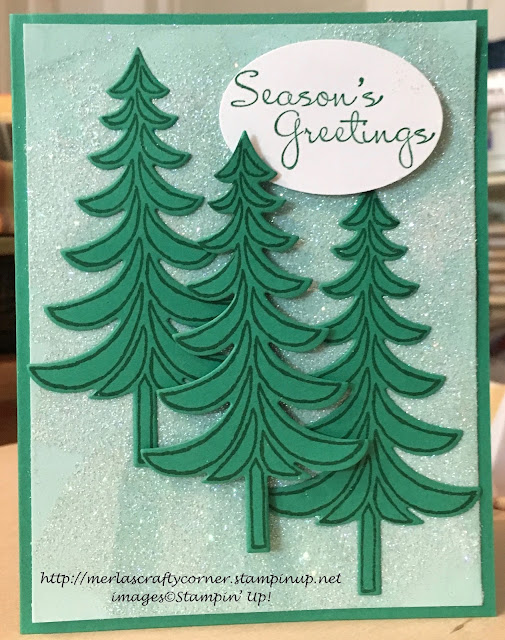
Oh, Christmas Tree

 Merry Christmas Everyone! 


If you want to get messy today and spread glitter everywhere, this is the technique for you. It is a faux suede technique with a twist. It is called Iced Leather. Of course, I am speaking of only the background. What do you think?


Stamps:
   Santa's Sleigh
   More Merry Messages

Paper:
   Emerald Envy A-2, 4-1/4 x 2-1/2 (3)
   Basic White 1-3/4 x 2-1/4, 5-1/4 x 4 (Inside)
   Pool Party 5-1/4 x 4

Ink:
   Emerald Envy

Technique:
   Iced Leather

Accessories:
   Sanding Block
   Heat & Stick Powder
   Dazzling Diamonds Glitter
   VersaMark
   Santa's Sleigh Framelits Dies
   Extra-Large Oval Punch
   Dimensionals
   Adhesive

First, I made the background, Iced Leather. I took a sanding block and roughed up the Pool Party panel. This gave the panel the look of suede.

I then swiped the sueded panel with VersaMark. I tried to create some rough or hard edges along with some soft edges.

I then sprinkled some Heat and Stick Powder. I applied heat with my heat tool and quickly added the glitter. I tapped off the access and set it aside to cool.

I stamped and die cut three trees and a sentiment.

I arranged them all on the card and attached them using dimensionals.

Lastly, I adhered the basic white panel to the inside of the card.

Thank you so much for stopping by here. Contact Me if you have any questions.

Shop Now and buy your supplies to make your own cards. Take a peek today and find out what you can grab for FREE!

Join Me and become my new team member. Enjoy the best savings and opportunity offered today!

Subscribe to Paper Pumpkin and craft monthly for under $25. Don't forget to take a look at the All-Inclusive Kits!

If you liked my card, please share, like, pin, tweet, or comment. I would love for you to FOLLOW and SUBSCRIBE to my blog. Let me know what you think in the comments below.

HAPPY STAMPING!

Thursday, July 1, 2021

Jingle Bells

I love to see glitter on a Christmas card, but I do not like for the glitter to end up on my hands, floor, table, clothes, etc. You know what I mean. This is why I like this glitter paper. The glitter stays on the card. What are your thoughts?


Stamps:
   Santa's Sleigh

Paper:
   Real Red A-2
   Whisper White 5-1/4 x 4 (2)
   Gold Glitter 3-1/8 x 1-3/4
   Crumb Cake 2 x 3

Ink:
   Archival Basic Black

Technique:
   Die Cutting

Accessories:
   Santa's Sleigh Framelits Dies
   Baker's Twine Trio Pack
   Mini Jingle Bells
   Dimensionals
   Glue Dots
   Fast Fuse
   Adhesive

First, I stamped and die cut the reindeer on Crumb Cake.

I then die cut the sleigh on glitter paper. It is easier to die cut on the back of the glitter paper, but not necessary.

Next, I stamped my sleigh and sentiment on the Whisper White panel.

I adhered the glitter sleigh onto the stamped sleigh.

I added a small gold bow to the left of the sentiment and topped it off with a few jingle bells. 

I attached the reindeer using dimensionals on the body only. I left the head alone until after I tied the twine from the reindeer to the sleigh. I went around the reindeer's neck and then onto the sleigh. I tied it off with a bow. I then added a dimensional to the head of the reindeer.

The other Whisper White panel was adhered to the inside of the card.

Thank you so very much for being here. I appreciate you taking the time to glance at my work. Please Contact Me if I can be of service.

Are you interested in Stampin' Up! products to make your own cards? Shop Now and have a look-see. I placed a HOST CODE for you to use if you do not earn your own rewards. It is sitting in the right sidebar.

Do you like surprises? Subscribe to our Paper Pumpkin and receive all you need to complete the monthly project. The cost is less than $25. Check it out.

Join Me and become privy to everything Stampin' Up! Receive a discount on all of your personal orders. Personally, I love SALES!

Please share, like, pin, tweet, or comment. Do not forget to FOLLOW and SUBSCRIBE to my blog.

HAPPY STAMPING!