Friday, April 8, 2022

Fresh Alcohol

Create an original card each time, using any watercolor technique. Do you have a favorite technique? 
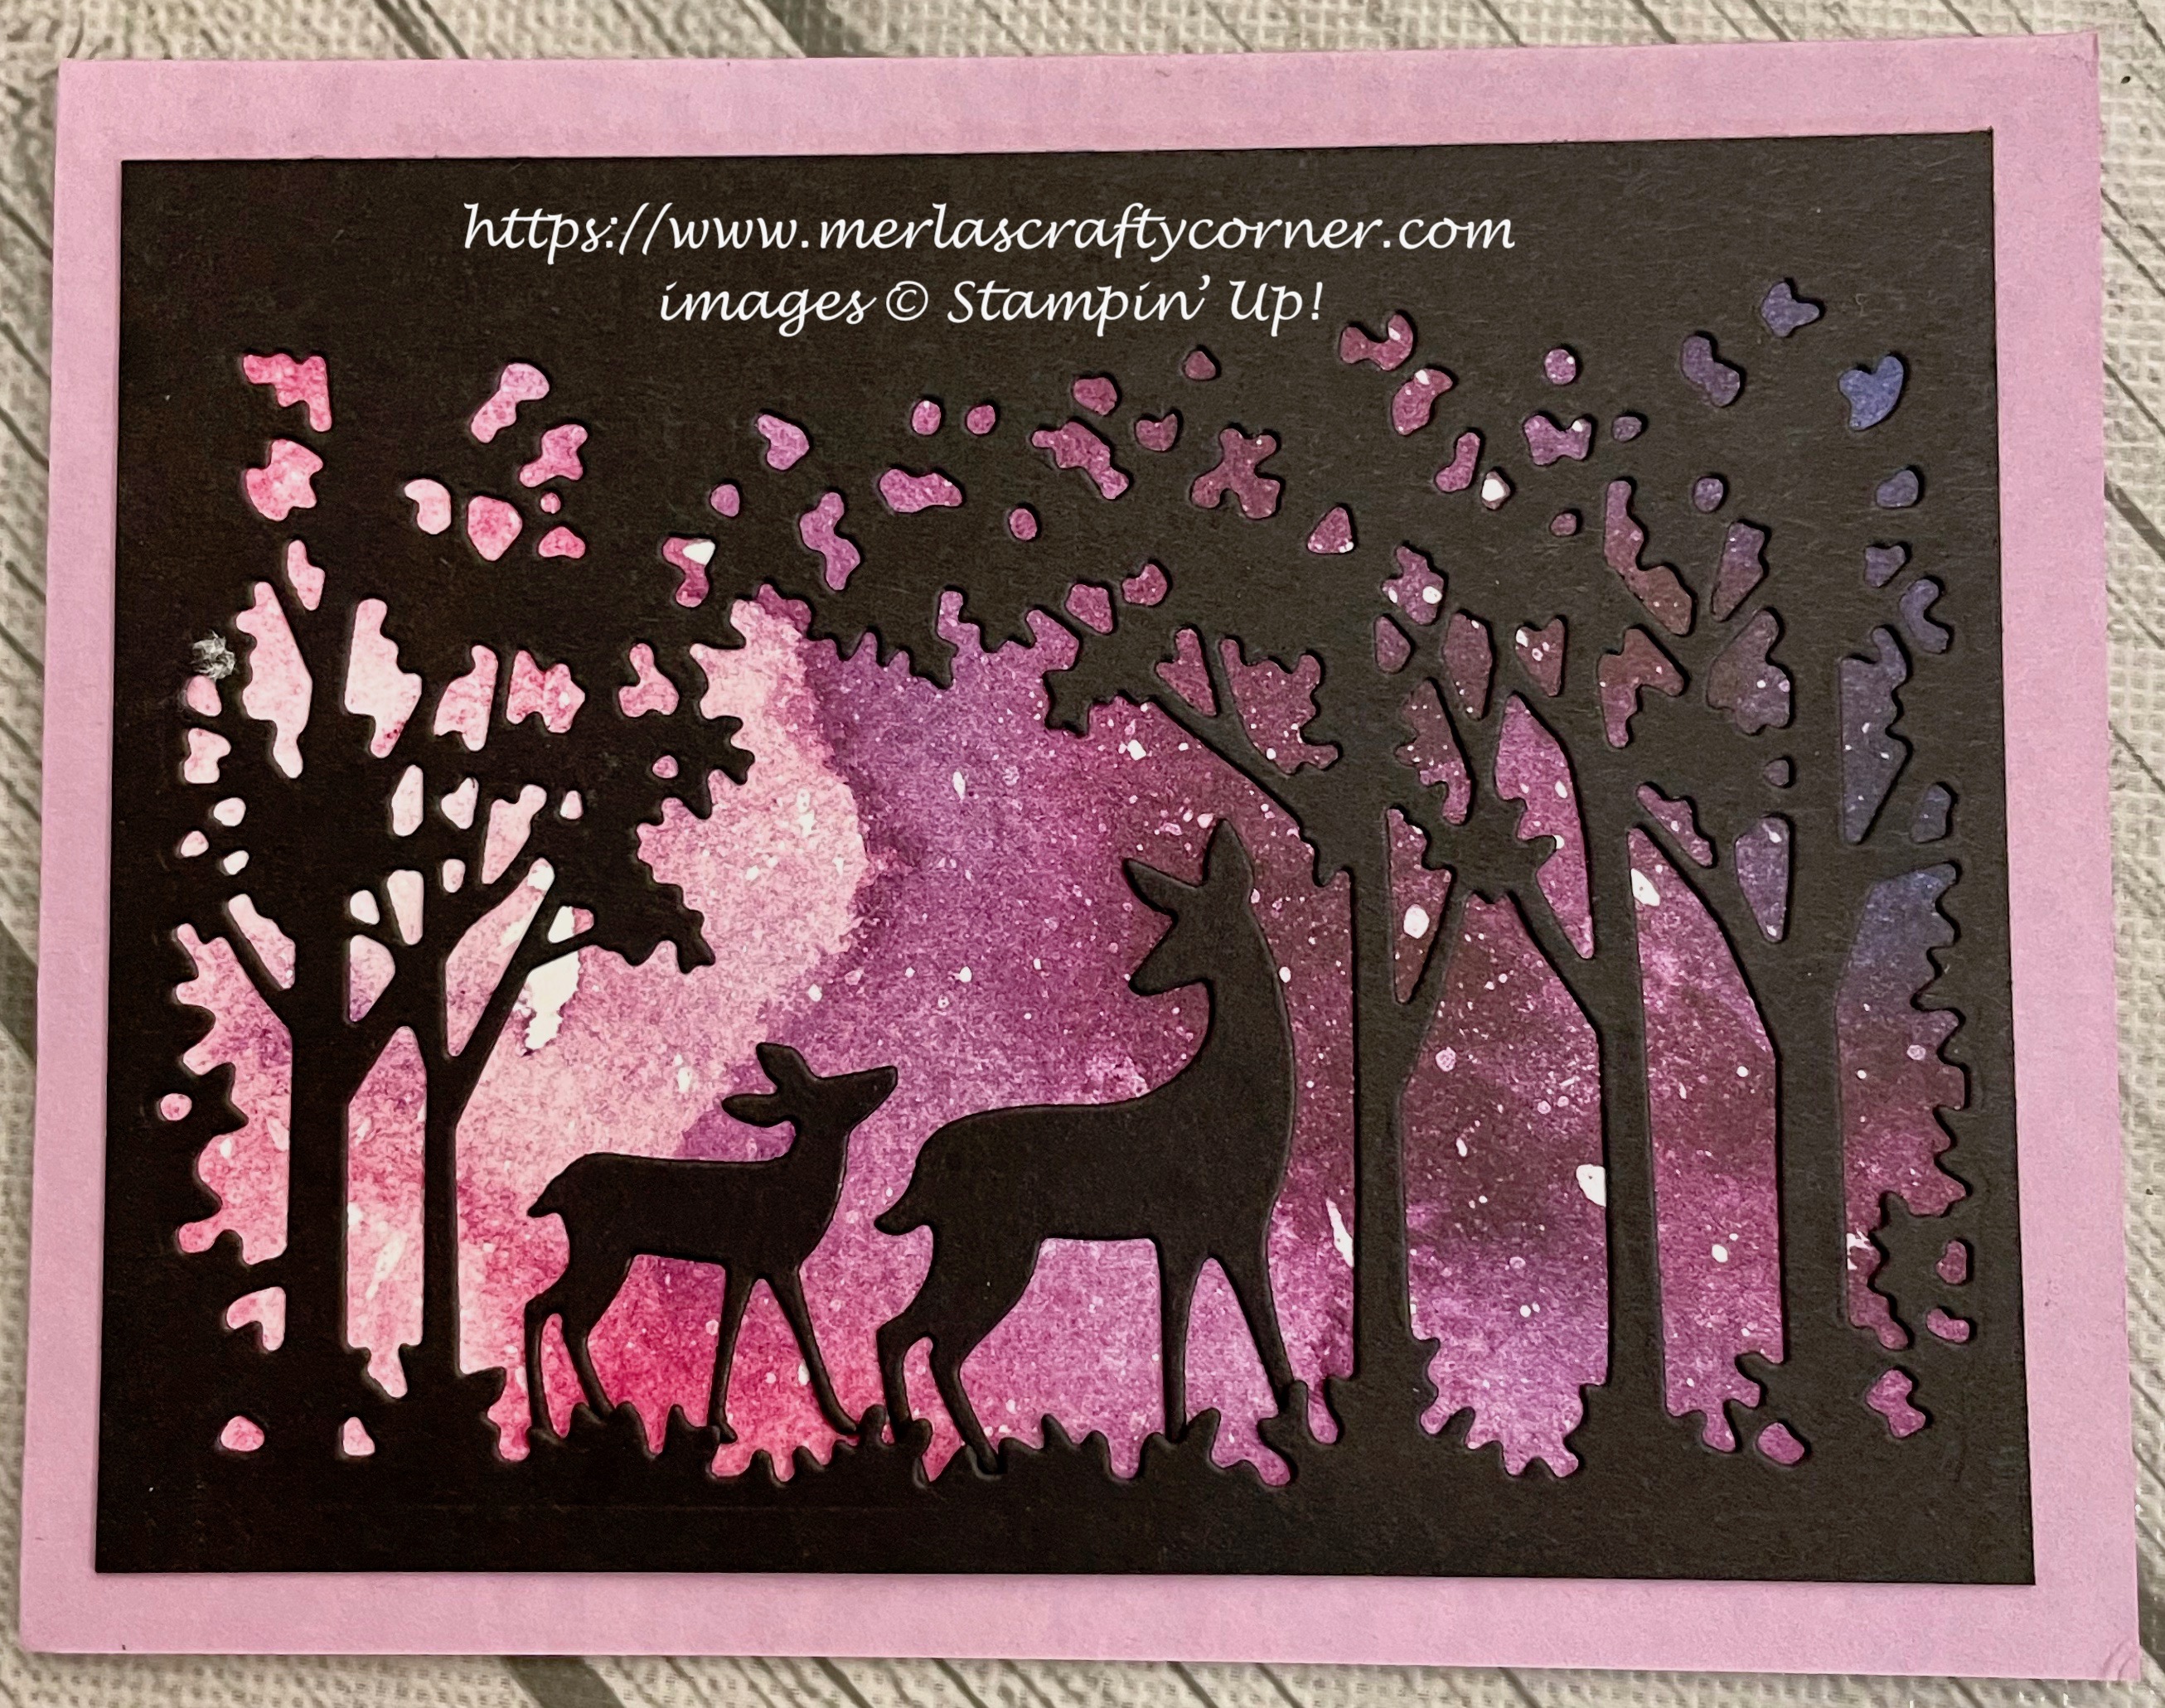

Fresh Alcohol


Stamps:
   None

Paper:
   Purely Pomegranate A-2
   Basic Black 5-3/8 x 4-1/8
   Glossy White 5-1/4 x 4
   Basic White 4-1/4 x 4 (Inside)

Ink Refills:
   Crushed Curry
   Garden Green
   Island Indigo
   Night of Navy
   Rose Red

Technique:
   Plastic Wrap 

Accessories:
   Plastic Wrap
   Water Mister
   Daffodil Delight Sequins
   In-Color Bitty Bows (Berry Burst)
   Expressions Natural Elements
   Glue Dots
   Adhesive

I followed the tutorial (more or less) found at SCS. Click on Cling Wrap Tutorial for the details.

Here is another card showing a different watercolor technique:

Fresh Alcohol Too


Stamps:
   None

Paper:
   Gable Green A-2
   Basic Black 5-3/8 x 4-1/8
   Glossy White 5-1/4 x 4
   Basic White 5-1/4 x 4 (Inside)

Alcohol Inks:
   Butterscotch
   Meadow
   Stream
   Wild Plum

Technique:
   Alcohol Inks (Felt Applicator)

Accessories:
   Alcohol Ink Applicator
   Alcohol
   Lemon Lime Twist Sequins
   In-Color Bitty Bows (Fresh Fig)
   Expressions Natural Elements
   Glue Dots
   Adhesive

I used Tim Holtz's Alcohol Ink with a Felt Tip Applicator. Click HERE for a tutorial.

Remember, there are numerous watercolor techniques to explore and try. Most of them are easy and can yield some surprising results. The main thing is to have some fun and have no fear!

Thank you for visiting. I do love company. Feel free to Contact Me if you have any questions.

Explore current products, promotions, and all of the opportunities. Just click on Shop Now. A HOST CODE is available in the right sidebar for those of you who do not earn your own rewards.

For those of you who like kits with everything you need to complete a project, we offer Paper Pumpkin. Your monthly cost is less than $25. Also, you might want to look at the new Kits Collection!

Join Me and become my newest team member. I look forward to meeting you.

Please take a minute to share, like, pin, tweet, or comment. Do not forget to FOLLOW and SUBSCRIBE to my blog.

HAPPY STAMPING!

Thursday, April 7, 2022

Streaming

I like this scenic stamp. It truly is a peaceful place. Thoughts? 


Stamps:
   Peaceful Place
   Artistically Inked

Paper:
   Pacific Point A-2
   Basic Black 5-3/8 x 4-1/8
   Watercolor 5-1/4 x 4
   Basic White 5-1/4 x 4 (Inside)

Ink:
   Tuxedo Black Memento

Watercolor Pencils:
   Basic Gray
   Daffodil Delight
   Early Espresso
   Old Olive
   Pacific Point

Technique:
   Watercolor

Accessories:
   Stamparatus/MISTI
   Aqua Painter
   Button
   Glue Dots
   Adhesive

First, I stamped my image on a watercolor panel. I used my stamparatus to ensure that my image would be well stamped. You can use any positioning tool that you have on hand. Make sure the ink has dried completely to prevent smears.

Next, I colored my scene using the watercolor pencils listed above. 

I then applied water with my aqua painter. You can use any watercolor brush you have on hand. The aqua painters are now referred to as water painters. 

Next, I stamped a sentiment at the bottom of the image and adhered the layers together. 

Lastly, I added a button with a glue dot and adhered a white panel to the inside of the card.

Thank you so very much for being here. I appreciate you taking the time to glance at my work. Please Contact Me if I can be of service.

Are you interested in Stampin' Up! products to make your own cards? Shop Now and have a look-see. I placed a HOST CODE for you to use if you do not earn your own rewards. It is sitting in the right sidebar.

Do you like surprises? Subscribe to our Paper Pumpkin and receive all you need to complete the monthly project. The cost is less than $25. Check it out.

Join Me and become privy to everything Stampin' Up! Receive a discount on all of your personal orders. Personally, I love SALES!

Please share, like, pin, tweet, or comment. Do not forget to FOLLOW and SUBSCRIBE to my blog.

HAPPY STAMPING!

Wednesday, April 6, 2022

Waving Congratulations

The movement shown on the designer series paper really highlights the motion of the wave on the forefront. I decided to use glimmer paper to aid the wave's presence. What do you think?


Stamps:
   Art Gallery

Paper:
   Pacific Point A-2
   Basic Black 5-3/8 x 4-1/8
   Basic white 5-1/4 x 4 (Inside), 3/4 x 3-1/4
   Soft Sky 5-1/4 x 4
   Waves of the Ocean DSP 5-1/4 x 2-1/2
   Myths & Magic Glimmer 5-1/4 x 2-1/2 (2)

Ink:
   Night of Navy
   Pacific Point

Technique:
   Die Cutting
   Blending/Sponging

Accessories:
   Waves Dies
   Rhinestone Waves Basic Jewels
   Blending Brush/Sponge
   Dimensionals
   Glue Dots
   Adhesive

First, I die cut the waves and the birds.

Next, I stamped and die cut the sentiment.

I adhered the waves to the strip of DSP. I used adhesive for the bottom wave on the DSP, and added the top wave using glue dots.

I then adhered the DSP to the Soft Sky as shown.

I matted this panel with Basic Black and then adhered it to the Pacific Point card front.

I used a blending brush to add a bit of blue to the sentiment. You can use a sponge if you do not have a blending brush. I then attached it to the card front using dimensionals.

Next, I added the birds with a bit of adhesive.

Lastly, I added a couple of rhinestones and the basic white panel to the inside of the card.

Thank you so much for spending time with me here. Contact Me if you have any questions.

Shop Now and take a look at all of our new products and current promotions. Please use the HOST CODE sitting in the right sidebar if you did not earn your own rewards.

Subscribe to Paper Pumpkin and keep your monthly cost below $25! Join Me and become my newest team member.

Either way, please share, like, pin, tweet, or comment. Do not forget to FOLLOW and SUBSCRIBE to my blog.

HAPPY STAMPING!

Tuesday, April 5, 2022

Camellia

I like how the flower emerges from a pool of ink. This distINKtive stamp does all of the work for you. What do you think? 


Stamps:
   Calming Camellia

Paper:
   Crushed Curry A-2
   Basic Black 5-3/8 x 4-1/8
   Myths & Magic Glimmer 5-1/4 x 4
   Basic White 3-1/4 x 4, 5-1/4 x 4 (Inside)

Ink:
   Crushed Curry
   Polished Pink

Technique:
   Sponging
   Tearing

Accessories:
   Sponge
   Dimensionals
   Adhesive

First, I stamped the camellia on Basic White.

I then tore the paper around it. Make sure you tear the paper toward you.

Next, I sponged the edges, using Crushed Curry.

I adhered the glimmer paper to a Basic Black panel to matte it.

I then adhered this panel to the card front.

Lastly, I added the Camellia image to the center of the panel, using dimensionals, and adhered the Basic White panel to the inside of the card.

Thank you so much for stopping by here and taking a quick look-see. If you have any questions or need my assistance, Contact Me.

Shop Now and take a look at all of our new products and current promotions. Please use the HOST CODE sitting in the right sidebar if you did not earn your own rewards.

If you want to craft, but keep your costs below $25 a month, check out Paper Pumpkin. It just might be what you are looking for at the moment.

Join Me and become the newest member of my team. Remember there are no hidden agendas or penalties for giving it a go. Don't pass this opportunity to save.

You've come this far, so please share, like, pin, tweet, or comment. I appreciate your thoughts and leave all of your questions behind. Do not forget to FOLLOW and SUBSCRIBE to my blog.

HAPPY STAMPING!

Monday, April 4, 2022

Golden Flowers

When you have beautiful paper, there is no need to add anything else. What do you think? 


Stamps:
   None

Paper:
   Crumb Cake A-2
   Night of Navy 5-3/8 x 4-1/8
   Affectionately Yours DSP 5-1/4 x 4
   Basic White 5-1/4 x 4

Ink:
   None

Technique:
   CAS

Accessories:
   Adhesive

Cut your paper to size and adhere the layers. You can add embellishments if you like, but I chose to leave well enough alone. There is gold on some of the flowers, so that was enough glimmer for me.

Thank you so much for stopping by here and spending a few minutes of your day with me. I appreciate your time. Contact Me if you have any questions, need a demonstrator, or just want to stamp or share ideas.

Shop Now and enjoy browsing products and promotions. I have a HOST CODE in the right sidebar in case you did not earn your own rewards.

Do not miss the opportunity to Join Me and become the newest member of my team.

Paper Pumpkin should not be ignored. I enjoy putting my kit together monthly.

Take a few more minutes and share, like, pin, tweet, or comment. I would love to see what you really think. Do not forget to FOLLOW and SUBSCRIBE to my blog.

HAPPY STAMPING!

Sunday, April 3, 2022

Sweet Soiree

All you really need to make a card is some beautiful paper and a bit of adhesive. What do you think? 


Stamps:
   None

Paper:
   Rich Razzleberry A-2
   Old Olive 5-3/8 x 4-1/8
   Sweet Soiree DSP 5-1/4 x 4
   Basic White 5-1/4 x 4 (Inside)

Ink:
   None

Technique:
   CAS

Accessories:
   Basic Pearl Jewels
   Adhesive

First, I cut my paper to size.

Then I adhered the layers together.

I added a white panel to the inside of the card.

Lastly, I added a few pearls to embellish the card, but this is not necessary. The paper is beautiful on its own.

Thank you so much for dropping by here. Contact Me if you have any questions.

Click on all of the tabs above and explore products, promotions, and opportunities.

Please take the time to share, like, pin, tweet, or comment. Do not forget to FOLLOW and SUBSCRIBE to my blog.

HAPPY STAMPING!


Saturday, April 2, 2022

Midnight Grove

This die cut fills the whole card front. Add an animal or simply a sentiment in the center as a focal point. The choice is yours. What would you do? Ideas?


Stamps:
   None

Paper:
   Fresh Freesia A-2 or Basic White A-2
   Basic Black 3-3/4 x 5, Scraps
   New Horizons DSP 3-1/2 x 4-7/8
   Basic White 5-1/4 x 4 (Inside)

Ink:
   None

Technique:
   Die Cutting

Accessories:
   Grove Dies
   Adhesive

First, I cut my paper to size.

I then die cut the grove and the deer. You can place one deer inside the center of the grove and then add a small scrap for the other deer.

Next, I adhered the grove to the DSP.

I added the deer and then adhered the white panel to the inside of the card.

Here is the same card using a Basic White card base and no DSP:

Midnight Grove Too


Thank you so very much for taking the time to stop and glance at my work. If you have any questions or suggestions, please Contact Me. I do appreciate your time.

If you need any supplies, or you are curious to know just how much these products cost, click on Shop Now and satisfy your curiosity. A HOST CODE is available for you to use in case you did not earn your own rewards. You can find it in the right sidebar.

Do you want the best value for your buck? Join Me and reap all of the rewards. I will be more than happy to assist you. Check it out and note that there are no hidden agendas.

Wait! Don't leave. If you just want to try it and see, then subscribe to Paper Pumpkin. You will receive a kit with everything you need to create a project. Check out the Kit Collection for more choices.

I would love for you to take a minute to share, like, pin, tweet, or comment. Please FOLLOW and SUBSCRIBE to my blog. Let me know what you think below in the comments.

HAPPY STAMPING!

Friday, April 1, 2022

Big Congratulations

Do you want to make your petals pop? Oh, my goodness, I was browsing through Pinterest and saw this beautiful card where the petals just caught my attention. I followed the link and made this card following Linda Bauwin's White Wash Technique. Check it out for yourself. I think it is fabulous. There are many stampers using it now, but I think Linda was the first. What do you think?


Stamps:
   Calming Camellia
   Special Moments

Paper:
   Evening Evergreen A-2
   Soft Succulent 5-1/4 x 4
   Basic White 5-1/4 x 4 (Inside)

Ink:
   Evening Evergreen
   Whisper White Craft

Technique:
   White Washing

Accessories:
   Blender Pen
   Adhesive

First, I stamped my image several times on the Soft Succulent panel, using Evening Evergreen ink.

I then added Whisper White Craft ink to the petals, using a Blender Pen.

Next, I stamped the sentiment in Evening Evergreen.

I adhered the stamped panel to the card front and added the Basic White panel to the inside of the card.

I thought about adding some other embellishments, but decided that less was more. I also didn't want to take away from the beautiful petals.

Thank you for checking out my blog. I so appreciate your time. Contact Me if you have any questions or concerns regarding Stampin' Up!

Are you curious about what is trending, the cost of materials and other products, or do you just feel like shopping? Click on Shop Now and have some fun.

Subscribe to Paper Pumpkin or check out the Kits Collection if you want to stay on a budget or just keep it all low-key.

Join Me and reap all of the benefits of becoming a part of the Stampin' Up! family. Check it out and gain the best value for your money.

Share, like, pin, tweet, or comment. Don't forget to FOLLOW and SUBSCRIBE to my blog.

HAPPY STAMPING!