Thursday, September 30, 2021

Amazing Rose

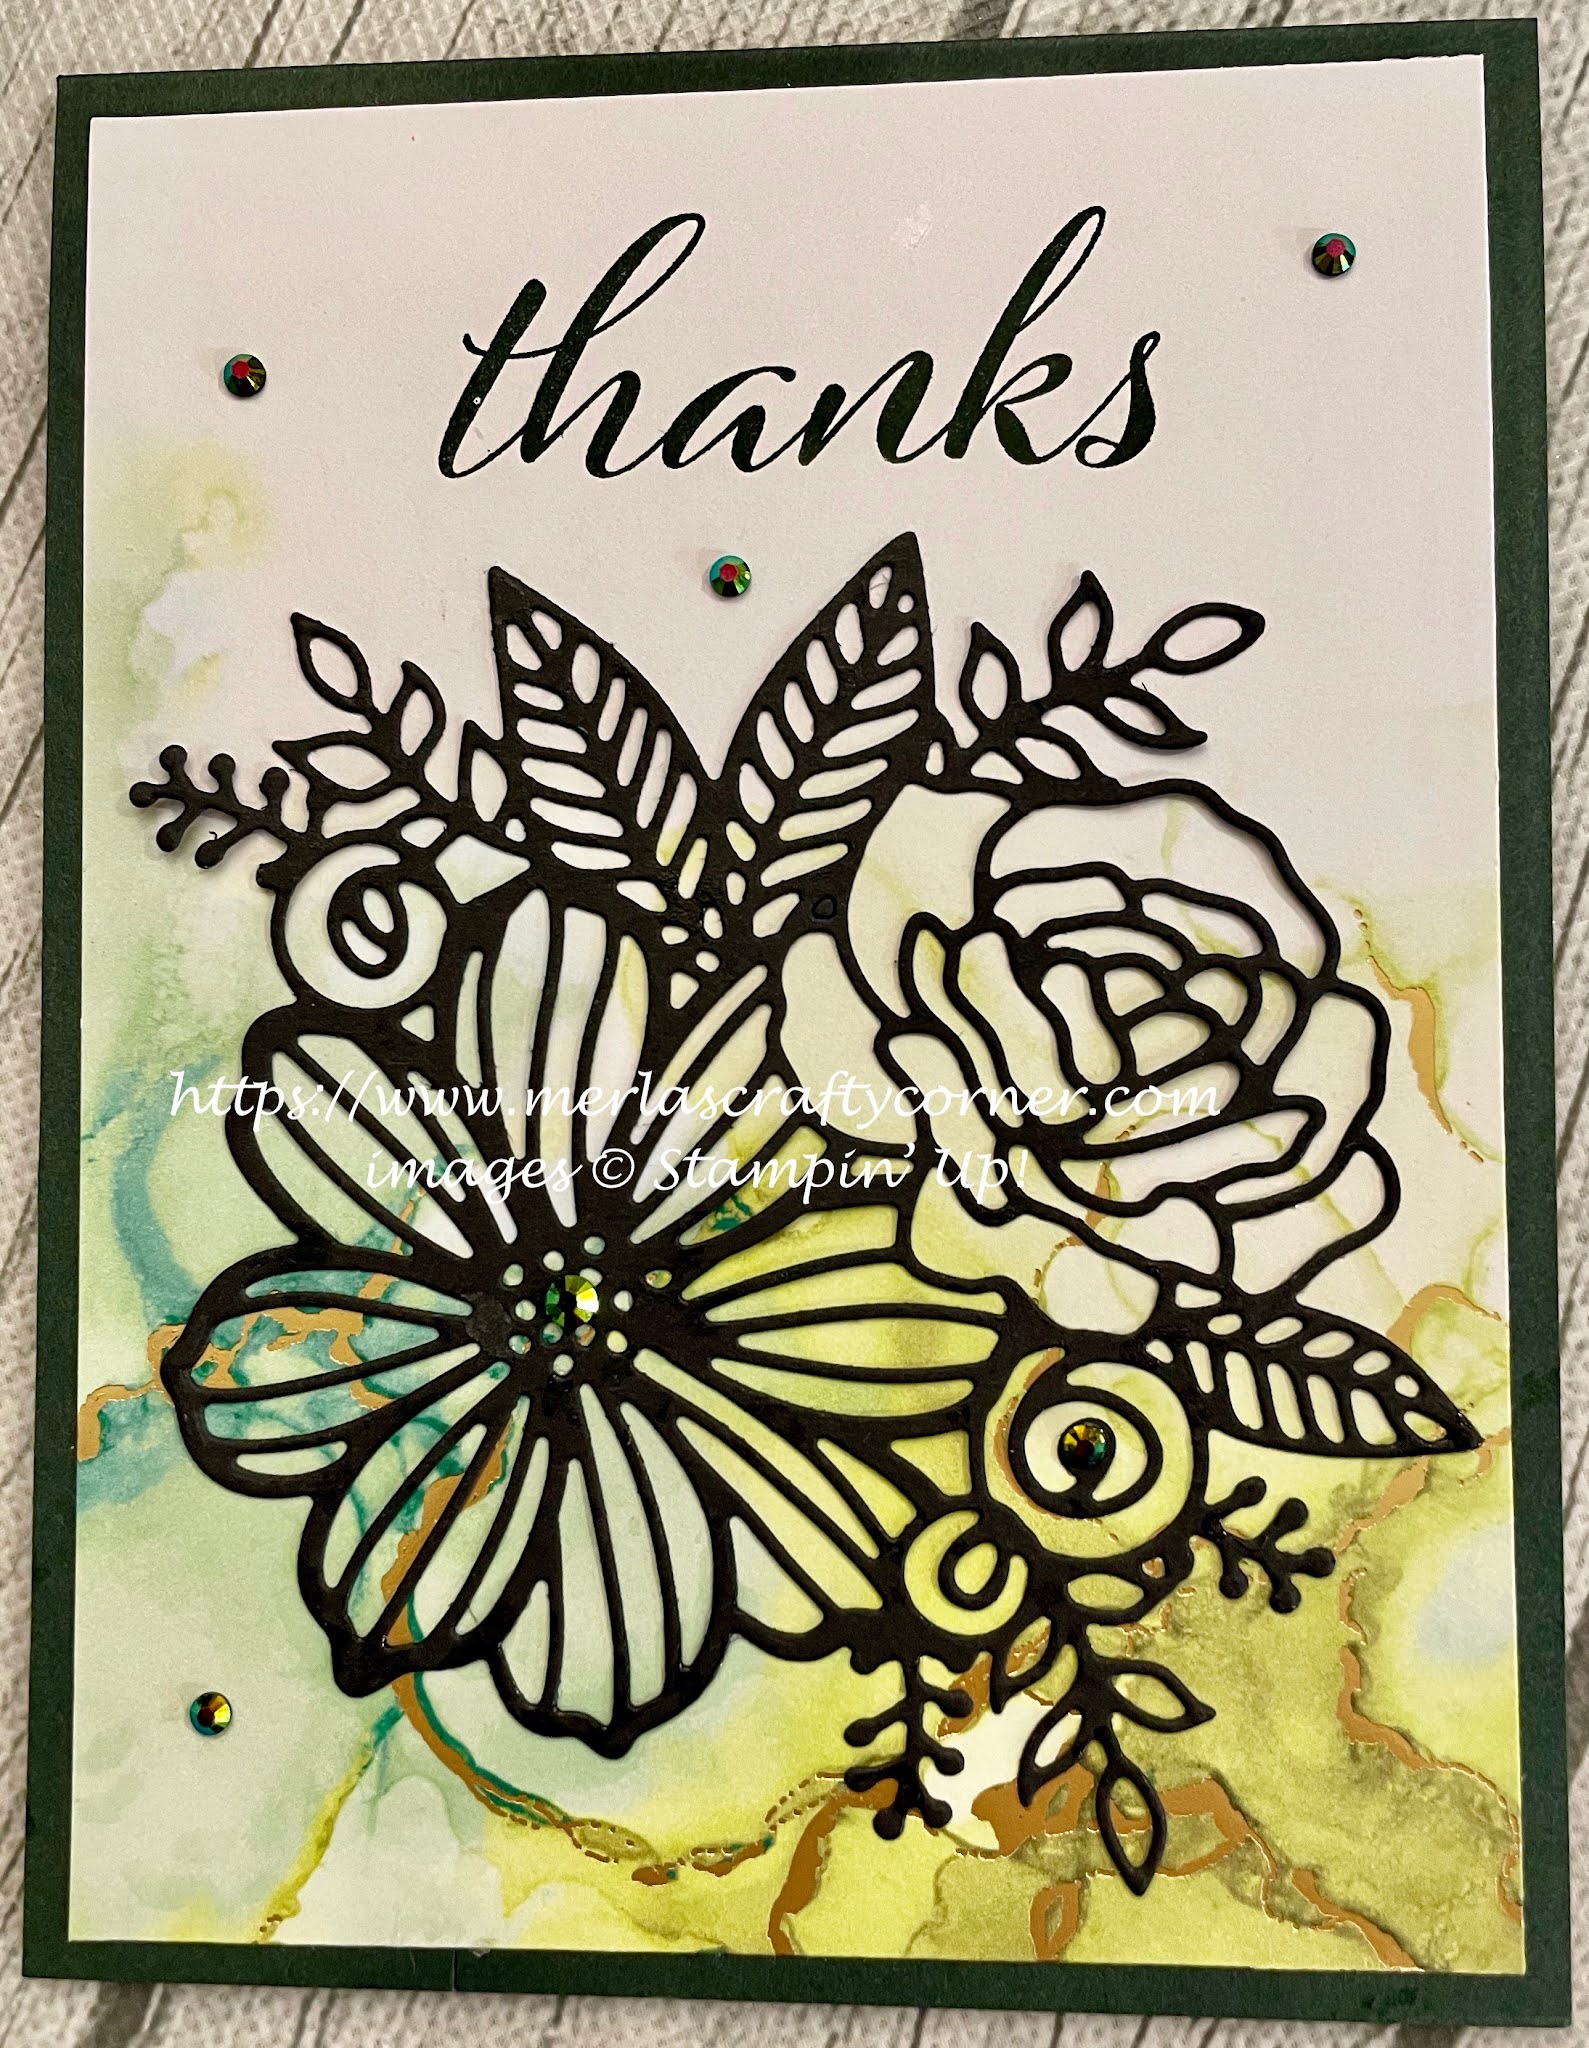
This card is for that person who needs a bit of praise and a good pat on the back. It is vital that we never take others for granted. More importantly, we must remember that everyone wants and needs praise. So, stop and look around. When was the last time you offered a bit of praise or gratitude to someone? Share the love. Thoughts?


Stamps:
   Painted Petals

Paper:
   Real Red A-2, 1-3/4 x 2-3/4
   Paper Studio Black Tie DSP 5-1/4 x 4
   Always Artichoke Scraps
   Whisper White 5-1/4 x 4, Scraps

Ink:
   Tuxedo Black Momento
   Real Red

Technique:
   Die Cutting
   Sponging

Accessories:
   Rose Garden Thinlits Dies
   White Tea Lace Paper Doily
   Clear Faceted Gems
   Sponge
   Dimensionals
   Adhesive

First, I die cut my Real Red Rose and Always Artichoke Leaves and set them aside.

I then stamped, die-cut, and sponged my sentiment. I set it aside as well.

I then adhered my black and white striped background panel to my Real Red card front.

I added a white tea lace doily on the center bottom of the panel and adhered the previously die-cut rose and leaves to it.

I attached the sentiment to the top center using dimensionals.

Lastly, I added a gem to the center of the rose and adhered the Whisper White panel to the inside of the card.

Thank you so very much for being here. I appreciate you taking the time to glance at my work. Please Contact Me if I can be of service.

Are you interested in Stampin' Up! products to make your own cards? Shop Now and have a look-see. I placed a HOST CODE for you to use if you do not earn your own rewards. It is sitting in the right sidebar.

Do you like surprises? Subscribe to our Paper Pumpkin and receive all you need to complete the monthly project. The cost is less than $25. Check it out.

Join Me and become privy to everything Stampin' Up! Receive a discount on all of your personal orders. Personally, I love SALES!

Please share, like, pin, tweet, or comment. Do not forget to FOLLOW and SUBSCRIBE to my blog.

HAPPY STAMPING!

Wednesday, September 29, 2021

Hello Flower

This is definitely a one-of-a-kind card. Anytime you use a gel press, your results will usually surprise you. These are the panels you hold on to for a bit. Eventually, you know what to do with them. Thoughts?


Stamps:
   Itty Bitty Greetings

Paper:
   Taken With Teal A-2
   Whisper White 5-1/4 x 4 (2)

Ink:
   Archival Basic Black

Markers:
   Copics (Personal Choice)

Paint:
   Acrylic (Personal Choice)

Technique:
   Image Tracing on Gel Press

Accessories:
   Gel Press
   Brayer
   Adhesive


Click on the link if you would like to see the video. 

My results looked differently in my head. I almost trashed this panel. Instead I placed it on a card front with a sentiment. To my surprise, it was admired, bought, and used. 

Thank you so much for spending time with me here. Contact Me if you have any questions.

Shop Now and take a look at all of our new products and current promotions. Please use the HOST CODE sitting in the right sidebar if you did not earn your own rewards.

Subscribe to Paper Pumpkin and keep your monthly cost below $25! Join Me and become my newest team member.

Either way, please share, like, pin, tweet, or comment. Do not forget to FOLLOW and SUBSCRIBE to my blog.

HAPPY STAMPING!

Tuesday, September 28, 2021

Just Because

Make a splash with color. I used a spritzer to spray some color on the background. I should have used a lighter hue. Yellow or light blue may have blended in more. Red is quite striking. Thoughts?


Stamps:
   Lovely as a Tree
   Simple Sayings II

Paper:
   Basic White A-2, 5-1/4 x 4 (Inside)

Ink:
   Tuxedo Black Memento
   Real Red
   Tea Stain

Technique:
   Splatter
   Spritz
   Stain

Accessories:
   Spritzer
   Adhesive

Basically, I stamped my image and sentiment and then added some splatter with a tea stain and some Real Red ink. I also spritzed the background with Real Red. 

Lastly, I adhered the Basic White panel to the inside of the card.

Note, you can change up the sentiment and get as creative as you like on the background. I need to hold the spritzer farther away, and I definitely need to play with the tea stain some more.

Thank you so much for stopping by here and taking a quick look-see. If you have any questions or need my assistance, Contact Me.

Shop Now and take a look at all of our new products and current promotions. Please use the HOST CODE sitting in the right sidebar if you did not earn your own rewards.

If you want to craft, but keep your costs below $25 a month, check out Paper Pumpkin. It just might be what you are looking for at the moment.

Join Me and become the newest member of my team. Remember there are no hidden agendas or penalties for giving it a go. Don't pass this opportunity to save.

You've come this far, so please share, like, pin, tweet, or comment. I appreciate your time and efforts. Let me know your thoughts and leave all of your questions behind. Do not forget to FOLLOW and SUBSCRIBE to my blog.

HAPPY STAMPING!

Monday, September 27, 2021

Mother's Blended Bloom

Flowers help us express our feelings toward others. Whether we are expressing sorrow, pain, regret, or joy, love, and congratulations, we use flowers as a medium. Here is a beautiful bloom for Mother on Mother's Day. What do you think?


Stamps:
   Blended Bloom
   Teeny Tiny Wishes

Paper:
   Rich Razzleberry A-2
   Irresistibly Yours DSP 5-3/8 x 1-5/8
   Watercolor 3-1/2" Sq.
   Basic White 5-1/4 x 4 (Inside)

Ink:
   Tuxedo Black Memento
   Rich Razzleberry

Markers:
   Cherry Cobbler
   Daffodil Delight
   Rich Razzleberry

Brushos:
   Various - Personal Choice

Technique:
   Watercolor (Brushos)
   Sponging
   Punching

Accessories:
   Gold Glimmer Washi Tape
   Basic Rhinestone Jewels
   Word Window Punch
   Aqua Painter
   Sponge
   Water Mister
   Dimensionals
   Adhesive

First, I sprinkled Brusho Flakes onto the DSP. I misted it with water and let the brushos do the work. I set it aside to let it dry.

Next, I stamped my bloom and colored it using markers and blends. I fussy cut it using my paper snips.

I then stamped, punched, and sponged my sentiment.

Next, I placed the strips of Gold Glimmer Washi Tape on the card front. I used the DSP strip to measure the distance between the strips. The DSP is an odd size because it is a left-over piece that I wanted to use. 

I then adhered the DSP on top of the gold glimmer washi tape, making sure it showed on both ends. 

I added the bloom and the sentiment with dimensionals.

Lastly, I added rhinestones to the center of the bloom and the Basic White panel to the inside of the card.

Thank you so much for stopping by here and spending a few minutes of your day with me. I appreciate your time. Contact Me if you have any questions, need a demonstrator, or just want to stamp or share ideas.

Shop Now and enjoy browsing products and promotions. I have a HOST CODE in the right sidebar in case you did not earn your own rewards.

Do not miss the opportunity to Join Me and become the newest member of my team.

Paper Pumpkin should not be ignored. I enjoy putting my kit together monthly.

Take a few more minutes and share, like, pin, tweet, or comment. I would love to see what you really think. Do not forget to FOLLOW and SUBSCRIBE to my blog.

HAPPY STAMPING!

Sunday, September 26, 2021

Sunshine Rainbow

Do you remember finger painting? Kudos to you if you can. I can barely remember this morning. Kidding. Check out this tutorial posted by Lydia. She demonstrates this Masked Pastels technique beautifully. I did the best that I could. Thoughts?


Stamps:
   Stitched All Around

Paper:
   Poppy Parade A-2
   Basic White 5-1/4 x 4 (2), Scraps

Ink:
   Archival Basic Black

Markers:
   Crushed Curry
   Pumpkin Pie
   Cajun Craze
   Basic Black

Pastel Chalks:
   Various: Red, Blue, Green, Yellow

Technique:
   Die Cutting
   Markering
   Masked Pastels

Accessories:
   Stitched Labels Framelits
   Dimensionals
   Adhesive

I followed Lydia's tutorial for Masked Pastels. I did not have any oils, but I did have chalks. I used them the same way.

Thank you so much for dropping by here. Contact Me if you have any questions.

Click on all of the tabs above and explore products, promotions, and opportunities.

Please take the time to share, like, pin, tweet, or comment. Do not forget to FOLLOW and SUBSCRIBE to my blog.

HAPPY STAMPING!

Saturday, September 25, 2021

In the Woods

This card can showcase any scene that you create. I did not have all of the tools necessary to make this card, but I was able to improvise and get close. Here is a link to the actual tutorial found on SCS: Bendi Frame. What do you think?


Stamps:
   Nature Silhouettes

Paper:
   Basic White 5-3/8 x 8-1/2 folded in half, 5-1/2 x 4-1/4, 5-1/4 x 4, Scraps

Ink:
   Tuxedo Black Memento
   Marina Mist

Technique:
   Bendi Frame
   Brayer
   Dry Embossing
   Fussy Cutting

Accessories:
   Woodland Textured Embossing Folder
   Foam Mounting Tape
   Paper Snips
   Dimensionals
   Adhesive

Your best bet is to check out the link to the tutorial and follow it. I did not have the inlaid die cuts for the frame nor the foam mounting tape. I substituted left-over bits of red rubber from stamp sets for the foam mounting tape. They proved to be too thick for this. I cut my frames out using a cutter and a crafting knife. I did not do a very good job. 

For the backdrop on this, I added Marina Mist with a brayer to my embossing folder. I then carefully placed the Basic White panel inside, making sure not to move it. I then ran it through the embossing machine. 

The wolves and the stag were stamped and fussy cut. I adhered them using dimensionals.

Thank you so much for stopping by here. Contact Me if you have any questions.

Shop Now and buy your supplies to make your own cards. Take a peek today and find out what you can grab for FREE!

Join Me and become my new team member. Enjoy the best savings and opportunity offered today!

Subscribe to Paper Pumpkin and craft monthly for under $25. Don't forget to take a look at the All-Inclusive Kits!

If you liked my card, please share, like, pin, tweet, or comment. I would love for you to FOLLOW and SUBSCRIBE to my blog. Let me know what you think in the comments below.

HAPPY STAMPING!

Friday, September 24, 2021

Simply Celebrate

Adding ink to an embossing folder before embossing can yield some surprising results. Have you tried it? Thoughts? 


Stamps:
   Happy Celebrations
   Timeless Textures

Paper:
   Tip Top Taupe A-2
   Cherry on Top DSP 5-1/4 x 4
   Basic White 5 x 2-7/8, 5-1/4 x 4

Ink:
   Tip Top Taupe

Technique:
   Dry Embossing
   Sponging
   Tearing

Accessories:
   Kraft Corduroy Button
   Celebrations Duo Embossing Folder
   Sponge
   Dimensionals
   Adhesive

First, I applied ink around "Celebrate" in the embossing folder. I carefully added my piece of Basic White and ran it through the embossing machine.

I then stamped around it a bit using stamps from the Timeless Textures stamp set.

I tore the Basic White around the sentiment, trying to create a jagged, uneven tear. Always tear paper toward you.

I sponged the torn edges with Tip Top Taupe.

I adhered the DSP panel to the Tip Top Taupe card base.

Next, I added the sentiment piece using dimensionals and attached the button on the lower-right corner. 

Lastly, I adhered the Basic White panel to the inside of the card.

Thank you for visiting. I do love company. Feel free to Contact Me if you have any questions.

Explore current products, promotions, and all of the opportunities. Just click on Shop Now. A HOST CODE is available in the right sidebar for those of you who do not earn your own rewards.

For those of you who like kits with everything you need to complete a project, we offer Paper Pumpkin. Your monthly cost is less than $25. Also, you might want to look at the new Kits Collection!

Join Me and become my newest team member. I look forward to meeting you.

Please take a minute to share, like, pin, tweet, or comment. Do not forget to FOLLOW and SUBSCRIBE to my blog.

HAPPY STAMPING!

Thursday, September 23, 2021

Hold on to Hope

Hope is a feeling of optimism. Although it is something you can lose, no one can take it from you. So, hold on to it! Thoughts?


Stamps:
   Hold on to Hope

Paper:
   Blushing Bride A-2
   Old Olive 3-1/2 x 4-1/4
   Basic White 3-1/4 x 4, 5-1/4 x 4 (Inside)

Ink:
   Blushing Bride
   Pink Pirouette
   Old Olive

Technique:
   Stamping

Accessories:
   Blushing Bride Brads
   Dimensionals
   Adhesive

I began with the small Basic White panel. I stamped the cross in the center using Old Olive ink.

I then stamped the foliage in each of the corners. I used Pink Pirouette.

Next, I adhered the Basic White panel onto the Old Olive panel.

I added a brad to each corner.

I attached this panel onto the Blushing Bride card front using dimensionals.

I then stamped the sentiment in the lower center of the card front. I used Old Olive ink. I added the leafy corner to each side of it.

Lastly, I adhered the other Basic White panel to the inside of the card using liquid adhesive.

Thank you so very much for being here. I appreciate you taking the time to glance at my work. Please Contact Me if I can be of service.

Are you interested in Stampin' Up! products to make your own cards? Shop Now and have a look-see. I placed a HOST CODE for you to use if you do not earn your own rewards. It is sitting in the right sidebar.

Do you like surprises? Subscribe to our Paper Pumpkin and receive all you need to complete the monthly project. The cost is less than $25. Check it out.

Join Me and become privy to everything Stampin' Up! Receive a discount on all of your personal orders. Personally, I love SALES!

Please share, like, pin, tweet, or comment. Do not forget to FOLLOW and SUBSCRIBE to my blog.

HAPPY STAMPING!

Wednesday, September 22, 2021

Thanks Evergreen

Another Clean And Simple (CAS) card where all of the credit goes to the Designer Series Paper (DSP)! Stamp a sentiment, add a die cut, and you have yourself a fabulous card. What do you think? 


Stamps:
   Artistically Inked

Paper:
   Evening Evergreen A-2
   Expressions in Ink DSP 5-1/4 x 4
   Basic White 5-1/4 x 4
   Basic Black 4" Sq.

Ink:
   Evening Evergreen

Technique:
   Die Cutting

Accessories:
   Artistic Dies
   2021 - 2023 In-Color Jewels
   Fine Tip Glue Pen
   Adhesive

First, I die cut the flowers using the Artistic Dies and a four inch square of Basic Black. I should have cut it using an adhesive sheet to make it easier to adhere. Still, I used the Fine Tip Glue Pen to adhere it to the DSP panel.

I then stamped the sentiment on the top blank space of the DSP.

I added a few In-Color Jewels and adhered the DSP panel to the Evening Evergreen card base.

Lastly, I adhered the Basic White panel to the inside of the card.

Thank you so much for spending time with me here. Contact Me if you have any questions.

Shop Now and take a look at all of our new products and current promotions. Please use the HOST CODE sitting in the right sidebar if you did not earn your own rewards.

Subscribe to Paper Pumpkin and keep your monthly cost below $25! Join Me and become my newest team member.

Either way, please share, like, pin, tweet, or comment. Do not forget to FOLLOW and SUBSCRIBE to my blog.

HAPPY STAMPING!

Tuesday, September 21, 2021

Friends Forever

The sanded background stamp works perfectly when you want to dirty up the white a bit. I used So Saffron to give the illusion of sunshine. What do you think?


Stamps:
   Season of Friendship
   Sanded
   Number of Years

Paper:
   Whisper White A-2, 5-1/4 x 4 (Inside)

Ink:
   Archival Basic Black
   Cajun Craze
   Early Espresso
   Night of Navy
   So Saffron

Technique:
   Die Cutting
   Sponging

Accessories:
   Large Numbers Framelits Dies
   Sponge
   Dimensionals
   Adhesive

First, I stamped, die cut, and sponged my banner. I stamped it using Archival Basic Black. I then die cut it using the Large Numbers Framelits. Lastly, I sponged it with some So Saffron ink.

I then took the Sanded background and "sanded" the background with a bit of So Saffron.

Next, I stamped the tree trunk in the lower center of the card with some Early Espresso.

I added leaves to the branches with Cajun Craze. 

Next, I stamped two blue birds using Night of Navy ink. 

Lastly, I attached the sentiment with dimensionals and added the Whisper White panel to the inside of the card using liquid adhesive.

Thank you so much for stopping by here and taking a quick look-see. If you have any questions or need my assistance, Contact Me.

Shop Now and take a look at all of our new products and current promotions. Please use the HOST CODE sitting in the right sidebar if you did not earn your own rewards.

If you want to craft, but keep your costs below $25 a month, check out Paper Pumpkin. It just might be what you are looking for at the moment.

Join Me and become the newest member of my team. Remember there are no hidden agendas or penalties for giving it a go. Don't pass this opportunity to save.

You've come this far, so please share, like, pin, tweet, or comment. I appreciate your time and efforts. Let me know your thoughts and leave all of your questions behind. Do not forget to FOLLOW and SUBSCRIBE to my blog.

HAPPY STAMPING!