Showing posts with label Perfectly Penned. Show all posts

Monday, September 9, 2024

Celebrate Plaid

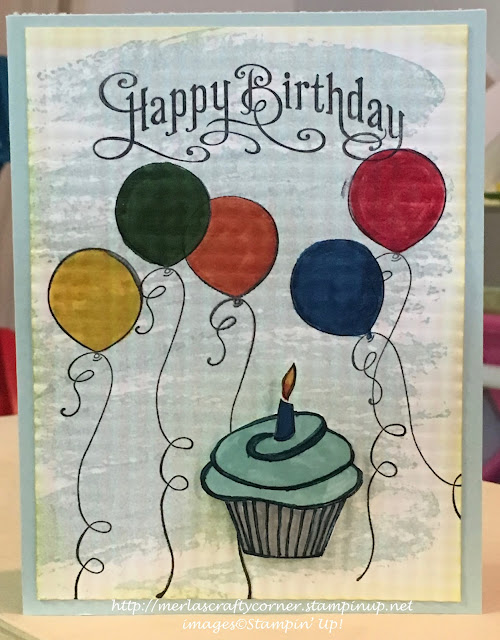
 I used three colors and three different-sized brushes to create a plaid background. What do you think? 


Stamps:
   Perfectly Penned

Paper:
   Strawberry Slush A-2
   Yo Yo Yellow 5-1/4 x 4
   Bermuda Bay 5 x 3-3/4
   Watercolor 4-1/2 x 3-1/4
   Basic White 5-1/4 x 4 (Inside)

Ink:
   Tuxedo Black Memento

Re-inkers:
   Bermuda Bay
   Strawberry Slush
   Yo Yo Yellow

Technique:
   Watercolor Plaid 

Accessories:
   Basic Rhinestone Jewels
   Adhesive

First, I used the largest brush to paint three horizontal stripes: top, middle, bottom.

I then used a medium brush to paint three and a quarter Strawberry Slush vertical stripes.

Next, I used the smallest brush to paint two Yo Yo Yellow horizontal stripes and three very light vertical stripes.

I added the sentiment in the center of the panel, using Tuxedo Black Memento ink.

Next, I adhered the panel to the center of the Bermuda Bay panel and then onto the Yo Yo Yellow panel. This was then adhered to the Strawberry Slush card front.

Lastly, I highlighted the sentiment by adding a row of rhinestones to the top and bottom of it. I also adhered a Basic White panel to the inside of the card.

Thank you so much for stopping by here and spending a few minutes of your day with me. I appreciate your time. Contact Me if you have any questions, need a demonstrator, or just want to stamp or share ideas.

Shop Now and enjoy browsing products and promotions. I have a HOST CODE  in the right sidebar in case you did not earn your own rewards.

Do not miss the opportunity to Join Me and become the newest member of my team.

Paper Pumpkin should not be ignored. I enjoy putting my kit together monthly.

Take a few more minutes and share, like, pin, tweet, or comment. I would love to see what you really think. Do not forget to FOLLOW and SUBSCRIBE to my blog.

HAPPY STAMPING!

Saturday, August 3, 2024

Bow Tie Birthday

It's time to dig out the oldies, but goodies. Grab your unloved Bow Builder Punch, the scraps of Designer Series Paper, and anything else you miss. I created this Clean And Simple masculine card. What do you think? 


Stamps:
   Perfectly Penned

Paper:
   Bermuda Bay A-2
   Sweet Taffy DSP 2 x 5 (3)
   Basic White 5-1/4 x 4 (Inside)

Ink:
   Tuxedo Black Memento

Technique:
   CAS
   Punching

Accessories:
   Bow Builder Punch
   Bone Folder
   Adhesive

First, I punched and assembled the bow ties, using the Bow Builder Punch. You need to punch twice on each of the 2 x 5 strips. Make sure to break up the fibers, using the bone folder, on each of the bows. I used liquid adhesive to assemble the bows, but you can also use glue dots or your favorite adhesive.

I then stamped the sentiment on the bottom of the Bermuda Bay card front. You can change the sentiment to suit your current need.

Next, I spaced out and added the three bow ties to the card front. 

Lastly, I added a Basic White panel to the inside of the card.

You can easily dress this card up more with some balloons, stamps, stickers, or other embellishments. I chose to keep it as simple as possible.

Thank you for stopping by here. Contact Me if you have questions or need anything Stampin' Up! related.

If you have a few minutes, Shop Now, and take a look at quality products and deals that may be happening today! There is a HOST CODE in the right sidebar, if you are interested.

If you like kits at your fingertips, then check out Paper Pumpkin and/or the Kits Collection. You will not regret it.

Want some company? Join Me and become a member of my team. I can't wait to meet you.

Please share, like, pin, tweet, or comment. Make sure you FOLLOW and/or SUBSCRIBE to my blog. This way you won't miss a thing!

HAPPY STAMPING!

Sunday, August 13, 2023

Baseball Birthday

Try this twisted pop-up card for that baseball player in your life. This will definitely brighten up a birthday and will definitely be a hit! What do you think? 


Stamps:
   Just Baseball
   Party Hearty
   Perfectly Penned

Paper:
   Night of Navy A-2
   Birthday Bash DSP 2-1/4 x 5-1/2
   Basic Gray
   Basic White

Ink:
   Night of Navy
   Basic Gray
   Calypso Coral
   Bermuda Bay

Technique:
   Twisted Pop-Up Card

Accessories:
   1/2" Circle Punch
   Gold Stars
   Adhesive
   Bone Folder
   Paper Snips
   Scoring Tool

I followed the tutorial from SCS found at Twisted Pop-Up Card Tutorial. Not only will you find a step-by-step instruction, but there is a short video for those who are visual learners. Give it a try, if I can do it, anyone can!

Thank you so much for stopping by here. Please Contact Me if you have any questions regarding Stampin' Up!

Take a few moments and Shop Now or click on any of the headers above for more information.

Don't forget to share, like, pin, tweet, or comment. I would appreciate it if you chose to FOLLOW or SUBSCRIBE to my blog.

HAPPY STAMPING!

Friday, July 21, 2023

Happy Thank You Medallion

Here is a simple, yet elegant card. I love the classic black and white look. Thoughts? 


Happy Birthday Medallion


Stamps:
   Daydream Medallions
   Perfectly Penned 

Paper:
   Basic Black A-2, 4-1/2" Sq., 2-1/2" Sq.
   Basic White 5-1/4 x 4 (2), 3-1/2" Sq., 1-1/2 " Sq.

Ink:
   Tuxedo Black Memento

Technique:
   Die Cutting

Accessories:
   Floral Frames Collection Dies
   1/2" Circle Punch
   Medium Pearl - Pretties Kit
   Glue Dots
   Adhesive

First, I stamped the Basic White squares with the Daydream Medallions Stamp Set.

I then die cut the medallion, using the Floral Frames Collection dies and the Black and White (stamped) squares.

Next, I arranged them on the Basic White panel and adhered them, using liquid adhesive.

I then added a medium pearl from the Pretties Kit, using a glue dot.

Next, I stamped the sentiment on the bottom of the Basic White panel.

Lastly, I added this panel to the Basic Black card front and adhered the other Basic White panel to the inside of the card.

Here is another card with a different sentiment:

Thank You Medallion

I followed the same steps stated above. They are identical, except for the sentiment. 

Thank you kindly for stopping by here. Contact Me if I can be of service.

Take a quick look and Shop Now for new products and current sales. There is a HOST CODE in the right sidebar for your use, if you like.

If you just want a quick fix, check out the Kits Collection or get a consistent dose with Paper Pumpkin.

Join Me and create a new friendship. We already have crafting in common!

Please take a few minutes to share, like, pin, tweet, or comment. Plus, you don't want to forget to FOLLOW and SUBSCRIBE to my blog.

HAPPY STAMPING!

Saturday, January 1, 2022

Balloons & Cupcake

Birthdays call for balloons and cupcakes at any age. Using a crimper on the front panel before adhering it to the card base really set this card apart. What do you think? 


Stamps:
   Wagon Full of Fun
   Crazy for Cupcakes
   Perfectly Penned
   Watercolor Wash

Paper:
   Soft Sky A-2
   Basic White 5-1/4 x 4 (2), Scraps

Ink:
   Soft Sky
   Archival Basic Black
   Daffodil Delight

Markers:
   Various - Personal Choice

Technique:
   Crimper
   Sponging
   Fussy Cutting

Accessories:
   Crimper
   Dimensionals
   Paper Snips
   Sponge
   Adhesive

First, I stamped my Basic White panel using the Watercolor Wash background stamp. I applied Soft Sky ink. If you do not own this background stamp, create your own watercolor wash using a brush and watercolor ink. 

I then stamped some balloons and colored them using various markers. I did not take the time to mask off any balloons. So, I used a dark color for the balloon that overlapped one of the others.

Next, I stamped the sentiment across the top of the panel.

I ran the panel through the crimper both vertically and horizontally. 

I then stamped, colored, and fussy cut a cupcake. I attached the cupcake to the lower part of the card front using dimensionals.

Lastly, I adhered the panel to the card front and added the other Basic White panel to the inside of the card.

Thank you so very much for taking the time to stop and glance at my work. If you have any questions or suggestions, please Contact Me. I do appreciate your time.

If you need any supplies, or you are curious to know just how much these products cost, click on Shop Now and satisfy your curiosity. A HOST CODE is available for you to use in case you did not earn your own rewards.

Do you want the best value for your buck? Join Me and reap all of the rewards. I will be more than happy to assist you. Check it out and note that there are no hidden agendas.

Wait! Don't leave. If you want to try it and see, then subscribe to Paper Pumpkin. You will receive a kit with everything you need to create a project. Check out the Kit Collection for more choices.

I would love for you to take a minute to share, like, pin, tweet, or comment. Please FOLLOW and SUBSCRIBE to my blog. Let me know what you think below in the comments.

HAPPY STAMPING!

Tuesday, September 14, 2021

Birthday Numbers

Do you celebrate your birthday? Do you make a big deal about it? How many people celebrate your birthday with you? If you are physically aging, are you also becoming wiser? Is your mental age keeping up with your physical age? All excellent questions to ponder. Thoughts?


Stamps:
   Perfectly Penned

Paper:
   Calypso Coral A-2
   Basic Black 5-1/4 x 4 or Scraps
   Birthday Bash DSP 5-1/4 x 4
   Whisper White 3-1/2 x 1, 5-1/4 x 4 (Inside)

Ink:
   Archival Basic Black
   Calypso Coral

Technique:
   Die Cutting
   Sponging

Accessories:
   Large Numbers Framelits Dies
   Sponge
   Dimensionals
   Adhesive
   Paper Snips

First, I die cut all of the numbers. Note that the six and nine are the same.

I then arranged and adhered the numbers onto the Birthday Bash DSP panel.

This panel was then adhered onto the Calypso Coral card base.

Next, I stamped my sentiment on a scrap of Whisper White. I snipped the two ends and sponged it using Calypso Coral.

I attached it onto the card front using dimensionals. 

Lastly, I adhered the Whisper White panel to the inside of the card.

Thank you so much for stopping by here and taking a quick look-see. If you have any questions or need my assistance, Contact Me.

Shop Now and take a look at all of our new products and current promotions. Please use the HOST CODE sitting in the right sidebar if you did not earn your own rewards.

If you want to craft, but keep your costs below $25 a month, check out Paper Pumpkin. It just might be what your are looking for at the moment.

Join Me and become the newest member of my team. Remember there are no hidden agendas or penalties for giving it a go. Don't pass this opportunity to save.

You've come this far, so please share, like, pin, tweet, or comment. I appreciate your time and efforts. Let me know your thoughts and leave all of your questions behind. Do not forget to FOLLOW and SUBSCRIBE to my blog.

HAPPY STAMPING!

Tuesday, August 3, 2021

Spread Your Wings

I used a die cut as a stencil to create a butterfly on my card front. It's great to celebrate with fun, bright colors. What do you think?


Stamps:
   Perfectly Penned

Paper:
   Melon Mambo A-2
   Whisper White 5-1/4 x 4 (2)

Ink:
   Archival Basic Black

Markers:
   Elegant Eggplant
   Sweet Sugarplum
   Tempting Turquoise
   Daffodil Delight
   Pumpkin Pie
   Watermelon Wonder
   Melon Mambo
   Rose Red

Technique:
   Stencilling with Mixed Media

Accessories:
   Butterflies Thinlits Dies
   Basic Rhinestone Jewels
   Adhesive

First, I die cut my stencil using the Butterflies Thinlits Dies. I chose this die because it was large and intricate. 

I then placed it on my Whisper White panel. I used a bit of washi tape to hold it in place. I then colored in the stencil using various markers. 

Next, I stamped my sentiment above the butterfly.

I adhered this panel to the Melon Mambo card front and added rhinestones for the butterfly's body. I also adhered the other Whisper White panel to the inside of the card.

Thank you so much for stopping by here and taking a quick look-see. If you have any questions or need my assistance, Contact Me.

Shop Now and take a look at all of our new products and current promotions. Please use the HOST CODE sitting in the right sidebar if you did not earn your own rewards.

If you want to craft, but keep your costs below $25 a month, check out Paper Pumpkin. It just might be what you are looking for at the moment.

Join Me and become the newest member of my team. Remember there are no hidden agendas or penalties for giving it a go. Don't pass this opportunity to save.

You've come this far, so please share, like, pin, tweet, or comment. I appreciate your time and efforts. Let me know your thoughts and leave all of your questions behind. Do not forget to FOLLOW and SUBSCRIBE to my blog.

HAPPY STAMPING!

Tuesday, July 13, 2021

Thank You for Dinner

This image can be used for several different sentiments. I chose to use it as a thank you. You might want to use it for a dinner party invite. What are your suggestions?


Stamps:
   Studio Sketches
   Perfectly Penned

Paper:
   Whisper White 6 x 7 scored @ 3-1/2, 5-3/4 x 3-1/4 (Inside)
   Watercolor Paper 2-1/2 x 2
   Bashful Blue 2-3/4 x 2-1/4

Ink:
   Archival Basic Black

Watercolor Crayons:
   Personal Choice 

Technique:
   Watercolor

Accessories:
   Cherry Cobbler Washi Tape (Season of Cheer)
   Aqua Painter
   Adhesive

First, I stamped my image on a piece of watercolor paper.

I then colored it using my watercolor crayons.

Next, I used my aqua painter to apply water and move the color around. I did keep a paper towel handy, in case I went overboard with the water.

I then adhered this panel to a bit of Bashful Blue.

I took the card base and stamped my sentiment on the center bottom of the card.

I adhered my image to the center top of the card.

I then added a strip of washi tape to divide the two. 

Lastly, I adhered the other Whisper White panel to the inside of the card. 

This card will fit a regular letter size envelope.

Thank you so much for stopping by here and taking a quick look-see. If you have any questions or need my assistance, Contact Me.

Shop Now and take a look at all of our new products and current promotions. Please use the HOST CODE sitting in the right sidebar if you did not earn your own rewards.

If you want to craft, but keep your costs below $25 a month, check out Paper Pumpkin. It just might be what you are looking for at the moment. 

Join Me and become the newest member of my team. Remember there are no hidden agendas or penalties for giving it a go. Don't pass this opportunity to save.

You've come this far, so please share, like, pin, tweet, or comment. I appreciate your time and efforts. Let me know your thoughts and leave all of your questions behind. Do not forget to FOLLOW and SUBSCRIBE to my blog.

HAPPY STAMPING!

Sunday, September 22, 2019

Get Well Lattice

Focus on each pearl and see the center of a flower. The lattice fits perfectly between the window frame and the vellum. The "Get Well" sentiment is inside the card. If you look closely at the center of the window you can vaguely see it through the vellum.


Stamps:
   Perfectly Penned

Paper:
   Lost Lagoon A-2
   Basic Black 3 5/8" Square
   Vellum 5 1/2 x 4 1/4

Ink:
   Basic Black

Technique:
   Die Cutting

Accessories:
   Bigz Lattice Die, Window Frame Collection Framelits (2 & 4 counting from smallest to largest), 4 1/4" Basic Black Scalloped Polka Dot Ribbon, Basic Pearl Jewels, Vellum Tape, Glue Dots, Dimensionals

Cut the window frame on the front of the card.

Die cut lattice and center it on the inside of the window frame using glue dots.

Use vellum tape to adhere the vellum sheet behind the lattice.

Stamp sentiment on Lost Lagoon scrap and die cut it using the smaller window frame. Adhere it to the inside center with dimensionals.

Place a pearl at the center of each flower on the lattice.

Adhere the ribbon to the bottom of the card.

Thank you so much for stopping by here. Contact me if you have any questions. I appreciate your time and comments. 

HAPPY STAMPING!