Showing posts with label Ribbon. Show all posts

Friday, August 29, 2025

Vines in the Moonlight

If you need a masculine card, just omit the three Hues of Blue Flowers. You can then leave it as is or add a wooden element of some sort. Thoughts? 


Stamps:
   None

Paper:
   Cloud Cover A-2
   Basic White 5-3/8 x 4-1/8, 5-1/4 x 4 (Inside), Scraps = 3-1/4 x 1-1/4 (3) 
   Peaceful Garden DSP 5-1/4 x 4 

Ink:
   None

Technique:
   CAS
   Die Cutting

Accessories:
   Misty Moonlight Silver Edged Ribbon (6-1/2")
   Peace on Earth Dies
   Hues of Blue Flowers
   Tear & Tape
   Adhesive

First, I adhered the Peaceful Garden DSP panel onto a Basic White matte.

I then placed the Misty Moonlight Silver Edged Ribbon across the bottom of the panel and secured the ends on the back with a bit of tear & tape.

Next, I adhered the panel onto a Cloud Cover card front.

I then die cut three leaf vines, using the Peace on Earth Dies. (I had a scrap of Misty Moonlight and decided to include one in this color as well.)

Next, I arranged and adhered the leaves to the card front, as shown above. I used liquid adhesive to secure them. 

Lastly, I added three Hues of Blue Flowers to the ribbon and adhered a Basic White panel to the inside of the card.

Thank you kindly for stopping by here. Contact Me if I can be of service.

Take a quick look and Shop Now for new products and current sales. 

If you just want a quick crafty fix, check out the Kits Collection or get a consistent dose with a Paper Pumpkin subscription. 

Join Me and create a new friendship. We already have crafting in common! 

Please take a few minutes to share, like, pin, tweet, or comment. Plus, you don’t want to forget to FOLLOW and SUBSCRIBE to my blog.

HAPPY STAMPING!

Saturday, July 12, 2025

Bella

I have always enjoyed the scent of freshly cut roses. What about you? 


Stamps:
   None

Paper:
   Kiwi Kiss A-2 (Top Fold)
   Basic Black 5-3/8 x 4-1/8
   Bella Rose DSP 5-1/4 x 4
   Basic White 5-1/4 x 4 (Inside)

Ink:
   None

Technique:
   CAS

Accessories:
   Basic Rhinestone Jewels
   Kiwi Kiss Satin Ribbon 24"
   Adhesive

First I adhered the Bella Rose DSP panel onto a Basic Black matte and then onto the Kiwi Kiss card front. 

I then wrapped the Kiwi Kiss Satin Ribbon around the top of the card front and tied it off in a bow. I trimmed the edges.

Lastly, I added a few Rhinestone Jewels to the card front and adhered a Basic White panel to the inside of the card.

Thank you so very much for taking the time to stop and glance at my work. If you have any questions or suggestions, please Contact Me. I do appreciate your time.

If you need any supplies, or you are curious to know just how much these products cost, click on Shop Now and satisfy your curiosity.

Do you want the best value for your buck? Join Me and reap all of the rewards. I will be more than happy to assist you. Check it out and note that there are no hidden agendas.

Wait! Don't leave. If you want to try it and see, then subscribe to Paper Pumpkin. You will receive a kit with everything you need to create a project. Check out the Kit Collection for more choices.

I would love for you to take a minute to share, like, pin, tweet, or comment. Please FOLLOW and SUBSCRIBE to my blog. Let me know what you think below in the comments.

HAPPY STAMPING!

Friday, July 11, 2025

Flirty Thank You

I used the leftover centers from the Gallery Blooms Frame Die to adorn my card front. I matted them with a bit of Basic Black to get them to stand out a bit more. What do you think? 


Stamps:
   Textured Notes

Paper:
   Flirty Flamingo A-2
   Basic Black 3-1/2 x 1-3/4 (2)
   Berry Delightful DSP 3-3/8 x 1-5/8 (or leftover centers of Gallery Blooms Dies - Frames) <2 centers of frame>
   Basic White 5-1/4 x 4 (Inside)

Ink:
   Tuxedo Black Memento

Technique:
   CAS 
   Die Cutting

Accessories:
   Flirty Flamingo 3/8" Ruched Ribbon
   2016-2018 In-Color Enamel Shapes
   Gallery Blooms Dies (Center of Frame leftover)
   Glue Dots
   Adhesive

First, I matted each of the Berry Delightful DSP leftover centers from the Gallery Blooms Dies, using Basic Black. I included the measurements of the pieces in case you just need to create your own panels.

I then adhered these two panels to the Flirty Flamingo card front.

Next, I stamped the sentiment on the top-right corner of the card front, using Tuxedo Black Memento ink.

I then added a bow to the lower left-side of the card front, using a glue dot.

Lastly, I added a few In-Color Enamel Shapes and adhered a Basic White panel to the inside of the card.

Thank you for checking out my blog. I so appreciate your time. Contact Me if you have any questions or concerns regarding Stampin' Up! 

Are you curious about what is trending, the cost of materials and other products, or do you just feel like shopping? Click on Shop Now and have some fun.

Subscribe to Paper Pumpkin or check out the Kits Collection if you want to stay on a budget or just keep it all low-key.

Join Me and reap all of the benefits of becoming a part of the Stampin' Up! family. Check it out and gain the best value for your money.

Share, like, pin, tweet, or comment. Don't forget to FOLLOW and SUBSCRIBE to my blog.

HAPPY STAMPING!

Thursday, June 26, 2025

Favored Petals

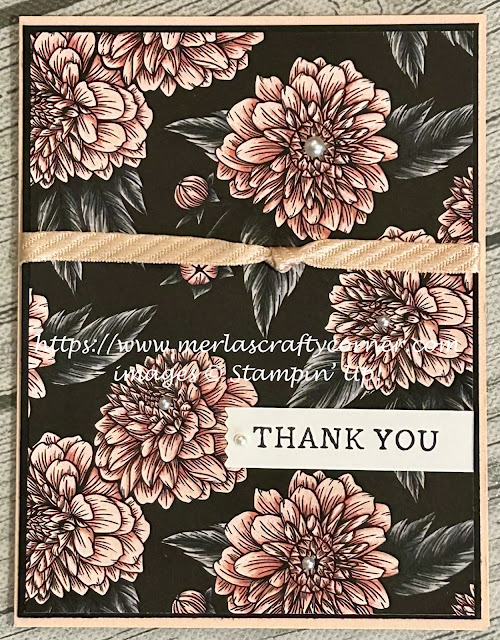
The black etching on the petals and leaves definitely pulls the onlookers attention. Thoughts? 


Stamps:
   Simply Said

Paper:
   Petal Pink A-2
   Basic Black 5-3/8 x 4-1/8
   Favored Flowers DSP 5-1/4 x 4
   Basic White 2-1/4 x 5/8, 5-1/4 x 4 (Inside)

Ink:
   Tuxedo Black Memento

Technique:
   CAS
   Punching

Accessories:
   Washi Label Punch 
   1/4" Diagonal Trim Combo Pack (8")
   Pearl Basic Jewels
   Glue Dots
   Adhesive

First, I adhered the Favored Flowers DSP panel onto a Basic Black matte.

I then took the ribbon and tied a knot in the center of it. I wrapped it around the panel and secured it on the back with a couple of glue dots. I also used a glue dot under the knot to keep it in place.

Next, I adhered the panel onto the Petal Pink card front.

I then stamped the sentiment on a strip of Basic White, using Tuxedo Black Memento ink.

Next, I used the Washi Label Punch on one end of the strip to add a bit of interest.

I then adhered the sentiment on the bottom portion of the card front, as shown above.

Lastly, I added a pearl to the sentiment and adhered a Basic White panel to the inside of the card.

Thank you so much for hanging out with me today. Contact Me if I can be of service.

Shop Now and browse some exciting new things.

Paper Pumpkin and the Kits Collection are two ways to get a quick fix for the Crafting Bug. Be careful, it is contagious, especially with family.

Join Me and flourish in the goodness that is Stampin' Up! I know you're thinking about it, or you would not have read this far. Check it out and let me know if you need anything.

Please share, like, pin, tweet, or comment. FOLLOW and SUBSCRIBE to my blog.

HAPPY STAMPING!

Monday, June 23, 2025

Birthday Refresh

I do like the black etching on the rose petals and leaves. I think it really draws in your attention. What do you think? 


Stamps:
   Simply Said

Paper:
   Fresh Freesia A-2
   Basic Black 5-3/8 x 4-1/8
   Favored Flowers DSP 5-1/4 x 4
   Mossy Meadow 3 x 3/4
   Basic White 2-3/4 x 5/8, 5-1/4 x 4 (Inside)

Ink:
   Tuxedo Black Memento

Technique:
   CAS
   Punching

Accessories:
   Fresh Freesia 3/8" Seam Binding Ribbon
   Adhesive-Backed Sequins & Gems
   Washi Label Punch
   Adhesive

First, I adhered the Favored Flowers DSP onto a Basic Black matte.

I then wrapped the Fresh Freesia Seam Binding Ribbon around the top portion of the panel and tied it off with a bow. 

Next, I adhered the panel onto the Fresh Freesia card front.

I then stamped the sentiment, using Tuxedo Black Memento ink and punched it out with the Washi Label Punch.

Next, I attached it to the Mossy Meadow strip at an angle, using liquid adhesive. 

I then adhered it to the bottom portion of the card front.

Lastly, I added a few sequins and gems to the card front and adhered a Basic White panel to the inside of the card.

I am so excited that you decided to pay me a visit. Please Contact Me if I can be of service.

Shop Now and enjoy looking at new products made especially for card making! 

If you are into kits, check out Paper Pumpkin and the Kits Collection. I am sure one of those will be right up your alley.

Still undecided? Join Me and find out what all of the fuss is about. Check it out today.

Please share, like, pin, tweet, or comment. FOLLOW and SUBSCRIBE to my blog.

HAPPY STAMPING!

Sunday, May 25, 2025

Knotted Pink

Everyone is entitled to their own feelings. Only you have control over them, unless you choose to relinquish that control. Personally, I choose happy as often as possible, but there are times when you just have to "feel how you feel," and it's okay! Thoughts? 


Stamps:
   It's Okay

Paper:
   Calypso Coral A-2
   Mixed Media Florals DSP 5-1/4 x 4
   Basic Black 5-3/8 x 4-1/8
   Basic White 5-1/4 x 4 (Inside)
   Tag 1-1/4 x 3-3/4 (DSP or Basic White)

Ink:
   Tuxedo Black Memento

Technique:
   Die Cutting

Accessories:
   Stylish Shapes Framelits
   Petal Pink 1/4" Diagonal Trim (8")
   Low Profile Dots
   Dimensionals
   Adhesive

First, I adhered the Mixed Media Florals DSP panel onto a Basic Black matte.

I then knotted the Petal Pink Diagonal Trim in the center and adhered it to the bottom part of the Mixed Media panel. I adhered the ends on the back of the panel.

Next, I adhered this panel onto a Calypso Coral card front. 

I then took a left-over piece of DSP and used the light blue side to stamp and die cut the sentiment, using Tuxedo Black ink and the Stylish Shapes Dies. You can also use a Basic White or Boho Blue scrap.

Next, I attached it to the card front, using dimensionals.

Lastly, I randomly added a few Low Profile Dots to the card front and adhered a Basic White panel to the inside.

Click HERE for a direct link to products used on this card.

Thanks for stopping by and taking a quick peek. Contact Me for more information on my cards or Stampin' Up!

Click on the headers above and satisfy your curiosity.

Please share, like, pin, tweet, or comment. Please take the time to FOLLOW or SUBSCRIBE to my blog.

HAPPY STAMPING!

Saturday, May 17, 2025

Delightful Birds

I added a few rhinestones with a bit of shimmery ribbon to a beautiful panel of designer paper and created a beautiful all occasion card. I now can use this for any purpose, simply by adding a personal message on the inside. Thoughts? 


Stamps:
   None

Paper:
   Daffodil Delight A-2
   Basic Black 5-3/8 x 4-1/8
   Bird Ballad DSP 5-1/4 x 4
   Basic White 5-1/4 x 4 (Inside)

Ink:
   None

Technique:
   CAS

Accessories:
   Calypso Coral 1/4" Shimmery Ribbon (9")
   Basic Rhinestone Jewels
   Adhesive

First, I knotted the ribbon in the center and attached it to the middle of the Bird Ballad DSP panel. I secured it on the back with a strong adhesive. You can also use glue dots if you like.

I then adhered this panel onto a Basic Black matte and added it to the Daffodil Delight card front.

Next, I randomly added a few rhinestones to the center of some flowers. This added a bit of sparkle to the card.

Lastly, I adhered a Basic White panel to the inside of the card.

Thank you so much for taking the time to stop and glance at my work. If you have any questions or suggestions, please Contact Me. I do appreciate your time.

If you need supplies, or you are curious to know just how much these products cost, click on Shop Now and satisfy your curiosity.

Do you want the best value for your buck? Join Me and reap all of the rewards. I will be more than happy to assist you. Check it out and note that there are no hidden agendas.

Wait! Don't leave. If you just want to try it and see, then subscribe to Paper Pumpkin. You will receive a kit with everything you need to create a project. Check out the Kit Collection for more choices.

I would love for you to take a minute to share, like, pin, tweet, or comment. Please FOLLOW and SUBSCRIBE to my blog. Let me know what you think below in the comments.

HAPPY STAMPING!

Monday, April 14, 2025

Pressing Thanks

I used a white taffeta ribbon to hide the seam between the panels. Thoughts? 


Stamps:
   Artistically Inked

Paper:
   Night of Navy A-2, 5-1/8 x 3-7/8
   Crumb Cake 5-1/4 x 4
   Pressed Petals DSP 5 x 3-3/4 (cut @ 1-3/4 and flip one side)
   Basic White 5-1/4 x 4 (Inside)

Ink:
   Night of Navy

Technique:
   Die Cutting
   Dry Embossing

Accessories:
   Cane Weave 3D Embossing Folder
   Deckled Rectangles Dies 
   Whisper White 3/8" Taffeta Ribbon - 8"
   Holiday Rhinestone Basic Jewels
   Dimensionals
   Glue Dots
   Adhesive

First, I cut the Pressed Petals DSP panel and dry embossed the side that was to remain solid.

I then adhered the two panels side by side onto a Night of Navy matte.

Next, I adhered a white taffeta ribbon over the seam and secured it on the back. I added a glue dot to hold it in place on the front.

I then adhered the panel onto a Crumb Cake panel and attached it all to the Night of Navy card front.

Next, I stamped and die cut the sentiment, using Night of Navy ink and the smallest Deckled Rectangle die. I attached the sentiment to the card front, using dimensionals.

Lastly, I added a couple of Holiday Rhinestone jewels and adhered a Basic White panel to the inside of the card.

Thanks so much for reading through my blog today. Contact Me if I can answer anything for you, or if you would like to buy any of my cards.

If you would like to buy your own products and make your own cards click on Shop Now and browse current merchandise.

Our monthly subscription to Paper Pumpkin is affordable and flexible. The cost is $27 monthly. Check out the Kits Collection for more options at varying prices.

Join Me and become part of a team. Check out the benefits and decide if it is for you.

Please share, like, pin, tweet, or comment. Don't forget to FOLLOW and SUBSCRIBE to my blog.

HAPPY STAMPING!

Monday, April 7, 2025

Star Bright

Although I did not use a stamp set, everything on this card coordinates with the "Christmas Gleaming" stamp set. I do my best to use all of my supplies, regardless if they are current or not. If you do not own these products, substitute your own and simply use the layout or colors as inspiration. Thoughts? 


Stamps:
   None

Paper:
   Very Vanilla A-2, 5-1/4 x 4 (Inside)
   Brightly Gleaming DSP 5-1/4 x 4

Ink:
   None

Technique:
   CAS

Accessories:
   Brightly Gleaming Foil Elements
   Classic Weave Ribbon (8")
   Clear Faceted Gems
   Glue Dots
   Stampin' Seal+
   Adhesive

First, I adhered the Classic Weave Ribbon to the bottom of the DSP panel. I used a few glue dots on the back of the ribbon to hold it in place and then adhered it securely on the back of the panel. Note: I cut the ribbon so the sentiment was centered on the bottom.

I then adhered the DSP panel onto the Very Vanilla card front. 

Next, I arranged and attached the foil elements to the front of the card. 

I then added a Clear Faceted Gem to the center of the star.

Lastly, I added a Very Vanilla panel to the inside of the card. This step is optional, but I think it adds strength and a bit more elegance to the card.

Thank you immensely for your time. I know how precious it can be. Please Contact Me if you need anything Stampin' Up! or if you have any questions.

Click on Shop Now and take a look at some quality products. Investing in your craft is a no-brainer.

Of course, the best value for your dollar is joining the Stampin' Up! family. Just click on Join Me and check out the benefits.

Let's not forget Paper Pumpkin. If you want to craft on the go, or you like to keep things small and low-key, check it out. The kit includes all you need.

Please take a minute or two to share, like, pin, tweet, or comment. Don't forget to FOLLOW and SUBSCRIBE to my blog.

HAPPY STAMPING!

Tuesday, December 17, 2024

Real Shepherd

I do like a clean and simple card, especially when I have to make several, or at least until my supplies are depleted. Thoughts? 


Stamps:
   Shepherd's Care

Paper:
   Real Red A-2
   Basic White 5-3/8 x 4-1/8, 5 x 3, 5-1/4 x 4 (Inside)
   Season of Elegance DSP 5-1/4 x 4

Ink:
   Crumb Cake
   Real Red

Technique:
   Die Cutting

Accessories:
   Nested Essentials Dies
   Real Red Woven Satin Ribbon - 16"
   Neutrals Adhesive-Backed Sequins
   Dimensionals
   Adhesive

First, I adhered the Season of Elegance DSP panel to a Basic White matte.

I then tied the Real Red Woven Satin Ribbon around the panel, vertically on the left side, as shown above.

Next, I adhered the panel onto the Real Red card front.

I then stamped the images on the 5 x 3 Basic White panel, using Crumb Cake ink.

Next, I stamped the sentiment across the image, using Real Red ink.

I then die cut the image, using the Nested Essentials dies.

Next, I attached the panel onto the right side of the card front, using dimensionals. 

Lastly, I added a Neutrals Adhesive-Backed Sequin to the center of the star and adhered a Basic White panel to the inside of the card.

I thank you so much for stopping by here and checking out my card today. I do hope you liked it. Contact Me if you need more information.

If you would like to Shop Now, Stampin' Up! is always offering something special, especially for online shoppers. There are items that are advertised Exclusively Online, so check it out. You don't want to miss out on these wonderful items.

The Kits Collection is always exciting. New kits are introduced online and are available while supplies last. Prices vary, depending on the kit. You don't want to miss Paper Pumpkin. It is what I enjoy each month. Take a peek!

Join Me and cash in for the best deal available. No fine print to miss. Check it out and see if it may be for you.

Please take a few more minutes to share, like, pin, tweet, or comment. Don't forget to FOLLOW and SUBSCRIBE to my blog.

HAPPY STAMPING!