Showing posts with label Floral Frames Collection. Show all posts

Friday, July 21, 2023

Happy Thank You Medallion

Here is a simple, yet elegant card. I love the classic black and white look. Thoughts? 


Happy Birthday Medallion


Stamps:
   Daydream Medallions
   Perfectly Penned 

Paper:
   Basic Black A-2, 4-1/2" Sq., 2-1/2" Sq.
   Basic White 5-1/4 x 4 (2), 3-1/2" Sq., 1-1/2 " Sq.

Ink:
   Tuxedo Black Memento

Technique:
   Die Cutting

Accessories:
   Floral Frames Collection Dies
   1/2" Circle Punch
   Medium Pearl - Pretties Kit
   Glue Dots
   Adhesive

First, I stamped the Basic White squares with the Daydream Medallions Stamp Set.

I then die cut the medallion, using the Floral Frames Collection dies and the Black and White (stamped) squares.

Next, I arranged them on the Basic White panel and adhered them, using liquid adhesive.

I then added a medium pearl from the Pretties Kit, using a glue dot.

Next, I stamped the sentiment on the bottom of the Basic White panel.

Lastly, I added this panel to the Basic Black card front and adhered the other Basic White panel to the inside of the card.

Here is another card with a different sentiment:

Thank You Medallion

I followed the same steps stated above. They are identical, except for the sentiment. 

Thank you kindly for stopping by here. Contact Me if I can be of service.

Take a quick look and Shop Now for new products and current sales. There is a HOST CODE in the right sidebar for your use, if you like.

If you just want a quick fix, check out the Kits Collection or get a consistent dose with Paper Pumpkin.

Join Me and create a new friendship. We already have crafting in common!

Please take a few minutes to share, like, pin, tweet, or comment. Plus, you don't want to forget to FOLLOW and SUBSCRIBE to my blog.

HAPPY STAMPING!

Sunday, January 9, 2022

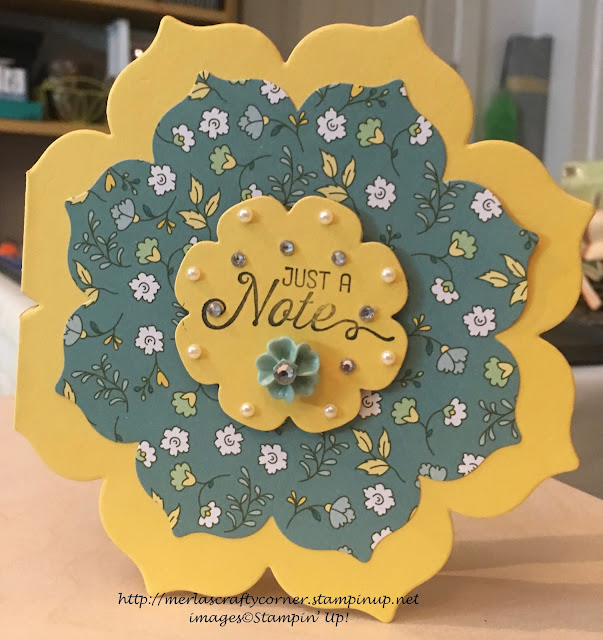
Floral Note

I do like the idea of making a card in a particular shape. Using die cuts makes the whole process quite easy. You only need to remember to keep one end intact in order to open it. What do you think? 


Stamps:
  Flourishing Phrases

Paper:
  Daffodil Delight 5 x 11 scored @ 5-1/2, 2-1/4 Sq.
  All Abloom DSP 4-1/2 Sq.

Ink:
  Archival Basic Black

Technique:
  Die Cutting

Accessories:
  Floral Frames Collection Dies
  2015-2017 In-Color Blossom Collection
  Basic Rhinestone Jewels
  Basic Pearl Jewels
  Dimensionals
  Glue Dots
  Adhesive

Die cut the card base with one of the larger dies from the Floral Frames Collection Dies. Note that the left edge is uncut and folded. I just made sure the die was past that edge so it would not cut it. You may have to pass your card a couple of times through your machine because you are cutting through two sheets. 

Next, I cut the DSP, using a smaller die cut from the collection. I adhered this piece onto the card front.

I then stamped and die cut the center of the flower. I attached it, using dimensionals.

I added a flower embellishment with a glue dot.

Lastly, I added a few rhinestones and pearls. You can die cut a white panel for the inside of the card if you wish. The Daffodil Delight is light enough to write on it. The choice is yours.

Thank you so much for dropping by here. Contact Me if you have any questions.

Click on all of the tabs above and explore products, promotions, and opportunities.

Please take the time to share, like, pin, tweet, or comment. Do not forget to FOLLOW and SUBSCRIBE to my blog.

HAPPY STAMPING!
Tuesday, July 6, 2021

Blushing Heart

I raided my stash to create this card. I just cannot part with my older stamps that are still mounted on wooden blocks. As long as my stamp-a-ma-jig works, I may never remove the rubber from the wood. Do you still have stamps on wooden blocks? Thoughts?


Stamps:
   Nice & Easy Notes

Paper:
   Blushing Bride A-2
   Blushing Bride Glimmer Scraps
   Love Blossoms DSP 5-1/4 x 4
   Basic Black 4" Sq.
   Whisper White 3-1/4" Sq., 5-1/4 x 4 (Inside)

Ink:
   Archival Basic Black

Markers:
   Basic Black
   Basic Gray
   Blushing Bride
   Early Espresso
   Garden Green
   Melon Mambo
   Pink Pirouette
   Real Red

Technique:
   Coloring
   Die Cutting
   Punching
   Sponging

Accessories:
   Rose Red Stitched Ribbon 4"
   Hearts Border Punch
   Small Heart Punch
   Window Frames Collection
   Floral Frames Collection
   Sponge
   Glue Dots
   Dimensionals

First, I stamped and colored my image using the markers listed above. Of course, you may choose to use any colors or medium you like.

Next, I die cut my image and its background. I used Basic Black to add a background for my sweet girl because I felt the tiny hearts were too busy for her. I did sponge the edges of her die cut to further separate her from her background. I adhered these two pieces together.

I added a panel of designer series paper to the card front, and attached 4 inches of stitched ribbon on the bottom. I punched and adhered small glitter hearts to the ribbon. These were added using glue dots.

I then attached the die cuts with the image to the top of the card front using dimensionals. I punched a small heart and adhered it inside the heart.

Lastly, I added the Whisper White panel to the inside of the card.

Thank you so much for stopping by here and taking a quick look-see. If you have any questions or need my assistance, Contact Me.

Shop Now and take a look at all of our new products and current promotions. Please use the HOST CODE sitting in the right sidebar if you did not earn your own rewards.

If you want to craft, but keep your costs below $25 a month, check out Paper Pumpkin. It just might be what you are looking for at the moment.

Join Me and become the newest member of my team. Remember there are no hidden agendas or penalties for giving it a go. Don't pass this opportunity to save.

You've come this far, so please share, like, pin, tweet, or comment. I appreciate your time and efforts. Let me know your thoughts and leave all of your questions behind. Do not forget to FOLLOW and SUBSCRIBE to my blog.

HAPPY STAMPING!

Wednesday, April 7, 2021

Easter Lily

 I stamped lilies on a floral frame card for Easter. This is a distINKtive stamp set. So, it stamps beautifully with just the right amount of saturation on each petal, stem, and leaf. I think it is beautiful. What are your thoughts?


Stamps:
   Lasting Lily
   Teeny Tiny Wishes

Paper:
   Whisper White A-2

Ink:
   Gorgeous Grape
   Mango Melody
   Old Olive
   Archival Basic Black

Technique:
   Die Cutting

Accessories:
   Floral Frames Collection

First, I die cut my card using the Floral Frames Collection. Just make sure that one end stays intact. 

I then stamped my Gorgeous Grape Lily in the middle, followed by the two Mango Melody lilies on each side.

Next, I stamped the stems and the leaf using Old Olive. 

Lastly, I stamped Happy Easter from the Teeny Tiny Wishes stamp set.

Thank you so much for spending time with me here. Contact Me if you have any questions.

Shop Now and take a look at all of our new products and current promotions. Please use the HOST CODE sitting in the right sidebar if you did not earn your own rewards.

Subscribe to Paper Pumpkin and keep your monthly cost below $25! Join Me and become my newest team member.

Either way, please share, like, pin, tweet, or comment. Do not forget to FOLLOW and SUBSCRIBE to my blog.

HAPPY STAMPING!