Showing posts with label Painted Texture Embossing Folder. Show all posts

Thursday, May 2, 2024

Gala Thanks

This is a wonderful layout to use those 1/4" strips of cardstock that fill up our scrap boxes. You can add any of the colors found on the designer series paper panel. I chose Basic Black Thoughts? 


Stamps:
   Butterfly Gala

Paper:
   Basic White A-2, 2 x 3, 5-1/4 x 4 (Inside)
   Botanical Butterfly DSP 2 x 5-1/2
   Basic Black 1/4 x 5-1/2 (2)

Ink:
   Tuxedo Black Memento

Technique:
   Die Cutting
   Dry Embossing

Accessories:
   Stitched Shapes Framelits
   Painted Texture 3D Embossing Folder
   Gingham Gala Adhesive-Backed Sequins
   Dimensionals
   Adhesive

First, I dry embossed the Basic White card front, using the Painted Texture 3D Embossing Folder.

I then adhered the Botanical Butterfly DSP panel onto the center of the card front. 

Next, I added a 1/4" strip of Basic Black to each side of the designer series paper panel.

I then stamped and die cut the sentiment, using the Stitched Shapes Framelits and Tuxedo Black Memento ink.

Next, I attached the sentiment toward the bottom of the card front, using dimensionals. You can place the sentiment anywhere on the card front, and change it to suit your current need.

Lastly, I added a few sequins and adhered a Basic White panel to the inside of the card.

I am so excited that you stopped to read and check out my work. Thank you from the bottom of my heart. Contact Me and let me know if there is anything I can answer for you.

Do you have some time to browse? You do not want to pass up the opportunity to shop some quality products and see what is trending. Shop Now and take a peek. If you decide to place an order, I have included a HOST CODE in the right sidebar if you do not earn any rewards on your own. Thanks in advance.

Are you undecided? Subscribe to Paper Pumpkin and give it a go. Let the products speak for themselves. The cost is $25 and you are completely in control. No small print for you to miss. Try it.

Join Me and gain the best value for your hard-earned money. Check it out now.

Share, like, pin, tweet, or comment. Come on, I dare you. Don't forget to FOLLOW and SUBSCRIBE to my blog.

HAPPY STAMPING!

Saturday, June 17, 2023

Moonlight Thank You

Flowers are fitting for any occasion. So, use the sentiments in the set or choose from other sets to complete a card with these images. Thoughts?


Stamps:
   Earthen Textures

Paper:
   Melon Mambo A-2, Brights DSP 3" Sq.
   Chocolate Chip 5-1/4 x 4
   Basic White 5-1/4 x 4 (Inside), 1/2 x 2-7/8, Scraps

Ink:
   Misty Moonlight
   Garden Green

Technique:
   Die Cutting
   Dry Embossing
   Punching

Accessories:
   Earthen Textures Dies
   Painted Texture 3D Embossing Folder
   Banners Pick a Punch
   Clear Faceted Gems
   Glue Dots
   Dimensionals
   Adhesive

First, I ran the Chocolate Chip panel through the Embossing machine, using the Painted Texture 3D Embossing Folder.

I then adhered this panel to the Melon Mambo card front, using liquid adhesive.

Next, I stamped the tall vase with Misty Moonlight and the ferns with Garden Green.

Using the Earthen Textures Dies, I die cut the vase and the ferns.

I then took the 3" square of Melon Mambo designer paper from the Brights collection and ran it through with the fan like die cut. I folded the top edges a bit to give it some dimension.

I added the Melon Mambo image to the card front with a glue dot. I lined it up with the top edge of the Chocolate Chip panel. 

I then adhered the Misty Moonlight vase with some liquid adhesive, as well as the Garden Green ferns. (I snipped the bottom stem of the ferns.)

Next, I stamped the sentiment on the Basic White strip, using Misty Moonlight and punched the edges with the Banners Pick a Punch. I attached it with a few dimensionals.

Lastly, I added a Clear Faceted Gem to the Melon Mambo floral, and adhered the Basic White panel to the inside of the card. 

Thank you so very much for taking the time to stop and glance at my work. If you have any questions or suggestions, please Contact Me. I do appreciate your time.

If you need any supplies, or you are curious to know just how much these products cost, click on Shop Now and satisfy your curiosity. A HOST CODE is available for you to use in case you did not earn your own rewards. You can find it in the right sidebar.

Do you want the best value for your buck? Join Me and reap all of the rewards. I will be more than happy to assist you. Check it out and note that there are no hidden agendas.

Wait! Don't leave. If you just want to try it and see, then subscribe to Paper Pumpkin. You will receive a kit with everything you need to create a project. Check out the Kit Collection for more choices.

I would love for you to take a minute to share, like, pin, tweet, or comment. Please FOLLOW and SUBSCRIBE to my blog. Let me know what you think below in the comments.

HAPPY STAMPING!

Monday, February 7, 2022

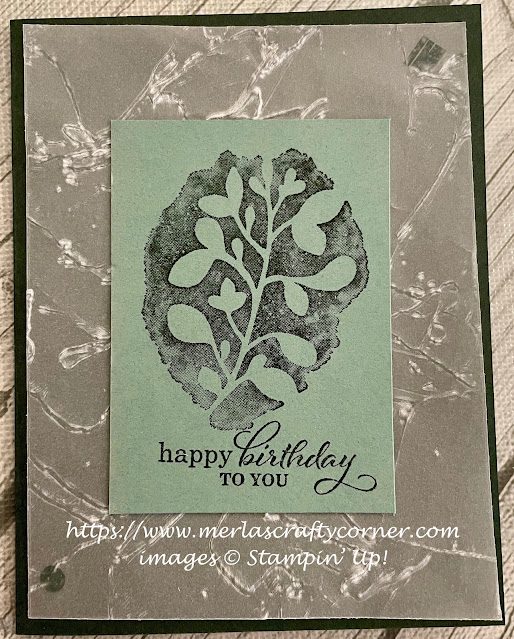
Textured Birthday

Dry emboss a panel of vellum and be amazed at the results. As the fibers are broken up by the embossing, the vellum turns white. I really like the look and feel that is created. What do you think? 


Stamps:
   Amazing Silhouettes
   Best Year

Paper:
   Evening Evergreen A-2
   Vellum 5-1/4 x 4
   Soft Succulent 2-1/2 x 3-1/2
   Basic White 5-1/4 x 4 (Inside)

Ink:
   Evening Evergreen

Technique:
   Dry Embossing

Accessories:
   Painted Texture 3D Embossing Folder
   Genial Gems
   Stampin' Seal+
   Adhesive

First, I dry embossed a vellum panel.

I then stamped my image and sentiment on a piece of Soft Succulent.

I adhered the stamped panel to the center of the vellum panel.

Next, I applied Stampin' Seal+ to the back of the vellum behind the Soft Succulent piece and added it to the card front. This will keep the marks left by the adhesive hidden from view.

Lastly, I added a few gems and adhered the Basic White panel to the inside of the card.

Thank you so much for stopping by here and spending a few minutes of your day with me. I appreciate your time. Contact Me if you have any questions, need a demonstrator, or just want to stamp or share ideas.

Shop Now and enjoy browsing products and promotions. I have a HOST CODE in the right sidebar in case you did not earn your own rewards.

Do not miss the opportunity to Join Me and become the newest member of my team.

Paper Pumpkin should not be ignored. I enjoy putting my kit together monthly.

Take a few more minutes and share, like, pin, tweet, or comment. I would love to see what you really think. Do not forget to FOLLOW and SUBSCRIBE to my blog.

HAPPY STAMPING!

Monday, October 11, 2021

Leaves Forever

I used two different embossing folders to create the faux tin metal squares behind the image. Surprisingly, I only applied one layer of silver embossing powder to my paper. I can't decide which one I like better. Thoughts?


Leaves Forever


Stamps:
   Queen Anne's Lace
   Forever Fern

Paper:
   Strawberry Slush A-2, 4-1/4 x 2-1/4
   Mossy Meadow 4-1/2 x 2-1/2
   Whisper White 4 x 2, 5-1/4 x 4 (Inside)
   Basic Black 5-1/4 x 4
   Sahara Sand 8-1/2 x 2-3/4 (10 - 1-1/4" Sq.)

Ink:
   Tuxedo Black Memento
   Strawberry Slush
   Mossy Meadow
   VersaMark

Technique:
   Faux Tin Metal

Accessories:
   Layered Leaves/Painted Texture Embossing Folder
   Silver Embossing Powder
   1-1/4" Sq. Punch
   Basic Rhinestone Jewels
   Dimensionals
   Adhesive

Here is another card using the Painted Texture Embossing Folder instead of the Layered Leaves. Which do you like better?


Leaves Forever Too


First, I created my faux tin metal squares. I covered the Sahara Sand strip with VersaMark, applied silver embossing powder, and heat set it. I then punched out ten 1-1/4" squares. I then glued these onto the outer edges of the Basic Black panel. The center of the panel will be covered with an image.

If you do not have a square punch, you can score lines on the strip and fussy cut them after the heat embossing has cooled.

I then adhered the Basic Black panel onto the Strawberry Slush card front. Strawberry Slush has been discontinued, but you can choose Melon Mambo, Magenta Madness, Poppy Parade, or choose your favorite hue.

Next, I stamped and colored my image. I also stamped my sentiment on it. 

I adhered the Whisper White panel onto the Strawberry Slush, and then onto the Mossy Meadow. This panel was attached to the center of the card front, using dimensionals.

Lastly, I added a few rhinestones and adhered the other Whisper White panel to the inside of the card.

Thank you so much for stopping by here and spending a few minutes of your day with me. I appreciate your time. Contact Me if you have any questions, need a demonstrator, or just want to stamp or share ideas.

Shop Now and enjoy browsing products and promotions. I have a HOST CODE in the right sidebar in case you did not earn your own rewards.

Do not miss the opportunity to Join Me and become the newest member of my team.

Paper Pumpkin should not be ignored. I enjoy putting my kit together monthly.

Take a few more minutes and share, like, pin, tweet, or comment. I would love to see what you really think. Do not forget to FOLLOW and SUBSCRIBE to my blog.

HAPPY STAMPING!
Sunday, January 24, 2021

Granny Art

 Create more backgrounds by adding ink to your embossing folder. I like the dramatic look and textured feel on this background. What do you think? 


Stamps:
   Art Gallery

Paper:
   Coastal Cabana A-2
   Whisper White 2-1/2 x 3 (2), 5-1/4 x 4 (2), Scrap

Ink:
   Coastal Cabana
   Gorgeous Grape
   Granny Apple Green

Technique:
   Dry Embossing
   Die Cutting
   Stamp-Off
   2-Step Stamping

Accessories:
   Painted Texture 3-D Embossing Folder
   Floral Gallery Dies
   Basic Rhinestone Jewels
   Dimensionals
   Adhesive

First, I applied my Granny Apple Green to the smooth side of the embossing folder. I dabbed a bit of Coastal Cabana on a bit of it, but I didn't want to mix my colors on my ink pads.

I carefully placed my Whisper White panel in the center of the embossing folder and ran it through my machine, making sure the white panel did not move. I did rinse and dry my embossing folder right after using it. 

Next, I stamped my flowers using Gorgeous Grape. I stamped-off once before adding the first step. The second step (accents) I added the ink at full strength. I die cut these using the Floral Gallery Dies. I attached the flowers to the top of the embossed panel using dimensionals.

I then used Coastal Cabana to stamp my sentiment on a scrap of Whisper White. I die cut it and attached it with dimensionals.

I added rhinestones to give the card a bit of glimmer.

Lastly, I adhered the embossed panel to the Coastal Cabana card base. The other Whisper White panel was added to the inside of the card.

Thank you so much for dropping by here. Contact Me if you have any questions.

Click on all of the tabs above and explore products, promotions, and opportunities.

Please take the time to share, like, pin, tweet, or comment. Do not forget to FOLLOW and SUBSCRIBE to my blog.

HAPPY STAMPING!