Showing posts with label Quiet Meadow. Show all posts

Sunday, April 14, 2024

Quiet Corner

I was challenged to create a corner cluster card, meaning things should be placed in only one corner. What do you think? It did make an interesting layout. Thoughts? 


Stamps:
   Corner Bouquet
   Quiet Meadow

Paper:
   Always Artichoke A-2
   Basic White 5-1/4 x 4 (2)

Ink:
   Always Artichoke

Technique:
   CAS

Accessories:
   Butterfly Gems
   Adhesive

First, I stamped the bouquet in the bottom left corner of a Basic White panel, using Always Artichoke ink and the Corner Bouquet stamp set.

I then stamped the sentiment, using the Quiet Meadow stamp set and Always Artichoke ink.

Next, I adhered the panel onto the Always Artichoke card front.

Lastly, I added a couple of Butterfly Gems and adhered the other Basic White panel to the inside of the card.

Thanks for stopping by and taking a quick peek. Contact Me for more information on my cards or Stampin' Up!

Click on the headers above and satisfy your curiosity.

Please share, like, pin, tweet, or comment. Please take the time to FOLLOW and SUBSCRIBE to my blog.

HAPPY STAMPING!

Monday, September 4, 2023

Blushing Rose

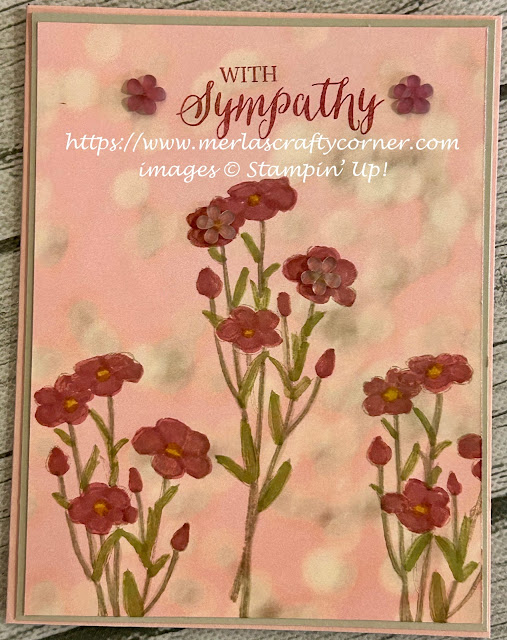
A blurry background allows the onlooker to focus on the main image and sentiment. Therefore, I was able to stamp directly onto the designer series paper. Thoughts? 


Blushing Rose


Stamps:
   Quiet Meadow
   Rose Wonder

Paper:
   Blushing Bride A-2
   Sahara Sand 5-3/8 x 4-1/8
   Falling in Love DSP 5-1/4 x 4
   Very Vanilla 5-1/4 x 4 (Inside)

Ink:
   Sahara Sand
   Sweet Sugarplum

Markers:
   Daffodil Delight
   Pear Pizzazz
   Sahara Sand
   Sweet Sugarplum

Technique:
   Coloring

Accessories:
   Frosted Flower Embellishments
   Adhesive

First, I stamped my sentiment on the top of the Falling in Love DSP, using the Rose Wonder stamp set and Sweet Sugarplum ink.

I then stamped the floral images from the Quiet Meadow stamp set, using Sahara Sand.

Next, I colored the images using my markers:
        Flower Centers - Daffodil Delight
        Flower Petals - Sweet Sugarplum
        Stems - Sahara Sand
        Leaves - Pear Pizzazz

I then adhered the DSP panel onto a Sahara Sand matte, and then onto the Blushing Bride card front.

I then added a Frosted Flower Embellishment on each side of the sentiment.

Lastly, I adhered a Very Vanilla panel to the inside of the card.

Here is another card I made, using the same products:

Blushing Rose Too


Thank you immensely for your time. I know how precious it can be. Please Contact Me if you need anything Stampin' Up! or if you have any questions.

Click on Shop Now and take a look at some quality products. Investing in your craft is a no-brainer. I have included a HOST CODE for those of you who enjoy ordering only one or two items. It is located in the right sidebar. Of course, if your product total is more than $150, enjoy your rewards.

Of course, the best value for your dollar is joining the Stampin' Up! family. Just click on Join Me and check out the benefits.

Let's not forget Paper Pumpkin. If you want to craft on the go, or you like to keep things small and low-key, check it out. The kit includes all you need.

Please take a minute or two to share, like, pin, tweet, or comment. Don't forget to FOLLOW and SUBSCRIBE to my blog.

HAPPY STAMPING!

Friday, May 12, 2023

Fernly Thoughts

Grab an embossing folder and a panel of vellum to create a beautiful background. What do you think?


Stamps:
   Nature's Prints
   Quiet Meadow

Paper:
   Evening Evergreen A-2
   Vellum 5-1/2 x 4-1/4
   Basic White 1-3/4 x 2-1/2 (2), 1 x 3, 5-1/4 x 4 (Inside)

Ink:
   Evening Evergreen

Technique:
   Dry Embossing
   Die Cutting

Accessories:
   Fern 3D Embossing Folder
   Meadow Dies 
   Natural Prints Dies
   2021-2023 In-Color Jewels
   Glue Dots
   Dimensionals
   Adhesive

First, I placed my vellum panel inside the Fern 3D embossing folder and ran it through the embossing machine. 

I added a few glue dots to the back center of the panel and adhered it onto the Evening Evergreen card base. I checked all the edges and trimmed the vellum if it needed it. It was a perfect fit.

Next, I stamped and die cut the two ferns and the sentiment. The fern leaf die cut is from the Natural Prints Dies, and the die cut for the sentiment can be found in the Meadow Dies.

I added the ferns with glue dots and the sentiment was attached using dimensionals.

Lastly, I added two jewels on the sentiment and adhered the Basic White panel to the inside of the card.

Thank you for visiting. I do love company. Feel free to Contact Me if you have any questions. 

Explore current products, promotions, and all of the opportunities. Just click on Shop Now. A HOST CODE is available in the right sidebar for those of you who do not earn your own rewards.

For those of you who like kits with everything you need to complete a project, we offer Paper Pumpkin. Your monthly cost is less than $25. Also, you might want to look at the new Kits Collection!

Join Me and become my newest team member. I look forward to meeting you.

Please take a minute to share, like, pin, tweet, or comment. Do not forget to FOLLOW and SUBSCRIBE to my blog.

HAPPY STAMPING!

Order what you need to make Fernly Thoughts!

Wednesday, May 10, 2023

Early Birds

Beautiful cards can be created with minimal stamping, especially when you have designer series paper that was created by talented artists. What do you think?


Stamps:
   Seaside Bay
   Quiet Meadow

Paper:
   Pool Party A-2
   Night of Navy 5-3/8 x 4-1/8
   By the Bay DSP 5-1/4 x 4
   Basic White 5-1/4 x 4 (Inside)

Ink:
   Crumb Cake
   Early Espresso
   Night of Navy
   Petal Pink

Technique:
   CAS

Accessories:
   Adhesive

First, I stamped the birds, using Early Espresso onto the designer series paper (DSP). 

I then stamped the sand with Crumb Cake ink.

Next I stamped the sentiment using Night of Navy ink. You can easily switch out the sentiment to suit your current need.

I then used Petal Pink ink to stamp a seashell on the bottom right corner of the DSP.

Next, I adhered the stamped DSP panel to the Night of Navy matte, and then onto the Pool Party card front.

Lastly, I adhered the Basic White panel to the inside of the card.

Thank you so much for spending time with me here. Contact Me if you have any questions.

Shop Now and take a look at all of our new products and current promotions. Please use the HOST CODE sitting in the right sidebar if you did not earn your own rewards.

Subscribe to Paper Pumpkin and keep your monthly cost below $25! Join Me and become my newest team member.

Either way, please share, like, pin, tweet, or comment. Do not forget to FOLLOW and SUBSCRIBE to my blog.

HAPPY STAMPING!

Tuesday, October 12, 2021

Finial Meadow

I used a discontinued embossing folder to create the faux tin metal squares behind the image. Surprisingly, I only applied one layer of silver embossing powder to my paper. If you are looking for a quick and easy way to make faux metal, this technique is for you. Thoughts?



Stamps:
   Quiet Meadow

Paper:
   Strawberry Slush A-2, 4-1/4 x 2-1/4
   Mossy Meadow 4-1/2 x 2-1/2
   Whisper White 4 x 2, 5-1/4 x 4 (Inside)
   Basic Black 5-1/4 x 4
   Sahara Sand 8-1/2 x 2-3/4 (1- - 1-1/4" Sq.)

Ink:
   Tuxedo Black Memento
   VersaMark

Markers:
   Mossy Meadow
   Strawberry Slush

Technique:
   Faux Tin Metal

Accessories:
   Finial Press Embossing Folder
   Silver Embossing Powder
   1-1/4" Square Punch
   Basic Rhinestone Jewels
   White Twine
   Dimensionals
   Adhesive

First, I created my faux tin metal squares. I applied VersaMark on my strip of Sahara Sand. (Make sure you leave a bit of space on the bottom to hold the strip while you heat emboss it.) I then covered it with silver embossing powder and heat set it. When it cooled, I punched out ten 1-1/4 inch squares. 

I then placed these squares into my Finial Press embossing folder and ran it through the embossing machine. I then adhered the embossed squares to the outer edges of the Basic Black panel, and adhered it to the Strawberry Slush card front.

Next, I stamped and colored my image using markers.

I then adhered the stamped white panel onto the Strawberry Slush and then onto the Mossy Meadow. I wrapped and tied a bow using white twine to the bottom of the image. I attached this to the center of the card front using dimensionals.

Lastly, I added a few rhinestones and adhered the other white panel to the inside of the card.

Thank you so much for stopping by here and taking a quick look-see. If you have any questions or need my assistance, Contact Me.

Shop Now and take a look at all of our new products and current promotions. Please use the HOST CODE sitting in the right sidebar if you did not earn your own rewards.

If you want to craft, but keep your costs below $25 a month, check out Paper Pumpkin. It just might be what you are looking for at the moment.

Join Me and become the newest member of my team. Remember there are no hidden agendas or penalties for giving it a go. Don't pass this opportunity to save.

You've come this far, so please share, like, pin, tweet, or comment. I appreciate your time and efforts. Let me know your thoughts and leave all of your questions behind. Do not forget to FOLLOW and SUBSCRIBE to my blog.

HAPPY STAMPING!