Showing posts with label Friendship. Show all posts

Sunday, September 1, 2024

Vintage Vogue Friends

This one takes me back to the days of fussy cutting, paper piercing, and wonderful conversations with friends. The pace was definitely slower. I was also able to make several cards or scrapbook pages with a stamp set before it was rendered obsolete. What about you? 


Stamps:
   Vintage Vogue
   Very Vintage Wheel

Paper:
   Soft Suede A-2, 5-1/8 x 1-1/4, 2 x 2-5/8
   Basic White 5-1/4 x 4 (2), 5-1/8 x 1, 1-3/4 x 2-3/8, Scraps
   Pretty in Pink 5-1/8 x 3-7/8

Ink:
   Pretty in Pink
   Creamy Caramel
   Soft Suede
   Sage Shadow

Technique:
   Sponging
   Fussy Cutting
   Punching

Accessories:
   Eyelet Border Punch
   5/8" Rose Romance Ribbon (16")
   Pretties Kit
   Blender Pen
   Dimensionals
   Glue Dots
   Adhesive

First, I stamped the Friends image, using Pretty in Pink, and then fussy cut the F.

I then inked up the stamp again, using Creamy Caramel, but before stamping, I took the ink off the word friends, using a blender pen, and then inked it up with a Soft Suede Marker. I then huffed on it, and stamped it. 

Next, I sponged the image panel, using Creamy Caramel and then adhered it to a Soft Suede matte.

I then added the Pretty in Pink F with a couple of dimensionals.

Next, I punched the Basic white strip, using the Eyelet Border punch. I adhered it to the bottom of the Soft Suede strip.

I then added the ribbon to the Soft Suede strip and tied it into a knot.

Next, I stamped the Pretty in Pink card front, using Pretty in Pink ink. I stamped the bottom, using the Very Vintage Wheel and the top part with the stamp from the stamp set. I then added the Soft Suede strip as shown above.

I then stamped and fussy cut the small flower and leaves. I added a silver brad from the Pretties Kit to hold them together.

Next, I attached the friends image, using dimensionals and adhered the small flower with a few glue dots.

I then adhered the panel onto a Basic White matte and then onto the Soft Suede card front.

Lastly, I adhered a Basic White panel to the inside of the card.

Thanks for stopping by and taking a quick peek. Contact Me for more information on my cards or Stampin' Up!

Click on the headers above and satisfy your curiosity.

Please share, like, pin, tweet, or comment. Please take the time to FOLLOW or SUBSCRIBE to my blog.

HAPPY STAMPING!

Tuesday, August 6, 2024

Happy Friend

Here are some die cut images that will complement any sentiment imaginable. Thoughts? 


Stamps:
   Winterly Tree Tops

Paper:
   Misty Moonlight A-2
   Basic Gray 5-3/8 x 3-7/8
   Basic White 4-1/4" Sq., 5-1/4 x 4 (Inside)
   Gray Granite 4 x 3/4 (I used Basic Gray, oops)

Ink:
   Tuxedo Black Memento

Watercolor Pencils:
   Balmy Blue
   Night of Navy
   Crushed Curry
   Cajun Craze
   Cherry Cobbler

Technique:
   Die Cutting

Accessories:
   Winterly Tree Tops Dies
   Mini Glue Dots
   Dimensionals
   Adhesive

First, I stamped and die cut the images, including the background frame. 

I then colored the bird and the branches, using watercolor pencils: Crushed Curry for the Bird and Cajun Craze for the accents on the bird, Cherry Cobbler for the berries on the branches, Balmy Blue for the open leaves on the branches and Night of Navy for the closed pointy leaves on the branches.

Next, I added the background frame to the card front, using dimensionals.

I then stamped and adhered the sentiment to the bottom left of the frame, leaving a bit of the bottom branches showing. I used dimensionals on the bottom of the sentiment to attach it. This allows me room to add the branches and the bird next.

Next, I added the branches to land behind the sentiment. I used dimensionals on the back of the branches.

I then added a glue dot to the front of the bird's feet and a dimensional to the back of his head and attached him to the back of the sentiment and over the leaves.

Lastly, I adhered a Basic White panel to the inside of the card.

I thank you so much for stopping by here and checking out my card today. I do hope you liked it. Contact Me if you need more information.

If you would like to Shop Now, Stampin' Up! is always offering something special, especially for online shoppers. There are items that are advertised Exclusively Online, so check it out. You don't want to miss out on these wonderful items.

The Kits Collection is always exciting. New Kits are introduced online and are available while supplies last. Prices vary, depending on the kit. You don't want to miss Paper Pumpkin. It is what I enjoy each month. Take a peek!

Join Me and cash in for the best deal available. No fine print to miss. Check it out and see if it may be for you.

Please take a few more minutes to share, like, pin, tweet, or comment. Don't forget to FOLLOW and SUBSCRIBE to my blog.

HAPPY STAMPING!

Tuesday, June 18, 2024

Valentine Kitty Collage

Have you ever had that day when everything you do is just a bit off? Here is a card I made on one of those days. I could not even get the image straight on the card front. I added, deleted, and changed a few things. What do you think? 


Stamps:
   Have a Heart

Paper:
   Lavender Lace A-2
   Pink Passions Scrap
   Naturals White Scrap
   Basic White 5-1/4 x 4 (Inside)

Ink:
   Tuxedo Black Memento

Markers:
   Pink Passion
   Early Espresso/Chocolate Chip
   Basic Black

Technique:
   Die Cutting

Accessories:
   Layering Circles Framelits
   Playful Palette Washi Tape
   Basic Rhinestone Jewels
   Adhesive

The card on the left was the first card I made. My challenge was to rescue the card. It was one of the first cards I ever made, and truthfully, I was embarrassed to send it to anyone. So, the first thing I did was to remove the ribbon and toss it.

I then separated the White & Pink panels.

Next, I die cut each one with a Layering Circles Framelit.

I then took a dark brown marker and colored the cat a bit better.

Next, I added small pearls to the dress, and accented the features on the cat, using a Basic Black marker.

I then adhered the image circle onto the Pink circle and attached them to the center of the card front.

Next, I added some washi tape to the top and bottom of the card as shown. 

Lastly, I adhered a Basic White panel to the inside of the card.

Thank you so much for stopping by here and taking a quick look-see. If you have any questions or need my assistance, Contact Me.

Shop Now and take a look at all of our new products and current promotions. Please use the HOST CODE sitting in the right sidebar if you did not earn your own rewards. 

If you want to craft, but keep your costs at $25 a month, check out Paper Pumpkin. It just might be what you are looking for at the moment.

Join Me and become the newest member of my team. Remember there are no hidden agendas or penalties for giving it a go. Don't pass this opportunity to save. 

You've come this far, so please share, like, pin, tweet, or comment. I appreciate your time and efforts. Let me know your thoughts and leave all of your questions behind. Do not forget to FOLLOW and SUBSCRIBE to my blog.

HAPPY STAMPING!

Tuesday, September 12, 2023

Country Hello

Wave hello to a friend with this clean and simple card. Of course, it's easy to send any sentiment or greeting with this layout. Who on your list would receive this card? 


Stamps:
   Biggest Wish

Paper:
   Early Espresso A-2
   Country Lane DSP 5-1/4 x 4
   Mint Macaron 2-1/4" Sq.
   Basic White 2-1/4" Sq., 5-1/4 x 4 (Inside)

Ink:
   Early Espresso
   Sweet Sorbet

Technique:
   Dry Embossing
   Sponging

Accessories:
   Timeworn Type 3D Embossing Folder
   Sponge
   Adhesive

First, I adhered the Country Lane DSP panel onto the Early Espresso card front.

I then dry embossed the Basic White square, using the Timeworn Type 3D embossing folder, and sponged it with a bit of Early Espresso ink.

I stamped the Mint Macaron square with my sentiment, using Sweet Sorbet ink.

Next, I adhered the squares onto the card front as shown on the image above. The squares overlap each other with the Mint Macaron square on top of the Basic White embossed square. I did make sure the corners were not extending over the card front.

Lastly, I adhered the Basic White panel to the inside of the card.

You may choose to embellish the card with ribbon, gems, or a trinket of some sort. I chose to keep it clean and simple.

Thank you for taking a peek. Please Contact Me for further information on Stampin' Up! or if you have questions.

Shop Now and browse our current products and promotions. There is a HOST CODE located in the right sidebar if your order is less than $150. Of course, you do not have to use it, but I would appreciate it.

Do you have the crafting bug? Subscribe to Paper Pumpkin and receive a monthly dose. The cost is less than $25, and you can buy it, skip it, or stop it. I must warn you. It can be addictive! I can't seem to stop!

Join Me and become a member of my team. Check out the benefits and gain the best value for your money.

Don't forget to share, like, pin, tweet, or comment. Make sure to FOLLOW and SUBSCRIBE to my blog.

HAPPY STAMPING!

Sunday, June 25, 2023

Garden Card-Again

Make someone's day by sending this card. How would you react if you received this in the mail? 


Garden Card-Again


Stamps:
   Forever Friendship

Paper:
   Garden Green A-2
   Basic White 2-1/2 x 3-1/4
   Crumb Cake 2-3/4 x3-1/2, 5-1/2 x 1-1/4
   Warmth & Cheer DSP 1 x 5-1/2
   Basic White 5-1/4 x 4 (Inside)

Ink:
   Tuxedo Black Memento

Markers:
   Garden Green
   Crumb Cake

Technique:
   None

Accessories:
   Ribbon 20"
   Candy Dots (Garden Green Card)
   Iridescent Snowflakes (Delightful Dijon Card)
   Adhesive

First, I stamped and colored the cardigan, and added the sentiment.

I then adhered it to a Crumb Cake matte and added three candy dots.

Next, I adhered the strip of DSP to the strip of Crumb Cake and adhered it to the left side of the card front.

I wrapped a bit of ribbon and tied it off in a bow.

I then added the image panel.

Lastly, I adhered the Basic White panel to the inside of the card.

I created another card using Delightful Dijon as a card base. The paper had different dimensions, but otherwise everything was the same. Here is a picture of that card followed by the paper measurements needed:

Delightful Card-Again


Paper:
   Delightful Dijon A-2
   Basic White 2-3/4 x 3
   Crumb Cake 3 x 3-1/4, 5-1/2 x 1-1/4
   Warmth & Cheer DSP 1 x 5-1/2
   Basic White 5-1/4 x 4 (Inside)

Marker: Delightful Dijon in place of Garden Green

Thanks for stopping by and taking a quick peek. Contact Me for more information on my cards or Stampin' Up!

Click on the headers above and satisfy your curiosity.

Please share, like, pin, tweet, or comment. Please take the time to FOLLOW and SUBSCRIBE to my blog.

HAPPY STAMPING!

Sunday, June 18, 2023

Cheerful Friends

Friendships should be treasured and nurtured. Here is a card to let someone know how much their friendship means to you. Thoughts? 


Cheerful Friends


Stamps:
   Cheerful Daisies

Paper:
   Crushed Curry A-2
   Early Espresso 2 x 5-1/2
   Fresh as a Daisy DSP 1-1/2 x 5-1/2
   Basic White 5-1/4 x 4 (Inside)

Ink:
   Crushed Curry
   Early Espresso
   Garden Green

Technique:
   CAS

Accessories:
   Basic Rhinestone Jewels
   Adhesive

First, I adhered the DSP panel onto the Early Espresso panel, and then onto the left side of the card front.

Next, I stamped the sentiment on the top right corner of the card front, using Early Espresso.

I then stamped the trio of flowers with Crushed Curry on the right side panel. You decide on their placement and spacing.

I then added a Garden Green stem to each trio of flowers. Do note that the stem does not have to point downward. 

Lastly, I added a few rhinestones and adhered the Basic White panel to the inside of the card.

I also made a thank you card using the same supplies, but I added the Pansy Patch stamp set for the sentiment. What do you think?


Cheerful Friends Too

And as fate would have it, I made a Thinking of You card as well. Again, the same supplies as the first card, but I added Thoughts & Prayers stamp set for the sentiment. What do you think?

Cheerful Friends Tre

I played with the placement of the trio of flowers.

Order your products today for Cheerful Friends!

Thank you so much for stopping by here. Please Contact Me if you have any questions regarding Stampin' Up!

Take a few moments and Shop Now or click on any of the headers above for more information.

Don't forget to share, like, pin, tweet, or comment. I would appreciate it if you chose to FOLLOW or SUBSCRIBE to my blog.

HAPPY STAMPING!

Monday, October 3, 2022

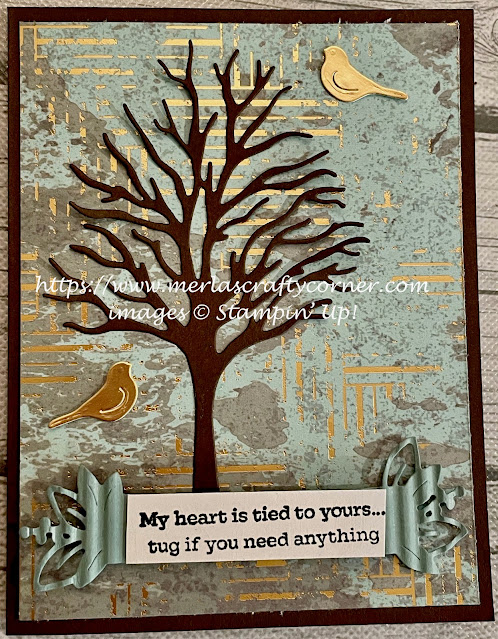
Heartstrings

The Texture Chic Designer Series Paper is wonderful to use for any occasion. The abstract design and bits of gold interspersed throughout gives it a very sophisticated feel. What do you think? 


Stamps:
   Eden's Garden

Paper:
   Early Espresso A-2, 4-1/2 x 3-1/4
   Texture Chic DSP 5-1/4 x 4
   Basic White 2-1/4 x 5/8, 5-1/4 x 4 (Inside)
   Soft Succulent 4-1/4 x 1-1/2
   Gold Foil Scraps

Ink:
   Tuxedo Black Memento

Technique:
   Die Cutting
   Crimping

Accessories:
   Eden Dies
   Beautiful Trees Dies
   Crimper
   Glue Dots
   Dimensionals
   Adhesive

First, I die cut my tree, using Beautiful Trees dies and Early Espresso cardstock.

I attached the tree to the Texture Chic DSP panel using liquid adhesive.

Next, I die cut the Soft Succulent band using the Eden dies. Since, it was a bit long, I ran it through the crimper and attached it to the base of the DSP panel using dimensionals.

I then stamped the sentiment on a scrap of Basic White and adhered it across the band with a bit of adhesive.

I die cut my birds from a scrap of gold foil using the Beautiful Trees dies and adhered them each with a glue dot.

I then adhered the panel to the Early Espresso card front.

Lastly, I added the Basic White panel to the inside of the card.

This is definitely a card that can be used for several different occasions. The inside is left blank for the sender to personalize and determine its true purpose: Get Well, Sympathy, Here for You, Love, Friendship, etc.

Thank you so much for stopping by here and spending a few minutes of your day with me. I appreciate your time. Contact Me if you have any questions, need a demonstrator, or just want to stamp or share ideas.

Shop Now and enjoy browsing products and promotions. I have a HOST CODE in the right sidebar in case you did not earn your own rewards.

Do not miss the opportunity to Join Me and become the newest member of my team.

Paper Pumpkin should not be ignored. I enjoy putting my kit together monthly.

Take a few more minutes and share, like, pin, tweet, or comment. I would love to see what you really think. Do not forget to FOLLOW and SUBSCRIBE to my blog.

HAPPY STAMPING!

Click HERE for a list of products.

Sunday, May 22, 2022

Beach Front

This is definitely a beautiful, peaceful day at the beach. The water looks so cool and inviting. What do you think?


Beach Front


Stamps:
   Oceanfront
   Special Moments

Paper:
   Bermuda Bay A-2
   Basic Black 5-3/8 x 4-1/8
   Basic White 5 1/4 x 4 (2)

Ink:
   Coastal Cabana
   Bermuda Bay
   Crumb Cake
   Cinnamon Cider
   Evening Evergreen
   Tuxedo Black Memento

Technique:
   CAS

Accessories:
   Pebbles Enamel Shapes
   Adhesive

First, I stamped the sky, using Coastal Cabana.

I then used Bermuda Bay for the water. This is the next stamp in line.

The sand was stamped using Crumb Cake. 

I then added a bit of gritty sand in Cinnamon Cider.

The grasses were stamped in Evening Evergreen.

Next, I added a birthday sentiment, using Tuxedo Black Memento.

Lastly, I added a few pebbles and adhered the panel to a Basic Black matte and then onto the Bermuda Bay card front. The other Basic White panel was adhered to the inside of the card.

Note, that I stamped everything in the center of the Basic White panel, making this a vertical card. Still, if you decide to include a friend, I made this card with a friendship stamp (from the same Special Moments stamp set) and made the card a horizontal image. You stamp the image to the left of the panel and add the sentiment on the right, or vice-versa. What do you think?


Beach Front Too


Thank you so much for giving me a bit of your time. Please Contact Me if I can return the favor.

Check out all of the options by clicking on the headers above.

Do not forget to FOLLOW and SUBSCRIBE to my blog. Please share, like, pin, tweet, or comment. I look forward to reading your thoughts and possible ideas for improvements.

HAPPY STAMPING!