Showing posts with label Good Greetings. Show all posts

Thursday, December 28, 2023

Purple Christmas

The silver foil panel adds glimmer and elegance to this card. Thoughts? 


Stamps:
   Good Greetings

Paper:
   Purple Posey A-2
   Basic White 5-1/4 x 4 (2), 1/4" Strip
   Silver Foil 5 x 2-1/4
   Feels Like Frost DSP 4-3/4 x 2

Ink:
   Highland Heather
   Tuxedo Black Memento

Technique:
   Sponging
   Punching
   Dry Embossing

Accessories:
   Softly Falling Embossing Folder
   Washi Label Punch
   Sponge
   Dimensionals
   Adhesive

First, I stamped, punched, and sponged the sentiment. I used Tuxedo Black Memento for stamping, and the Highland Heather for sponging. The strip of Basic White was punched with the Washi Label Punch.

I then took one of the Basic White panels and dry embossed it, using the Softly Falling Embossing Folder. I adhered this panel onto the Purple Posey card front.

Next, I adhered the DSP panel onto the Silver Foil panel and then adhered this panel to the right side of the card front, using liquid adhesive.

Lastly, I adhered the sentiment with dimensionals, and added the other Basic White panel to the inside of the card. 

Thank you so much for hanging out with me today. Contact Me if I can be of service.

Shop Now and browse some exciting new things. There is a HOST CODE in the right sidebar for you to use if you like.

Paper Pumpkin and the Kits Collection are two ways to get a quick fix for the Crafting Bug that is going around. Be careful, it is contagious, especially with family.

Join Me and flourish in the goodness that is Stampin' Up! I know you're thinking about it, or you would not have read this far. Check it out and let me know if you need anything.

Share, like, pin, tweet, or comment. FOLLOW and SUBSCRIBE to my blog.

HAPPY STAMPING!

Friday, January 14, 2022

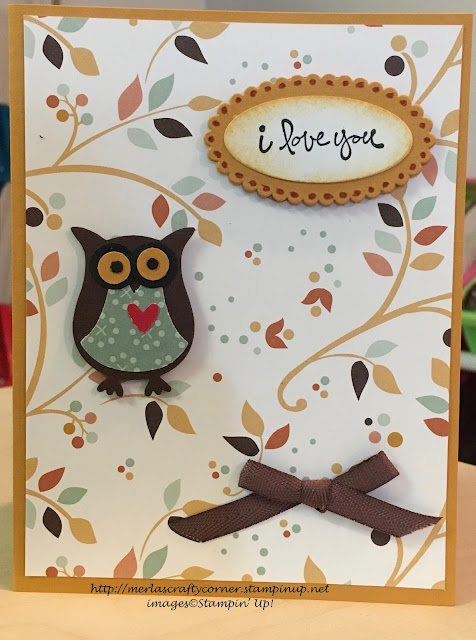
Lovely Autumn

Here are a few colors from the past: More Mustard, Chocolate Chip, Really Rust. These are such beautiful fall colors. I still have paper, inks, and markers. So, they may have been discontinued by Stampin' Up!, but they will live on as long as my supplies last. What color from the past do you miss the most? Thoughts? 


Stamps:
   Good Greetings

Paper:
   More Mustard A-2, Scraps
   Autumn Vine DSP 5-1/4 x 4
   Basic White Scraps, 5-1/4 x 4 (Inside)
   Delicate Dots DSP Scraps
   Chocolate Chip Scraps
   Real Red Scrap
   Basic Black Scrap

Ink:
   Archival Basic Black
   More Mustard

Markers:
   Really Rust

Technique:
   Sponging
   Die Cutting
   Punching

Accessories:
   Owl Builder Punch
   Layering Ovals Framelits Dies
   1/4" Chocolate Chip Ribbon
   Sponge
   Dimensionals
   Glue Dots
   Adhesive

First, I punched out all of the pieces of the owl and put him together. I used scraps and the Owl Builder Punch. Chocolate Chip (Body), DSP (Belly), More Mustard, Chocolate Chip and Basic Black (Eyes), Real Red (Heart).

Next, I stamped my sentiment, die cut it, and sponged it. I adhered it to a slightly larger scalloped oval and added Really Rust dots with my marker.

I then took a bit of Chocolate Chip ribbon and tied a bow.

Lastly, I put the card together. I adhered the DSP panel onto the card front and the Basic White panel to the inside of the card, using liquid adhesive. I attached the owl and sentiment with dimensionals and added the bow with a glue dot.

Thank you for visiting. I do love company. Feel free to Contact Me if you have any questions.

Explore current products, promotions, and all of the opportunities. Just click on Shop Now. A HOST CODE is available in the right sidebar for those of you who do not earn your own rewards.

For those of you who like kits with everything you need to complete a project, we offer Paper Pumpkin. Your monthly cost is less than $25. Also, you might want to look at the new Kits Collection!

Join Me and become my newest team member. I look forward to meeting you.

Please take a minute to share, like, pin, tweet, or comment. Do not forget to FOLLOW and SUBSCRIBE to my blog. 

HAPPY STAMPING!
Saturday, April 4, 2020

Sparkling Peacock

A sparkle is fitting for any occasion. This beautiful peacock with a bit of sparkle will brighten any occasion. The card is blank on the inside, so the sender can personalize the message and determine the occasion.


Stamps:
   Perfect Peacock
   Good Greetings

Paper:
   Tempting Turquoise A-2
   Whisper White 5-1/4 x 4

Ink:
   VersaMark

Markers:
   Always Artichoke
   Basic Gray
   Bermuda Bay
   Daffodil Delight
   Island Indigo
   Melon Mambo
   Old Olive
   Pool Party
   Raspberry Ripple
   Tempting Turquoise

Technique:
   Heat Embossing

Accessories:
   White Circle Metal Edge Tag
   Dazzling Diamonds Embossing Powder
   Rhinestone
   Dimensionals
   Adhesive

First, stamp the peacock using VersaMark. Apply Dazzling Diamonds Embossing Powder.

Second, heat set the embossing powder.

Third, color your image. The markers I used are listed above.

Fourth, adhere the metal tag using dimensionals. Adhere panel onto card base with adhesive.

Thank you for stopping by here and taking a peek. Let me know what you think. Contact me if you have any questions.

Click on Shop Now above for your stamping supplies.

HAPPY STAMPING!


Sunday, January 5, 2020

Ornaments and Pines

Ornaments and pine cones mixed together with a bit of shimmer paint make a wonderful Christmas card. Do you agree?


Stamps:
   Good Greetings
   Ornamental Pine

Paper:
   Wild Wasabi A-2
   Melon Mambo 5 1/2 x 2 1/2, Scraps
   Basic Gray 1 1/2 x 1 3/4 (5)
   Whisper White 1 3/8 x 1 5/8 (5)

Ink:
   Melon Mambo
   Wild Wasabi
   Basic Gray
   Frost White Shimmer Paint

Technique:
   Punching
   Sponging

Accessories:
   Doily Triple Layer Punch, Frost White Shimmer Paint, Sponge Dauber, Adhesive

I used a sponge dauber to apply the Frost Shimmer Paint on the three punched snowflakes. I grouped them together on the card to make them look like a doily.

The ornaments were inked using Melon Mambo and the pine cones were inked with Wild Wasabi. 

Thank you so much for stopping and taking a peek. Let me know if you have any questions. The layout is quite interesting and can be used with any stamps and inks you have on hand. 

Don't forget to Shop Now and check out the Clearance section and our current Sale-a-Bration promotion.

HAPPY STAMPING!

Monday, September 9, 2019

Winter Cabin

Challenge Accepted: I was challenged to make a card using only three colors: Granny Apple Green, Call Me Clover, and Real Red. Neutrals are allowed: Very Vanilla and Archival Basic Black. I decided to go with a Christmas theme so I could use a brand new stamp set: Snow Front. 


Stamps:
   Snow Front
   Good Greetings

Paper:
   Granny Apple Green A-2
   Dashing DSP 5 1/4 x 4
   Very Vanilla 5 1/4 x 4

Ink:
   Granny Apple Green
   Call Me Clover
   Real Red
   Archival Basic Black

Technique:
   Sponging, Tearing

Accessories:
   Sponge, Stamparatus/MISTI, Adhesive

I stamped my winter scene on the Very Vanilla card stock and then I tore away the edges in a circular pattern. I like that it is not a perfect circle. I then took my Real Red sponge and sponged the edges to make the piece stand out. 

This stamp set is in the Holiday Catalog, just click on Shop Now and order yours today. 

Thank you so much for stopping by here. I appreciate your time. Feel free to leave me your thoughts in the comment section below, or click on the word comment and it will open a window for you. 

HAPPY STAMPING!


Saturday, July 6, 2019

Pumpkin Trio

This is a fun Halloween card for the kids or an adult who still acts like a kid. You can even make it goofier by adding googly eyes to the pumpkins.


Stamps: Fall Fest, Good Greetings
Paper: Kraft A-2, Rich Razzleberry 4 1/2 x 3 1/2, Motley Monsters DSP 3 1/4" Sq., Whisper White Scraps for the pumpkins and the sentiment
Ink: Tangerine Tango, Bermuda Bay, Garden Green, Tuxedo Black Memento
Technique: Dry Embossing, Sponging 
Accessories: Woodgrain Embossing Folder, Stylish Stripes Embossing Folder, Fall Fest Die Cuts, Modern Label Punch, Tangerine & White Two-Tone Trim, Sponge, Blender Pens, Dimensionals, Adhesive

First, I inked my pumpkins with Tangerine Tango. Using a blender pen (you can sub a tissue or napkin) I took the ink off of the stem. I colored it in with a Garden Green marker and then stamped it onto a scrap of Whisper White card stock. You then stamp the face with Tuxedo Black Memento ink. Die cut them using the Fall Fest Die Cuts or fussy cut them.

I dry embossed the Rich Razzleberry with the Stylish Stripes Embossing Folder and the Kraft A-2 with the Woodgrain Embossing Folder.

I stamped (Bermuda Bay), punched (Modern Label)and sponged (Tangerine Tango) the sentiment.

The two-tone trim (11") is wrapped around the Rich Razzleberry card stock. 

The two small pumpkins, sentiment, and Rich Razzleberry piece are put on with dimensionals. 

I like these goofy pumpkins for Halloween cards. They are a lot of fun. I hope you like it.

HAPPY STAMPING!

Sunday, May 19, 2019

Celebrate with Papillon Potpourri

Who doesn't enjoy celebrating with butterflies? This is a sweet, simple card for anyone on your list. 


Although this particular stamp set has been discontinued, you can find our Butterfly Gala stamp set that may be used in its stead.

Supplies:

Stamps: Papillon Potpourri, Good Greetings
Paper: Whisper White A-2, Night of Navy 3 3/4" Sq., Designer Series Paper (DSP) 3 1/2" Sq., Scraps of Whisper White for the sentiment, butterflies, and lattice
Ink: Night of Navy, Certainly Celery
Technique: Die Cutting, Sponging
Accessories: Lattice Bigz Die, Basic Pearl Jewels, Butterfly Punch, Scallop Punch, Certainly Celery Ribbon, Glue Dots, Sponge,  Dimensionals, Adhesive

Steps:

1. Cut all paper to size.
2. Die Cut Lattice Bigz Die. (Whisper White)
3. Stamp 4 butterflies with Night of Navy.
4. Punch out with Butterfly Punch.
5. Stamp sentiment with Night of Navy.
6. Punch out with Scallop Punch.
7. Sponge edges with Certainly Celery ink.
8. Adhere Night of Navy to Whisper White card.
9. Adhere DSP onto Night of Navy.
10. Adhere Lattice Die Cut onto DSP.
11. Adhere butterflies to lattice with glue dots.
12.Adhere Ribbon or card stock strip to bottom.
13. Glue sentiment to ribbon with dimensionals.
14. Add pearls to butterflies & sentiment.
15. Mail card to brighten someone's day.

The wonderful thing about Stampin' Up! stamps is that they last a very long time. So, although this is no longer a current stamp, I continue to use it because I think it is beautiful.

Contact me with any questions, or feel free to leave your thoughts in the comments section. I appreciate all of your feedback. 

HAPPY STAMPING!


Saturday, May 18, 2019

Butterfly Garden Love

The background on this card is dry embossed and then colored with markers. It does take patience and time, but I think it is worth it. Don't you?


Supplies:

Stamps: Four Frames, Good Greetings
Paper: Pink Pirouette A-2, 2" Sq., Very Vanilla 5 x 4, Melon Mambo 4 x 1 1/2, 2" Sq. (The 2" squares are for the butterfly embossilites.
Ink: Melon Mambo, Early Espresso
Markers: Pink Pirouette, Melon Mambo, Soft Sky, Sahara Sand, Pear Pizzazz
Techniques: Sponging, Dry Embossing
Accessories: Small Oval Punch, Decorative Punch, Eyelet Border Punch, Beautiful Wings Embossilites, Floral Garden Embossing Folder, Sponge, Glue Dots, Pearls, Rhinestones, Dimensionals, Adhesive

Steps:

I first cut all of my paper to the sizes I needed.

I then embossed the Beautiful Wings (butterflies) in both Pink Pirouette and Melon Mambo. 

Next, I embossed my Very Vanilla card stock and took my time coloring it with my markers. You have to take care to only color the raised portion of the embossing. I used the small tip of the marker to have more control, but you can use the brush side if you can hold it horizontally to the paper. 

I then stamped and cut out my sentiment using the Decorative Punch and the Small Oval Punch. 

I sponged the edges with Melon Mambo. 

Then I assembled the card. 

The Very Vanilla was adhered with glue onto the Pink Pirouette card. 

I then attached the sentiment on the top left of the card. 

I used both Pink Pirouette and Melon Mambo butterflies randomly on the card using glue dots. 

Lastly, I attached the pearls and rhinestones. 

Please note that any floral background embossing folder will work for this card. You can even use a regular floral background stamp, just color the stamp, breathe on it, and then stamp it on the Very Vanilla card stock. The sentiment can also be changed to suit your needs. 

Have fun! Feel free contact me with any questions you may have. Thanks for looking and reading.

HAPPY STAMPING!