Showing posts with label Word Window Punch. Show all posts

Friday, October 4, 2024

Flowers, Just Because

Some stamps may be retired, but they never get "old." Thoughts? 


Stamps:
   And Many More
   Just Believe
   Hardwood

Paper:
   Old Olive A-2, 5-1/4 x 4
   Apricot Appeal 2-3/4 x 3-3/4, Scraps
   Basic White 2-1/2 x 3-1/2, 5-1/4 x 4 (Inside), Scrap
   Daffodil Delight Scraps

Ink:
   Old Olive
   Always Artichoke
   Tuxedo Black Memento

Technique:
   Punching

Accessories:
   Boho Blossoms Punch
   Petite Petals Punch
   Word Window Punch
   Basic Pearl Jewels
   Dimensionals
   Adhesive

First, I stamped the Hardwood background on the Old Olive panel, using Always Artichoke ink and adhered it onto the Old Olive card front.

I then stamped the flower silhouette from the Just Believe stamp set onto the Basic White small panel, using Old Olive ink.

Next, I adhered it onto the Apricot Appeal matte and then onto the card front, leaving space at the bottom for the sentiment. 

I then stamped the sentiment on the scrap of Basic White, using Tuxedo Black Memento. You can change the sentiment to suit your current need.

Next, I punched out the sentiment, using the Word Window punch and adhered it onto the card front.

I then punched out the flowers: 
   Large one-Apricot Appeal-Boho Blossoms Punch
   Small one-Daffodil Delight-Petite Petals punch.

Next, I attached them onto the card front, using dimensionals.

Lastly, I added a pearl to the center of each punched flower and adhered a Basic White panel to the inside of the card.

Thank you for dropping by here. Contact Me if you need anything.

Shop Now and take a look at items that are Exclusively Online! You do not want to miss them.

Did you know that Paper Pumpkin and the Kits Collection make the perfect gift? Heck, I say, gift yourself one today! Check them out.

Join Me and become part of my team. Take a look at today's offering and see if it is for you.

Please share, like, pin, tweet, or comment. Do not forget to FOLLOW and SUBSCRIBE to my blog.

HAPPY STAMPING!

Sunday, June 2, 2024

Scrappy Thank You

This is definitely one way to use up some of those scraps of designer series paper that are laying around your table or stuck in a drawer. The great thing about making a collage is that the colors do not always have to coordinate. What do you think? Do you like this one. 


Stamps:
   Baroque Motifs
   Stem Silhouettes

Paper:
   Purely Pomegranate A-2
   Basic White 5-1/4 x 4 (2)
   Various DSP Scraps
   Hand-Stamped Washi Tape

Ink:
   Tuxedo Black Memento

Technique:
   Punching
   Paper Piecing

Accessories:
   Stamp-a-ma-jig
   Word Window Punch
   Paper Piecing Punch

First, I stamped the sentiment to make sure I would not leave it out.

I then punched out several pieces of DSP, using the Word Window Punch. I adhered these on a diagonal alternating the colors.

Next, I punched out another scrap of DSP, using the Paper Piecing Punch. I adhered these on the right side of the Word Window shapes, alternating the colors.

I then stamped the Baroque Motif on opposite corners of the card as shown. I used the Tuxedo Black Memento Ink and the Stamp-a-ma-jig to make sure I covered the space.

Next, I added a couple of leftover Washi Tape strips that I stamped earlier. 

I then adhered the Basic White panel onto the Purely Pomegranate card front.

Lastly, I adhered a Basic White panel to the inside of the card.

Thank you so much for stopping by here. Please Contact Me if you have any questions regarding Stampin' Up!

Take a few moments and Shop Now or click on any of the headers above for more information.

Don't forget to share, like, pin, tweet, or comment. I would appreciate it if you chose to FOLLOW or SUBSCRIBE to my blog.

HAPPY STAMPING!


Thursday, January 6, 2022

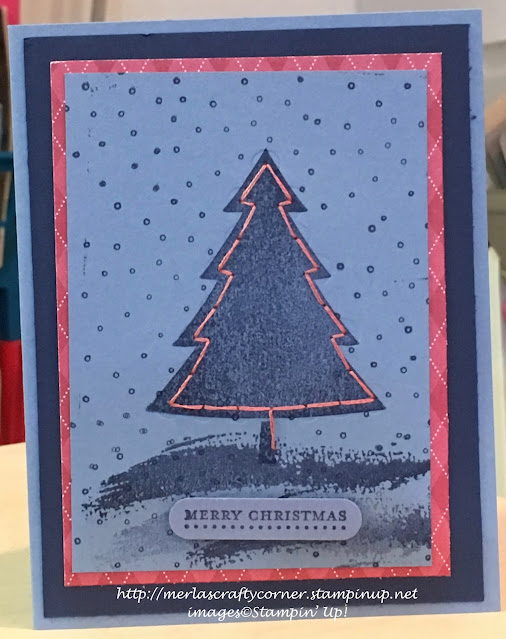
A Tree in Stitches

I was challenged to add some stitches to my card. So, I grabbed a needle and thread. This was the result. What do you think? 


Stamps:
   Festive Season
   Sheltering Tree
   Teeny Tiny Wishes
   Itty Bitty Backgrounds

Paper:
   Brocade Blue A-2, 4-1/2 x 3-1/4, Scraps
   Night of Navy 5-1/4 x 4
   Rose Red DSP 4-3/4 x 3-1/2
   Basic White 5-1/4 x 4 (Inside)

Ink:
   Night of Navy
   Brocade Blue

Technique:
   Die Cutting
   Stitching (Sewing)

Accessories:
   Festive Stitching Thinlits Dies
   Word Window Punch
   Dimensionals
   Thread
   Needle
   Adhesive

To begin, I stamped and sewed on the 4-1/2 x 3-1/4 piece of Brocade Blue. I used 3 strands of x-stitch thread that I had in my stash for the sewing. 

First, I stamped the tree, ground cover, and snow. I used both Night of Navy and Brocade Blue for the snowfall. 

I then used the Festive Stitching Thinlits Dies to make the sewing holes on the tree frame. I added the thread keeping all of the mess on the back of the card and the pretty stitching in the front.

Next, I adhered all of the layers as shown above.

Lastly, I stamped and attached the sentiment using dimensionals, and added the Basic White panel to the inside of the card.

I am so excited that you stopped to read and check out my work. Thank you from the bottom of my heart. Contact Me and let me know if there is anything I can answer for you.

Do you have some time to browse? You do not want to pass up the opportunity to shop some quality products and see what is trending. Shop Now and take a peek. If you decide to place an order, I have included a HOST CODE in the right sidebar if you do not earn any rewards on your own. Thanks in advance.

Are you undecided? Subscribe to Paper Pumpkin and give it a go. Let the products speak for themselves. The cost is less than $25 and you are completely in control. No small print for you to miss. Try it.

Join Me and gain the best value for your hard-earned money. Check it out now.

Share, like, pin, tweet, or comment. Come on, I dare you. Don't forget to FOLLOW and SUBSCRIBE to my blog.

HAPPY STAMPING!

Monday, September 27, 2021

Mother's Blended Bloom

Flowers help us express our feelings toward others. Whether we are expressing sorrow, pain, regret, or joy, love, and congratulations, we use flowers as a medium. Here is a beautiful bloom for Mother on Mother's Day. What do you think?


Stamps:
   Blended Bloom
   Teeny Tiny Wishes

Paper:
   Rich Razzleberry A-2
   Irresistibly Yours DSP 5-3/8 x 1-5/8
   Watercolor 3-1/2" Sq.
   Basic White 5-1/4 x 4 (Inside)

Ink:
   Tuxedo Black Memento
   Rich Razzleberry

Markers:
   Cherry Cobbler
   Daffodil Delight
   Rich Razzleberry

Brushos:
   Various - Personal Choice

Technique:
   Watercolor (Brushos)
   Sponging
   Punching

Accessories:
   Gold Glimmer Washi Tape
   Basic Rhinestone Jewels
   Word Window Punch
   Aqua Painter
   Sponge
   Water Mister
   Dimensionals
   Adhesive

First, I sprinkled Brusho Flakes onto the DSP. I misted it with water and let the brushos do the work. I set it aside to let it dry.

Next, I stamped my bloom and colored it using markers and blends. I fussy cut it using my paper snips.

I then stamped, punched, and sponged my sentiment.

Next, I placed the strips of Gold Glimmer Washi Tape on the card front. I used the DSP strip to measure the distance between the strips. The DSP is an odd size because it is a left-over piece that I wanted to use. 

I then adhered the DSP on top of the gold glimmer washi tape, making sure it showed on both ends. 

I added the bloom and the sentiment with dimensionals.

Lastly, I added rhinestones to the center of the bloom and the Basic White panel to the inside of the card.

Thank you so much for stopping by here and spending a few minutes of your day with me. I appreciate your time. Contact Me if you have any questions, need a demonstrator, or just want to stamp or share ideas.

Shop Now and enjoy browsing products and promotions. I have a HOST CODE in the right sidebar in case you did not earn your own rewards.

Do not miss the opportunity to Join Me and become the newest member of my team.

Paper Pumpkin should not be ignored. I enjoy putting my kit together monthly.

Take a few more minutes and share, like, pin, tweet, or comment. I would love to see what you really think. Do not forget to FOLLOW and SUBSCRIBE to my blog.

HAPPY STAMPING!

Saturday, July 31, 2021

Friend to Friend

A friend gifted me a silhouette image of two ladies. So, I decided to frame them and create a card using the classic colors of black and white. Basically, I chose a classy look for a couple of classy ladies. What do you think?


Stamps:
   Teeny Tiny Wishes
   Unknown (Image)

Paper:
   Whisper White A-2, 5-1/4 x 4, Scraps

Ink:
   Archival Basic Black

Technique:
   Punching

Accessories:
   Word Window Punch
   Adhesive

I stamped and punched out a sentiment using my Word Window Punch. 

I then adhered a panel of designer series paper to the Whisper White card front.

Next, I adhered the image and sentiment onto the designer series paper.

Lastly, I adhered the Whisper White panel to the inside of the card.

This is one card that I cannot duplicate, since I do not have the silhouette of the women. The layout, however, is classic.

Thank you so much for stopping by here. Contact Me if you have any questions.

Shop Now and buy your supplies to make your own cards. Take a peek today and find out what you can grab for FREE!

Join Me and become my new team member. Enjoy the best savings and opportunity offered today! 

Subscribe to Paper Pumpkin and craft monthly for under $25. Don't forget to take a look at the All-Inclusive Kits!

If you liked my card, please share, like, pin, tweet, or comment. I would love for you to FOLLOW and SUBSCRIBE to my blog. Let me know what you think in the comments below.

HAPPY STAMPING!

Sunday, July 11, 2021

Christmas Postcard

One way to age your paper is to wrinkle it, tear it, and sponge it. What do you think?


Stamps:
   Post Card
   Teeny Tiny Wishes
   En Francais

Paper:
   Blush Blossom A-2
   Poppy Parade DSP 5-1/4 x 4
   Whisper White 5 x 4, Scrap, 5-1/4 x 4 (Inside)

Ink:
   Archival Basic Black
   Crushed Curry

Technique:
   Sponging
   Punching

Accessories:
   Word Window Punch
   Sponge
   Dimensionals
   Adhesive

First, I took my 5 x 4 Whisper White panel and stamped my Post Card on it.

I wrinkled it up, squishing it into a ball.

I then unfolded it and ironed it out with my hands.

I tore off the bottom, tearing the paper toward me.

I sponged the edge using Crushed Curry. I also sponged parts of it on the wrinkles.

I then adhered it onto the Poppy Parade DSP and then onto the Blush Blossom card base.

I stamped, punched, and sponged my sentiment. This can be changed to suit your needs. I attached it using dimensionals.

Lastly, I adhered the other Whisper White panel to the inside of the card.

Thank you so much for dropping by here. Contact Me if you have any questions.

Click on all of the tabs above and explore products, promotions, and opportunities.

Please take the time to share, like, pin, tweet, or comment. Do not forget to FOLLOW and SUBSCRIBE to my blog.

HAPPY STAMPING!

Friday, December 11, 2020

Golden Mesh

 Sometimes an idea looks so much better in my head than in real life. This is a prime example. The baker's twine did not behave the way I imagined. Still, once the card is made, I sell, send, or store it. In this case, I sold it. I will find a better use for my twine in the future. Thoughts?


Stamps:
   Flower Shop
   Teeny Tiny Wishes

Paper:
   Rich Razzleberry A-2
   Basic Black 3 x 4
   Cottage Wall DSP 2-1/4 x 4
   Whisper White 5-1/4 x 4, Scraps

Ink:
   Basic Black
   Real Red
   Rich Razzleberry
   Perfect Plum
   Strawberry Slush

Technique:
   Punching

Accessories:
   Pansy Punch
   Word Window Punch
   Gold Mesh
   Basic Pearl Jewels
   Gold Baker's Twine
   Dimensionals
   Adhesive

I stamped and punched out a few flowers using my Flower Shop stamp set and the Pansy Punch. 

I grabbed the gold mesh from my stash and decided it would make a nice divider for my background.

I used Basic Black for the top half of my card and the Cottage Wall DSP for the bottom half. I glued these onto my Rich Razzleberry card front.

I then grabbed my gold baker's twine and did my best to have it swirl up and down behind the gold mesh. The gold mesh was then adhered to the card front to hide the paper seam. It didn't quite turn out the way I imagined, but I did want to use the gold mesh that was gifted to me by a dear friend.

I then added the flowers using dimensionals. I placed a pearl in the center of each flower.

The leaves were sitting on my table top, so I added them. 

Lastly, I stamped and punched my sentiment, and added the Whisper White panel to the inside of the card. 

Thank you for visiting. I do love company. Feel free to Contact Me if you have any questions.

Explore current products, promotions, and all of the opportunities, just click on Shop Now. A HOST CODE is available in the right sidebar for those of you who do not earn your own rewards.

For those of you who like kits with everything you need to complete a project, we offer Paper Pumpkin. Your monthly cost is less than $25.

Join Me and become my newest team member. I look forward to meeting you.

Please take a minute to share, like, pin, tweet, or comment. Do not forget to FOLLOW and SUBSCRIBE to my blog.

HAPPY STAMPING!

Wednesday, August 12, 2020

Shower With Petals

 Flowers are fitting for any occasion. Here they are presented on a card to celebrate an upcoming wedding. Thoughts?


Stamps:
   Petite Petals
   Teeny Tiny Wishes

Paper:
   Blushing Bride A-2, 3" Sq.
   All ABloom DSP 5-1/4 x 4
   Very Vanilla 1-1/4" Sq. (4)
   Daffodil Delight 1-3/8" Sq. (4)

Ink:
   Mossy Meadow
   Strawberry Slush
   Archival Basic Black

Technique:
   Punching

Accessories:
   Strawberry Slush Thick Baker's Twine 22"
   Basic Pearl Jewels
   Word Window Punch
   Gold Glitter Washi Tape
   Dimensionals
   Adhesive


The flowers are stamped and layered onto the 3" square of Blushing Bride. Flowers are stamped on Very Vanilla, adhered on top of Daffodil Delight and then added to the three inch Blushing Bride square. I then tied the Strawberry Slush ribbon and then adhered this all to the DSP panel.

I then added some gold glitter washi tape and a tag.

Thank you so much for stopping by here and taking a quick look-see. Please Contact Me if you have any questions or need my assistance.

Shop Now and take notice of our new products and current promotions. If you do not earn your own rewards, there is a HOST CODE sitting in the right sidebar waiting for your attention. 

If you want to keep your cost below $25 a month, check out Paper Pumpkin! Stampin' Up! always includes a bit of extras so you can accumulate products and continue to craft between your projects. Don't worry there are plenty of ideas on-line.

If you like to have the inside scoop before everyone else, you might want to Join Me and become a member of my team!

Please take the time to share, like, pin, tweet, and comment. I appreciate your time and all of your feedback. Do not forget to FOLLOW and SUBSCRIBE to my blog.

HAPPY STAMPING!

Monday, July 20, 2020

Newborn

There are so many items that are needed when a newborn arrives. Here is a stamp that depicts some of those items. I think it makes a nice card. Don't you?


Stamps:
   Packed for Baby
   Well-Scripted
   Alphabet Rotary Stamp

Paper:
   Crushed Curry A-2
   Cherry on Top DSP 5-1/4 x 4
   Whisper White 3-1/4 x 3-3/4, Scraps

Ink:
   Archival Basic Black

Markers:
   Bermuda Bay
   Crushed Curry
   Cucumber Crush
   Hello Honey
   Pool Party
   Tip Top Taupe
   Watermelon Wonder
   Whisper White

Technique:
   Sponging
   Punching

Accessories:
   Word Window Punch
   Ticket Corner Punch
   Sponge
   Brights Candy Dots
   Dimensionals
   Adhesive

People ask me: How do you decide what to make? My answer is simple: It depends. If I just bought a new stamp set, I might want to make a card to use that stamp set. Or, maybe I need a birthday card, or a get well card. Maybe, I just bought a new tool that I can't wait to use, or I just saw a You Tube video that inspired me. There are countless reasons to create, but my all time favorite reason is: I want to play and have some FUN!

One of the fabulous things about Stampin' Up! is that their products coordinate with each other. If I am going to use designer series paper on my project, I look at the colors that are there and use items with those colors.

So, I stamped my image and colored it with the colors found on the DSP. I sponged the Whisper White with Watermelon Wonder and attached them with dimensionals.

Thank you for stopping by here and taking a quick peek at my card. Contact Me if you have any questions or need assistance.

Although this stamp is no longer available you should take the time to Shop Now and browse through our current products. Check out our current promotions too. Note that the images are timeless. If you order less than $150 please use the HOSTESS CODE found on the right sidebar. 

Check out Paper Pumpkin and Join Me. Don't miss these opportunities. 

Please share, like, pin, tweet, and comment. I appreciate your time and efforts. Do not forget to FOLLOW and SUBSCRIBE to my blog. 

HAPPY STAMPING!


Monday, April 27, 2020

You Made My Day

Have you ever had someone surprise you and make your day? These occurrences are few and quite rare. So, make note of them and remember to say thank you. Who knows? Maybe they will occur more often. 


Stamps:
   Upsy Daisy
   And Many More

Paper:
   Tempting Turquoise A-2
   Daffodil Delight 5-1/4 x 4
   Whisper White 5 x 3-3/4, Scrap

Ink:
   Daffodil Delight
   Old Olive
   Tempting Turquoise
   Rich Razzleberry
   Night of Navy
   Basic Black

Technique:
   Sponging

Accessories:
   Word Window Punch
   Sponges
   Dimensionals
   Adhesive

I sponged the colors onto my Whisper White cardstock in the order that they are listed above. Remember to stamp from the lightest color to the darkest.

I then stamped my silhouette of daisies using my Basic Black ink.

The sentiment was stamped in black, punched out, and then sponged with Daffodil Delight. I adhered it using dimensionals.

Thank you for stopping by here. Contact me with any questions or concerns. Shop Now for any Stampin' Up! supplies that you may need. 

HAPPY STAMPING!