Showing posts with label Favored Flowers DSP. Show all posts

Thursday, June 26, 2025

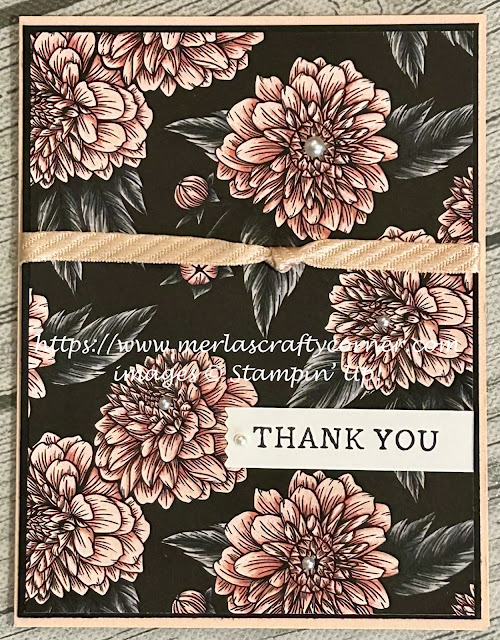
Favored Petals

The black etching on the petals and leaves definitely pulls the onlookers attention. Thoughts? 


Stamps:
   Simply Said

Paper:
   Petal Pink A-2
   Basic Black 5-3/8 x 4-1/8
   Favored Flowers DSP 5-1/4 x 4
   Basic White 2-1/4 x 5/8, 5-1/4 x 4 (Inside)

Ink:
   Tuxedo Black Memento

Technique:
   CAS
   Punching

Accessories:
   Washi Label Punch 
   1/4" Diagonal Trim Combo Pack (8")
   Pearl Basic Jewels
   Glue Dots
   Adhesive

First, I adhered the Favored Flowers DSP panel onto a Basic Black matte.

I then took the ribbon and tied a knot in the center of it. I wrapped it around the panel and secured it on the back with a couple of glue dots. I also used a glue dot under the knot to keep it in place.

Next, I adhered the panel onto the Petal Pink card front.

I then stamped the sentiment on a strip of Basic White, using Tuxedo Black Memento ink.

Next, I used the Washi Label Punch on one end of the strip to add a bit of interest.

I then adhered the sentiment on the bottom portion of the card front, as shown above.

Lastly, I added a pearl to the sentiment and adhered a Basic White panel to the inside of the card.

Thank you so much for hanging out with me today. Contact Me if I can be of service.

Shop Now and browse some exciting new things.

Paper Pumpkin and the Kits Collection are two ways to get a quick fix for the Crafting Bug. Be careful, it is contagious, especially with family.

Join Me and flourish in the goodness that is Stampin' Up! I know you're thinking about it, or you would not have read this far. Check it out and let me know if you need anything.

Please share, like, pin, tweet, or comment. FOLLOW and SUBSCRIBE to my blog.

HAPPY STAMPING!

Monday, June 23, 2025

Birthday Refresh

I do like the black etching on the rose petals and leaves. I think it really draws in your attention. What do you think? 


Stamps:
   Simply Said

Paper:
   Fresh Freesia A-2
   Basic Black 5-3/8 x 4-1/8
   Favored Flowers DSP 5-1/4 x 4
   Mossy Meadow 3 x 3/4
   Basic White 2-3/4 x 5/8, 5-1/4 x 4 (Inside)

Ink:
   Tuxedo Black Memento

Technique:
   CAS
   Punching

Accessories:
   Fresh Freesia 3/8" Seam Binding Ribbon
   Adhesive-Backed Sequins & Gems
   Washi Label Punch
   Adhesive

First, I adhered the Favored Flowers DSP onto a Basic Black matte.

I then wrapped the Fresh Freesia Seam Binding Ribbon around the top portion of the panel and tied it off with a bow. 

Next, I adhered the panel onto the Fresh Freesia card front.

I then stamped the sentiment, using Tuxedo Black Memento ink and punched it out with the Washi Label Punch.

Next, I attached it to the Mossy Meadow strip at an angle, using liquid adhesive. 

I then adhered it to the bottom portion of the card front.

Lastly, I added a few sequins and gems to the card front and adhered a Basic White panel to the inside of the card.

I am so excited that you decided to pay me a visit. Please Contact Me if I can be of service.

Shop Now and enjoy looking at new products made especially for card making! 

If you are into kits, check out Paper Pumpkin and the Kits Collection. I am sure one of those will be right up your alley.

Still undecided? Join Me and find out what all of the fuss is about. Check it out today.

Please share, like, pin, tweet, or comment. FOLLOW and SUBSCRIBE to my blog.

HAPPY STAMPING!

Sunday, May 11, 2025

Fresh Flowers

I like how the Fresh Freesia Roses stand out against the Black Background. The shading on the rose petals definitely aids this 3-D effect. What do you think? 


Stamps:
   None

Paper:
   Fresh Freesia A-2
   Favored Flowers DSP 5-1/4 x 4
   Basic White 5-1/4 x 4 (Inside)

Ink:
   None

Technique:
   CAS

Accessories:
   Adhesive-Backed Sequins & Gems
   Adhesive

First, I adhered the Favored Flowers DSP panel onto the Fresh Freesia card front.

I then randomly added some Adhesive-Backed Sequins & Gems.

Lastly, I adhered a Basic White panel to the inside of the card.

Thank you so much for dropping by here. Contact Me if you have any questions.

Click on all of the tabs above and explore products, promotions, and opportunities.

Please take the time to share, like, pin, tweet, or comment. Do not forget to FOLLOW and SUBSCRIBE to my blog.

HAPPY STAMPING!

Wednesday, July 10, 2024

Calypso Flowers

Choose any of the colors in the designer series paper pattern to accent. I chose Calypso Coral. What would you choose? 


Stamps:
   None

Paper:
   Calypso Coral A-2
   Basic Black 5-3/8 x 4-1/8
   Favored Flowers DSP 5-1/4 x 4
   Basic White 5-1/4 x 4 (Inside)

Ink:
   None

Technique:
   CAS

Accessories:
   Iridescent Rhinestone Basic Jewels
   Adhesive

First, I adhered the Favored Flowers DSP panel onto a Basic Black matte.

I then adhered this panel onto the Calypso Coral card front.

Next, I added a few Iridescent Rhinestone Basic Jewels to add a bit of sparkle.

Lastly, I adhered a Basic White panel to the inside of the card.

Thank you for being here! Contact Me if you have questions or need anything that is Stampin' Up! related.

Check out each of the headers above and see the fabulousness that is Stampin' Up! If you become a buyer, there is a HOST CODE located in the right sidebar for your use.

Please take a minute to share, like, pin, tweet, or comment. Plus, you want to take the time to FOLLOW and SUBSCRIBE to my blog.

HAPPY STAMPING!

Monday, April 8, 2024

Colored Roses

 When you want your chalks to really pop, use the Poppin' Pastels technique. I had no idea VersaMark could make such an impact. What do you think of this card? 


Stamps:
   Fragrant Flowers

Paper:
   Rose Red A-2
   Favored Flowers DSP 5-1/4 x 2
   Subtles DSP 5-1/4 x 2
   Basic Black 5-3/8 x 4-1/8
   Basic White 1-1/2 x 3-1/2, 3-5/8 x 4, 5-1/4 x 4 (Inside)

Ink:
   Tuxedo Black Memento
   VersaMark

Chalks:
   Stampin' Pastels 

Technique:
   Poppin' Pastels
   Die Cutting

Accessories:
   Fragrant Flowers Dies
   Basic Rhinestone Jewels
   Sponge Daubers
   Dimensionals
   Adhesive

I followed the steps on SplitCoastStampers for the Poppin' Pastels Technique.

I then die cut the image, using the Fragrant Flowers Dies, and set it aside.

Next, I stamped and die cut the sentiment and set it aside.

I then adhered the DSP strips to the Basic Black matte and then onto the Rose Red card front. 

Next, I attached the floral die cut and the sentiment to the card front, using dimensionals.

Lastly, I added a few rhinestones and adhered a Basic White panel to the inside of the card.

Thanks so much for reading through my blog today. Contact Me if I can answer anything for you, or if you would like to buy any of my cards.

If you would like to buy your own products and make your own cards click on Shop Now and browse current merchandise. I have placed a HOST CODE for you to use if you do not earn any rewards on your own. It is located in the right sidebar.

Our monthly subscription to Paper Pumpkin is affordable and flexible. The cost is less than $25 monthly. Check out the Kits Collection for more options at varying prices.

Join Me and become part of a team. Check out the benefits and decide if it is for you.

Please share, like, pin, tweet, or comment. Don't forget to FOLLOW and SUBSCRIBE to my blog.

HAPPY STAMPING!

Saturday, May 13, 2023

Favored Birthday

This is a wonderful layout for smaller panels of designer series paper. Just like everyone else, you probably start with a 12 x 12 sheet, or maybe a 6 x 6 sheet. Either way, once you cut your panels to fit an A-2 size card, you find that there seems to be a few scraps that you just hate to throw away. After all, this paper can be quite expensive. Just create a matte for these left-over panels and arrange them on a card front. Add a sentiment, some embellishments and mail it away. What do you think?


Stamps:
   Waves of Inspiration

Paper:
   Blackberry Bliss A-2, 2-1/4 x 3-3/4 (2)
   Basic White 5-3/8 x 4-1/8, 5-1/4 x 4 (Inside), Scrap
   Mossy Meadow 5-1/4 x 4
   Favored Flowers DSP 2 x 3-1/2

Ink:
   Blackberry Bliss

Technique:
   Dry Embossing
   Die Cutting

Accessories:
   Waves Dies
   Layered Leaves 3D Embossing Folder
   Dimensionals
   Adhesive

First, I embossed the Mossy Meadow panel, using the Layered Leaves 3D embossing folder.

I then adhered it to the Basic White panel, and then onto the Blackberry Bliss card front.

Next, I adhered the two DSP panels onto two Blackberry Bliss mattes.

I then arranged them onto the card front and adhered them with liquid adhesive.

Lastly, I stamped, die cut, and adhered the sentiment to the center of the card, using dimensionals. I also adhered a Basic White panel to the inside of the card.

Thank you so much for stopping by here. Contact Me if you have any questions.

Shop Now and buy your supplies to make your own cards. Place an order today for your favorites before they run out of stock.

Join Me and become my new team member. Enjoy the best savings and opportunity offered today!

Subscribe to Paper Pumpkin and craft monthly for under $25. Don't forget to take a look at the All-Inclusive Kits!

If you liked my card, please share, like, pin, tweet, or comment. I would love for you to FOLLOW and SUBSCRIBE to my blog. Let me know what you think in the comments below.

HAPPY STAMPING!