Showing posts with label Shaped Card. Show all posts

Monday, August 5, 2024

Coffee Window

When you create a shaped card, make sure you leave a folding edge. It can be on the side or at the top. Thoughts? 


Stamps:
   Coffee With Friends

Paper:
   Barely Banana A-2
   Basic White 5-1/4 x 4 (Inside)

Ink:
   Tuxedo Black Memento

Watercolor Pencils:
   Various Colors - Personal Choice

Technique:
   Die Cutting

Accessories:
   Window Frame Collection
   Enamel Shapes
   Adhesive

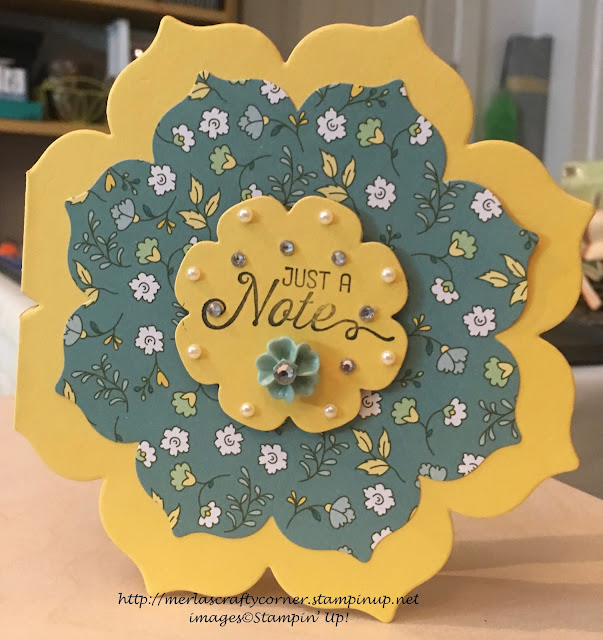
First, I die cut my card shape by placing the left edge of the die off the paper. This gives me a fold.

I then stamped the image on the card front.

Next, I used various watercolor pencils to color in the image. It seems that when I ran my card through the Embossing and Die Cutting Machine, it left some imprints on the paper. I think they are from the cutting plate. I think they add a bit of texture and character, so I continued.

I then stamped the sentiment to the right of the image, using Tuxedo Black Ink.

Lastly, I added an Enamel Shape under the sentiment and a Basic White panel to the inside of the card. I used the next smaller size to die cut the white panel for the inside.

I am so excited that you decided to pay me a visit. Please Contact Me if I can be of service.

Shop Now and enjoy looking at new products made especially for card making! There is a HOST CODE located in the right sidebar, if you care to use it.

If you are into kits, check out Paper Pumpkin and the Kits Collection. I am sure one of those will be right up your alley.

Still undecided? Join Me and find out what all the fuss is about. Check it out today.

Please share, like, pin, tweet, or comment. FOLLOW and SUBSCRIBE to my blog.

HAPPY STAMPING!

Sunday, January 9, 2022

Floral Note

I do like the idea of making a card in a particular shape. Using die cuts makes the whole process quite easy. You only need to remember to keep one end intact in order to open it. What do you think? 


Stamps:
  Flourishing Phrases

Paper:
  Daffodil Delight 5 x 11 scored @ 5-1/2, 2-1/4 Sq.
  All Abloom DSP 4-1/2 Sq.

Ink:
  Archival Basic Black

Technique:
  Die Cutting

Accessories:
  Floral Frames Collection Dies
  2015-2017 In-Color Blossom Collection
  Basic Rhinestone Jewels
  Basic Pearl Jewels
  Dimensionals
  Glue Dots
  Adhesive

Die cut the card base with one of the larger dies from the Floral Frames Collection Dies. Note that the left edge is uncut and folded. I just made sure the die was past that edge so it would not cut it. You may have to pass your card a couple of times through your machine because you are cutting through two sheets. 

Next, I cut the DSP, using a smaller die cut from the collection. I adhered this piece onto the card front.

I then stamped and die cut the center of the flower. I attached it, using dimensionals.

I added a flower embellishment with a glue dot.

Lastly, I added a few rhinestones and pearls. You can die cut a white panel for the inside of the card if you wish. The Daffodil Delight is light enough to write on it. The choice is yours.

Thank you so much for dropping by here. Contact Me if you have any questions.

Click on all of the tabs above and explore products, promotions, and opportunities.

Please take the time to share, like, pin, tweet, or comment. Do not forget to FOLLOW and SUBSCRIBE to my blog.

HAPPY STAMPING!

Wednesday, June 19, 2019

Balmy Rose

Shaped cards are very unique. They are sure to put a smile on the recipient's face. As long as you have a shaped die cut, you can create a shaped card. Here is one with a rose on it to send Birthday Wishes.


Stamps: Healing Hugs, Varied Vases
Paper: Whisper White A-2
Ink: Balmy Blue, Lemon Lime Twist, Night of Navy
Technique: Shaped Card, Die Cutting
Accessories: Top Note Die, 1/4" Lemon Lime Twist Organdy Ribbon (16"), Basic Pearl Jewels

When you create a shaped card, you must remember to leave the top or the side in tack. The card must have a folded edge in order to open. This card has its fold on top. So the flap opens upward. The inside is left blank for the sender to write their own personal message. 

Thank you for looking and feel free to contact me with any questions. I treasure all of your feedback. Have a wonderful day.

HAPPY STAMPING!