Showing posts with label Washi Label Punch. Show all posts

Thursday, June 26, 2025

Favored Petals

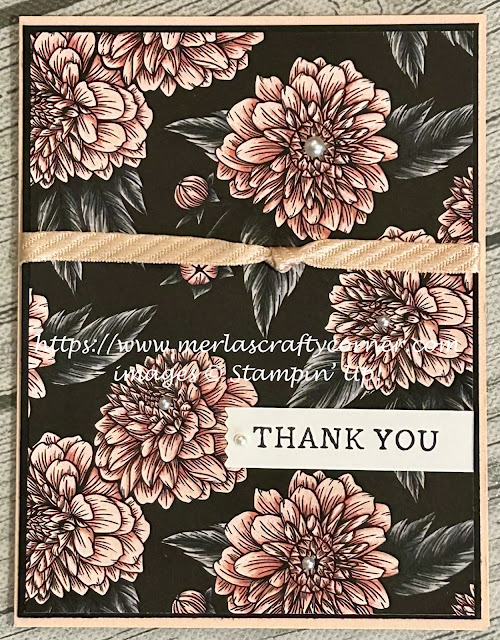
The black etching on the petals and leaves definitely pulls the onlookers attention. Thoughts? 


Stamps:
   Simply Said

Paper:
   Petal Pink A-2
   Basic Black 5-3/8 x 4-1/8
   Favored Flowers DSP 5-1/4 x 4
   Basic White 2-1/4 x 5/8, 5-1/4 x 4 (Inside)

Ink:
   Tuxedo Black Memento

Technique:
   CAS
   Punching

Accessories:
   Washi Label Punch 
   1/4" Diagonal Trim Combo Pack (8")
   Pearl Basic Jewels
   Glue Dots
   Adhesive

First, I adhered the Favored Flowers DSP panel onto a Basic Black matte.

I then took the ribbon and tied a knot in the center of it. I wrapped it around the panel and secured it on the back with a couple of glue dots. I also used a glue dot under the knot to keep it in place.

Next, I adhered the panel onto the Petal Pink card front.

I then stamped the sentiment on a strip of Basic White, using Tuxedo Black Memento ink.

Next, I used the Washi Label Punch on one end of the strip to add a bit of interest.

I then adhered the sentiment on the bottom portion of the card front, as shown above.

Lastly, I added a pearl to the sentiment and adhered a Basic White panel to the inside of the card.

Thank you so much for hanging out with me today. Contact Me if I can be of service.

Shop Now and browse some exciting new things.

Paper Pumpkin and the Kits Collection are two ways to get a quick fix for the Crafting Bug. Be careful, it is contagious, especially with family.

Join Me and flourish in the goodness that is Stampin' Up! I know you're thinking about it, or you would not have read this far. Check it out and let me know if you need anything.

Please share, like, pin, tweet, or comment. FOLLOW and SUBSCRIBE to my blog.

HAPPY STAMPING!

Monday, June 23, 2025

Birthday Refresh

I do like the black etching on the rose petals and leaves. I think it really draws in your attention. What do you think? 


Stamps:
   Simply Said

Paper:
   Fresh Freesia A-2
   Basic Black 5-3/8 x 4-1/8
   Favored Flowers DSP 5-1/4 x 4
   Mossy Meadow 3 x 3/4
   Basic White 2-3/4 x 5/8, 5-1/4 x 4 (Inside)

Ink:
   Tuxedo Black Memento

Technique:
   CAS
   Punching

Accessories:
   Fresh Freesia 3/8" Seam Binding Ribbon
   Adhesive-Backed Sequins & Gems
   Washi Label Punch
   Adhesive

First, I adhered the Favored Flowers DSP onto a Basic Black matte.

I then wrapped the Fresh Freesia Seam Binding Ribbon around the top portion of the panel and tied it off with a bow. 

Next, I adhered the panel onto the Fresh Freesia card front.

I then stamped the sentiment, using Tuxedo Black Memento ink and punched it out with the Washi Label Punch.

Next, I attached it to the Mossy Meadow strip at an angle, using liquid adhesive. 

I then adhered it to the bottom portion of the card front.

Lastly, I added a few sequins and gems to the card front and adhered a Basic White panel to the inside of the card.

I am so excited that you decided to pay me a visit. Please Contact Me if I can be of service.

Shop Now and enjoy looking at new products made especially for card making! 

If you are into kits, check out Paper Pumpkin and the Kits Collection. I am sure one of those will be right up your alley.

Still undecided? Join Me and find out what all of the fuss is about. Check it out today.

Please share, like, pin, tweet, or comment. FOLLOW and SUBSCRIBE to my blog.

HAPPY STAMPING!

Monday, December 16, 2024

Flighty Thoughts

I used markers to color the bird, but I think I will try watercolor pencils with a blender pen next. Thoughts? 


Stamps:
   Winterly Tree Tops

Paper:
   Crumb Cake A-2, 3-1/2" Sq.
   Basic Black 5-3/8 x 4-1/8
   Nests of Winter DSP 5-1/4 x 4
   Simply Marbleous 6x6 DSP 3" Sq.
   Basic White 2-3/4 x 2, 5-1/4 x 4 (Inside)
   Coastal Cabana 2-1/2 x 2
   Garden Green 1 x 1-3/4 (2)

Ink:
   Tuxedo Black Memento

Markers:
   Real Red
   Coastal Cabana
   Pumpkin Pie
   Daffodil Delight
   Crumb Cake
   Soft Suede

Technique:
   Die Cutting
   Punching

Accessories:
   Winterly Tree Tops Dies
   Spotlight on Nature Dies
   Washi Label Punch
   Earth Tones Shimmer Gems
   Glue Dots
   Dimensionals
   Adhesive

First, I adhered the Nests of Winter DSP panel onto a Basic Black matte and then onto the Crumb Cake card front.

I then stamped, die cut, and colored the bird image, using the Winterly Tree Tops dies and my markers: Real Red for the berries, Crumb Cake on the tree limb, Soft Suede for the Bird's beak and legs, Coastal Cabana, Pumpkin Pie, and Daffodil Delight were all used to color the bird's body.

Next, I die cut the Crumb Cake square and the Simply Marbleous DSP square, using the Spotlight on Nature Dies. I adhered the Simply Marbleous DSP circle onto the Crumb Cake Circle and adhered these onto the upper part of the card front.

Next, I die cut the two Garden Green pieces, using the Winterly Tree Tops dies. I adhered these two pieces onto the back of the bird, using a few glue dots. 

I then added a few dimensionals onto the back of the bird and attached it to the center of the circle die cuts.

Next, I stamped and punched the sentiment, using the Washi Label Punch. I attached it to the card front, using dimensionals.

Lastly, I added a few Earth Tones Shimmer Gems and adhered a Basic White panel to the inside of the card.

I am so excited that you decided to pay me a visit. Please Contact Me if I can be of service.

Shop Now and enjoy looking at new products made especially for card making! There is a HOST CODE located in the right sidebar, if you care to use it.

If you are into kits, check out Paper Pumpkin and the Kits Collection. I am sure one of those will be right up your alley.

Still undecided? Join Me and find out what all the fuss is about. Check it out today.

Please share, like, pin, tweet, or comment. FOLLOW and SUBSCRIBE to my blog.

HAPPY STAMPING!

Thursday, May 30, 2024

Jeweled Balloon

Create your own background panel, using strips of leftover designer series paper. They don't even have to be the same width. As long as the length is the same, you can make it work. Thoughts? 


Stamps:
   Lift Me Up

Paper:
   Very Vanilla A-2, 4-1/2 x 3-1/4, Scrap
   Real Red DSP Strips
   Basic Black 2-5/8 x 3-1/2

Ink:
   Tuxedo Black Memento

Technique:
   Die Cutting
   Punching

Accessories:
   Up & Away Thinlits Dies
   Washi Label Punch
   Basic Rhinestone Jewels
   Washi Tape
   Dimensionals
   Fine Tip Glue Pen
   Adhesive

First, I pulled some leftover strips out of the Real Red DSP pack. 

I then adhered them onto the Very Vanilla panel. Flipping every other one to establish a pattern.

I then attached this panel to the Very Vanilla card front, centering it on the top part of the card. 

Next, I added a strip of Washi tape to even out the bottom of the card.

I then die cut the hot air balloon, using the Up & Away Thinlits Dies. 

Next, I adhered it, using the Fine Tip Glue Pen.

I then stamped, punched, and attached the sentiment with dimensionals.

Lastly, I added some Basic Rhinestone Jewels to the balloon.

I am so excited that you stopped to read and check out my work. Thank you from the bottom of my heart. Contact Me and let me know if there is anything I can answer for you.

Do you have some time to browse? You do not want to pass up the opportunity to shop some quality products and see what is trending. Shop Now and take a peek. If you decide to place an order, I have included a HOST CODE in the right sidebar if you do not earn any rewards on your own. Thanks in advance.

Are you undecided? Subscribe to Paper Pumpkin and give it a go. Let the products speak for themselves. The cost is $25 and you are completely in control. No small print for you to miss. Try it.

Join Me and gain the best value for your hard-earned money. Check it out now.

Share, like, pin, tweet, or comment. Come on, I dare you. Don't forget to FOLLOW and SUBSCRIBE to my blog.

HAPPY STAMPING!

Monday, March 18, 2024

Brushed Florals

Watercolor crystals will always yield surprising results. Sometimes, I am a bit disappointed, especially if some of the colors run together to create a muddy presence. Still, beauty is in the eye of the beholder. Thoughts? 


Brushed Florals


Brushed Florals Too


Brushed Florals Tre


Stamps:
   Happy & Heartfelt

Paper:
   Melon Mambo A-2, Scrap
   Granny Apple Green A-2, Scrap
   Daffodil Delight A-2, Scrap
   Basic Black 5-3/8 x 4-1/8
   Irresistibly Floral DSP 5-1/4 x 4
   Basic White 5-1/4 x 4 (Inside)

Ink:
   Tuxedo Black Memento

Brusho Crystal Colour:
   Gamboge
   Yellow
   Moss Green
   Brilliant Red

Pigment Watercolor Sprinkles:
   Melon Mambo
   Granny Apple Green
   Daffodil Delight

Technique:
   Punching
   CAS

Accessories:
   Washi Label Punch
   Gold Glitter Washi Tape
   Bright's Enamel Shapes
   Glitter Ribbon
   Dimensionals
   Adhesive

As you can see, I went a bit overboard in creating these cards. It is so easy and fun to play with watercolor crystals. I used the Brusho Crystal Colours on the first card and the Pigment Watercolor Sprinkles on the other two cards.

First, I sprinkled the DSP panel with some watercolor crystals or sprinkles.

I then spritzed the panel with water, and let the crystals or sprinkles do their thing. I did keep a paper towel close by to dab here and there. The muddy look happens when too many of the colors run together. Oops.

I let the panels dry for a bit.

Next, I stamped the sentiments on scraps of matching cardstock.

I punched them out, using the Washi Label Punch. 

Next, I adhered the dried panels onto a Basic Black matte and then onto a matching card front.

I then adhered a bit of Gold Glitter Ribbon to the card front and attached the sentiment, using dimensionals.

Lastly, I added some Enamel Shapes and adhered a Basic White panel to the inside of the card.

I am so excited that you decided to pay me a visit. Please Contact Me if I can be of service.

Shop Now and enjoy looking at new products made especially for card making! There is a HOST CODE located in the right sidebar, if you care to use it.

If you are into kits, check out Paper Pumpkin and the Kits Collection. I am sure one of those will be right up your alley.

Still undecided? Join Me and find out what all the fuss is about. Check it out today.

Please share, like, pin, tweet, or comment. FOLLOW and SUBSCRIBE to my blog.

HAPPY STAMPING!

Wednesday, March 13, 2024

Lots of Love

Whenever you have beautiful designer paper, you want to keep everything clean and simple. Just add a sentiment, matte, and maybe an embellishment, and you're good to go. Thoughts? 


Stamps:
   Inspiring Iris

Paper:
   Lemon Lime Twist A-2
   Basic Black 5-3/8 x 4-1/8
   Masterfully Made DSP 5-1/4 x 4
   Basic White 2-1/4 x 3/4, 5-1/4 x 4 (Inside)

Ink:
   Tuxedo Black Memento

Technique:
   Punching

Accessories:
   Washi Label Punch
   Gingham Gala Adhesive-Backed Sequins
   Dimensionals
   Adhesive

First, I adhered the Masterfully Made DSP panel onto a Basic Black matte, and then onto the Lemon Lime Twist card front.

I then stamped and punched the sentiment, using the Washi Label Punch.

Next, I attached it to the card front with dimensionals.

Lastly, I added a couple of Gingham Gala Adhesive-Backed Sequins and adhered a Basic White panel to the inside of the card.

Thank you so much for stopping by here and taking the time to peek at my latest creation. Contact Me for any further information.

If you have a few minutes, I suggest you Shop Now and check out all of our current deals. You don't want to kick yourself later for passing up the opportunity. There is a HOST CODE in the right sidebar if you care to use it.

If you want to feed your Crafty Bug that has been going around, subscribe to Paper Pumpkin. Check it out and see if it is for you.

Join Me and become my newest team member. It is the best deal around.

Please take some time to share, like, pin, tweet, or comment. I do appreciate all of your feedback. Don't forget to FOLLOW and SUBSCRIBE to my blog.

HAPPY STAMPING!

Wednesday, January 3, 2024

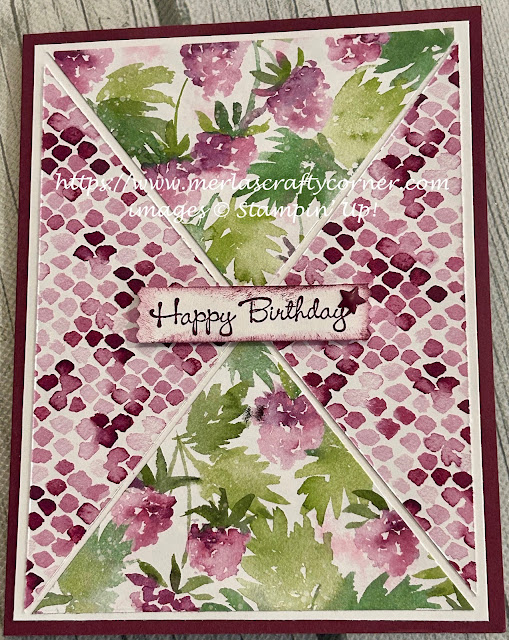
Berry Birthday

Draw attention to your card simply by cutting the designer series paper (DSP) differently. Using two-sided paper makes this even easier because all you have to do is flip two sides. What do you think? 


Stamps:
   Go To Greetings

Paper:
   Rich Razzleberry A-2
   Basic White 5-1/4 x 4 (2), Scrap
   Berry Delightful DSP 5 x 3-3/4

Ink:
   Rich Razzleberry

Technique:
   Sponging
   Punching

Accessories:
   Brights Enamel Shapes
   Washi Label Punch
   Sponge
   Dimensionals
   Adhesive

First, I cut the DSP panel. I lined up two opposite ends of the DSP on the cutting line and cut the paper on the diagonal. This gave me two large triangles.

Keeping the paper together, I slid the paper to the other two opposite corners and diagonally cut the DSP. I now had 4 triangles.

I then flipped over the left and right triangles to give me a view of the other side of the DSP.

Next, I adhered these triangles on to a Basic White panel. I left a little space between the panels as shown above.

I then adhered this panel on to the Rich Razzleberry card front.

Next, I stamped, punched, and sponged the sentiment. You can change this to whatever you need. I adhered it to the center of the card, using dimensionals.

Lastly, I added an enamel star shape to the sentiment, and adhered the other Basic White panel to the inside of the card.

Thank you so much for spending time with me here. Contact Me if you have any questions.

Shop Now and take a look at all of our new products and current promotions. Please use the HOST CODE sitting in the right sidebar if you did not earn your own rewards.

Subscribe to Paper Pumpkin and keep your monthly cost below $25! Join Me and become my newest team member.

Either way, please share, like, pin, tweet, or comment. Do not forget to FOLLOW and SUBSCRIBE to my blog.

HAPPY STAMPING!

Thursday, December 28, 2023

Purple Christmas

The silver foil panel adds glimmer and elegance to this card. Thoughts? 


Stamps:
   Good Greetings

Paper:
   Purple Posey A-2
   Basic White 5-1/4 x 4 (2), 1/4" Strip
   Silver Foil 5 x 2-1/4
   Feels Like Frost DSP 4-3/4 x 2

Ink:
   Highland Heather
   Tuxedo Black Memento

Technique:
   Sponging
   Punching
   Dry Embossing

Accessories:
   Softly Falling Embossing Folder
   Washi Label Punch
   Sponge
   Dimensionals
   Adhesive

First, I stamped, punched, and sponged the sentiment. I used Tuxedo Black Memento for stamping, and the Highland Heather for sponging. The strip of Basic White was punched with the Washi Label Punch.

I then took one of the Basic White panels and dry embossed it, using the Softly Falling Embossing Folder. I adhered this panel onto the Purple Posey card front.

Next, I adhered the DSP panel onto the Silver Foil panel and then adhered this panel to the right side of the card front, using liquid adhesive.

Lastly, I adhered the sentiment with dimensionals, and added the other Basic White panel to the inside of the card. 

Thank you so much for hanging out with me today. Contact Me if I can be of service.

Shop Now and browse some exciting new things. There is a HOST CODE in the right sidebar for you to use if you like.

Paper Pumpkin and the Kits Collection are two ways to get a quick fix for the Crafting Bug that is going around. Be careful, it is contagious, especially with family.

Join Me and flourish in the goodness that is Stampin' Up! I know you're thinking about it, or you would not have read this far. Check it out and let me know if you need anything.

Share, like, pin, tweet, or comment. FOLLOW and SUBSCRIBE to my blog.

HAPPY STAMPING!

Monday, December 25, 2023

Christmas Snowflakes

How fun to celebrate Christmas with a little shake. This is sure to put a smile on anyone's face. Thoughts? 


Stamps:
   Teeny Tiny Wishes

Paper:
   Pacific Point A-2
   Snowflake Splendor 5-1/4 x 4
   Basic White 3-1/2 x 4-3/4, 1 x 2-1/2, 5-1/4 x 4 (Inside)
   Window Sheet 3-1/4 x 4-1/2
   Balmy Blue Glimmer Paper (small snowflake)

Ink:
   Pacific Point

Technique:
   Shaker Card
   Dry Embossing

Accessories:
   Winter Snow Embossing Folder
   Washi Label Punch
   So Many Snowflakes Dies
   Snowflake Sequins
   Blue Adhesive-Backed Gems
   Felt Snowflakes
   Tear & Tape
   Foam Adhesive Strips
   Glue Dots
   Adhesive

First, I took the 3-1/2 x 4-3/4 Basic White panel and dry embossed it with the Winter Snow Embossing Folder.

I then die cut the center, using the die from So Many Snowflakes. I also took the smallest snowflake and die cut two, using the Balmy Blue Glimmer Paper.

Next, I stamped and punched out the sentiment, using Pacific Point and the Washi Label Punch. 

I then adhered the Window Sheet with a few glue dots onto the back of the die cut panel. 

Using foam adhesive strips, I enclosed the opening of the die cut. The foam strips will keep the sequins in view through the window sheet. I also added a foam strip on the outer edge of the panel to keep it from crushing down.

Next, I added my shaker card filling in the center of the DSP panel. I then added the window sheet panel on to the DSP. This was then adhered to the Pacific Point card front.

I added a Blue Felt Snowflake from my stash, using a glue dot, and adhered the sentiment with some liquid adhesive.

Lastly, I added the Balmy Blue Glimmer snowflakes, using glue dots, and adhered the Basic White panel to the inside of the card.

I am so excited that you decided to pay me a visit. Please Contact Me if I can be of service.

Shop Now and enjoy looking at new products made especially for card making! There is a HOST CODE located in the right sidebar, if you care to use it.

If you are into kits, check out Paper Pumpkin and the Kits Collection. I am sure one of those will be right up your alley.

Still undecided? Join Me and find out what all the fuss is about. Check it out today.

Please share, like, pin, tweet, or comment. FOLLOW and SUBSCRIBE to my blog.

HAPPY STAMPING!