Showing posts with label Banner Triple Punch. Show all posts

Tuesday, October 8, 2024

Circles & Stars

Sketch Challenges are fairly easy to meet. These challenges allow you to flip the sketch if you need and you can use any sentiment you like. So, basically, you just need to find a way to fill the shape and size of the sketch. Thoughts? 


Stamps:
   Apple Blossoms
   Circle Circus

Paper:
   Pumpkin Pie A-2
   Basic White Scraps, 5-1/4 x 4 (Inside)
   Silver Glitter Scraps
   Pumpkin Pie Glitter Scraps
   Basic Black Scraps

Ink:
   Pacific Point

Technique:
   Sponging
   Punching
   Die Cutting

Accessories:
   Stars Framelits Dies
   1-3/4" Circle Punch
   3/4" Circle Punch
   Washi Label Punch
   Triple Banner Punch
   Sponge
   Dimensionals
   Adhesive

First, I stamped and punched the 1-3/4" Circle, using the matching punch and Pacific Point ink.

I then punched a smaller circle (3/4") from a Pumpkin Pie Glitter scrap.

Next, I die cut two silver glimmer stars, using the Stars Framelits Dies and Silver Glimmer Scraps.

I then used the Triple Banner Punch for a Basic Black directional arrow (>).

Next, I stamped, punched, and sponged the sentiment for the card.

I then assembled the card as shown above: the glimmer shapes are attached with dimensionals. 

Lastly, I adhered a Basic White panel to the inside of the card.

Thank you so much for stopping by here and taking a quick look-see. If you have any questions or need my assistance, Contact Me.

Shop Now and take a look at all of our new products and current promotions. Please use the HOST CODE sitting in the right sidebar if you did not earn your own rewards.

If you want to craft, but keep your costs at $25 a month, check out Paper Pumpkin. It just might be what you are looking for at the moment. 

Join Me and become the newest member of my team. Remember there are no hidden agendas or penalties for giving it a go. Don't pass this opportunity to save.

You've come this far, so please share, like, pin, tweet, or comment. I appreciate your time and efforts. Let me know your thoughts and leave all of your questions behind. Do not forget to FOLLOW and SUBSCRIBE to my blog.

HAPPY STAMPING!

Thursday, August 22, 2024

Foiled Posies

Make your card sparkle with a bit of aluminum foil from your pantry. What do you think? 


Stamps:
   Paisleys & Posies

Paper:
   Sweet Sugarplum A-2
   Basic White 5-1/4 x 4 (2), Scraps
   Aluminum Foil 6 x 5

Ink:
   Berry Burst
   Melon Mambo
   Sweet Sugarplum

Technique:
   Aluminum Foil
   Dry Embossing
   Die Cutting
   Punching

Accessories:
   Spring Flowers Embossing Folder
   Paisley Framelits Dies
   Triple Banner Punch
   Basic Rhinestone Jewels
   Basic Pearl Jewels
   Clear Faceted Gems
   Sponge
   Dimensionals
   Fast Fuse

First, I wrapped aluminum foil around a Basic White panel and dry embossed it, using the Spring Flowers Embossing Folder.

I then adhered it to the Sweet Sugarplum card front.

Next, I stamped and die cut paisleys and posies.

I then stamped, punched, and sponged the sentiment.

Next, I arranged all the pieces on the card front and attached them all, using dimensionals.

Lastly, I added a couple of pearls, rhinestone, clear faceted gem, and adhered a Basic White panel to the inside of the card.

I am so excited that you stopped to read and check out my work. Thank you from the bottom of my heart. Contact Me and let me know if there is anything I can answer for you.

Do you have some time to browse? You do not want to pass up the opportunity to shop some quality products and see what is trending. Shop Now and take a peek. If you decide to place an order, I have included a HOST CODE in the right sidebar if you do not earn any rewards on your own. Thanks in advance.

Are you undecided? Subscribe to Paper Pumpkin and give it a go. Let the products speak for themselves. The cost is $25 and you are completely in control. No small print for you to miss. Try it.

Join Me and gain the best value for your hard-earned money. Check it out now.

Share, like, pin, tweet, or comment. Come on, I dare you. Don't forget to FOLLOW and SUBSCRIBE to my blog.

HAPPY STAMPING!

Wednesday, September 28, 2022

Sense of Time Again

Time is constant. Yet, it is something that we are always trying to control and wishing we had more. If I only had more time...Bonnie Friedman said it all. Take a look, if you have time. 


Stamps:
   Sense of Time

Paper:
   Ballet Blue A-2
   Textured Sage Shadow 5-1/4 x 4
   Chocolate Chip 5-1/8 x 3-7/8
   Coloring Page 5 x 3-3/4
   Basic White 3-1/2" Sq., 1 x 4-1/2, 5-1/4 x 4 (Inside)

Ink:
   Chocolate Chip

Technique:
   Sponging
   Fussy Cutting

Accessories:
   Triple Banner Punch
   5/16" Neutral Brad
   3/16" Neutral Brad
   Seaside Ribbon - 5"
   Dimensionals
   Tacky Tape
   Adhesive

First, I stamped my clock face and fussy cut it.

I then sponged it using Chocolate Chip and adhered it to the top of my coloring page. 

Next, I adhered the coloring page to a Chocolate Chip panel and then onto the Textured Sage Shadow panel.

I added two neutral brads to the face of the clock. The larger one on the large clock and the smaller one for the seconds clock.

I then stamped my sentiment and used the Triple Banner punch for the edges. I sponged it with Chocolate Chip.

Next, I adhered the ribbon across the bottom of the panel. I used tacky tape to keep the ribbon in place. I looped the ribbon to the back of the panel and used more tacky tape to keep it attached.

I added the sentiment with dimensionals and adhered the panel to the Ballet Blue card front.

Lastly, I adhered the Basic White panel to the inside of the card.

Thank you for stopping to take a peek. Contact Me if you have any questions.

Click on Shop Now and browse through all things Stampin' Up! Start your wish list or order your favorites today. I included a HOST CODE for you to use if you like. Use it only if your product total is less than $150. You can find it in the right sidebar.

Join Me and get the best bang for your buck.

Do you want everything at your fingertips without having to look for it? Subscribe to Paper Pumpkin. Want more choices? Check out the Kit Collection.

One last thing, share, like, pin, tweet, or comment. Don't forget to FOLLOW and SUBSCRIBE to my blog. Okay, that was more than one thing.

HAPPY STAMPING!

Saturday, September 17, 2022

Shaking Birthday Portal

Can a person get too old to receive a shaker card? I think not. What do you think? 


Stamps:
   A Little Birthday Cheer

Paper:
   Pool Party A-2
   Cherry on Top DSP 5-1/4 x 4
   Bermuda Bay Scraps
   Basic White 5-1/4 x 4 (Inside), Scraps

Ink:
   Archival Basic Black
   Pool Party

Technique:
   Die Cutting
   Punching
   Sponging

Accessories:
   Layering Circles Framelits Dies
   Foam Adhesive Strips
   Window Sheet
   Triple Banner Punch
   Dimensionals
   Sponge
   Sequins


I followed the tutorial found on SCS for the Die Cut Shaker. To see written instructions with pictures and a short video, click on Die Cut Shaker. The backing of my shaker is my DSP. The front of it is a window sheet, and the frame is Bermuda Bay. I used beads as a filler inside.

I added the shaker to the top center of my DSP panel, and then onto the Pool Party card front.

I added a sentiment to the bottom. I used the Triple Banner Punch and sponged the edges with Pool Party.

I added sequins around the shaker, and adhered a Basic White panel to the inside of the card.

Thank you so very much for taking the time to stop and glance at my work. If you have any questions or suggestions, please Contact Me. I do appreciate your time.

If you need any supplies, or you are curious to know just how much these products cost, click on Shop Now and satisfy your curiosity. A HOST CODE is available for you to use in case you did not earn your own rewards. You can find it in the right sidebar.

Do you want the best value for your buck? Join Me and reap all of the rewards. I will be more than happy to assist you. Check it out and note that there are no hidden agendas.

Wait! Don't leave. If you just want to try it and see, then subscribe to Paper Pumpkin. You will receive a kit with everything you need to create a project. Check out the Kit Collection for more choices.

I would love for you to take a minute to share, like, pin, tweet, or comment. Please FOLLOW and SUBSCRIBE to my blog. Let me know what you think below in the comments.

HAPPY STAMPING!

Wednesday, January 5, 2022

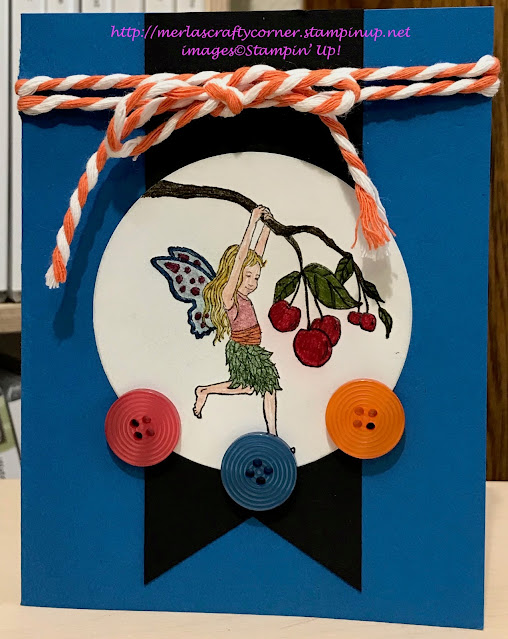
Swinging Fairy

This card was made for a sketch challenge. Since I left off a sentiment, it can be used for any occasion. What do you think? 


Stamps:
   Fairy Celebration

Paper:
   Pacific Point A-2
   Basic Black 5-1/4 x 2
   Basic White Scraps, 5-1/4 x 4 (Inside)

Ink:
   Tuxedo Black Memento
   Soft Sky

Markers:
   Various - Personal Choice

Technique:
   Die Cutting
   Punching
   Sponging

Accessories:
   Layering Circles Framelits
   Triple Banner Punch
   Brights Collections Buttons
   Thick Baker's Twine
   Glue Dots
   Adhesive

First, I stamped my image on a scrap of Basic White. I then colored it, using markers.

Next, I die cut it, using a circle from the Layering Circles Framelits. I sponged the edges, using Soft Sky.

I punched one end of the Basic Black, using the Triple Banner Punch and adhered it onto the Pacific Point card front.

I then added the thick Baker's Twine and adhered the circle with the image.

I added three buttons using glue dots and added the Basic White panel to the inside of the card.

Thank you for stopping to take a peek. Contact Me if you have any questions.

Click on Shop Now and browse through all things Stampin' Up! Start your wish list or order your favorites today. I included a HOST CODE for you to use if you like. Use it only if your product total is less than $150. You can find it in the right sidebar.

Join Me and get the best bang for your buck.

Do you want everything at your fingertips without having to look for it? Subscribe to Paper Pumpkin. Want more choices? Check out the Kit Collection.

One last thing, share, like, pin, tweet, and comment. Don't forget to FOLLOW and SUBSCRIBE to my blog. O.K. that was more than one thing.

HAPPY STAMPING!

Thursday, October 29, 2020

Awesome Shoes

 Sometimes we need to give someone a pat on the back. This is just the card to remind them how great they are. I like the image of shoes for this sentiment because sometimes there are people whose shoes are too big to fill. Don't you agree?


Stamps:
   Epic Celebrations

Paper:
   Tangerine Tango A-2
   Whisper White 5-1/4 x 4 (2), 1 x 3

Ink:
   Archival Basic Black
   Always Artichoke
   Pacific Point
   Elegant Eggplant
   Rose Red
   Tangerine Tango
   Tempting Turquoise

Technique:
   Sponging

Accessories:
   Triple Banner Punch
   Brights Candy Dots
   Sponge
   Dimensionals
   Adhesive

I listed the ink colors in the order that I applied them, starting with Always Artichoke and ending with Tempting Turquoise.

The sentiment was stamped using Archival Basic Black and sponged with Tangerine Tango.

Note that I left the shoes without color on them. I wanted the focus to be on the sentiment rather than the Converse shoes. This is the joy of making your own cards. You are in control. 

Thank you so much for stopping by here and taking a quick look-see. If you have any questions or need my assistance, Contact Me.

Shop Now and take a look at all of our new products and current promotions. Please use the HOST CODE sitting in the right sidebar if you did not earn your own rewards.

If you want to craft, but keep your costs below $25 a month, check out Paper Pumpkin. It just might be what you are looking for at the moment.

Join Me and become the newest member of my team. Remember there are no hidden agendas or penalties for giving it a go.

You've come this far, so please share, like, pin, tweet, or comment. I appreciate your time and efforts. Let me know your thoughts and leave all of your questions behind. Do not forget to FOLLOW and SUBSCRIBE to my blog.

HAPPY STAMPING!


Wednesday, April 29, 2020

Tick Tock

Time is the universal measurement. It is a constant in our life. No matter what is happening around us or in other parts of the world, there are 24 hours in a day, 60 minutes in an hour, and 60 seconds in a minute. Yet, we are either running out of time or...check this out:


Stamps:
   Sense of Time

Paper:
   Ballet Blue A-2
   Sage Shadow 5-1/4 x 4
   Chocolate Chip 5-1/8 x 3-7/8
   Bashful Blue 5 x 3-3/4
   Whisper White 1 x 4-1/2, 3-1/2" Sq.

Ink:
   Chocolate Chip
   VersaMark

Technique:
   Sponging

Accessories:
   Triple Banner Punch
   5/16" Neutral Brad
   3/16" Neutral Brad
   5" Seaside Ribbon
   Dimensionals
   Tacky Tape
   Adhesive

The clock was stamped, cut out, and sponged with Chocolate Chip before adhering it to the layers on the card base.

Bashful Blue was stamped using VersaMark to create the watermarks.

The sentiment was stamped and then punched using the Triple Banner punch. It was adhered using dimensionals.

I used tacky tape to adhere the ribbon onto the card.

Thank you for taking a peek. The card is simple and can be used with other sentiments. Let me know your thoughts.

Contact me if you need to buy any of my cards. Each one is available for $5 until supplies last. Special orders may be taken. 

HAPPY STAMPING!


Wednesday, April 1, 2020

A+ Teacher

Remember to say thank you to your teacher. Remote learning for everyone? Wow, I'm glad I am retired. I don't know if I could keep up with today's demands. My daughter creates fantastic lessons online for her students. I, on the other hand, can barely keep up with this blog. Let's say thank you to that special teacher. Let me know if you need to order any of these cards. $5 each. 


Stamps:
   Harvest Hellos
   Tart & Tangy

Paper:
   Melon Mambo A-2
   Grapefruit Grove 5 x 3-3/4
   Blushing Bride 2-1/4 x 2-1/2, 2-1/8" Sq., 2 x 1

Ink:
   Archival Basic Black
   Grapefruit Grove
   Melon Mambo

Markers:
   Melon Mambo
   Grapefruit Grove
   Blushing Bride
   Basic Black

Technique:
   Die Cutting
   Tone on Tone Stamping

Accessories:
   Stitched Nested Labels
   Banner Triple Punch
   Dimensionals
   Adhesive

Colors can be changed to your liking or to your school colors. 

Triple Banner Punch was used to create a stencil for the inverted banners. 

Thank you for stopping by here and taking a peek. Let me know what you think.

Click on Shop Now to order your Stampin' Up! Supplies. Check out the Clearance section.

HAPPY STAMPING!

Monday, March 23, 2020

Day After Day

Who is by your side day after day, year after year? I do hope it is someone you like! Here is a card to let that someone know how special they are to you.


Stamps:
   In the Meadow

Paper: 
   Wild Wasabi A-2
   Creamy Caramel 2 x 5
   Bordering Blue 3 x 2-1/4
   Whisper White 2-3/4 x 2-1/4

Ink:
   Tuxedo Black Memento
   Stampin' Up! Chalk Pastels

Technique:
   Punching
   Chalks

Accessories:
   Banner Triple Punch
   Dimensionals
   Adhesive

This card allows you to go back through your stash and pull out those forgotten colors and supplies. 

I used a cotton swab to apply my chalks onto the image. I like the soft subtle colors.

I also like that this card can be converted to an all occasion card, simply by deleting the sentiment.

Thank you for being here. Let me know what you think. One week left for Sale-A-Bration, so don't forget to click on the Shop Now button above.

HAPPY STAMPING!