Showing posts with label In-Color Enamel Dots. Show all posts

Thursday, April 17, 2025

Cloudy Thanks

The various blobs of color on the designer series paper reminded me of clouds. What do you think? 


Stamps:
   Greetings by TPC Studio

Paper:
   Just Jade A-2
   Basic Black 5-3/8 x 4-1/8
   Basic White 5-1/4 x 4 (2)
   Butterfly Dijou 6x6 DSP 5-1/4 x 2 

Ink:
   Tuxedo Black Memento

Technique:
   CAS

Accessories:
   2020-2022 In-Color Enamel Dots
   Adhesive

First, I adhered a strip of Butterfly Dijou DSP to the left side of a Basic White panel.

I then stamped my sentiment several times on the right side of the Basic White panel, using Tuxedo Black Memento ink. 

Next, I adhered the panel onto a Basic Black matte and then adhered it to the Just Jade card front.

I then added some enamel dots between the sentiments as shown above.

Lastly, I adhered a Basic White panel to the inside of the card.

Thank you for being here and taking the time to look at my blog entry. Contact Me if you need anything related to Stampin' Up!

If you would like to Shop Now, you can check out all that is new, current, and on-sale!

Notice that we offer a monthly subscription called Paper Pumpkin. Check it out and see if it is for you. The Kits Collection also offers a variety of kits at varying prices.

In order to get the most value for your dollar, you will want to Join Me and become part of my team. Click on the link and see if you are interested.

I would love for you to take a few minutes and share, like, pin, tweet, or comment. Don't forget to FOLLOW and SUBSCRIBE to my blog.

HAPPY STAMPING!

Wednesday, June 5, 2024

Birthday Rounds

I enjoy creating with this stamp set. I like all of the different patterns and designs on each circle. What do you think? 


Stamps:
   Go To Greetings
   Circle Circus

Paper:
   Bumblebee A-2
   2020-2022 In-Color DSP 5-3/8 x 4-1/8
   Basic White 5-1/4 x 4 (2)

Ink:
   Bumblebee 
   Cinnamon Cider
   Just Jade
   Magenta Madness
   Misty Moonlight

Technique:
   Blending Brush/Sponging

Accessories:
   2020-2022 In-Color Enamel Dots
   Blending Brush/Sponge
   Adhesive

First, I stamped the sentiment in the center of a Basic White panel, using Misty Moonlight.

I then brushed on Bumblebee ink all around the sentiment, using a Blending Brush.

Next, I randomly added circle stamps in various colors.

I then adhered the panel onto a 2020-2022 In-Color DSP matte and then onto a Bumblebee card front.

Lastly, I added a few 2020-2022 In-Color Enamel Dots and adhered a Basic White panel to the inside of the card.

Thank you so much for stopping by here and taking the time to peek at my latest creation. Contact Me for any further information.

If you have a few minutes, I suggest you Shop Now and check out all of our current deals. You don't want to kick yourself later for passing up the opportunity. There is a HOST CODE in the right sidebar if you care to use it. 

If you want to feed your Crafty Bug that has been going around, subscribe to Paper Pumpkin. Check it out and see if it is for you.

Join Me and become my newest team member. It is the best deal around.

Please take some time to share, like, pin, tweet, or comment. I do appreciate all of your feedback. Don't forget to FOLLOW and SUBSCRIBE to my blog.

HAPPY STAMPING!

Monday, February 26, 2024

Just Sunflowers

This layout is very easy to duplicate when you need a clean and simple card. All you need is stamps, ink, and paper. Thoughts? 


Stamps:
   Celebrate Sunflowers

Paper:
   Bumblebee A-2
   Flowers for Every Season DSP 4 x 4-1/4
   Basic White 5-1/4 x 4 (Inside)

Ink:
   Cinnamon Cider

Technique:
   CAS

Accessories:
   2020-2022 In-Color Enamel Dots
   Adhesive

First, I cut and adhered the DSP panel to the Bumblebee card front.

I then stamped the sentiment on the bottom of the card front, using Cinnamon Cider ink.

Next, I added a couple of enamel dots on each side of the sentiment and a few on the sunflower centers.

Lastly, I adhered a Basic White panel to the inside of the card.

Thank you so much for stopping by here and spending a few minutes of your day with me. I appreciate your time. Contact Me if you have any questions, need a demonstrator, or just want to stamp or share ideas.

Shop Now and enjoy browsing products and promotions. I have a HOST CODE in the right sidebar in case you did not earn your own rewards.

Do not miss the opportunity to Join Me and become the newest member of my team.

Paper Pumpkin should not be ignored. I enjoy putting my kit together monthly.

Take a few more minutes and share, like, pin, tweet, or comment. I would love to see what you really think. Do not forget to FOLLOW and SUBSCRIBE to my blog.

HAPPY STAMPING!

Friday, August 11, 2023

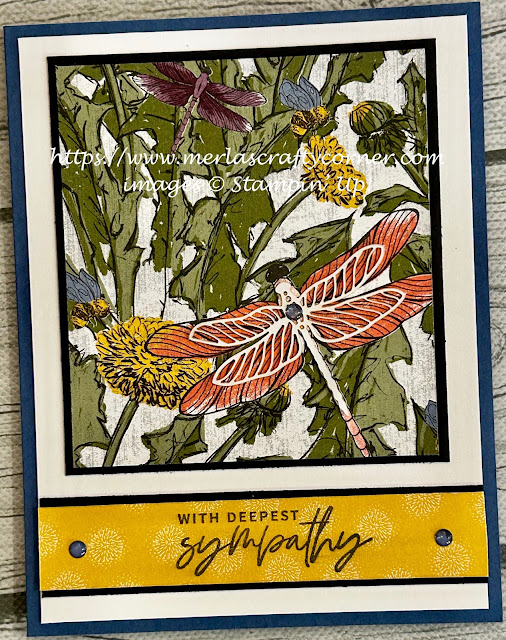
Misty Garden

Can you find the dragonflies and the bees in this jungle of greenery? I added the laser-cut dragonfly on top of the printed one to help highlight it. Did it work? Thoughts? 


Stamps:
   Something Fancy

Paper:
   Misty Moonlight A-2
   Basic White 5-1/4 x 4 (2)
   Basic Black 3-1/2 x 3-3/4, 7/8 x 4
   Dandy Garden DSP 3-5/16 x 3-5/8, 3/4 x 4
   Dandy Laser-Cut Paper

Ink:
   Tuxedo Black Memento

Technique:
   Layering

Accessories:
   2020-2022 In-Color Enamel Dots
   Glue Dots
   Adhesive

First, I stamped the sentiment on the strip of Dandy Garden DSP, using Tuxedo Black Memento.

I then matted this strip with Basic Black.

Next, I matted the larger panel of Dandy Garden DSP with its matching Basic Black panel.

These two panels were then adhered to the panel of Basic White, and then onto the Misty Moonlight card front.

I then adhered the Dandy Laser-Cut dragonfly on top of the printed dragonfly on the DSP.

Lastly, I adhered a few enamel dots and added the other Basic White panel to the inside of the card.

Thank you for checking out my blog. I so appreciate your time. Contact Me if you have any questions or concerns regarding Stampin' Up! 

Are you curious about what is trending, the cost of materials and other products, or do you just feel like shopping? Click on Shop Now and have some fun. 

Subscribe to Paper Pumpkin or check out the Kits Collection if you want to stay on a budget or just keep it all low-key.

Join Me and reap all of the benefits of becoming a part of the Stampin' Up! family. Check it out and gain the best value for your money.

Share, like, pin, tweet, or comment. Don't forget to FOLLOW and SUBSCRIBE to my blog.

HAPPY STAMPING!

Tuesday, June 21, 2022

Mossy Grove

This stamp set is ideal for creating masculine scenes as well as having an appeal for all who cherish the outdoors. Thoughts? 


Mossy Grove


Stamps:
Grassy Grove

Paper:
   Soft Sea Foam A-2, Scraps
   Simply Marbleous DSP 5-1/4 x 4
   Basic White 5-1/4 x 4 (Inside), Scraps

Ink:
   Cinnamon Cider
   Mossy Meadow

Technique:
   Die Cutting

Accessories:
   Grove Dies
   2020-2022 In-Color Enamel Dots
   Dimensionals
   Adhesive

First, I stamped and die cut the tall pines using Mossy Meadow on Soft Sea Foam card stock.

I then stamped and die cut a deer. I used Cinnamon Cider on a scrap of Basic White card stock.

Next, I stamped and die cut the grove using Mossy Meadow ink on Mossy Meadow card stock.

I adhered the DSP panel to the Soft Sea Foam card front. I attached the grove with dimensionals. I then adhered the trees and the deer with adhesive.

Lastly, I stamped the sentiment and added a couple of enamel dots. I adhered the Basic White panel to the inside of the card.

Here is another card using the same products, but a different layout:

Mossy Grove Too


Stamps:
   Grassy Grove

Paper:
   Soft Sea Foam A-2
   Simply Marbleous DSP 5-1/4 x 2
   Basic White 5-1/4 x 4 (2), Scraps

Ink:
   Cinnamon Cider
   Mossy Meadow

Technique:
   Die Cutting

Accessories:
   Grove Dies
   2020-2022 In-Color Enamel Dots
   Dimensionals
   Adhesive

First, I stamped and die cut three sections of grass, using Cinnamon Cider on scraps of Basic White.

I then stamped and die cut a deer, using Cinnamon Cider on a scrap of Basic White card stock.

I then stamped and die cut the trees using Mossy Meadow on a scrap of Basic White cardstock.

Next, I adhered the strip of DSP onto the left side of a Basic White panel.

I then attached the three sections of grass using dimensionals. I snipped off the grass section that went past the panel on the left. 

I adhered the deer and the trees using adhesive.

Lastly, I stamped the sentiment and added a few enamel dots. I adhered the other Basic White panel to the inside of the card.

Thank you so much for stopping by here and taking a quick look-see. If you have any questions or need my assistance, Contact Me.

Shop Now and take a look at all of our new products and current promotions. Please use the HOST CODE sitting in the right sidebar if you did not earn your own rewards.

If you want to craft, but keep your costs below $25 a month, check out Paper Pumpkin. It just might be what you are looking for at the moment.

Join Me and become the newest member of my team. Remember there are no hidden agendas or penalties for giving it a go. Don't pass this opportunity to save.

You've come this far, so please share, like, pin, tweet, or comment. I appreciate your time and efforts. Let me know your thoughts and leave all of your questions behind. Do not forget to FOLLOW and SUBSCRIBE to my blog.

HAPPY STAMPING!

Tuesday, June 7, 2022

Bare Tree

 As they say, "Less is More." What do you think?


Stamps:
   Beauty of Friendship
   Watercolor Wash

Paper:
   Old Olive A-2, 3-1/4 x 4-3/4
   Basic White 5-1/2 x 4, 5-1/4 x 4 (Inside)

Ink:
   Misty Moonlight
   Pineapple Punch

Technique:
   Die Cutting

Accessories:
   Beautiful Trees Dies
   2020-2022 In-Color Enamel Dots
   Fine Tip Glue Pen
   Adhesive

First, I stamped the 5-1/2 x 4 Basic White panel, using the Watercolor Wash Background stamp and the Pineapple Punch ink.

Next, I die cut the tree in Old Olive and adhered it to the center of the panel, using the Fine Tip Glue Pen.

I then stamped the sentiment in Misty Moonlight and adhered an enamel dot.

Lastly, I adhered the panel to the Old Olive card front, and added the other Basic White panel to the inside of the card.

Thank you so much for stopping by here and taking a quick look-see. If you have any questions or need my assistance, Contact Me.

Shop Now and take a look at all of our new products and current promotions. Please use the HOST CODE sitting in the right sidebar if you did not earn your own rewards.

If you want to craft, but keep your costs below $25 a month, check out Paper Pumpkin. It just might be what you are looking for at the moment.

Join Me and become the newest member of my team. Remember there are no hidden agendas or penalties for giving it a go. Don't pass this opportunity to save.

You've come this far, so please share, like, pin, tweet, or comment. I appreciate your time and efforts. Let me know your thoughts and leave all of your questions behind. Do not forget to FOLLOW and SUBSCRIBE to my blog.

HAPPY STAMPING!

Tuesday, May 24, 2022

Tough Cookie

Sometimes life throws us situations that require us to be tough. Here is a card to lend some support or acknowledgement for meeting those challenges. What do you think? 


Stamps:
   A Little Cheesy

Paper:
   Early Espresso A-2
   Gingham Gala 5-1/4 x 4
   Basic White 3-1/2" Sq., 5-1/4 x 4 (Inside)

Ink:
   Baked Brown Sugar
   Early Espresso

Markers:
   Early Espresso
   Baked Brown Sugar
   Crumb Cake

Technique:
   Coloring

Accessories:
   2020-2022 In-Color Enamel Dots
   Glittered Organdy Ribbon - 21"
   Adhesive

First, I stamped my sentiment in the right-center of the Basic White square panel.

I then stamped cookies around the sentiment. I made sure I fit as many whole cookies as possible and then stamped partial ones to fill in where space allowed.

I then colored the cookies with markers. I used Early Espresso for the chocolate chips. I then added Baked Brown Sugar to the ones that were off the card. (They looked a bit burned.) Finally, I added Crumb Cake to the main cookies surrounding the sentiment. 

Next, I adhered the small panel to the DSP panel.

Then I wrapped the glittered organdy ribbon around the entire panel and tied a bow in the center.

This panel was then adhered to the card base.

Lastly, I added a few enamel dots and adhered the Basic White panel to the inside of the card.

Thank you for taking the time to read this. I try my best to keep it short and sweet. Contact Me if you have questions or need anything Stampin' Up!

Shop Now and take a peek at quality products. There is a HOST CODE if your product total is less than $150. You do not have to use it, but I would appreciate it. It is located in the right sidebar.

Join Me and become part of my team. I will be as involved as you like. Check out the advantages.

Are you curious, but undecided? Subscribe to Paper Pumpkin and try it. The kit will include everything you need, and it won't break the bank. Check out the Kit Collection for more all-inclusive kit choices.

Please share, like, pin, tweet, or comment. I would love for you to FOLLOW and SUBSCRIBE to my blog.

HAPPY STAMPING!

Friday, May 13, 2022

Tasty Thanks

Food trucks are a big deal today. Although their menu is limited, they are fast, convenient, and mobile. Thoughts?


Stamps:
   Tasty Trucks

Paper:
   Bumblebee A-2
   Blueberry Bushel 5-3/8 x 4-1/8
   Basic White 5-1/4 x 4 (2)

Ink:
   Bumblebee
   Tuxedo Black Memento

Markers:
   Bermuda Bay
   Blueberry Bushel
   Bumblebee
   Granny Apple Green
   Gray Granite
   Night of Navy

Technique:
   Blending Brush/Sponge
   Coloring

Accessories:
   Star Designer Elements
   2020-2022 In-Color Enamel Dots
   Blending Brush/Sponge
   Adhesive

First, I added some Bumblebee ink to the Basic White panel using my Blending Brush. 

Next, I stamped my food truck in the center of the panel using Tuxedo Black Memento.

I then colored in the image using the markers listed above. 
    Bermuda Bay - Truck
    Blueberry Bushel - Awning, Window Frames, etc.
    Bumblebee - Awning, Light, Tacos
    Granny Apple Green - Taco Lettuce
    Gray Granite - Road
    Night of Navy - Tires (I meant to use Black)

I stamped the sentiment in Tuxedo Black Memento.

Next, I adhered the layers together. I adhered the image panel onto the Blueberry Bushel and then onto the Bumblebee card front. The other Basic White panel was adhered to the inside of the card.

Lastly, I added a few stars as a finishing touch.

Thank you for visiting. I do love company. Feel free to Contact Me if you have any questions.

Explore current products, promotions, and all of the opportunities. Just click on Shop Now. A HOST CODE is available in the right sidebar for those of you who do not earn your own rewards.

For those of you who like kits with everything you need to complete a project, we offer Paper Pumpkin. Your monthly cost is less than $25. Also, you might want to look at the new Kits Collection!

Join Me and become my newest team member. I look forward to meeting you.

Please take a minute to share, like, pin, tweet, or comment. Do not forget to FOLLOW and SUBSCRIBE to my blog.

HAPPY STAMPING!

Wednesday, May 11, 2022

Thank You Feelings

Color directly onto your designer series paper and give it a new look. This particular paper has been discontinued, but I wanted to use it for a color challenge. So, I added the two missing colors. What do you think? 


Stamps:
   Good Feelings

Paper:
   Magenta Madness A-2
   Night of Navy 5-3/8 x 4-1/8
   Floral Boutique DSP 5-1/4 x 4
   Basic White 5-1/4 x 4 (Inside), Scrap

Ink:
   Magenta Madness

Markers:
   Daffodil Delight
   Magenta Madness

Technique:
   Punching 
   Coloring

Accessories:
   Corner Rounder Punch
   2020-2022 In-Color Enamel Dots
   Basic Rhinestone Jewels
   Adhesive

First, I colored in the flowers, using a Magenta Madness marker.

I then colored in the background with a Daffodil Delight marker. I wanted it to have a bit of a messy look. So, you can see the marker marks and a bit of the white still showing through. 

I then adhered it to the Night of Navy matte, and then onto the Magenta Madness card front.

Next, I stamped my sentiment on a scrap of Basic White, using Magenta Madness ink.

I rounded the four corners, using a corner rounder punch.

Lastly, I added an enamel dot, a few rhinestones and adhered the Basic White panel to the inside of the card.

Thank you so much for spending time with me here. Contact Me if you have any questions.

Shop Now and take a look at all of our new products and current promotions. Please use the HOST CODE sitting in the right sidebar if you did not earn your own rewards.

Subscribe to Paper Pumpkin and keep your monthly cost below $25! Join Me and become my newest team member.

Either way, please share, like, pin, tweet, or comment. Do not forget to FOLLOW and SUBSCRIBE to my blog.

HAPPY STAMPING!