Showing posts with label Doilies. Show all posts

Tuesday, July 23, 2024

Honey, I'm Home

Make an easel card and display it for all to see. Thoughts? 


Stamps:
   Honeybee Home

Paper:
   Cinnamon Cider 8-1/2 x 4-1/4, 4-1/4" Sq.
   Heart & Home DSP 3-7/8" Sq., 1/2 x 3-7/8
   Pale Papaya 1/2 x 3-1/2, 3-7/8" Sq.

Ink:
   Tuxedo Black Memento

Technique:
   Easel Card
   Punching

Accessories:
   Heart & Home Doilies
   Bumblebee Trinkets
   Banners Pick a Punch
   Tear & Tape
   Glue Dots
   Adhesive

You can find a written tutorial with pictures and a short video for an Easel card at Split Coast Stampers. Just click on Easel Card. 

I added a couple of extras that can be seen clearly on the photo above. Have some fun and make your own changes.

Thank you for taking the time to read this. I try my best to keep it short and sweet. Contact Me if you have questions or need anything Stampin' Up!

Shop Now and take a peek at quality products. There is a HOST CODE if your product total is less than $150. You do not have to use it, but I would appreciate it. It is located in the right sidebar.

Join Me and become part of my team. I will be as involved as you like. Check out the advantages.

Are you curious, but undecided? Subscribe to Paper Pumpkin and try it. The kit will include everything you need, and it won't break the bank. Check out the Kit Collection for more all-inclusive kit choices.

Please share, like, pin, tweet, or comment. I would love for you to FOLLOW and SUBSCRIBE to my blog.

HAPPY STAMPING!

Wednesday, September 21, 2022

Thank God

This is such a wonderful and expressive sentiment. Thoughts? 


Stamps:
   Hope & Prayer

Paper:
   Misty Moonlight A-2
   Falling in Love DSP 5-1/4 x 4
   Basic White 5-1/4 x 4 (Inside)
   Gold Foil Scrap

Ink:
   Misty Moonlight

Technique:
   Die Cutting

Accessories:
   Cross of Hope Framelits
   White Tea Lace Paper Doilies
   Heart & Home Doilies
   Pearl Basic Jewels
   Brushed Brass Butterflies
   Glue Dots
   Fine Tip Glue Pen
   Adhesive

First, I stamped the sentiment in the center of the Heart & Home Doily, using Misty Moonlight ink.

I then added glue dots on the back and attached it to the center of a White Tea Lace Paper Doily. 

I then added glue dots on the back of this doily and attached it to the center bottom of the Falling in Love DSP panel.

Next, I took a scrap of gold foil and die cut the small cross from the Cross of Hope Framelits. I attached it using my fine tip glue pen. You can easily use regular adhesive, a glue dot, or an adhesive sheet to attach it.

I then adhered the panel to the Misty Moonlight card front.

Lastly, I added a few pearls, a brass butterfly, and adhered the Basic White panel to the inside of the card.

Thank you so much for spending time with me here. Contact Me if you have any questions.

Shop Now and take a look at all of our new products and current promotions. Please use the HOST CODE sitting in the right sidebar if you did not earn your own rewards.

Subscribe to Paper Pumpkin and keep your monthly cost below $25! Join Me and become my newest team member.

Either way, please share, like, pin, tweet, or comment. Do not forget to FOLLOW and SUBSCRIBE to my blog.

HAPPY STAMPING!

Sunday, June 5, 2022

Cheesy

Remember those plastic gingham tablecloths? Ah, the memories. 


Stamps:
   A Little Cheesy

Paper:
   So Saffron A-2, 2-3/4 x 3-1/4
   Basic Black 5-3/8 x 4-1/8
   Gingham Gala DSP 5-1/4 x 4
   Basic White 5-1/4 x 4 (Inside)

Ink:
   Tuxedo Black Memento

Markers:
   Crushed Curry
   So Saffron

Technique:
   CAS

Accessories:
   Gingham Gala Adhesive Backed Sequins
   White Tea Lace Doilies
   Grapefruit Grove Thick Twine 6"
   Glue Dots
   Adhesive

First, I stamped the image and sentiment, using Tuxedo Black Memento ink on So Saffron cardstock.

I then colored the cheese with markers.

Next, I adhered the doily to the Gingham Gala DSP.

I added the So Saffron image panel to the upper center of the DSP panel.

I tied the twine into a bow and adhered it using a glue dot.

I then adhered the panel onto the Basic Black panel, and then onto the So Saffron card front.

Lastly, I added a few sequins and adhered the Basic White panel to the inside of the card.

Thank you so much for dropping by here. Contact Me if you have any questions.

Click on all of the tabs above and explore products, promotions, and opportunities.

Please take the time to share, like, pin, tweet, or comment. Do not forget to FOLLOW and SUBSCRIBE to my blog.

HAPPY STAMPING!

Monday, May 23, 2022

Pudding Cup

Sometimes we forget how difficult we can be toward others. Let's not forget to be thankful that they stick around. Thoughts? 


Stamps:
   A Little Cheesy

Paper:
   Petal Pink A-2
   Basic White 3-1/4 x 4, 5-1/4 x 4 (Inside)

Ink:
   Tuxedo Black Memento

Markers:
   Blackberry Bliss
   Chocolate Chip
   Petal Pink
   Real Red

Technique:
   CAS

Accessories:
   White Tea Lace Doilies
   Pop-Up Stickers
   Enamel Shapes
   Adhesive

First, I stamped the image and sentiment on the Basic White panel.

I then colored the image, using the markers listed above.

Next, I adhered a half doily to the bottom left corner of the card base, using my liquid adhesive.

I then adhered the image panel on top of it. I wanted the doily to show, so I positioned the image up and toward the right.

Lastly, I added a few enamel dots, two pop-up stickers and added the Basic White panel to the inside of the card.

Thank you immensely for your time. I know how precious it can be. Please Contact Me if you need anything Stampin' Up! or if you have any questions.

Click on Shop Now and take a look at some quality products. Investing in your craft is a no-brainer. I have included a HOST CODE for those of you who enjoy ordering only one or two items. It is located in the right sidebar. Of course, if your product total is more than $150, enjoy your rewards.

Of course, the best value for your dollar is joining the Stampin' Up! family. Just click on Join Me and check out the benefits.

Let's not forget Paper Pumpkin. If you want to craft on the go or you like to keep things small and low-key, check it out. The kit includes all you need.

Please take a minute or two to share, like, pin, tweet, or comment. Don't forget to FOLLOW and SUBSCRIBE to my blog.

HAPPY STAMPING!

Sunday, December 19, 2021

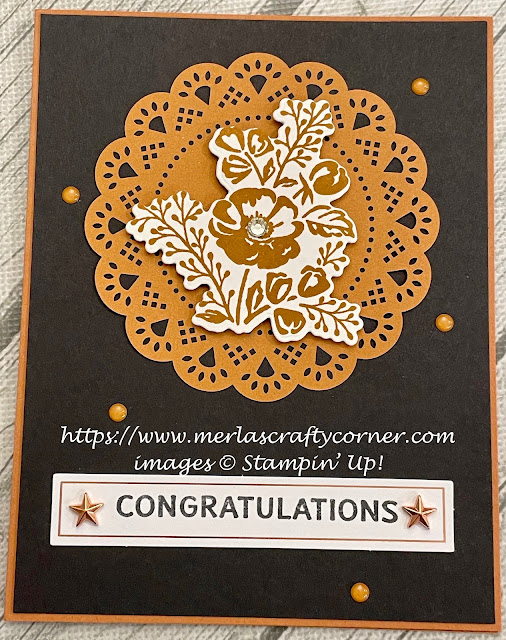
Cinnamon Cider Doily

The more I use Cinnamon Cider, the more I like it! Thoughts? Feelings? 


Stamps:
   Shaded Summer
   Expressions of Color (Paper Pumpkin 6/21)

Paper:
   Cinnamon Cider A-2
   Basic Black 5-3/8 x 4-1/8
   Basic White 2-1/4" Sq., 5-1/4 x 4 (Inside)

Ink:
   Cinnamon Cider
   Tuxedo Black Memento

Technique:
   Die Cutting

Accessories:
   Summer Shadows Dies
   Heart & Home Doilies
   Stars Designer Elements
   2020-2022 In-Color Enamel Dots
   Paper Pumpkin Left-Over Tag
   Basic Rhinestone Jewels
   Dimensionals
   Adhesive

First, I stamped and die cut the flower image using Cinnamon Cider ink on Basic White cardstock, along with the Summer Shadows Dies.

Next, I stamped a sentiment on a left-over Paper Pumpkin tag. I keep all extra tags in one box, so it is difficult to identify the original Paper Pumpkin Kit.

I then adhered the Basic Black panel onto the Cinnamon Cider card front.

I adhered the doily and attached the flower using dimensionals.

I then adhered the tag to the bottom of the Basic Black panel.

Lastly, I added a few enamel dots, a couple of star embellishments, and adhered a Basic White panel to the inside of the card.

Thank you so much for dropping by here. Contact Me if you have any questions.

Click on all of the tabs above and explore products, promotions, and opportunities.

Please take the time to share, like, pin, tweet, or comment. Do not forget to FOLLOW and SUBSCRIBE to my blog.

HAPPY STAMPING!
Thursday, September 30, 2021

Amazing Rose

This card is for that person who needs a bit of praise and a good pat on the back. It is vital that we never take others for granted. More importantly, we must remember that everyone wants and needs praise. So, stop and look around. When was the last time you offered a bit of praise or gratitude to someone? Share the love. Thoughts?


Stamps:
   Painted Petals

Paper:
   Real Red A-2, 1-3/4 x 2-3/4
   Paper Studio Black Tie DSP 5-1/4 x 4
   Always Artichoke Scraps
   Whisper White 5-1/4 x 4, Scraps

Ink:
   Tuxedo Black Momento
   Real Red

Technique:
   Die Cutting
   Sponging

Accessories:
   Rose Garden Thinlits Dies
   White Tea Lace Paper Doily
   Clear Faceted Gems
   Sponge
   Dimensionals
   Adhesive

First, I die cut my Real Red Rose and Always Artichoke Leaves and set them aside.

I then stamped, die-cut, and sponged my sentiment. I set it aside as well.

I then adhered my black and white striped background panel to my Real Red card front.

I added a white tea lace doily on the center bottom of the panel and adhered the previously die-cut rose and leaves to it.

I attached the sentiment to the top center using dimensionals.

Lastly, I added a gem to the center of the rose and adhered the Whisper White panel to the inside of the card.

Thank you so very much for being here. I appreciate you taking the time to glance at my work. Please Contact Me if I can be of service.

Are you interested in Stampin' Up! products to make your own cards? Shop Now and have a look-see. I placed a HOST CODE for you to use if you do not earn your own rewards. It is sitting in the right sidebar.

Do you like surprises? Subscribe to our Paper Pumpkin and receive all you need to complete the monthly project. The cost is less than $25. Check it out.

Join Me and become privy to everything Stampin' Up! Receive a discount on all of your personal orders. Personally, I love SALES!

Please share, like, pin, tweet, or comment. Do not forget to FOLLOW and SUBSCRIBE to my blog.

HAPPY STAMPING!

Friday, June 11, 2021

Love OSW#3

This is card 3 of 13 cards made from one 12 x 12 sheet of designer series paper. I used two strips of DSP bordered by strips of velvet ribbon and a cut up doily. What do you think?


Stamps:
   Love What You Do

Paper:
   Very Vanilla A-2, 5-1/4 x 4 (Inside)
   Share What You Love DSP 5-1/2 x 1/2 (2)

Ink:
   Tuxedo Black Memento
   Mint Macaron

Technique:
   Stamp-Off
   OSW

Accessories:
   Pearlized Doilies
   Share What You Love Artisan Pearls
   Velvet Ribbon - 2 Strips
   Glue Dots
   Tacky Tape or Tear & Tape
   Adhesive

First, I cut my two strips of DSP, and played with the placement on the left side of the card front.

Next, I decided to add a bit of Mint Macaron to draw some attention to my sentiment. I stamped off on a scratch paper and then applied it to the center right of my card.

I then stamped my sentiment on top of it.

Next, I adhered a strip of velvet ribbon to the left edge of the card front, followed by a strip of DSP.

I decided to repeat the velvet and DSP strip, but added a bit of pearlized doily to the DSP before adhering it. I cut one doily and added only the edges to form a scalloped edge. 

Lastly, I added a few pearls and adhered the other Very Vanilla panel to the inside of the card.

Here is the template for cutting the DSP:


If I plan to use the DSP for card fronts, I cut my sheet into 6 panels. I make my first cut by turning the DSP on it's side and cutting either at 5-1/2 or 5-1/4. Next, I turn it 180 degrees and cut it again at 5-1/2 or 5-1/4. I then take each of these strips and cut them at 4" and 4". This created 6 card fronts. I leave the left-over strip intact until I am ready to use it. I then take each panel and decide how to use it on a card. As you can see above, I cut two strips off of this panel. Tomorrow you will see what I did with the other section: Card 4.

Thank you for visiting. I do love company. Feel free to Contact Me if you have any questions.

Explore current products, promotions, and all of the opportunities, just click on Shop Now. A HOST CODE is available in the right sidebar for those of you who do not earn your own rewards.

For those of you who like kits with everything you need to complete a project, we offer Paper Pumpkin. Your monthly cost is less than $25. Check it out!

Join Me and become my newest team member. I look forward to meeting you.

Please take a minute to share, like, pin, tweet, or comment. Do not forget to FOLLOW and SUBSCRIBE to my blog.

HAPPY STAMPING!


Tuesday, June 8, 2021

Love OSW 13 Cards

Make 13 cards using one sheet of 12 x 12 designer series paper (DSP) with no left-over pieces. This is known as a One Sheet Wonder (OSW) technique. Once you make a template, you can apply it to your own personal crafting materials. Below is a picture of all 13 cards and the supplies I used. Each card will have its own entry for exact supplies and measurements. What do you think? 


Stamps:
   Floral Phrases
   Great Big Greetings
   Hello
   Love What You Do
   Statement of My Heart
   You're Priceless

Paper:
   Basic Black
   Share What You Love DSP
   Vellum
   Very Vanilla

Ink:
   Blackberry Bliss
   Mint Macaron
   Old Olive
   Rich Razzleberry
   Tuxedo Black Memento

Markers:
   Always Artichoke
   Crushed Curry
   Real Red

Technique:
   Die Cutting
   Dry Embossing
   OSW
   Stamp-Off

Accessories:
   Adhesive
   Baker's Twine
   Basic Pearl Jewels
   Basic Rhinestone Jewels
   Bright's Collection Button
   Dimensionals
   Filigree Brads
   Glue Dots
   Layering Ovals Framelits Dies
   Lovely Floral Embossing Folder
   Pearlized Doilies
   Share What You Love Artisan Pearls
   Share What You Love Embellishment Kit
   Stamparatus/MISTI
   Stitched Shapes Framelits
   Tacky Tape
   Velvet Ribbon

Here is the template to cut the 12 x 12 DSP:


The pink number refers to the card number where the piece was used. Remember each card will have its own entry.

Thank you so much for stopping by here and taking a quick look-see. If you have any questions or need my assistance, Contact Me.

Shop Now and take a look at all of our new products and current promotions. Please use the HOST CODE sitting in the right sidebar if you did not earn your own rewards.

If you want to craft, but keep your costs below $25 a month, check out Paper Pumpkin. It just might be what you are looking for at the moment.

Join Me and become the newest member of my team. Remember there are no hidden agendas or penalties for giving it a go. Don't pass this opportunity to save.

You've come this far, so please share, like, pin, tweet, or comment. I appreciate your time and efforts. Let me know your thoughts and leave all of your questions behind. Do not forget to FOLLOW and SUBSCRIBE to my blog.

HAPPY STAMPING!


Saturday, March 27, 2021

Make Me Happy

 This card can be given to someone for Valentine's Day or just because they cause you to smile and feel joyful. Don't you agree?


Stamps:
   Happy Wishes

Paper:
   Elegant Eggplant A-2
   Watercolor 2-1/4 x 4-1/4
   Red Glitter 1/2 x 4-1/4
   Whisper White 5-1/4 x 4 (Inside)

Markers:
   Basic Black
   Real Red
   Melon Mambo
   Old Olive
   Always Artichoke
   Elegant Eggplant
   Perfect Plum 

Brushos:
   Yellow
   Gamboge
   Brilliant Red

Technique:
   Watercolor
   Markering
   Punching

Accessories:
   White Tea Lace Doilies
   Hearts Border Punch
   Basic Rhinestone Jewels
   Water Spritzer
   Adhesive

I began with my watercolor background. I sprinkled on some brushos and then spritzed the panel with water. I dabbed it with a paper towel here and there. I may have added a bit more flakes along with water. I then set it aside to dry.

I then took the large happy stamp and my markers. I colored in the happy with Basic Black and used the other markers on the flowers below.

Once the watercolor panel was dry, I breathed on the stamp to re-activate the ink and then stamped my panel.

I then added the words above the happy.

I chose to add a bit of glimmer. In looking through my envelope of Red Glitter paper, I found the strip that I had used to punch out hearts. So, I decided to just place it on the bottom of the card as a border. This is why I don't like to throw away my scraps. (I also sometimes punch these pieces to create fillers for my shaker cards.)

The two panels looked a bit bland to me. So, I grabbed one of my doilies and placed it underneath. I think it is just what the card needed. I adhered the layers onto the card. 

Lastly, I added rhinestones and the other panel to the inside of the card.

Thank you so much for stopping by here. Contact Me if you have any questions.

Shop Now and buy your supplies to make your own cards.

Join Me and become my new team member.

Subscribe to Paper Pumpkin and craft monthly for under $25.

If you liked my card, please share, like, pin, tweet, or comment. I would love for you to FOLLOW and SUBSCRIBE to my blog. Let me know what you think in the comments below.

HAPPY STAMPING!