Sunday, November 12, 2023

Foiled Snowflake

Snowflakes look beautiful in any form: die cut, embossed, or foiled. Which is your favorite? 


Stamps:
   Snowflake Sentiments

Paper:
   Brilliant Blue A-2
   Soft Sky 5-1/4 x 4
   Basic White 2 x 4-1/2 (2), 2-3/4 x 2, 5-1/4 x 4 

Ink:
   Brilliant Blue

Technique:
   Dry Embossing
   Die Cutting
   Punching

Accessories:
   Foil Snowflakes
   Snow Burst Embossing Folder
   Swirly Snowflakes Thinlits Dies
   Everyday Label Punch
   Snowflake Splendor Ribbon
   Basic Rhinestone Jewels
   Glue Dots
   Dimensionals
   Adhesive

First, I dry embossed the Soft Sky panel, using the Snow Burst Embossing Folder.

I then die cut two snowflake panels, using the Swirly Snowflakes Thinlits dies and Basic White card stock.

Next, I adhered the snowflake panels to the Soft Sky embossed panel, using liquid adhesive. I then turned the panel over and snipped off the excess on the sides. 

I then added the large silver foiled snowflake to the center of the card, using glue dots.

Next, I stamped and punched the sentiment, using the Everyday Label punch and Brilliant Blue ink. 

I then attached the sentiment to the center of the foiled snowflake, using dimensional.

Lastly, I added a few Basic Rhinestone Jewels and adhered a Basic White panel to the inside of the card.

Thank you so much for giving me a bit of your time. Please Contact Me if I can return the favor.

Check out all of the options by clicking on the headers above.

Do not forget to FOLLOW and SUBSCRIBE to my blog. Please share, like, pin, tweet, or comment. I look forward to reading your thoughts and possible ideas for improvements. 

HAPPY STAMPING!

Saturday, November 11, 2023

Prince of Peace

Gold embossing looks great on dark colors. What do you think? 


Stamps:
   Night Divine

Paper:
   Copper Clay A-2, 2 x 3
   Basic White 5-3/8 x 4-1/8, 5-1/4 x 4 (Inside)
   O Holy Night DSP 5-1/4 x 4 

Ink:
   Gold Metallic

Technique:
   Heat Embossing
   Die Cutting

Accessories:
   Embossing Buddy
   Gold Embossing Powder
   Night Divine Dies
   Adhesive-Backed Star Trinkets
   Adhesive

First, I heat embossed the sentiment on the top of the DSP panel. I stamped it, using Gold Metallic Ink, added Gold Embossing Powder, then heat set it. Do not forget to use an embossing buddy on the DSP first to make sure you do not have any golden stray marks. Although, if you do, you can call them shooting stars!

I then die cut the figures, using the Night Divine dies and Copper Clay card stock. 

I adhered the die cuts below the sentiment, using adhesive.

Next, I adhered the panel onto a Basic White matte, and then onto the Copper Clay card front.

Lastly, I added an Adhesive-Backed Star Trinket and adhered a Basic White panel to the inside of the card.

Thank you so much for stopping by here. Contact Me if you have any questions.

Shop Now and buy your supplies to make your own cards. Place an order today for your favorites before they run out of stock.

Join Me and become my new team member. Enjoy the best savings and opportunity offered today!

Subscribe to Paper Pumpkin and craft monthly for under $25. Don't forget to take a look at the All-Inclusive Kits!

If you liked my card, please share, like, pin, tweet, or comment. I would love for you to FOLLOW and SUBSCRIBE to my blog. Let me know what you think in the comments below.

HAPPY STAMPING!

Friday, November 10, 2023

Stillness

This distINKtive stamp set can be monochromatic, adding just the right shade of color to the images. You can also opt to add color after stamping, or add color directly to the stamp before stamping. What is your preference? 


Stamps:
   Graceful Deer
   Regal Reindeer

Paper:
   Early Espresso A-2
   Basic White 5-1/4 x 4 (2), Scrap

Ink:
   Early Espresso
   Real Red

Marker:
   Real Red

Technique:
   Punching

Accessories:
   Large Oval Punch
   Adhesive-Backed Snowflakes
   Snowfall Accents Puff Paint
   Dimensionals
   Adhesive

Since, this is a large stamp, you may choose to use a Stamparatus or MISTI to get a good impression. 

First, I stamped my image, using Early Espresso onto a Basic White panel.

I then colored the red robin in the tree, using a Real Red marker.

Next, I added some Snowfall Accents Puff Paint and heat set it. I tried to not add too much of this. I used it mostly around the bottom of the trees and the deer's feet.

I then stamped and punched out the sentiment, using Real Red ink and the Large Oval Punch. I adhered it with dimensionals.

Lastly, I adhered the panel onto the Early Espresso card front, added a few snowflakes, and adhered a Basic White panel to the inside of the card.

Thank you for visiting. I do love company. Feel free to Contact Me if you have any questions.

Explore current products, promotions, and all of the opportunities. Just click on Shop Now. A HOST CODE is available in the right sidebar for those of you who do not earn your own rewards.

For those of you who like kits with everything you need to complete a project, we offer Paper Pumpkin. Your monthly cost is less than $25. Also, you might want to look at the new Kits Collection!

Join Me and become my newest team member. I look forward to meeting you.

Please take a minute to share, like, pin, tweet, or comment. Do not forget to FOLLOW and SUBSCRIBE to my blog.

Here is a link to the products that are still available: Stillness 

HAPPY STAMPING!

Thursday, November 9, 2023

Quiet

I am delighted when all I have to do is stamp a sentiment on a card front and send it off. You can always add more, but I think less is more. What do you think? 


Stamps:
   Perched in a Tree

Paper:
   Smoky Slate A-2
   Basic Black 5-3/8 x 4-1/8
   Winter Meadow DSP 5-1/4 x 4
   Basic White 5-1/4 x 4 (Inside)

Ink:
   Tuxedo Black Memento

Technique:
   CAS

Accessories:
   Adhesive

First, I stamped my sentiment on the top of a Winter Meadow DSP panel, using Tuxedo Black Memento.

I then adhered this panel onto a Basic Black matte, and then onto the Smoky Slate card front.

Next, I adhered a Basic White panel to the inside of the card.

You can easily change the sentiment to suit your current need. 

Thank you so very much for being here. I appreciate you taking the time to glance at my work. Please Contact Me if I can be of service.

Are you interested in Stampin' Up! products to make your own cards? Shop Now and have a look-see. I placed a HOST CODE for you to use if you do not earn your own rewards. It is sitting in the right sidebar.

Do you like surprises? Subscribe to our Paper Pumpkin and receive all you need to complete the monthly project. The cost is less than $25. Check it out.

Join Me and become privy to everything Stampin' Up! Receive a discount on all of your personal orders. Personally, I love SALES!

Please share, like, pin, tweet, or comment. Do not forget to FOLLOW and SUBSCRIBE to my blog.

Here is a link to the products that are still available for this card: Quiet 

HAPPY STAMPING!

Wednesday, November 8, 2023

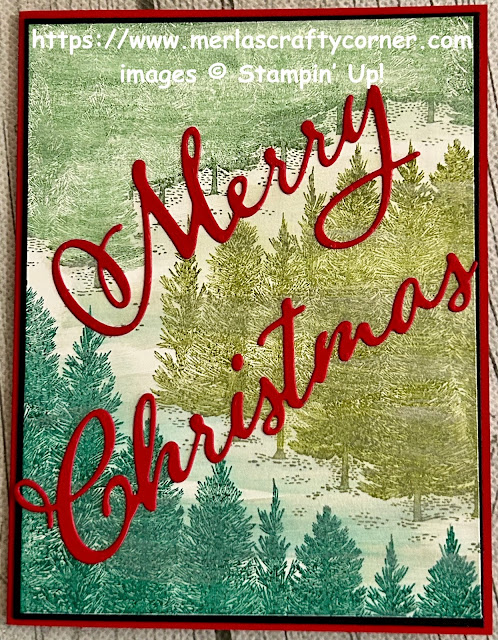
Windy Christmas

The Frost Winter All-Purpose Ink looks quite differently in real life. It adds a shimmer and gives the illusion of a windy day. What do you think? 


Stamps:
   Fragrant Forest

Paper:
   Real Red A-2, 2-3/4 x 5
   Basic Black 5-3/8 x 4-1/8
   Basic White 5-1/4 x 4 (2)

Ink/Markers:
   Garden Green
   Old Olive
   Shaded Spruce
   Smoky Slate

Technique:
   Die Cutting

Accessories:
   Merry Christmas Thinlits
   Frost Winter All-Purpose Ink
   Sponge Dauber
   Adhesive

First, I added ink to the large Fragrant Forest stamp. I used markers to add the ink, but you can use Stampin' Spots, or the large ink pads, if you are careful. Garden Green was applied at the top, followed by Old Olive in the middle and Shaded Spruce on the bottom. I used Smoky Slate for the bits of marks in the snow. Of course, you can ink the entire stamp, using one color if you choose.

I then stamped the image on a Basic White panel. You may want to use a Stamparatus or MISTI, in case you need to stamp more than once.

Next, I added the Frost Winter All-Purpose ink. I used a sponge dauber to add the ink across the panel. I didn't allow enough time for the ink to dry, which caused a bit of a smear on the top trees. I think it still works.

I then adhered the panel to a Basic Black matte, and then onto the Real Red card front.

I die cut "Merry Christmas" for the card front. This die set is discontinued, but you can use any of the word dies you have on hand. I used a traditional Real Red color, but you can choose any of your favorites and then just match the card base with the word dies. I adhered the dies, using liquid adhesive.

Lastly, I adhered a Basic White panel to the inside of the card. 

Thank you so much for spending time with me here. Contact Me if you have any questions.

Shop Now and take a look at all of our new products and current promotions. Please use the HOST CODE sitting in the right sidebar if you did not earn your own rewards. 

Subscribe to Paper Pumpkin and keep your monthly cost below $25! Join Me and become my newest team member.

Either way, please share, like, pin, tweet, or comment. Do not forget to FOLLOW and SUBSCRIBE to my blog.

Here is a link to products that are still current for this card: Windy Christmas

HAPPY STAMPING!