Showing posts with label Birthday Banners. Show all posts

Tuesday, September 10, 2024

Ice Cream Bash

Create your background, using a bit of shaving cream. Believe it or not, the foamy shaving cream allows you to mix colors and lift them onto your background. Then simply wipe the cream away with a paper towel and let it all dry for a few minutes. Thoughts? 


Stamps:
   Birthday Banners
   Coffee Cafe

Paper:
   Pink Pirouette A-2
   Basic White 5-1/4 x 4 (2)

Ink:
   Pink Pirouette
   Night of Navy

Re-Inkers:
   Lovely Lilac
   Pool Party

Technique:
   Shaving Cream

Accessories:
   Shaving Cream (Foamy)
   Adhesive

First, I created the background using the Shaving Cream technique found at Split Coast Stampers. Click HERE for written instructions, pictures, and a short video.

I then stamped a sentiment, using Night of Navy and an ice-cream cone image, using Pink Pirouette. I added a few lines on the cone with a marker.

Lastly, I adhered the panel onto a Pink Pirouette card front and adhered a Basic White panel to the inside of the card.

Thank you so much for stopping by here and taking a quick look-see. If you have any questions or need my assistance, Contact Me.

Shop Now and take a look at all of our new products and current promotions. Please use the HOST CODE sitting in the right sidebar if you did not earn your own rewards.

If you want to craft, but keep your costs at $25 a month, check out Paper Pumpkin. It just might be what you are looking for at the moment.

Join Me and become the newest member of my team. Remember there are no hidden agendas or penalties for giving it a go. Don't pass this opportunity to save.

You've come this far, so please share, like, pin, tweet, or comment. I appreciate your time and efforts. Let me know your thoughts and leave all of your questions behind. Do not forget to FOLLOW and SUBSCRIBE to my blog.

HAPPY STAMPING!

Monday, August 26, 2024

Birthday Shake

Shaker cards can be quite a bit of fun. The best part is that you can fill it with anything you like or happen to have on hand. What do you think? 


Stamps:
   Birthday Banners

Paper:
   Pistachio Pudding A-2
   Basic Gray 5-1/4 x 4
   Confetti Celebration DSP 5 x 3-3/4
   Basic White 5-1/4 x 4 (Inside), Scraps
   Window Sheet 

Ink:
   Tuxedo Black Memento

Technique:
   Dry Embossing
   Die Cutting
   Shaker Card

Accessories:
   Circle Embossing Folder
   Bunch of Banners Framelits
   Layering Circles Framelits
   Foam Adhesive Strips
   Multi-Colored Beads
   Dimensionals
   Adhesive

I followed the Shaker Card tutorial found at Split Coast Stampers. 

I then adhered the Shaker panel to a Basic Gray matte and then onto the Pistachio Pudding card front.

Next, I stamped and die cut the sentiment.

I adhered it to the card front, using dimensionals.

Lastly, I adhered a Basic White panel to the inside of the card.

Thanks so much for reading through my blog today. Contact Me if I can answer anything for you, or if you would like to buy any of my cards.

If you would like to buy your own products and make your own cards click on Shop Now and browse current merchandise. I have placed a HOST CODE for you to use if you do not earn any rewards on your own. It is located in the right sidebar. 

Our monthly subscription to Paper Pumpkin is affordable and flexible. The cost is $25 monthly. Check out the Kits Collection for more options at varying prices.

Join Me and become part of a team. Check out the benefits and decide if it is for you. 

Please share, like, pin, tweet, or comment. Don't forget to FOLLOW and SUBSCRIBE to my blog.

HAPPY STAMPING!

Saturday, March 9, 2024

Hello You

I was challenged to use a masking technique. As usual, I took the easy way out and chose the Crazy About You stamp set because it has a punch to easily create a mask for the flower. In retrospect, I should have fussy cut closer to each petal. What do you think? 


Stamps:
   Crazy About You
   Birthday Banners

Paper:
   Basic White A-2, 5-1/4 x 4 (2), Scrap 

Ink:
   Archival Basic Black
   Melon Mambo
   Real Red
   Rose Red
   Sweet Sugarplum

Technique:
   Masking
   Die Cutting
   Punching

Accessories:
   Bunch of Banners Framelits
   Flower Medallion Punch
   Fire Circles Rhinestone Brad
   Dimensionals
   Adhesive

First, I stamped and punched out the flower medallion to create a mask.

I then stamped the flower on the Basic White panel where I wanted to create focus.

Next, I added the mask to cover it. I used a temporary adhesive. You can now purchase masking paper for this step. 

I then stamped various flowers around it, using various reds (listed above) to cover the panel. You can add or move the mask around to the other flowers, but I chose not to do this.

Next, I added a rhinestone brad to the center of the main flower.

I then adhered the panel to the Basic White card front.

Next, I stamped and die cut the sentiment. This can easily be changed to suit your current need.

Lastly, I attached the banner, using dimensionals, and adhered a Basic White panel to the inside of the card.

Thank you so very much for taking the time to stop and glance at my work. If you have any questions or suggestions, please Contact Me. I do appreciate your time.

If you need any supplies, or you are curious to know just how much these products cost, click on Shop Now and satisfy your curiosity. A HOST CODE is available for you to use in case you did not earn your own rewards. You can find it in the right sidebar.

Do you want the best value for your buck? Join Me and reap all of the rewards. I will be more than happy to assist you. Check it out and note that there are no hidden agendas.

Wait! Don't leave. If you just want to try it and see, then subscribe to Paper Pumpkin. You will receive a kit with everything you need to create a project. Check out the Kits Collection for more choices.

I would love for you to take a minute to share, like, pin, tweet, or comment. Please FOLLOW and SUBSCRIBE to my blog. Let me know what you think below in the comments.

HAPPY STAMPING!

Saturday, September 9, 2023

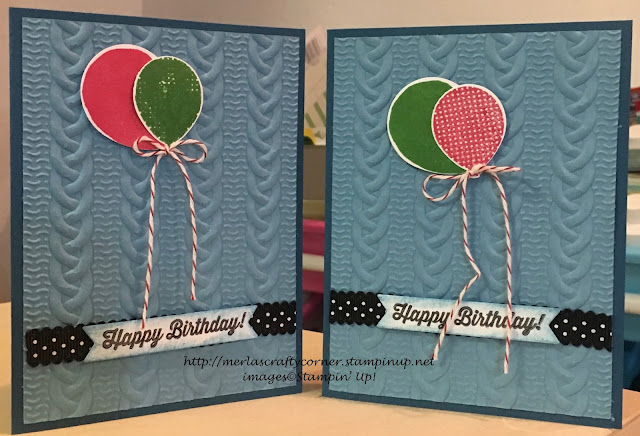
Birthday Sweaters

I really like all of the texture on this card, especially with the dry embossing folder. Thoughts? 


Stamps:
   Balloon Celebration
   Birthday Banners

Paper:
   Dapper Denim A-2
   Marina Mist 5-1/4 x 4
   Basic White Scraps, 5-1/4 x 4 (Inside)

Ink:
   Archival Basic Black
   Cucumber Crush
   Marina Mist
   Real Red

Technique:
   Die Cutting
   Dry Embossing
   Punching
   Sponging

Accessories:
   Balloon Bouquet Punch
   Bunch of Banners Framelits Dies
   Cable Knit 3D Embossing Folder
   1/2" Black Scallop Dots Ribbon 4-1/4"
   Cherry Cobbler Baker's Twine
   Sponge
   Dimensionals
   Glue Dots
   Adhesive

First, I stamped and punched out the balloons, using Cucumber Crush ink, Real Red ink, and the Balloon Bouquet punch.

I then stamped, die cut, and sponged the sentiment. I used the sentiment from the Birthday Banners stamp set and the Archival Basic Black ink to stamp it. I then die cut it, using the Bunch of Banners Framelits dies, and then sponged it with a bit of Marina Mist ink.

Next, I dry embossed the Marina Mist panel with the Cable Knit 3D Embossing Folder. You may want to mist the panel before embossing to prevent any tearing.

I then adhered the Marina Mist panel onto the Dapper Denim card front.

Next, I added the ribbon across the lower front of the card, using glue dots.

I then added the sentiment with a few glue dots.

Next, I attached the balloons, using dimensionals.

I tied the twine into a bow and added it to the balloons with a glue dot.

Lastly, I adhered a Basic White panel to the inside of the card.

Thank you so very much for taking the time to stop and glance at my work. If you have any questions or suggestions, please Contact Me. I do appreciate your time.

If you need any supplies, or you are curious to know just how much these products cost, click on Shop Now and satisfy your curiosity. A HOST CODE is available for you to use in case you did not earn your own rewards. You can find it in the right sidebar.

Do you want the best value for your buck? Join Me and reap all of the rewards. I will be more than happy to assist you. Check it out and note that there are no hidden agendas.

Wait! Don't leave. If you just want to try it and see, then subscribe to Paper Pumpkin. You will receive a kit with everything you need to create a project. Check out the Kit Collection for more choices.

I would love for you to take a minute to share, like, pin, tweet, or comment. Please FOLLOW and SUBSCRIBE to my blog. Let me know what you think below in the comments.

HAPPY STAMPING!