Showing posts with label Wonderland. Show all posts

Wednesday, December 27, 2023

Winter Calm

What do you think of the Snowfall Puff Paint Accents on this card? 


Stamps:
   Wonderland

Paper:
   Mossy Meadow A-2, 4-1/4 x 3-1/2
   Cherry Cobbler 5-1/4 x 4
   Very Vanilla 3/4 x 4, 5-1/4 x 4 (Inside)
   Crumb Cake 3-1/4" Sq.
   Festive Farmhouse DSP 2 x 4

Ink:
   Cherry Cobbler
   Mossy Meadow
   Whisper White Craft

Technique:
   Punching
   Puff Paint

Accessories:
   Snow Fall Accents Puff Paint
   Banners Pick a Punch
   Wooden Snowflakes
   Glue Dots
   Adhesive

First, I stamped the trees on the Crumb Cake panel, using Mossy Meadow.

I then stamped the snowflakes with Whisper White Craft ink.

Next, I stamped the sentiment on the Very Vanilla strip, using Cherry Cobbler.

I then adhered the Crumb Cake panel to the top of the Mossy Meadow panel.

Next, I punched the ends of the sentiment strip, using the Banners Pick a Punch and adhered it to the bottom of the Mossy Meadow panel.

I then adhered the Festive Farmhouse DSP to the bottom of the Cherry Cobbler panel, and added this panel to the Mossy Meadow card front.

Next, I adhered the Mossy Meadow/Crumb Cake stamped panel to the center of the card front, leaving room at the bottom for the wooden snowflake embellishment.

I then added the wooden snowflake with a glue dot and adhered the Very Vanilla panel to the inside of the card.

Lastly, I added some Snowfall Accents Puff Paint on a few tree branches. I heat set it to make it puffy. If you don't have puff paint, you can use a white gel pen, or even add a bit of glitter with a bit of adhesive. 

Thank you for being here! Contact Me if you have questions or need anything that is Stampin' Up! related.

Check out each of the headers above and see the fabulousness that is Stampin' Up! If you become a buyer, there is a HOST CODE located in the right sidebar for your use.

Please take a minute to share, like, pin, tweet, or comment. Plus, you want to take the time to FOLLOW and SUBSCRIBE to my blog.

HAPPY STAMPING!

Saturday, January 8, 2022

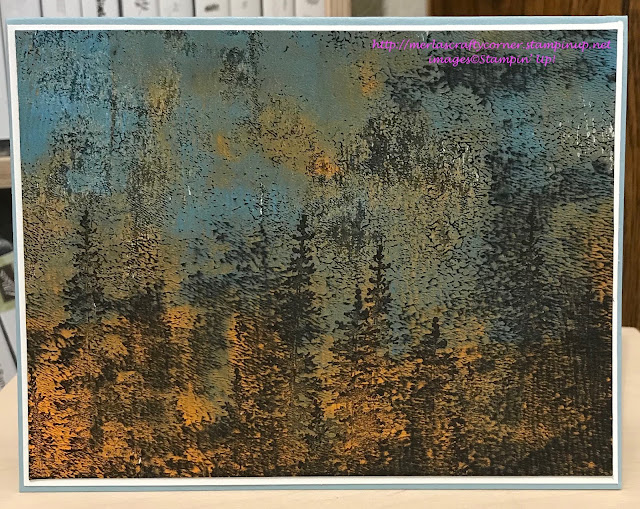
The Woods

Gel press printing yields a unique and sometimes surprising print. This is a print that was more than halfway to the trash. It was dark, splotchy, and plain ugly. Still, I hate to throw away anything. So, I held onto it. Lo and behold, I decided to stamp trees on it in order to meet a sunrise or sunset challenge. I think it worked. What are your thoughts? 


Stamps:
   Wonderland

Paper:
   Baja Breeze A-2
   Basic White 5-3/8 x 4-1/8, 5-1/4 x 4 (2)

Ink:
   Archival Basic Black

Acrylic Paint:
   Blue
   Orange

Technique:
   Gel Press Printing

Accessories:
   Gel Press
   Brayer 
   Adhesive

First, I added acrylic paint to my gel plate. I used a hard brayer to spread the paint and then pressed a white panel onto it. I then set it aside to dry. This print was sitting in my stash for months. It did seem to brighten a bit over time.

I then took the print and stamped trees from the Wonderland stamp set. 

I adhered the print onto a Basic White panel and then onto a Baja Breeze card front.

The other Basic White panel was adhered to the inside of the card.

Thank you so much for taking the time to stop and glance at my work. If you have any questions or suggestions, please Contact Me. I do appreciate your time.

If you need any supplies, or you are curious to know just how much these products cost, click on Shop Now and satisfy your curiosity. A HOST CODE is available for you to use in case you did not earn your own rewards.

Do you want the best value for your buck? Join Me and reap all of the rewards. I will be more than happy to assist you. Check it out and note that there are no hidden agendas.

Wait! Don't leave. If you want to try it and see, then subscribe to Paper Pumpkin. You will receive a kit with everything you need to create a project. Check out the Kit Collection for more choices.

I would love for you to take a minute to share, like, pin, tweet, or comment. Please FOLLOW and SUBSCRIBE to my blog. Let me know what you think below in the comments.

HAPPY STAMPING!

Tuesday, June 30, 2020

A Quiet Joy

Can you hear the quiet? Can you feel it? I can only imagine the peacefulness, joy, and calmness of the moment. Enjoy...


Stamps:
   Wonderland
   Country Morning
   Itty Bitty Backgrounds

Paper:
   Rich Razzleberry A-2
   Whisper White 5-1/4 x 4 (2), 5-1/8 x 3-7/8, 3/4 x 3-7/8

Ink:
   Island Indigo
   Rich Razzleberry
   Soft Suede
   Whisper White Craft
   Tuxedo Black Memento
   White Gel Pen

Technique:
   Sponging
   Brayer

Accessories:
   Brayer
   Sponge
   Iridescent Ice Glitter
   2-Way Glue Pen
   Adhesive

First, I added Island Indigo with my brayer from the top toward the middle of the card. I always started rolling the brayer right off the page and then downward to pull the ink toward the middle. This gets the deeper shade of blue at the top and a lighter shade as it moves downward.

Second, I did the same with Rich Razzleberry, but pulled the color from the bottom up toward the middle. Since I am right-handed, I just flipped my panel. 

Third, I used a sponge to fill in and blend the color of the two in the middle until I had what I liked. I did make several of these panels at the same time, and I was amazed at how closely they resembled each other. There are subtle differences, but mostly the same.

Fourth, I stamped the trees using Soft Suede. Then I added some "snow" on the trees using my white gel pen.

Fifth, I stamped falling snow using Whisper White Craft ink and the background stamp from the Itty Bitty Backgrounds stamp set. 

Sixth, I stamped my sentiment using Tuxedo Black Memento ink on a strip of Whisper White. I tore the top edge. (Always tear paper toward you.)

Seventh, I added glue with the 2-Way glue pen and sprinkled glitter on it. This helped to highlight the slope and draw attention to the sentiment. This step can be skipped if you prefer. Then, I adhered this piece to the bottom of my panel.

The panel was then adhered to a Whisper White panel that was just a hair larger. I wanted the white frame around it.

Lastly, I adhered this panel onto the card front. The extra panel of Whisper White (5-1/4 x 4) is for the inside of the card. 

If you want me to make a video for this card, let me know in the comments below. 

Thank you for stopping by and taking an interest in my cards. Please share, like, pin, and comment as you wish.

Click on the buttons above and check out the wonderful deals offered this month. If you choose to place an order less than $150, I would appreciate it if you use:

HOSTESS CODE: BJM4ADTP

Today, this code expires at midnight. There will be a new code tomorrow.

Contact Me if you have any questions, and please FOLLOW and SUBSCRIBE to my blog. I appreciate it.

HAPPY STAMPING!