Showing posts with label Winter Woods. Show all posts

Thursday, December 21, 2023

Seasonal Woods

 I like all of the sparkle on this card. Thoughts?


Stamps:
   Winter Woods

Paper:
   Merry Merlot A-2
   Early Espresso 5-1/4 x 4
   Basic White 5 x 3-3/4, 3 x 4, 2 x 2-3/4, 5-1/4 x 4 (Inside)
   Myths & Magic Glimmer Paper 5 x 1-1/4

Ink:
   Early Espresso
   Merry Merlot
   Shaded Spruce

Technique:
   Punching
   Sponging
   Die Cutting

Accessories:
   In the Woods Framelits
   Everyday Label Punch
   Iridescent Rhinestone Basic Jewels
   Sponge
   Dimensionals
   Adhesive

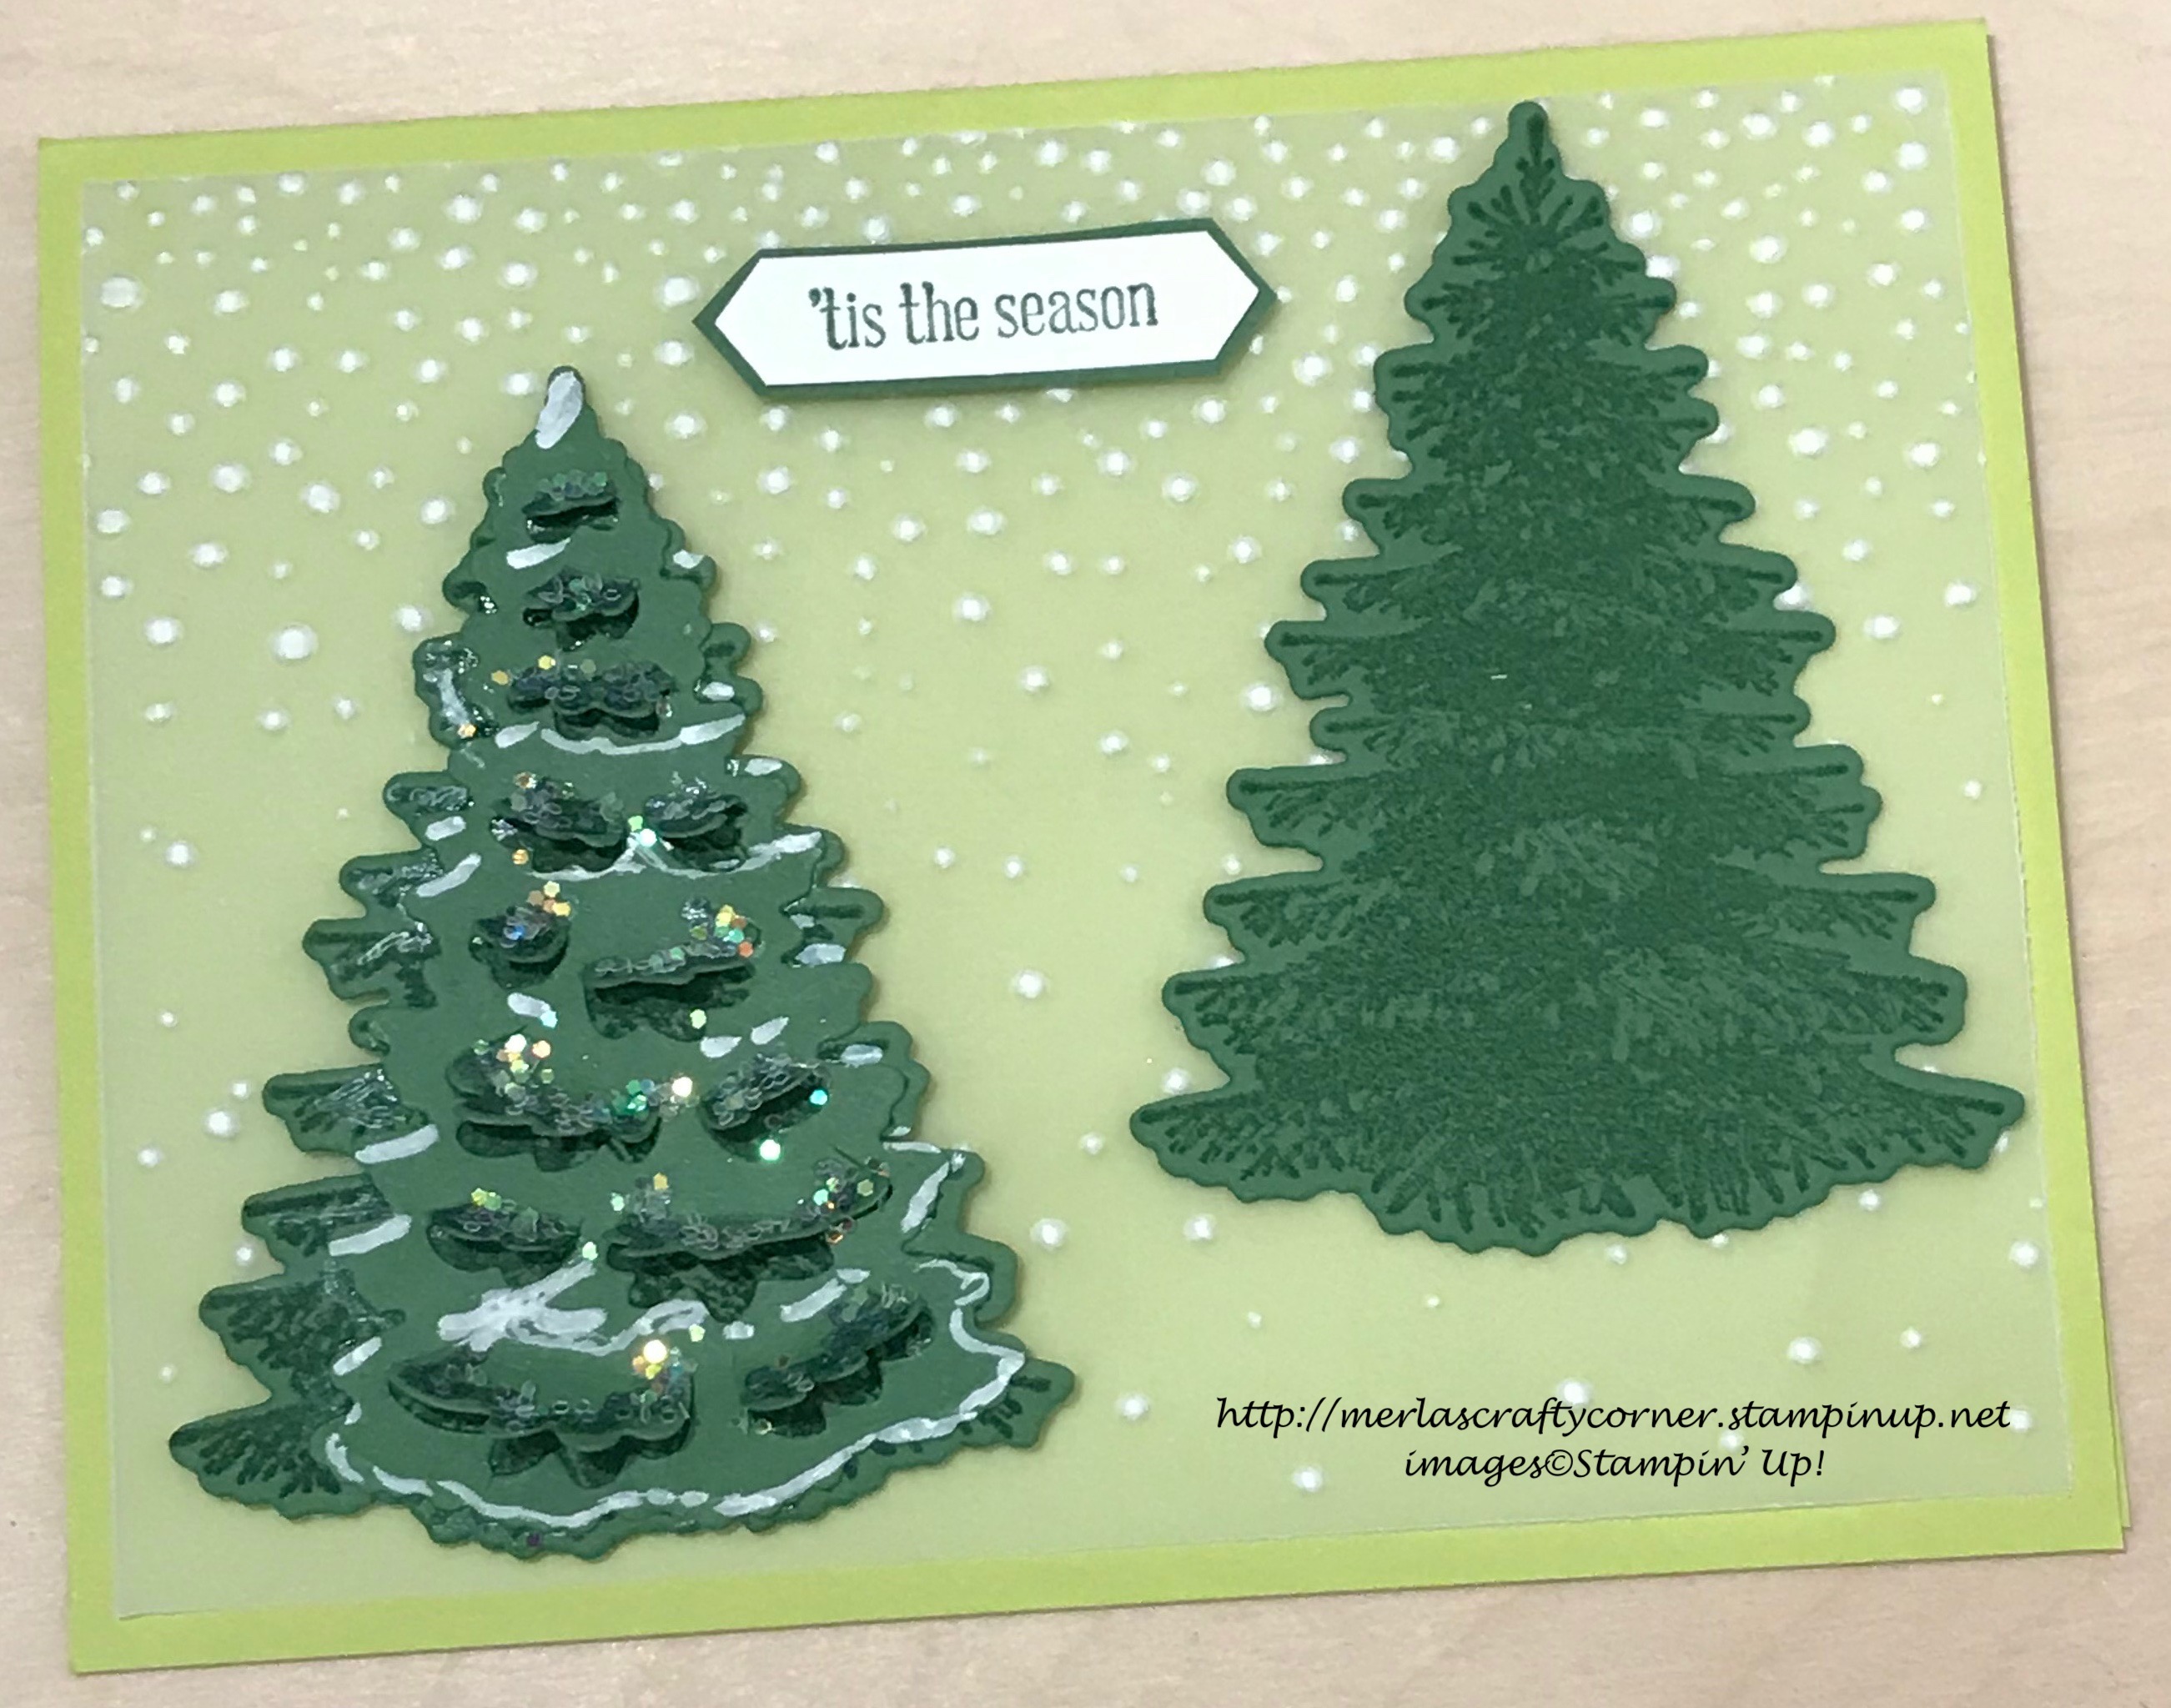
First, I stamped the trees, using Early Espresso, on the Basic White panel (5 x 3-3/4). Note that the trees reach the top of the panel.

I then stamped and die cut the tree, using Shaded Spruce ink and In the Woods Framelits. I used the 3 x 4 piece.

Next, I die cut the top edge of the glimmer paper using the framelit from the set. I adhered this onto the bottom of the stamped white panel.

I attached the tree using dimensionals.

I then stamped the sentiment on the 2 x 2-3/4 Basic White piece, using Merry Merlot ink. I punched it out with the Everyday Label Punch and sponged it with a bit of Merry Merlot ink. This was adhered to the top right of the panel, using my favorite adhesive.

I then adhered this panel onto an Early Espresso matte, and then onto the Merry Merlot card front.

Lastly, I added a few iridescent rhinestones, and adhered the Basic White panel to the inside of the card.

Thank you for being here and taking the time to look at my blog entry. Contact Me if you need anything related to Stampin' Up!

If you would like to Shop Now, you can check out all that is new, current, and on-sale! I have included a HOST CODE in the right sidebar, if you would like to use it.

Notice that we offer a monthly subscription called Paper Pumpkin. Check it out and see if it is for you. The Kits Collection also offers a variety of kits at varying prices.

In order to get the most value for your dollar, you will want to Join Me and become part of my team. Click on the link and see if you are interested.

I would love for you to take a few minutes and share, like, pin, tweet, or comment. Don't forget to FOLLOW and SUBSCRIBE to my blog.

HAPPY STAMPING!

Wednesday, July 14, 2021

'tis the Season

 Do you remember your very first Christmas as an adult on your own? Maybe you have a special Christmas that you will never forget. What made it so special? 'tis the season...


Stamps:
   Winter Woods
   Itty Bitty Greetings

Paper:
   Emerald Envy A-2
   Christmas Cocoa DSP 5-1/4 x 4
   Whisper White 5 x 4, 5-1/4 x 4 (Inside)

Ink:
   Yo-Yo Yellow
   Dusty Durango
   Crumb Cake
   Emerald Envy
   Early Espresso

Technique:
   Die Cutting
   Brayer

Accessories:
   Top Note Die
   Brayer
   Home for Christmas Buttons
   2016-18 Enamel Shapes
   Glue Dots
   Dimensionals
   Adhesive 

First, I used a brayer to add color to the 5 x 4 Whisper White panel. 

I then die cut the panel using the Top Note Die. Using a mask for the top portion of the die cut, I added the ground to the die cut, using Crumb Cake.

Next, I stamped my tree in Emerald Envy.

I then added my sentiment and a few pine cones using Early Espresso.

I adhered the DSP panel to the Emerald Envy card base and attached the Top Note Die cut using dimensionals.

Lastly, I added some enamel shapes to the tree and a star button as the top ornament. The other Whisper White panel was adhered to the inside of the card.

Thank you so much for spending time with me here. Contact Me if you have any questions.

Shop Now and take a look at all of our new products and current promotions. Please use the HOST CODE sitting in the right sidebar if you did not earn your own rewards.

Subscribe to Paper Pumpkin and keep your monthly cost below $25! Join Me and become my newest team member.

Either way, please share, like, pin, tweet, or comment. Do not forget to FOLLOW and SUBSCRIBE to my blog.

HAPPY STAMPING!

Tuesday, March 23, 2021

Gated Christmas Trees

 You can find a tutorial for this trifold or gate fold card HERE. I like the simplicity of this card. The green foiled trees on the vellum make this card glimmer and shine. It definitely sets it apart without getting glitter everywhere. What do you think?


Stamps:
   Winter Woods

Paper:
   Whisper White A-2
   Call Me Clover 4 x 3 
   Holiday Fancy Foil Vellum 1-7/8 x 5-1/4 (2)

Ink:
   Call Me Clover

Technique:
   Gate Fold Card

Accessories:
   In the Woods Framelits
   Glue Dots
   Dimensionals


First, I stamped and die cut my tree.

Next, I cut my panels of vellum. These are attached using glue dots.

I then adhered the Christmas tree with dimensionals. I did add another panel of Whisper White to the inside of the card. I feel this finishes the card nicely. Since the card base is Whisper White, this panel is optional.

Thank you so much for stopping by here and taking a quick look-see. If you have any questions or need my assistance, Contact Me.

Shop Now and take a look at all of our new products and current promotions. Please use the HOST CODE sitting in the right sidebar if you did not earn your own rewards.

If you want to craft, but keep your costs below $25 a month, check out Paper Pumpkin. It just might be what you are looking for at the moment.

Join Me and become the newest member of my team. Remember there are no hidden agendas or penalties for giving it a go.

You've come this far, so please share, like, pin, tweet, or comment. I appreciate your time and efforts. Let me know your thoughts and leave all of your questions behind. Do not forget to FOLLOW and SUBSCRIBE to my blog.

HAPPY STAMPING!


Tuesday, December 22, 2020

Flaky Tree

 This beautiful tree decorates a card front all by itself. Although there are die cuts that coordinate, they are not necessary. I love the simplicity of the card. You can easily duplicate it for your entire Christmas card list. What do you think?


Stamps:
   Winter Woods
   Snow Wonder

Paper:
   Pool Party A-2
   Whisper White 5-1/4 x 4 (2)

Ink:
   Pool Party
   Poppy Parade
   Shaded Spruce

Technique:
   Sponging

Accessories:
   Snowflakes
   Sequins
   Stamparatus or MISTI 
   Blending Brush
   Adhesive

I added Pool Party to my Whisper White panel using my blending brush. A sponge can also fulfill the task, I'm just excited about my new blending brush!

Next, I stamped my tree using Shaded Spruce. I used my Stamparatus in case I needed to stamp it more than once. I didn't! It sure is nice to be able to do that if necessary. A MISTI tool will also accomplish that task. 

Keeping my card in my Stamparatus, I stamped the sentiment using Poppy Parade. 

I added a few snowflakes and sequins. I then adhered my panel onto the Pool Party card base, and the other panel to the inside of the card.

Thank you so much for stopping by here and taking a quick look-see. If you have any questions or need my assistance, Contact Me.

Shop Now and take a look at all of our new products and current promotions. Please use the HOST CODE sitting in the right sidebar if you did not earn your own rewards.

If you want to craft, but keep your costs below $25 a month, check out Paper Pumpkin. It just might be what you are looking for at the moment.

Join Me and become the newest member of my team. Remember there are no hidden agendas or penalties for giving it a go.

You've come this far, so please share, like, pin, tweet, or comment. I appreciate your time and efforts. Let me know your thoughts and leave all of your questions behind. Do not forget to FOLLOW and SUBSCRIBE to my blog.

HAPPY STAMPING!

Wednesday, August 26, 2020

Highland Christmas

 This slimline card will fit in a regular business envelope. I am not sure I like this size of card. I think there is too much paper wasted with this size. You only get one card from one sheet. Still, it does allow you a different look to a card. What is your preference?


Stamps:
   Winter Woods
   Christmas Gleaming

Paper:
   Highland Heather 7 x 8-1/2 scored @ 3-1/2
   Snowflake Splendor DSP 3-1/4 x 8-1/4
   Whisper White 3 x 4 (2), 1/2 x 2 (2)

Ink:
   Misty Moonlight
   Highland Heather

Technique:
   Die Cutting
   Sponging

Accessories:
   In the Woods Framelits Dies
   Snowflakes & Sequins
   Iridescent Pearls
   Flowers for Every Season Combo Pack
   Sponge
   Dimensionals
   Adhesive

I cut a scrap of paper at an angle to use as a mask for snow slopes. I then sponged these with Misty Moonlight directly onto the DSP.

Next, I stamped and die cut the two trees using Highland Heather Ink. I wrapped each tree with 24" of Misty Moonlight thread from the combo pack.

I attached the trees using dimensionals. 

Then I stamped and fussy cut the Merry Christmas greetings and adhered them with liquid adhesive.

I added a few snowflakes, sequins, and pearls. This was then adhered to the Highland Heather card base.

Thank you so much for stopping by here and taking a quick peek. I appreciate your time and interest. Contact Me if you have any questions.

Shop Now and take notice of our new products and current promotions. If you do not earn your own rewards, there is a HOST CODE  sitting in the right sidebar waiting for your attention.

If you want to keep your cost below $25 a month, check out Paper Pumpkin!

If you like to have the inside scoop before everyone else, Join Me and become a memeber of my team!

Please take the time to share, like, pin, tweet, and comment. I await to hear what you have to say. Do not forget to FOLLOW and SUBSCRIBE to my blog.

HAPPY STAMPING!


Friday, July 10, 2020

Tree Line

A fall tree line at sunset is perfect for a masculine card. The sentiment can be changed to whatever you need. Of course, "You are wonderful" can be left on the front, and you can add your other sentiment on the inside: Happy Birthday, Happy Father's Day, Congratulations, etc..


Stamps:
   Winter Woods
   Rooted in Nature
   Waterfront

Paper:
   Soft Suede A-2
   Whisper White 3-3/8 x 4, 5-1/4 x 4, 3 x 1-3/4
   Blackberry Bliss 1-3/4 x 4-1/4

Ink:
   Archival Basic Black
   Soft Suede
   Blackberry Bliss
   Tangerine Tango

Technique:
   Sponging
   Crimping
   Fussy Cut

Accessories:
   Crimper
   Sponge
   Jute Twine
   Fast Fuse
   Dimensionals

The tree line is from the Winter Woods stamp set. The ground cover is from the Waterfront stamp set. The sentiment is from the Rooted in Nature stamp set. Any of these can be switched for a stamp you have in your inventory.

First, I sponged my sky with Tangerine Tango and a hint of Blackberry Bliss.

I then stamped the ground using Soft Suede.

I inked up the tree line with Archival Basic Black and stamped in the center of my panel.

I stamped the sentiment and fussy cut around it. It is attached using dimensionals.

The Blackberry Bliss strip is crimped and then trimmed down to measure 4 inches in width. I purposely cut it a bit bigger because it shrinks a tad when you crimp it.

Once I trimmed it down, I wrapped Jute twine around it twice and made a small knot. This is why the sentiment is attached with dimensionals. It helps to hide the knot underneath it. This piece is adhered with the strong fast fuse adhesive. 

The large 5-1/4 x 4 Whisper White panel is for the inside of the card.

Thank you so much for stopping by here and taking an interest in my cards. Contact Me if you have any questions or need my assistance.

Shop Now and take a look at our current promotions. If you decide to place an order for less than $150 please use:

HOSTESS CODE: 2BR7KGQ2

This code will remain in effect until July 26, 2020.

Check out Paper Pumpkin as well. Subscribe and keep your cost below $25 a month.

Join Me for some fun, excellent deals, and being privy to everything Stampin' Up! 

Please share, like, pin, tweet, and comment. I appreciate your time and opinions. Do not forget to FOLLOW and SUBSCRIBE to my blog.

HAPPY STAMPING!

Tuesday, June 9, 2020

Snowing

Using the embossing folder on the vellum panel was the perfect choice for a snowy background. Can you imagine walking in the forest among these beautiful trees? I really like this stamp set with the coordinating die cuts. The die cuts help to add so much more dimension to the card. What do you think?


Stamps:
   Winter Woods
   Itty Bitty Greetings

Paper:
   Lemon Lime Twist A-2
   Vellum 5-1/4 x 4
   Garden Green 3 x 3-3/4 (3), Scraps
   Whisper White Scraps

Ink:
   Garden Green

Technique:
   Die Cutting
   Dry Embossing
   Punching

Accessories:
   In the Woods Framelits Dies
   Softly Falling Embossing Folder
   Classic Label Punch
   Glitter
   VersaMark
   Chalk Pen
   Fine Tip Glue Pen
   2-Way Glue
   Glue Dots
   Dimensionals


I used the 2-way glue pen to adhere the glitter to the tree branches. 

The chalk pen was used to draw snow on the branches. My attempt did not work. So, that is the creative process. Oops.

I used glue dots to adhere the top layer of the tree.

I shortened the classic label punch to fit the sentiment. I adhered it with dimensionals.

Here is another photo of the card:


The light washes out the color quite a bit. 

Thank you for dropping by here. Click on Shop Now above to order your stamp sets and any other supplies you might like. If you order less than $150 please use:

HOSTESS CODE: BJM4ADTP

Click on Join Me if you would like to become a member of my stamping team. Aside of a wonderful savings on everything you buy, you get to be first in line for everything. 

Tomorrow is the last day to sign up for Paper Pumpkin. This monthly subscription allows a crafter to keep the expense down below $25 a month while still crafting. This next month we are spreading Sunshine! Sign up for yours today by clicking Paper Pumpkin above. 

Contact Me if you have questions or need help.

HAPPY STAMPING!

Monday, January 13, 2020

Celebrate Balmy Blue

This is a simple, masculine card to celebrate any occasion: birthday, retirement, graduation, a new beginning, etc. Maybe you just want to celebrate tomorrow because it comes around only once a year! Of course, you can change the celebrate to any sentiment you want! What do you think?


Stamps:
   Winter Woods

Paper:
   Balmy Blue A-2
   Whisper White 2 1/2 x 3 1/8
   Gingham Gala DSP 1 1/4 x 5 1/2
   So Saffron 3 1/4 x 4, Scrap

Ink:
   Early Espresso
   So Saffron

Technique:
   Die Cutting
   Sponging
   Punching

Accessories:
   Hearth & Home Framelits Dies
   Love & Happiness Rub Ons
   Word Window Punch
   Sponge
   Dimensionals
   Adhesive

First, I sponged my Whisper White with So Saffron, and then stamped the trees from the Winter Woods stamp set using Early Espresso.

Second, I die cut my window and adhered the image of the trees behind it. Make sure that none of the Whisper White peeks around the Window Frame sides.

Third, I adhered the Balmy Blue Gingham DSP onto the card base. I then added the window frame.

Lastly, I rubbed on the sentiment onto a scrap of So Saffron and adhered it using dimensionals.

The card is simple and easy to create. The sentiment can be changed out to suit your needs.

Thank you so much for stopping by here. Contact me or leave your comments below.

Shop Now and take advantage of our Sale-A-Bration event. Earn products with qualifying purchases. 

HAPPY STAMPING!


Friday, September 27, 2019

Christmas Stamp

A simple Christmas card is always beautiful. A tree with a golden star and a few sequins is all that is needed.


Stamps:
   Merry Christmas to All
   Winter Woods

Paper:
   Always Artichoke A-2
   Whisper White 5 1/4 x 4 (2)

Ink:
   Garden Green
   Tranquil Tide
   Mossy Meadow

Technique:
   CAS

Accessories:
   Golden Sequins, Adhesive

This tree from the Winter Woods stamp set is a classic. I like the way it stamps lightly in some areas. You don't have to do any of the work. The stamp does it all. Your job is solely to ink and stamp. I stamped the tree and the sentiment. I glued on a few sequins and a star. Then adhered the Whisper White cardstock to the card base. The card is done!

Thank you for your time. Please let me know what you think.

HAPPY STAMPING!


Tuesday, September 17, 2019

Seasonal Trees

Two wonderful stamp sets from the annual catalog were used to make this card.


Stamps:
   Winter Woods
   Waterfront

Paper:
   Kraft A-2
   Whisper White 5 1/4 x 4

Ink:
   Archival Basic Black
   Tip Top Taupe
Markers:
   Mint Macaron
   Mossy Meadow
   Call It Clover
   Garden Green
   Early Espresso

Technique:
   Stamp Coloring

Accessories:
   Stamparatus or MISTI

I colored the stamp with markers and then stamped the image on the Whisper White cardstock. Using the stamparatus or MISTI allows you to add more color in the exact same place. The discontinued stamp-a-ma-jig did the same thing. It was just not as accurate. 

The ground was created by stamping twice before re-inking. 

The Kraft cardstock is no longer current, but the Crumb Cake is very close to it.

Thank you so much for stopping by here. I appreciate your time and comments. Contact me for any further questions or information.

HAPPY STAMPING!


Friday, September 13, 2019

Christmas Season

Christmas cards should be made all year, especially if you have a long list. The images and symbols do not change nor do they get old. New trends brighten things up a bit, but nothing goes out of style when it comes to Christmas.


Stamps:
   Winter Woods

Paper:
   Mossy Meadow A-2
   Very Vanilla 5 1/4 x 4 (2), scraps
   Brightly Gleaming DSP 4 x 2 3/4

Ink:
   Mossy Meadow

Technique:
   Die Cutting

Accessories:
   In the Woods Framelits Dies, Brightly Gleaming Foil Elements, Star Designer Elements, Holiday Rhinestone Basic Jewels, Shimmery Crystal Effects, Ice Stampin' Glitter,
Very Vanilla/Copper Weave Ribbon, Glue Dots, Adhesive, Fine Tip Glue Pen, Fast Fuse

The Christmas Tree is stamped twice on Very Vanilla card stock using Mossy Meadow ink. One of the images is die cut with the Christmas Tree Framelit. The other one is die cut on the tree itself, allowing the branches to be curled up.  This is what gives the tree the 3-D look. I then added the Shimmery Crystal Effects and Ice Stampin Glitter on these branches.

The ribbon was adhered with the Fast Fuse. The foil elements were put on with glue dots and the fine tip glue pen.

All of the items can be purchased through my online store. Just click on Shop Now above and order yours today. 

Thank you for stopping by here. I appreciate your time and feedback.

HAPPY STAMPING!