Showing posts with label Gold Embossing Powder. Show all posts

Friday, October 18, 2024

Golden Blessings

Create unique cards using alcohol inks. I have found that even if I use the same colors and application, each panel will still be different. Give it a try and have some fun. Thoughts? 


Stamps:
   More Merry Messages

Paper:
   Very Vanilla A-2, 5-1/4 x 4 (Inside)
   Early Espresso 5-1/4 x 4
   Glossy White 3-3/4 x 3-1/2
   Gold Foil 2-1/2" Circle

Ink:
   Metallic Gold

Alcohol Ink:
   Stream
   Wild Plum
   Butterscotch

Technique:
   Alcohol Inks Baubles
   Heat Embossing

Accessories:
   2-1/2" Circle Punch
   Gold Embossing Powder
   Embossing Buddy
   Holiday Ornaments Framelits Dies
   Sequins
   Dimensionals
   Adhesive

I followed the tutorial found at SCS for Alcohol Ink Baubles. There are written instructions along with a short video. Check it out.

I heat embossed the sentiment with Gold Embossing Powder on the bottom of the Early Espresso panel. Make sure to wipe the panel down with the embossing buddy before you begin.

I die cut ornaments from the alcohol ink backgrounds and adhered them onto the panel, and onto a gold foil circle.

Next, I adhered the Early Espresso panel onto the Very Vanilla card front. 

I added a few sequins and adhered a Very Vanilla panel to the inside the card.

Thank you for checking out my blog. I so appreciate your time. Contact Me if you have any questions or concerns regarding Stampin' Up!

Are you curious about what is trending, the cost of materials and other products, or do you just feel like shopping? Click on Shop Now and have some fun.

Subscribe to Paper Pumpkin or check out the Kits Collection if you want to stay on a budget or just keep it all low-key.

Join Me and reap all of the benefits of becoming a part of the Stampin' Up! family. Check it out and gain the best value for your money.

Share, like, pin, tweet, or comment. Don't forget to FOLLOW and SUBSCRIBE to my blog. 

HAPPY STAMPING!

Saturday, April 6, 2024

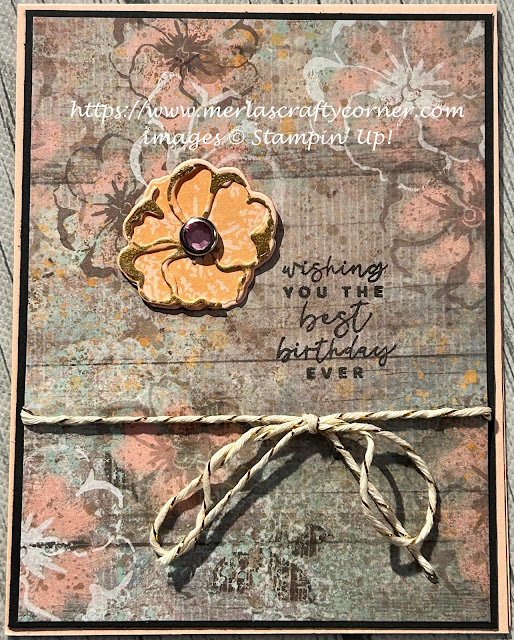
Birthday Season

I like how the images emerge from the designer series paper. I also like how all of the colors somewhat bleed onto each other. What do you think? 


Stamps:
   Season of Chic

Paper:
   Petal Pink A-2, Scraps
   Basic Black 5-3/8 x 4-1/8
   Texture Chic DSP 5-1/4 x 4
   Basic White 5-1/4 x 4 (Inside)

Ink:
   Petal Pink
   Tuxedo Black Memento
   Metallic Gold

Technique:
   Heat Embossing
   Die Cutting

Accessories:
   Gold Embossing Powder
   Season of Chic Dies
   21" Gold Baker's Twine
   Glue Dots
   Pink Circle Rhinestone Brads
   Adhesive

First, I stamped, heat embossed and die cut the flower. You can easily add more flowers on the card front if you like. I kept mine simple.

I then stamped the sentiment directly onto the DSP panel, using Tuxedo Black Memento ink. You can heat emboss this in gold as well.

Next, I attached the flower, using a Pink Circle Rhinestone Brad from my stash.

I then wrapped some Gold Bakers's Twine on the bottom of the sentiment and tied a bow on it.

Next, I adhered the DSP panel onto a Basic Black matte and then onto the Petal Pink card front.

Lastly, I adhered a Basic White panel to the inside of the card.

Thank you so very much for taking the time to stop and glance at my work. If you have any questions or suggestions, please Contact Me. I do appreciate your time.

If you need any supplies, or you are curious to know just how much these products cost, click on Shop Now and satisfy your curiosity. A HOST CODE is available for you to use in case you did not earn your own rewards. You can find it in the right sidebar.

Do you want the best value for your buck? Join Me and reap all of the rewards. I will be more than happy to assist you. Check it out and note that there are no hidden agendas.

Wait! Don't leave. If you just want to try it and see, then subscribe to Paper Pumpkin. You will receive a kit with everything you need to create a project. Check out the Kit Collection for more choices.

I would love for you to take a minute to share, like, pin, tweet, or comment. Please FOLLOW and SUBSCRIBE to my blog. Let me know what you think below in the comments.

HAPPY STAMPING!

Friday, December 22, 2023

Divine Night

I like this clean and simple Christmas card. It includes two die cuts and one heat embossed phrase. The background can easily be water-colored. If the designer series paper is unavailable, simply change it. Do you like it? Express yourself in the comments below. 


Stamps:
   Night Divine

Paper:
   Boho Blue A-2
   Basic Black 5-3/8 x 4-1/8, 2 x 3
   Copper Clay 5 x 4
   O Holy Night DSP 5-1/4 x 4
   Basic White 5-1/4 x 4 (Inside)

Ink:
   Gold Metallic

Technique:
   Heat Embossing
   Die Cutting

Accessories:
   Embossing Buddy
   Gold Embossing Powder
   Night Divine Dies
   Adhesive-Backed Star Trinkets
   Adhesive

First, I die cut the stable, using Copper Clay cardstock and the Night Divine Dies. I set it aside.

I then die cut the nativity scene, using Basic Black and the Night Divine Dies.

I then used the embossing buddy on the center of the DSP panel. This helps to keep the embossing powder in place and off the surrounding area.
 
Next, I placed the die cuts on the DSP panel and more or less made note of where to place the sentiment. 

Using Gold Metallic ink, I stamped, applied gold embossing powder, and heat set the sentiment.

Next, I adhered the die cut images onto the DSP panel. I then adhered the panel to a Basic Black matte, and then on to a Boho Blue card front.

Lastly, I added a star trinket to the top of the stable and adhered a Basic White panel to the inside of the card.

Thank you kindly for stopping by here. Contact Me if I can be of service.

Take a quick look and Shop Now for new products and current sales. There is a HOST CODE in the right sidebar for your use, if you like.

If you want a quick crafty fix, check out the Kits Collection or get a consistent dose with a Paper Pumpkin subscription.

Join Me and create a new friendship. We already have crafting in common!

Please take a few minutes to share, like, pin, tweet, or comment. Plus, you don't want to forget to FOLLOW and SUBSCRIBE to my blog.

HAPPY STAMPING!

Monday, May 8, 2023

Shelling Sympathy

Create texture on this beautiful sympathy card with an embossing folder. The recipient will find comfort in the feel of the card. Thoughts?


Stamps:
   Seaside Bay

Paper:
   Petal Pink A-2, 2-1/4" Sq., 5 x 3-3/4, Scrap
   Balmy Blue 5-1/4 x 4
   By the Bay DSP 2-3/4 x 5
   Basic White 5-1/4 x 4 (Inside)

Ink:
   Petal Pink
   VersaMark

Technique:
   Dry Embossing
   Heat Embossing
   Die Cutting
   Sponging

Accessories:
   Seashells 3D Embossing Folder
   Layering Circles Framelits
   Seaside Bay Dies
   Balmy Blue & White Ribbon 20"
   White Embossing Powder
   Gold Embossing Powder
   Sponge
   Glue Dots
   Dimensionals
   Adhesive

First, I adhered the DSP panel onto the 5 x 3-3/4" Petal Pink panel.

Next, I placed it into the Seashells 3D embossing folder and ran it through the Die Cutting & Embossing machine.

I then wrapped the blue & white ribbon around it and tied a bow in the lower part of the panel.

I adhered this embossed panel onto the Balmy Blue panel and then onto the Petal Pink card front.

I then took a scrap of Petal Pink and stamped a seashell, using VersaMark. I added some White Embossing Powder and heat embossed it. I die cut it using the matching die cut from the Seaside Bay Dies.

Next, I took the 2-1/4" square of Petal Pink and die cut a circle, using the Layering Circles Framelits.

I then stamped the sentiment with VersaMark, added Gold Embossing Powder and heat embossed it.

Next, I sponged the circle with a bit of Petal Pink ink. I added the white embossed seashell using glue dots.

I then attached this sponged circle to the top center of the card front.

Lastly, I added the Basic White panel to the inside of the card.

Thank you so much for stopping by here and spending a few minutes of your day with me. I appreciate your time. Contact Me if you have any questions, need a demonstrator, or just want to stamp or share ideas.

Shop Now and enjoy browsing products and promotions. I have a HOST CODE in the right sidebar in case you did not earn your own rewards.

Do not miss the opportunity to Join Me and become the newest member of my team.

Paper Pumpkin should not be ignored. I enjoy putting my kit together monthly.

Take a few more minutes and share, like, pin, tweet, or comment. I would love to see what you really think. Do not forget to FOLLOW and SUBSCRIBE to my blog.

HAPPY STAMPING!

Have a look-see at the items that are still current in the new catalog: Shelling Sympathy


Tuesday, November 16, 2021

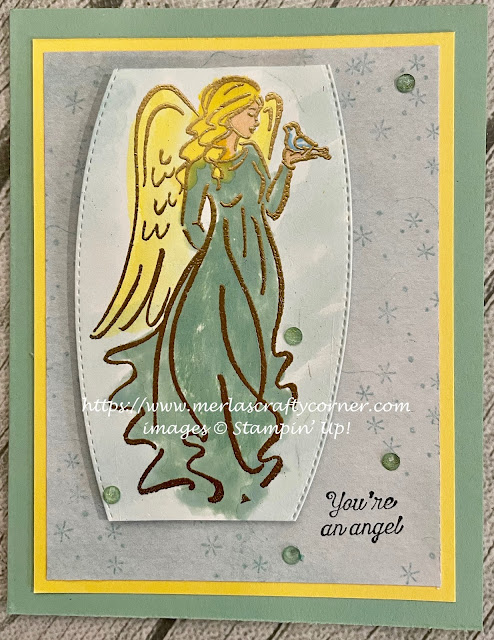
You're an Angel

Here is another way to say thank-you to someone. There are people who go out of their way to extend a helping hand and show kindness. Sometimes we just need to recognize the angels that walk among us. Thoughts?


Stamps:
   Angels of Peace

Paper:
   Mint Macaron A-2
   Daffodil Delight 5 x 3-3/4
   Painted Blooms DSP 4-3/4 x 3-1/2
   Basic White 3-1/4 x 4, 4-1/4 x 4 (Inside)

Ink:
   Metallic Gold
   Soft Sky
   Tuxedo Black Memento

Re-Inkers:
   Daffodil Delight
   Mint Macaron
   Soft Sky

Technique:
   Heat Embossing
   Die Cutting
   Watercolor

Accessories:
   Basic Borders Dies
   Gold Embossing Powder
   Water Painters
   Genial Gems
   Dimensionals
   Adhesive

First, I stamped my image on a Basic White scrap using Metallic Gold ink. I then applied Gold Embossing Powder and heat set it.

I then watercolored my image. I applied Mint Macaron to her garb and used Daffodil Delight on her hair and wings. I added a bit of Soft Sky to the bird and the area around her.

I used the curved Border die to die cut the sides of the image. 

Next, I stamped snowflakes on the DSP using Soft Sky. You can stamp directly onto a Soft Sky panel.

I then adhered the Soft Sky DSP panel onto the Daffodil Delight panel, and then onto the Mint Macaron card front.

I stamped the sentiment on the lower right corner using Tuxedo Black Memento ink, and attached the image with dimensionals.

Lastly, I adhered the Basic White panel to the inside of the card and added a few Mint Macaron Genial Gems on the card front.

Here is another picture of the card. 


Thank you so much for stopping by here and taking a quick look-see. If you have any questions or need my assistance, Contact Me.

Shop Now and take a look at all of our new products and current promotions. Please use the HOST CODE sitting in the right sidebar if you did not earn your own rewards.

If you want to craft, but keep your costs below $25 a month, check out Paper Pumpkin. It just might be what you are looking for at the moment.

Join Me and become the newest member of my team. Remember there are no hidden agendas or penalties for giving it a go. Don't pass this opportunity to save.

You've come this far, so please share, like, pin, tweet or comment. I appreciate your time and efforts. Let me know your thoughts and leave all of your questions behind. Do not forget to FOLLOW and SUBSCRIBE to my blog. 

HAPPY STAMPING!

Thursday, July 22, 2021

Sympathy Flowers

If you have the time and the supplies, heat embossing adds elegance to your card. Here is a floral arrangement with a touch of gold. Thoughts?



Stamps:
   Petite Petals
   Teeny Tiny Wishes
   Baroque Motifs

Paper:
   Blushing Bride A-2
   All ABloom DSP 5-1/4 x 4
   Basic Black 3-3/8 x 4-7/8
   Whisper White 3-1/8 x 4-5/8, Scraps, 5-1/4 x 4 

Ink:
   Metallic Gold
   Archival Basic Black
   Daffodil Delight
   Strawberry Slush
   Blushing Bride

Technique:
   Heat Embossing
   Punching

Accessories:
   Gold Embossing Powder
   Petite Petals Punch
   Basic Pearl Jewels
   Glue Dots
   Adhesive

First, I took a small white panel and stamped the floral flourish using my Metallic Gold stamp pad. I then added some gold embossing powder and heat embossed it.

Next, I stamped some small petals using Strawberry Slush, Daffodil Delight, and Blushing Bride. I punched these using my Petite Petals Punch. 

I then stamped my sentiment on the top left corner of my panel.

I adhered the layers to the front of the card as shown above and added the 5-1/4 x 4 Whisper White panel to the inside of the card.

The petals were added using dimensionals and the pearls were adhered with glue dots.

Thank you so very much for being here. I appreciate you taking the time to glance at my work. Please Contact Me if I can be of service.

Are you interested in Stampin' Up! products to make your own cards? Shop Now and have a look-see. I placed a HOST CODE for you to use if you do not earn your own rewards. It is sitting in the right sidebar.

Do you like surprises? Subscribe to Paper Pumpkin and receive all you need to complete the monthly project. The cost is less than $25. Check it our.

Join Me and become privy to everything Stampin' Up! Receive a discount on all of your personal orders. Personally, I love SALES!

Please share, like, pin, tweet, or comment. Do not forget to FOLLOW and SUBSCRIBE to my blog. 

HAPPY STAMPING!

Sunday, April 5, 2020

Feel Better with a Peacock

Do you smile when you see a peacock? I do, and when it spreads its plumes...well, let's just say, I feel great. So, take a moment and send a beautiful peacock to someone who needs to feel better.


Stamps:
   Perfect Peacock
   Sassy Salutations

Paper:
   Coastal Cabana A-2
   Whisper White 5-1/4 x 4, Scrap

Ink:
   VersaMark
   Melon Mambo

Stampin' Blends/Markers
   Coastal Cabana
   Melon Mambo
   Daffodil Delight
   Old Olive

Technique:
   Heat Embossing
   Sponging

Accessories:
   Artisan Label Punch
   Gold Embossing Powder
   Sponge
   Dimensionals
   Adhesive

Stamp the peacock using VersaMark and apply the Gold Embossing Powder.

Heat set using your heat tool.

Color the peacock with whatever medium you have. The Stampin' Blends I used are listed above.

Stamp your sentiment and punch it out using the Artisan Label Punch.

Sponge the edges with Melon Mambo.

Adhere the Whisper White panel to the Coastal Cabana card base. Attach the sentiment using dimensionals.

Thank you so much for stopping by here. Let me know what you think. I appreciate your time and feedback.

HAPPY STAMPING!


Wednesday, May 22, 2019

The Ornament

It is never too early to begin to make Christmas cards, especially if your list is long. 


Stamps: Ornamental Pine
Paper: Daffodil Delight A-2, Whisper White Scraps
Ink: Old Olive, Cherry Cobbler Stamping Blends
Technique: Sponging, Heat & Dry Embossing
Accessories: Gold Embossing Powder, Holiday Frame Embossing Folder, Gold Baker's Twine, 1/8" Hole Punch, Dimensionals

1. Dry Emboss Daffodil Delight card base using the Holiday Frame Embossing Folder.

2. Heat emboss the ornament on a scrap of Whisper White card stock using the Gold Embossing Powder. 

3. Optional: Color your ornament with Stamping Blends or markers. I used Cherry Cobbler.

4. Optional: Sponge the frame with Old Olive.

5. Punch the top of ornament with 1/8" hole punch and pull the twine through to tie a bow.

6. Attach the ornament to the card using dimensionals.

I like the simplicity of this card. Although, these supplies have been discontinued, feel free to browse the current catalog for current stamps that will look as wonderful as this one. 

Thank you so much for stopping by and taking a peek. I appreciate your feedback. Leave me a comment or just say hello.

HAPPY STAMPING!