Sunday, July 28, 2019

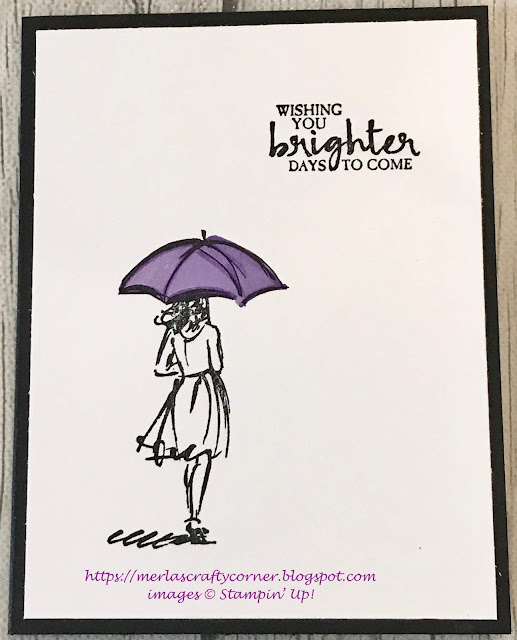
Gorgeous Umbrella

Here is a traditional clean and simple card in the classic black and white with a POP of purple. The umbrella was colored using markers. I like the sentiment for anyone who has been going through a difficult time, or who has been ill or just needs to be uplifted. We should all strive to be optimistic.


Stamps: Beautiful You
Paper: Basic Black A-2, Whisper White 5 1/4 x 4 (2)
Ink: Archival Basic Black, Markers: Highland Heather, Gorgeous Grape
Technique: CAS
Accessories: Adhesive

It is so easy to want to embellish this card more. You can add sequins, ribbon, more color, even rhinestones or pearls, but I think it would distract rather than enhance the card. What do you think?

All supplies can be purchased through my online store. Feel free to contact me with any questions or concerns.

I thank you for your time and appreciate your feedback. 

HAPPY STAMPING!


Saturday, July 27, 2019

Golden Sympathy

Prayers and heartfelt sympathy are golden. These two are priceless. You cannot go to the mall or place an order on Amazon for these precious gifts. Yet, when they are graciously given they comfort, heal, and instill peace within us. I decided to place a golden frame around these two gifts. Thoughts?


Stamps: Woven Heirlooms
Paper: Cherry Cobbler A-2, Whisper White 5 X 4, 5 1/4 x 4, Gold Foil 5 x 4
Ink: Garden Green
Technique: Die Cutting, Dry Embossing
Accessories: Heirloom Frames Dies & Embossing Folders, Eastern Gold Vinyl Stickers, Adhesive

I used a bit of washi tape to keep the center white panel in place with the gold embossed frame. I then applied my glue and adhered it to the card.

This frame would also work well with an image, picture, or other sentiments. I do think the gold adds an elegance to the card. The possibilities are endless.

Thank you for taking a peek. Let me know what you think. Shop Now for any of the supplies you may need to CASE (Copy And Share Everything) this card. The stickers are no longer current, but the stamp set has a great stamp you can use in place of them.

Contact me with any questions or if I may be of service. 

HAPPY STAMPING!


Friday, July 26, 2019

Silver Thanks

It only takes a hint of silver glitter to turn a simple card into an elegant one. I first stamped the flower flourish along each side of my Whisper White panel. I then added my sentiment toward the top using Pretty Peacock ink. I then switched to my Bermuda Bay ink and randomly stamped the bokeh dots. Lastly, I added a 3/8" strip of silver glitter paper to the left, and few rhinestones and this card not only sparkled, it came alive. What do you think?


Stamps: Beauty Abounds
Paper: Pretty Peacock A-2, Whisper White 5 1/4 x 4 (2), Silver Glitter 3/8 x 5 1/4 
Ink: Pretty Peacock, Bermuda Bay
Technique: CAS
Accessories: Rhinestone Basic Jewels, Adhesive

Once the front panel is stamped and embellished, add your favorite adhesive and glue it onto the card base.

Contact me for any further details. All of the products can be ordered through my online store. 

Thank you for visiting. I appreciate all of your comments, likes, shares, questions, and time.

HAPPY STAMPING!


Thursday, July 25, 2019

Summer Day

Stamp, paper, and ink is all that you need to make a beautiful card for someone. When you use only these three elements, we categorize the card as a Clean and Simple (CAS) card. Here is a red, white, and blue summer card that had nothing to do with the 4th of July.


Stamps: Love What You Do
Paper: Whisper White A-2
Ink: Real Red, Night of Navy
Technique: CAS
Accessories: MISTI / Stamparatus

All of the supplies to make this card can be ordered through my online store. Click on SHOP NOW above and place your order today. 

July Special: Order $50 before taxes and shipping/handling and receive a $5 coupon code to be used in August. Offer ends July 31, 2019.

Now is the time to join the Stampin' Up! family. From now until August 31st, a new demonstrator may order $30 more in their starter kit. You still only pay $99, but you get to order $155 dollars worth of products. You will also be sent a $10 coupon code to be used the following month. Click on Join Me and sign up. Don't forget to choose me as your demonstrator.

Contact me for any questions you may have. If you do not have a demonstrator and you would like to have a catalog, contact me and let me know. 

Thank you so very much for stopping by here and taking a peek. All of your feedback is appreciated. 

Saturday, July 6, 2019

Pumpkin Trio

This is a fun Halloween card for the kids or an adult who still acts like a kid. You can even make it goofier by adding googly eyes to the pumpkins.


Stamps: Fall Fest, Good Greetings
Paper: Kraft A-2, Rich Razzleberry 4 1/2 x 3 1/2, Motley Monsters DSP 3 1/4" Sq., Whisper White Scraps for the pumpkins and the sentiment
Ink: Tangerine Tango, Bermuda Bay, Garden Green, Tuxedo Black Memento
Technique: Dry Embossing, Sponging 
Accessories: Woodgrain Embossing Folder, Stylish Stripes Embossing Folder, Fall Fest Die Cuts, Modern Label Punch, Tangerine & White Two-Tone Trim, Sponge, Blender Pens, Dimensionals, Adhesive

First, I inked my pumpkins with Tangerine Tango. Using a blender pen (you can sub a tissue or napkin) I took the ink off of the stem. I colored it in with a Garden Green marker and then stamped it onto a scrap of Whisper White card stock. You then stamp the face with Tuxedo Black Memento ink. Die cut them using the Fall Fest Die Cuts or fussy cut them.

I dry embossed the Rich Razzleberry with the Stylish Stripes Embossing Folder and the Kraft A-2 with the Woodgrain Embossing Folder.

I stamped (Bermuda Bay), punched (Modern Label)and sponged (Tangerine Tango) the sentiment.

The two-tone trim (11") is wrapped around the Rich Razzleberry card stock. 

The two small pumpkins, sentiment, and Rich Razzleberry piece are put on with dimensionals. 

I like these goofy pumpkins for Halloween cards. They are a lot of fun. I hope you like it.

HAPPY STAMPING!
Wednesday, July 3, 2019

Wetlands Thank You

Sometimes cards look better in our heads than they do on actual paper. What do you think of this one?


Stamps: Wetlands, Work of Art
Paper: Pool Party A-2, Very Vanilla 5 1/4 x 4
Ink: Pool Party, Sahara Sand, Summer Starfruit, Dusty Durango, Cajun Craze, Tangerine Tango, Basic Black
Technique: Masking, Sponging, Brayer
Accessories: Brayer, Sponge, Mask, Adhesive

So, I punched out a circle to mask my full moon. Then I thought it was too bright so I sponged it a bit to tone it down. 

I also need to make sure that when I use my brayer, my surface needs to be smoother than this. I'm not even sure where the lines are from. Maybe the woodgrain on my table? 

I imaged a more ombre effect on the background. Also a more staggering line on the sand. Still, when making a hand made card there is no right way. There are no mistakes, just creations. So, what do you really think?

Thanks for stopping by here.

HAPPY STAMPING!


Tuesday, July 2, 2019

Glittery Balloons

Here is a wonderful masculine birthday card for any age group.


Stamps: Celebrate Today
Paper: Night of Navy A-2, Tangerine Tango 5 1/4 x 4, Whisper White 5 1/8 x 3 7/8, Gold Glimmer, + scraps of each one.
Ink: Night of Navy, Tangerine Tango
Technique: Sponging, Dry Embossing, Die Cutting
Accessories: Balloon Framelit Dies, Perfect Polka Dot Embossing Folder, Sponge, Paper Snips, Dimensionals, Adhesive

I die cut my balloons and then dry embossed them with the Polka Dot Embossing Folder. I then just placed them on the card to know where to stamp the balloon baskets. Next, I randomly stamped the background using both colors. I then added the balloons. You can attach them with adhesive or dimensionals. You do need to cut the balloons to give them the straight edge on the card. I then stamped my sentiment and sponged the edges. Lastly, I assembled the card. I used adhesive and dimensionals. Notice the use of the two colors throughout the card.

Thank you so much for stopping by and taking a peek. Your feedback is welcomed and appreciated. 

HAPPY STAMPING!