Showing posts with label Sheltering Tree. Show all posts

Monday, September 25, 2023

Bubbly Octopus

Here is a technique to amuse your inner child. Unfortunately, mine did not want to play nicely, so I stamped a few bubbles in the end. Check it out. You might have better luck than I did. The tutorial is at: Soap Bubble Art


Stamps:
   Sea of Textures
   Bubble Over
   Sheltering Tree

Paper:
   Soft Suede A-2
   Watercolor 5-1/4 x 4
   Whisper White 5-1/4 x 4 (Inside), Scrap

Ink:
   Baked Brown Sugar
   Melon Mambo
   More Mustard
   Mossy Meadow
   Soft Sky
   Tranquil Tide

Re-Inkers:
   Orchid Opulence
   Pacific Point
   Pixie Pink

Technique:
   Soap Bubble Art
   Die Cutting

Accessories:
   Under the Sea Framelits
   Dimensionals
   Straws
   Cups
   Napkins
   Dish Soap
   Adhesive

First, I took the watercolor paper panel and tried to do the tutorial mentioned above, but my bubbles did not come up at all. So I watercolored the background, using Orchid Opulence, Pacific Point, and Pixie Pink. I let the panel dry and then stamped directly onto it.

I stamped the sand, using Baked Brown Sugar.

I then stamped the tall grasses with Tranquil Tide.

Next, I stamped the sentiment and the small plants, using Mossy Meadow.

I then stamped and die cut the Octopus, using Melon Mambo and Under the Sea Framelits.

I attached the octopus with a few dimensionals.

I then added the net, using More Mustard and added a few bubbles with a bit of Soft Sky.

Lastly, I adhered the panel to the Soft Suede card front and adhered the Whisper White panel to the inside of the card.

I am so excited that you decided to pay me a visit. Please Contact Me if I can be of service.

Shop Now and enjoy looking at new products made especially for card making! There is a HOST CODE located in the right sidebar, if you care to use it.

If you are into kits, check out Paper Pumpkin and the Kits Collection. I am sure one of those will be right up your alley.

Still undecided? Join Me and find out what all the fuss is about. Check it out today.

Please share, like, pin, tweet, or comment. FOLLOW and SUBSCRIBE to my blog.

HAPPY STAMPING!

Sunday, May 8, 2022

Sheltering

Create your own background stamp with some markers, a clear block, and a bit of water. What do you think?


Stamps:
   Sheltering Tree

Paper:
   Crushed Curry A-2
   Mossy Meadow 5-3/8 x 4-1/8
   Watercolor 5-1/4 x 4
   Basic White 5-1/4 x 4 (Inside)

Ink:
   Tuxedo Black Memento

Markers:
   Crushed Curry
   Mossy Meadow
   Pacific Point

Technique:
   Clear Block Watercolor

Accessories:
   Clear Block "D"
   Water Mister
   Adhesive

First, I colored my block using markers.

I then misted it with a bit of water. 

Next, I stamped my watercolor panel and allowed a few seconds for the ink to soak into the paper.

Once dry, (less than a minute) I stamped my image and sentiment.

I adhered the panel to the Mossy Meadow panel and then onto the card front.

Lastly, I adhered the Basic White panel to the inside of the card.

You can easily add embellishments of your choice or change the sentiment to suit your current need.

Thank you so much for taking the time to stop and glance at my work. If you have any questions or suggestions, please Contact Me. I do appreciate your time.

If you need any supplies, or you are curious to know just how much these products cost, click on Shop Now and satisfy your curiosity. A HOST CODE is available for you to use in case you did not earn your own rewards. You can find it in the right sidebar.

Do you want the best value for your buck? Join Me and reap all of the rewards. I will be more than happy to assist you. Check it out and note that there are no hidden agendas.

Wait! Don't leave. If you just want to try it and see, then subscribe to Paper Pumpkin. You will receive a kit with everything you need to create a project. Check out the Kit Collection for more choices.

I would love for you to take a minute to share, like, pin, tweet, or comment. Please FOLLOW and SUBSCRIBE to my blog. Let me know what you think below in the comments.

HAPPY STAMPING!

Thursday, January 6, 2022

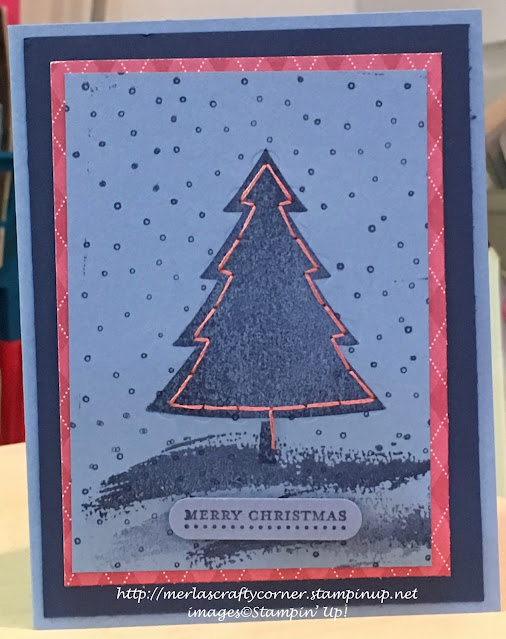
A Tree in Stitches

I was challenged to add some stitches to my card. So, I grabbed a needle and thread. This was the result. What do you think? 


Stamps:
   Festive Season
   Sheltering Tree
   Teeny Tiny Wishes
   Itty Bitty Backgrounds

Paper:
   Brocade Blue A-2, 4-1/2 x 3-1/4, Scraps
   Night of Navy 5-1/4 x 4
   Rose Red DSP 4-3/4 x 3-1/2
   Basic White 5-1/4 x 4 (Inside)

Ink:
   Night of Navy
   Brocade Blue

Technique:
   Die Cutting
   Stitching (Sewing)

Accessories:
   Festive Stitching Thinlits Dies
   Word Window Punch
   Dimensionals
   Thread
   Needle
   Adhesive

To begin, I stamped and sewed on the 4-1/2 x 3-1/4 piece of Brocade Blue. I used 3 strands of x-stitch thread that I had in my stash for the sewing. 

First, I stamped the tree, ground cover, and snow. I used both Night of Navy and Brocade Blue for the snowfall. 

I then used the Festive Stitching Thinlits Dies to make the sewing holes on the tree frame. I added the thread keeping all of the mess on the back of the card and the pretty stitching in the front.

Next, I adhered all of the layers as shown above.

Lastly, I stamped and attached the sentiment using dimensionals, and added the Basic White panel to the inside of the card.

I am so excited that you stopped to read and check out my work. Thank you from the bottom of my heart. Contact Me and let me know if there is anything I can answer for you.

Do you have some time to browse? You do not want to pass up the opportunity to shop some quality products and see what is trending. Shop Now and take a peek. If you decide to place an order, I have included a HOST CODE in the right sidebar if you do not earn any rewards on your own. Thanks in advance.

Are you undecided? Subscribe to Paper Pumpkin and give it a go. Let the products speak for themselves. The cost is less than $25 and you are completely in control. No small print for you to miss. Try it.

Join Me and gain the best value for your hard-earned money. Check it out now.

Share, like, pin, tweet, or comment. Come on, I dare you. Don't forget to FOLLOW and SUBSCRIBE to my blog.

HAPPY STAMPING!

Saturday, November 6, 2021

Fallen Leaves

The fall season brings leaves in many colors that fall with the slightest breeze. It also brings the added chore of raking. I stamped various leaves in fall colors and made this Thanksgiving card. Thoughts?


Stamps:
   Vintage Leaves
   Sheltering Tree
   Teeny Tiny Wishes

Paper:
   Soft Suede A-2
   Very Vanilla 5-1/4 x 4 (Inside), Scraps
   First Edition DSP 5-1/4 x 4

Ink:
   Archival Basic Black
   Always Artichoke
   Cajun Craze
   Crushed Curry
   Soft Suede

Technique:
   Die Cutting

Accessories:
   Leaflets Framelits Dies
   Dimensionals
   Adhesive

First, I stamped and die cut various leaves, using Crushed Curry, Cajun Craze, Always Artichoke, and Soft Suede. Leaves are from the Vintage Leaves stamp set and the dies are from the Leaflets Framelits. I scrounged through my Very Vanilla scraps for stamping, since they were individual leaves.

I then adhered a First Edition DSP panel to the Soft Suede card front.

I arranged and attached the various leaves, using liquid adhesive and dimensionals.

Next, I added a couple of rakes, using Cajun Craze and a stamp from the Sheltering Tree stamp set.

I then added the sentiment from Teeny Tiny Wishes, using Archival Basic Black.

Lastly, I adhered a Very Vanilla panel to the inside of the card.

Thank you so much for stopping by here. Contact Me if you have any questions.

Shop Now and buy your supplies to make your own cards. Take a peek today and find out what you can grab for FREE!

Join Me and become my new team member. Enjoy the best savings and opportunity offered today!

Subscribe to Paper Pumpkin and craft monthly for under $25. Don't forget to take a look at the All-Inclusive Kits!

If you liked my card, please share, like, pin, tweet, or comment. I would love for you to FOLLOW and SUBSCRIBE to my blog.  Let me know what you think in the comments below.

HAPPY STAMPING!
 

Sunday, July 25, 2021

Inspired by Salt

Add some flavor to your card with a bit of salt. This background was created using a bit of rock salt. What do you think?


Stamps:
   Sheltering Tree
   Inspired by Nature

Paper:
   Island Indigo A-2
   Glossy White 5-1/4 x 4
   Whisper White 5-1/4 x 4

Ink:
   StazOn Black
   Elegant Eggplant
   Island Indigo
   Always Artichoke
   Daffodil Delight
   Cajun Craze

Technique:
   Salted Background

Accessories:
   Spritzer/Spray Bottle
   Aqua Painter
   Rock Salt
   Adhesive

First, I sprayed the glossy panel with water. 

I then added my colors using an aqua painter. You may choose to drop the colors or swirl them around. 

I then sprinkled my rock salt over the background and sprayed it with a bit more water.

I set it aside and let it dry. You may use a heat tool if you do not have time to wait.

Once it was dry, I brushed off the rock salt and finished it with a bit of stamping.

I added the Whisper White panel to the inside of the card.

You can find the tutorial that I followed at SplitCoastStampers: Salted Background.

Thank you so much for dropping by here. Contact Me if you have any questions.

Click on all of the tabs above and explore products, promotions, and opportunities.

Please take the time to share, like, pin, tweet, or comment. Do not forget to FOLLOW and SUBSCRIBE to my blog.

HAPPY STAMPING!

Thursday, December 10, 2020

Outdoor Christmas

 This background was made using a watercolor splash technique. Loll Thompson has a you tube video demonstrating it. You can see it HERE. I used inks from different color groups on my card and am quite pleased with my result. What do you think?


Stamps:
   Carols of Christmas
   Season of Friendship
   Sheltering Tree
   Best Yet

Paper:
   Marina Mist A-2
   Peekaboo Peach 5-3/8 x 4-1/8
   Whisper White 5-1/4 x 4 (2)

Ink:
   Early Espresso
   Marina Mist
   Peekaboo Peach
   Archival Basic Black
   Various Markers

Technique:
   Watercolor Splash
   Sponging
   Die Cutting

Accessories:
   Tags & Labels Framelits
   Home for Christmas Designer Buttons
   Sponge
   Glue Dots
   Dimensionals
   Adhesive

First, I splashed my background with Peekaboo Peach and Marina Mist. I did let the color dry between splashes.

Next, I randomly stamped snowflakes on the background using Marina Mist.

Then I stamped my tree using Early Espresso. I added the leaves and ornaments using various colors.

I stamped, die cut, and sponged my sentiment. I attached it using dimensionals.

Lastly, I added the tree topper using a glue dot.

I assembled the card, and added the extra Whisper White panel to the inside of the card.

Thank you so much for being here. I appreciate you taking the time to glance at my work. Please Contact Me if I can be of service.

Are you interested in Stampin' Up! products to make your own cards? Shop Now and have a look-see. I placed a HOST CODE for you to use if you do not earn your own rewards. It is sitting in the right sidebar.

Do you like surprises? Subscribe to Paper Pumpkin and receive all you need to complete the monthly project. The cost is less than $25. Check it out.

Join Me and be privy to everything Stampin' Up! Receive a discount on all of your personal orders. Personally, I love SALES!

Please share, like, pin, tweet, or comment. Do not forget to FOLLOW and SUBSCRIBE to my blog.

HAPPY STAMPING!


Saturday, June 20, 2020

Thankful Tree OSW #9

This is card 9 of 14 using one sheet from the Painted Autumn Designer Series Paper Pack.


Stamps:
   Sheltering Tree

Paper:
   Very Vanilla A-2
   Painted Autumn DSP 5-1/4 x 4 (measure 1" from top left and right bottom, then cut diagonally)

Ink:
   Early Espresso

Technique:
   None

Accessories:
   Adhesive

I took the 4 x 5-1/4 piece of DSP and made a mark 1" from the bottom right corner and another mark 1" from the top left corner. I then put these two marks on the cutting groove of my cutter and cut the paper. 

Taking the bottom half of the paper, I adhered it to the Very Vanilla card base after stamping the tree from the Sheltering Tree stamp set. 

Lastly, I stamped the sentiment on the top left of the card.

Here is a video showing all 14 cards and how I put them together.


Thank you for taking an interest in my cards. Contact Me if you have any questions.

I appreciate your time and feedback. Let me know what you think. Please like, pin, tweet, and/or share my blog. Do not forget to FOLLOW or SUBSCRIBE.

HAPPY STAMPING!

Tuesday, May 19, 2020

Kite Flying

Before video games, outdoor activities were all the rage. Believe it or not, there was a time when all of the kids were outside playing and interacting with all of the other neighborhood kids. After all, the temperature indoors was the same as outdoors. Two fun things were bike riding and kite flying. 


Stamps:
   Sheltering Tree
   Send Me Soaring

Paper:
   Watermelon Wonder A-2
   Whisper White 5-1/4 x 4

Ink:
   Old Olive
   Summer Sun
   Melon Mambo
   Early Espresso
   Midnight Muse
   Watermelon Wonder

Technique:
   Sponging
   Stamp-Off
   2-Step Stamping

Accessories:
   Adhesive

Sky is sponged with Summer Sun.

The grass mounds, leaves, and blades of grass are all stamped using Old Olive. You can stamp twice before re-inking. This allows for the different shades of the same color.

The tree trunk is stamped with Early Espresso.

The bike and one kite use Midnight Muse.

The other kite is stamped with Watermelon Wonder.

Kite tails are inked with Melon Mambo.

Thank you for dropping by here and spending a bit of time. I appreciate it.

Notice that the occasion for this card will be determined by what the sender writes on the inside of the card.

Spread some sunshine by subscribing to Paper Pumpkin before the 10th of the month.


HAPPY STAMPING!

Tuesday, April 28, 2020

The Journey Begins

Celebrate an engagement or wedding with this card.


Stamps:
   Beautiful Ride
   Sheltering Tree

Paper:
   Elegant Eggplant A-2
   Basic Black 5-1/4 x 4
   Very Vanilla 5 x 3-3/4, Scrap

Ink:
   Always Artichoke
   Archival Basic Black
   Baked Brown Sugar
   Cajun Craze
   Daffodil Delight
   Early Espresso
   Mossy Meadow
   Night of Navy
   Old Olive
   Pumpkin Pie
   Various Markers
   VersaMark

Technique:
   Stamp-Off
   Sponging

Accessories:
   Washi Label Punch
   Sponges
   Dimensionals
   Adhesive

First, I sponged the sky with Daffodil Delight, Cajun Craze, and Night of Navy.

Second, I added the grassy mounds. I inked my stamp with Old Olive and stamped twice on the card before re-inking. 

I used Mossy Meadow for the blades of grass.

Third, I added the tree trunk and branches using Early Espresso.

I added the foliage using Always Artichoke, Pumpkin Pie, and Baked Brown Sugar. I stamped off with Pumpkin Pie and Baked Brown Sugar. I also made sure I slightly moved the stamp.

Fourth, I stamped the couple using the Archival Basic Black and colored them in with various markers. 

Fifth, I stamped the sentiment on a scrap of Very Vanilla. I punched it out with the Washi Label Punch and sponged it with Daffodil Delight. I adhered it with dimensionals. 

Thank you for stopping by here and taking a peek. I appreciate your time and feedback.

HAPPY STAMPING!


Sunday, April 12, 2020

Pondering Away

Take a deep breath, close your eyes, and imagine sitting by the lake and leaning against a tree. You sit quietly and ponder, taking nature in through your senses. Your mind is suddenly filled with...


Stamps:
   Sheltering Tree

Paper:
   Lost Lagoon A-2
   Mossy Meadow 5 x 3-3/4
   Whisper White 4-3/4 x 3-1/2

Ink:
   Tuxedo Black Memento

Markers:
   Lost Lagoon
   Hello Honey
   Mossy Meadow

Technique:
   Clear Block Stamping

Accessories:
   Clear Block "D"
   Black Brad
   Water Spritzer/Mister
   Adhesive

This is one of those techniques where no two cards will ever look exactly the same. 

Begin with a clean clear block. 

Color it with markers. I used 3 colors on mine. 

Spritz/mist a bit of water on the block.

Stamp the block onto your card. Let it dry.

Stamp your images and finish your card.

Do make note that you want to keep each color on the block separate from the other colors. When you apply water, they will begin to bleed onto each other. Some colors do not mix well and look like mud. Play a bit on scratch paper and have some fun. 

Thank you for dropping by here. Don't forget to follow me.

I appreciate your time and feedback.

HAPPY STAMPING!