Friday, September 30, 2022

Tea-riffic Mom

Do you like special fold cards? They can be fun, but sometimes difficult to get them right. What do you think of this one? 


Stamps:
   A Nice Cuppa

Paper:
   Soft Sky
    5-1/2 x 11 (card base)
    3-7/8" Sq. (cut diagonally)
    1-7/8" Sq. (2)
   Afternoon Tea DSP
    5-3/8" Sq.
    5-3/8 x 2-5/8
    3-3/8" Sq. (cut diagonally)
    1-5/8" Sq. (2)

Ink:
   Archival Basic Black

Technique:
   Special Pop-Up Fold
   Die Cutting

Accessories:
   Cups & Kettle Framelits
   Adhesive

This was a special fold card that was sent to me by a friend. Once I had completed the card, I found a very similar card fold on SCS that was quite a bit easier to follow. It is called the Fold Back Pop-Up Card. You can find instructions HERE.

Thank you for checking out my blog. I so appreciate your time. Contact Me if you have any questions or concerns regarding Stampin' Up!

Are you curious about what is trending, the cost of materials and other products, or do you just feel like shopping? Click on Shop Now and have some fun.

Subscribe to Paper Pumpkin or check out the Kits Collection if you want to stay on a budget or just keep it all low-key.

Join Me and reap all of the benefits of becoming a part of the Stampin' Up! family. Check it out and gain the best value for your money.

Share, like, pin, tweet, or comment. Don't forget to FOLLOW and SUBSCRIBE to my blog.

HAPPY STAMPING!

Thursday, September 29, 2022

Deep Blue Sea

I can only imagine the vastness of the deep blue sea. My preference of course is to stay above the water and breathe, but given the challenge of "Under the Sea," I created a dark blue panel with splotches of a lighter tone. No, really, I painted the panel with acrylic blue paint and got lucky. What do you think? 


Stamps:
   Sea of Textures
   By the Tide

Paper:
   Basic White A-2, 5-1/4 x 4 (2)

Ink:
   Whisper White Craft

Acrylic Paint:
   Blue

Technique:
   CAS

Accessories:
   Pearl Basic Jewels
   Adhesive

First, I painted a Basic White panel with blue acrylic paint and waited a minute as it dried.

I then stamped several underwater images using Whisper White craft ink. 

Next, I adhered the panel to a Basic White card front.

Lastly, I added a few pearls to represent bubbles and adhered the other Basic White panel to the inside of the card.

I am so excited that you stopped to read and check out my work. Thank you from the bottom of my heart. Contact Me and let me know if there is anything I can answer for you.

Do you have some time to browse? You do not want to pass the opportunity to shop some quality products and see what is trending. Shop Now and take a peek. If you decide to place an order, I have included a HOST CODE in the right sidebar if you do not earn any rewards on your own. Thanks in advance.

Are you undecided? Subscribe to Paper Pumpkin and give it a go. Let the products speak for themselves. The cost is less than $25 and you are completely in control. No small print for you to miss. Try it.

Join Me and gain the best value for your hard-earned money. Check it out now.

Share, like, pin, tweet, or comment. Come on, I dare you. Don't forget to FOLLOW and SUBSCRIBE to my blog.

HAPPY STAMPING!

Wednesday, September 28, 2022

Sense of Time Again

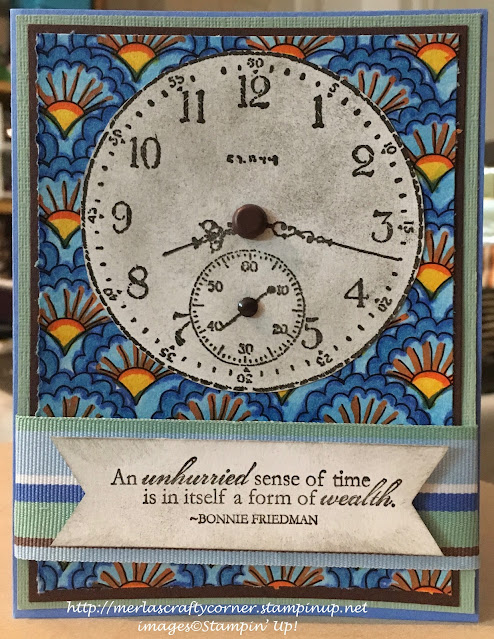
Time is constant. Yet, it is something that we are always trying to control and wishing we had more. If I only had more time...Bonnie Friedman said it all. Take a look, if you have time. 


Stamps:
   Sense of Time

Paper:
   Ballet Blue A-2
   Textured Sage Shadow 5-1/4 x 4
   Chocolate Chip 5-1/8 x 3-7/8
   Coloring Page 5 x 3-3/4
   Basic White 3-1/2" Sq., 1 x 4-1/2, 5-1/4 x 4 (Inside)

Ink:
   Chocolate Chip

Technique:
   Sponging
   Fussy Cutting

Accessories:
   Triple Banner Punch
   5/16" Neutral Brad
   3/16" Neutral Brad
   Seaside Ribbon - 5"
   Dimensionals
   Tacky Tape
   Adhesive

First, I stamped my clock face and fussy cut it.

I then sponged it using Chocolate Chip and adhered it to the top of my coloring page. 

Next, I adhered the coloring page to a Chocolate Chip panel and then onto the Textured Sage Shadow panel.

I added two neutral brads to the face of the clock. The larger one on the large clock and the smaller one for the seconds clock.

I then stamped my sentiment and used the Triple Banner punch for the edges. I sponged it with Chocolate Chip.

Next, I adhered the ribbon across the bottom of the panel. I used tacky tape to keep the ribbon in place. I looped the ribbon to the back of the panel and used more tacky tape to keep it attached.

I added the sentiment with dimensionals and adhered the panel to the Ballet Blue card front.

Lastly, I adhered the Basic White panel to the inside of the card.

Thank you for stopping to take a peek. Contact Me if you have any questions.

Click on Shop Now and browse through all things Stampin' Up! Start your wish list or order your favorites today. I included a HOST CODE for you to use if you like. Use it only if your product total is less than $150. You can find it in the right sidebar.

Join Me and get the best bang for your buck.

Do you want everything at your fingertips without having to look for it? Subscribe to Paper Pumpkin. Want more choices? Check out the Kit Collection.

One last thing, share, like, pin, tweet, or comment. Don't forget to FOLLOW and SUBSCRIBE to my blog. Okay, that was more than one thing.

HAPPY STAMPING!

Tuesday, September 27, 2022

Dream Big

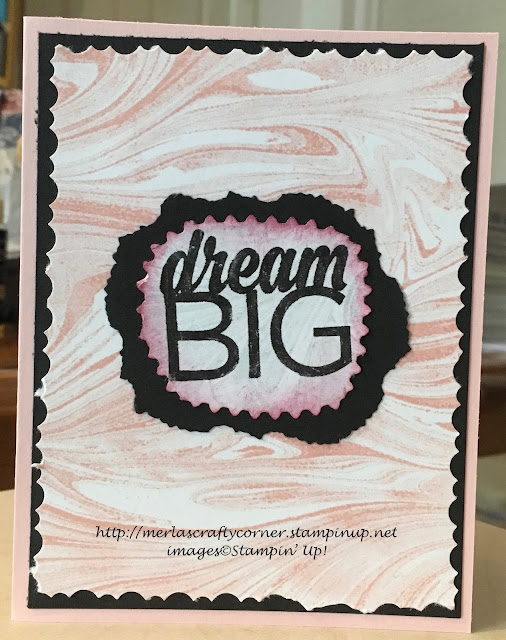
I had a container full of decorative scissors and decided to test them out on this card. Looks like some of them worked and others liked to tear rather than cut. Still, the marbled background made up for it. What do you think? 


Stamps:
   Marbled
   Enjoy the Little Things

Paper:
   Powder Pink A-2
   Basic White 5-1/4 x 4 (2), Scraps
   Basic Black 5-1/4 x 4, Scraps

Ink:
   Archival Basic Black
   Powder Pink
   Soft Sky
   Sweet Sugarplum

Technique:
   Sponging

Accessories:
   Sponge
   Decorative Scissors
   Adhesive

First, I stamped the marbled background using Powder Pink on Basic White. I cut the edges using decorative scissors. I adhered it to the Basic Black panel.

I then stamped the sentiment using Archival Basic Black ink on a scrap of Basic White. I cut it using decorative scissors, sponged it with Powder Pink, and added a dab of Soft Sky in the middle with a sponge to tone down the white.

Next, I adhered the sentiment to a larger scrap of Basic Black and tore around the edges. I then adhered it to the center of the marbled background.

Lastly, I adhered the Basic Black panel to the Powder Pink card front and added the Basic White panel to the inside of the card.

Thank you for taking the time to read this. I try my best to keep it short and sweet. Contact Me if you have any questions or need anything Stampin' Up!

Shop Now and take a peek at quality products. There is a HOST CODE if your product total is less than $150. You do not have to use it, but I would appreciate it. It is located in the right sidebar.

Join Me and become part of my team. I will be as involved as you like. Check out the advantages.

Are you curious, but undecided? Subscribe to Paper Pumpkin and try it. The kit will include everything you need, and it won't break the bank. Check out the Kit Collection for more all-inclusive kit choices.

Please share, like, pin, tweet, or comment. I would love for you to FOLLOW and SUBSCRIBE to my blog.

HAPPY STAMPING!

Monday, September 26, 2022

Christmas Sweater

This is a simple, yet elegant Christmas card that is easy to duplicate and send out to everyone on your list. Thoughts? 


Stamps:
   More Merry Messages

Paper:
   Cherry Cobbler A-2
   Warmth & Cheer DSP 2-1/2 x 4-1/4
   Basic Black 4-1/4 x 1/4, 3-1/2 x 2-1/2
   Basic White 5-1/4 x 4 (Inside)

Ink:
   Archival Basic Black

Technique:
   Die Cutting
   Dry Embossing

Accessories:
   Layering Ovals Framelits 
   Cable Knit Embossing Folder
   White Gel Pen
   Dimensionals
   Adhesive

First, I stamped and die cut my sentiment using the Layering Ovals Framelits and Basic White cardstock. 

I then cut the next larger scalloped oval in Basic Black, and placed a white dot on each scallop using a white gel pen.

I adhered these two layers together using liquid adhesive. This was attached to the top of the card front using dimensionals.

Next, I dry embossed the Warmth & Cheer DSP panel using the Cable Knit Embossing Folder. I did spray a bit of water on the DSP to prevent tearing.

I adhered the DSP to the bottom of the card using liquid adhesive.

I added a thin strip of Basic Black to cover the seam and pull the card together.

Lastly, I adhered the Basic White panel to the inside of the card.

You can easily dress this up more by adding rhinestones, pearls, sequins, or snowflakes. 

Thank you immensely for your time. I know how precious it can be. Please Contact Me if you need anything Stampin' Up! or if you have any questions.

Click on Shop Now and take a look at some quality products. Investing in your craft is a no-brainer. I have included a HOST CODE for those of you who enjoy ordering only one or two items. It is located in the right sidebar. Of course, if your product total is more than $150, enjoy your rewards.

Of course, the best value for your dollar is joining the Stampin' Up! family. Just click on Join Me and check out the benefits.

Let's not forget Paper Pumpkin. If you want to craft on the go, or you like to keep things small and low-key, check it out. The kit includes all you need.

Please take a minute or two to share, like, pin, tweet, or comment. Don't forget to FOLLOW and SUBSCRIBE to my blog.

HAPPY STAMPING!

Sunday, September 25, 2022

Celebrate You Too

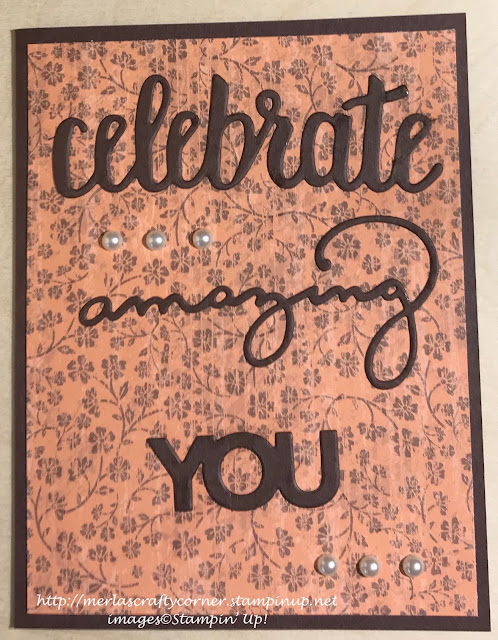
Don't forget about the amazing word dies in your collection. You can easily make them the focus of your card front. I did just that on this one. What do you think? 


Stamps:
   Celebrate You

Paper:
   Chocolate Chip A-2, Scraps (words)
   Afternoon Tea DSP 5-1/4 x 4
   Basic White 5-1/4 x 4

Ink:
   None

Technique:
   Die Cutting

Accessories:
   Celebrate You Thinlits Dies
   Pearl Basic Jewels
   Fine Tip Glue Pen
   Adhesive

First, I die cut the words, using scraps of Chocolate Chip cardstock.

I then adhered my Afternoon Tea DSP panel to the Chocolate Chip card front.

Next, I placed the words on the card front to check the spacing. I then used my Fine Tip Glue Pen to adhere them in place.

Lastly, I added a few pearls and adhered the Basic White panel to the inside of the card.

Thank you so much for giving me a bit of your time. Please Contact Me if I can return the favor.

Check out all of the options by clicking on the headers above.

Do not forget to FOLLOW and SUBSCRIBE to my blog. Please share, like, pin, tweet, or comment. I look forward to reading your thoughts and possible ideas for improvements.

HAPPY STAMPING!

Saturday, September 24, 2022

Above the Mountains

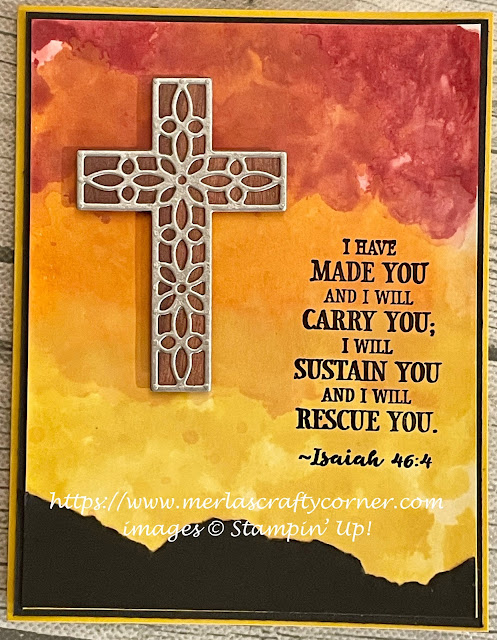
This is one of those cards that looks so much better in real life. The background was created using a bit of alcohol and ink, so each turned out to be quite unique. I made four of them, but they all used the same supplies. What do you think? 


Above the Mountains


Above the Mountains Too


Above the Mountains Tre


Above the Mountains Quad


Stamps:
   Hold on to Hope

Paper:
   Crushed Curry A-2
   Basic Black 5-3/8 x 4-1/8, 2-1/4 x 4 
   Glossy white 5-1/4 x 4
   Galvanized Metallic Paper 2 x 3
   Wood Textures DSP 2 x 3
   Basic White 5-1/4 x 4 (Inside)

Ink:
   StazOn Jet Black

Re-Inkers:
   Real Red
   Pumpkin Pie
   Crushed Curry

Technique:
   Polished Stone

Accessories:
   Cross of Hope Framelits
   Fine Tip Glue Pen
   Dimensionals
   Adhesive
   Stamparatus/MISTI

First, I created my background using the Polished Stone Technique found on SCS. Click HERE for instructions. I did not use a sealer on mine.

Once the background was dry, I adhered the Basic Black to the bottom of the panel. I took the Basic Black piece and tore it to give the illusion of mountains in the distance. I placed one half on one card and the other half on another card.

I then die cut the solid cross on a piece of Wood Textures DSP, and the more intricate cross on a piece of Galvanized Metallic Paper. I adhered the crosses together, using a Fine Tip Glue Pen.

Next, I adhered the glossy panel to the Basic Black matte. This helped to keep it flat. 

I then placed it into my Stamparatus and stamped the sentiment. I did have to stamp the sentiment twice to get it nice and dark. The last card moved a tad without my noticing, but I think it looks like shadow stamping. It makes this one VERY unique.

Next, I adhered the panel to the card front and added the cross, using dimensionals.

Lastly, I adhered a Basic White panel to the inside of the card.

Thank you so much for stopping by here. Contact Me if you have any questions.

Shop Now and buy your supplies to make your own cards. Place an order today for your favorites before they run out of stock.

Join Me and become my new team member. Enjoy the best savings and opportunity offered today!

Subscribe to Paper Pumpkin and craft monthly for under $25. Don't forget to take a look at the All-Inclusive Kits!

If you liked my card, please share, like, pin, tweet, or comment. I would love for you to FOLLOW and SUBSCRIBE to my blog. Let me know what you think in the comments below.

HAPPY STAMPING!

Friday, September 23, 2022

Flowery Lace

Let those deserving individuals know how much you appreciate who they are and what they do. Don't forget about those who volunteer their time and energy to help others in need. Thoughts? 


Stamps:
   Blessed by God

Paper:
   Blushing Bride A-2
   Falling in Love DSP 5-1/4 x 4
   Basic White 5-1/4 x 4 (Inside)

Ink:
   Night of Navy

Technique:
   CAS

Accessories:
   Pearl Basic Jewels
   Adhesive

First, I stamped the cross directly onto the Falling in Love DSP panel, using Night of Navy ink.

I then stamped the sentiment below it, using Night of Navy ink.

Next, I adhered the DSP panel onto the Blushing Bride card front.

Lastly, I added a pearl at the end of the sentiment and adhered the Basic White panel to the inside of the card.

Thank you for visiting. I do love company. Feel free to Contact Me if you have any questions.

Explore current products, promotions, and all of the opportunities. Just click on Shop Now. A HOST CODE is available in the right sidebar for those of you who do not earn your own rewards.

For those of you who like kits with everything you need to complete a project, we offer Paper Pumpkin. Your monthly cost is less than $25. Also, you might want to look at the new Kits Collection!

Join Me and become my newest team member. I look forward to meeting you.

Please take a minute to share, like, pin, tweet, or comment. Do not forget to FOLLOW and SUBSCRIBE to my blog.

HAPPY STAMPING!

Thursday, September 22, 2022

Hopeful

Here is a Clean And Simple (CAS) card that can be used for several occasions. The message is in the details that the sender expresses on the inside of the card. What do you think? 


Stamps:
   Hope & Prayer

Paper:
   Very Vanilla A-2, 5-1/4 x 4 (Inside)
   Falling in Love DSP 1-1/2 x 5-1/2

Ink:
   Tuxedo Black Memento

Technique:
   CAS

Accessories:
   Pearl Basic Jewels
   Adhesive

First, I cut and adhered the strip of DSP on the left side of the card front.

I then stamped the cross and the sentiment on the right side of the card using Tuxedo Black Memento ink. 

Lastly, I added a few pearls and adhered the Very Vanilla panel to the inside of the card.

Thank you so very much for being here. I appreciate you taking the time to glance at my work. Please Contact Me if I can be of service.

Are you interested in Stampin' Up! products to make your own cards? Shop Now and have a look-see. I placed a HOST CODE for you to use if you did not earn your own rewards. It is sitting in the right sidebar.

Do you like surprises? Subscribe to Paper Pumpkin and receive all you need to complete the monthly project. The cost is less than $25. Check it out.

Join Me and become privy to everything Stampin' Up! Receive a discount on all of your personal orders. Personally, I love SALES!

Please share, like, pin, tweet, or comment. Do not forget to FOLLOW and SUBSCRIBE to my blog.

HAPPY STAMPING!