Showing posts with label Dry Embossing. Show all posts

Saturday, October 26, 2024

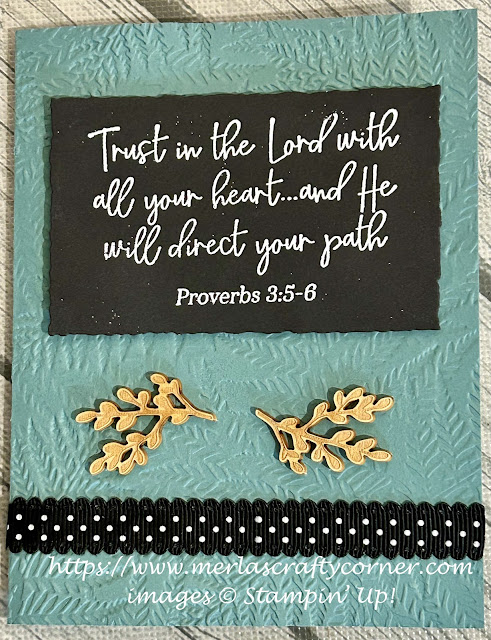
Proverbs

There are many techniques that can be used to make a card. My favorite is embossing. So, I heat and dry embossed on this card. What do you think? 


Stamps:
   You Are Beautiful

Paper:
   Lost Lagoon A-2
   Basic Black 2-1/2 x 3-7/8
   Basic White 5-1/4 x 4 (Inside)

Ink:
   VersaMark

Technique:
   Dry Embossing
   Heat Embossing

Accessories:
   White Embossing Powder
   Deckled Rectangles Dies
   Fern 3D Embossing Folder
   In Good Taste Elements
   Black Polka Dot Scalloped Ribbon 4-1/4"
   Embossing Buddy
   Dimensionals
   Mini Glue Dots
   Adhesive

First, I dry embossed the Lost Lagoon card front, using the Fern 3D Embossing Folder.

I then heat embossed the proverb on the Basic Black panel.
  1.    I rubbed down the panel with my embossing buddy.
  2.    I stamped the proverb, using VersaMark.
  3.    I applied white embossing powder to the panel.
  4.    I shook off the excess.
  5.    I applied heat with my heat tool.
  6.    I set it down to cool for a minute.

Next, I attached the heat embossed panel to the top of my card front, using dimensionals.

I then adhered the ribbon to the bottom of the card, using a strong adhesive. 

Next, I attached a couple of In Good Taste Elements, using glue dots.

Lastly, I added a Basic White panel to the inside of the card.

Thank you for stopping by here. Contact Me if you have questions or need anything Stampin' Up! related.

If you have a few minutes, Shop Now, and take a look at quality products and deals that may be happening today! There is a HOST CODE in the right sidebar, if you are interested.

If you like kits at your fingertips, then check out Paper Pumpkin and/or the Kits Collection. You will not regret it.

Want some company? Join Me and become a member of my team. I can't wait to meet you.

Please share, like, pin, tweet, or comment. Make sure you FOLLOW and SUBSCRIBE to my blog. This way you won't miss a thing! 

HAPPY STAMPING!

Wednesday, October 16, 2024

Cherry Blossom Fan

A single cherry blossom branch is quite elegant. I added a pearl at the center of each blossom for an extra glance. What do you think? 


Stamps:
   Cherry Blossom
   Teeny Tiny Wishes

Paper:
   Kraft A-2
   Basic White 5-1/4 x 4 (2), Scrap
   Textured/Embossed Pink DSP 1-3/4 x 5-1/4

Ink:
   Tuxedo Black Memento

Markers:
   Copic Markers - Personal Choice

Technique:
   CAS

Accessories:
   Classic Label Punch
   Clear Glitter Ribbon 6"
   Basic Pearl Jewels
   Dimensionals
   Tacky Tape
   Adhesive

First, I stamped the Cherry Blossom Branch on the top of a Basic White panel, using Tuxedo Black Memento ink.

I then colored it with my choice of Copic Markers.

Next, I adhered the pink embossed paper at the bottom of the panel. I think this paper is a sheet from a Martha Stewart Collection that I had in my stash.

I then added a strip of the clear glitter ribbon to hide the seam and give the card a bit of glimmer.

Next, I stamped and punched the sentiment, using the Classic Label Punch. I attached it to the bottom of the card front, using dimensionals.

I then added Basic Pearl Jewels to the center of the blossoms and to the sentiment label.

Lastly, I adhered a Basic White panel to the inside of the card.

Thank you for stopping to take a peek. Contact Me if you have any questions.

Click on Shop Now and browse through all things Stampin' Up! Start your wish list or order your favorites today. I included a Host Code for you to use if you like. Use it only if your product total is less than $150. You can find it in the right sidebar.

Join Me and get the best bang for your buck.

Do you want everything at your fingertips without having to look for it? Subscribe to Paper Pumpkin. Want more choices? Check out the Kit Collection.

One last thing, share, like, pin, tweet, and comment. Don't forget to FOLLOW and SUBSCRIBE to my blog. Okay, that was more than one thing.

HAPPY STAMPING!

Sunday, April 14, 2024

Timeworn Delight

Sometimes I am able to create a card with scraps that are left-over from other projects. This card was created, using scraps on my table. No stamping was required on this one. Thoughts? 


Stamps:
   None

Paper:
   Parakeet Party A-2
   Basic Black 5-3/8 x 4-1/8
   Delightful Floral DSP 2-1/4 x 1-5/8, 1-3/4 x 1-5/8
   Berry Burst 3-3/4 x 2-1/4, 3-3/4 x 1-3/4
   Basic White 5-1/4 x 4 (Inside)

Ink:
   None

Technique:
   Dry Embossing

Accessories:
   Timeworn Type 3D Embossing Folder
   Butterfly Gems
   2022-2024 In-Color Pearls
   Adhesive

First, I dry embossed the Berry Burst pieces, using the Timeworn Type 3D Embossing Folder.

I then adhered the Berry Burst pieces onto the Basic Black panel, leaving a Basic Black gap in the middle of the two pieces.

Next, I adhered this panel onto the Parakeet Party card front.

I then adhered the DSP pieces onto the card front, covering the Basic Black gap in between the Berry Burst pieces. 

Lastly, I added a couple of Butterfly Gems, a Pearl, and adhered a Basic White panel to the inside of the card.

I chose to omit a sentiment or greeting, making this an all occasions card. Note: this layout is perfect for odd-sized pieces of DSP.

Thank you for stopping by here. Contact Me if you have questions or need anything Stampin' Up! related.

If you have a few minutes, Shop Now, and take a look at quality products and deals that may be happening today! There is a HOST CODE in the right sidebar, if you are interested.

If you like kits at your fingertips, then check out Paper Pumpkin and/or the Kits Collection. You will not regret it.

Want some company? Join Me and become a member of my team. I can't wait to meet you.

Please share, like, pin, tweet, or comment. Make sure you FOLLOW and/or SUBSCRIBE to my blog. This way you won't miss a thing!

HAPPY STAMPING!

Monday, February 12, 2024

Pretty Peacock Butterflies

Here is a great layout to use up a few of those odd size left-over designer series paper scraps. They make excellent backgrounds, but the focus is still on the sentiment. Thoughts? 


Stamps:
   Thoughtful Expressions

Paper:
   Calypso Coral A-2
   Delightful Floral DSP 2-1/4 x 3-5/8, 1-3/4 x 3-5/8
   Berry Burst 2-1/4 x 1-1/2, 1-3/4 x 1-1/2
   Pretty Peacock 3" Sq.
   Basic White 2-1/2" Sq., 5-1/4 x 4 (Inside)

Ink:
   Pretty Peacock

Technique:
   Dry Embossing
   Die Cutting

Accessories:
   Thoughtful Expressions Dies
   Timeworn Type 3D Embossing Folder
   Butterfly Gems
   Polished Dots
   Adhesive

First, I stamped and die cut the sentiment and its matte, using the square pieces of cardstock, Pretty Peacock ink, and the Thoughtful Expressions Dies. 

I then adhered the Basic White sentiment onto the Pretty Peacock matte and set it aside.

Next, I placed the Berry Burst pieces and the DSP pieces on the Calypso Coral card front to make sure I was matching them up correctly. Note that each piece allows a little of the Calypso Coral card front to show around it.

I then adhered the two DSP strips onto the card front.

Next, I dry embossed the two Berry Burst pieces, using the Timeworn Type 3D Embossing Folder. You may want to make sure the script is flowing in the correct direction.

I then adhered these onto the card front.

I added the sentiment, using adhesive, but you can easily raise it a bit with dimensionals if you wish.

Lastly, I added a couple of butterflies and adhered a Basic White panel to the inside of the card.

Thanks so much for reading through my blog today. Contact Me if I can answer anything for you, or if you would like to buy any of my cards.

If you would like to buy your own products and make your own cards, click on Shop Now and browse current merchandise. I have placed a HOST CODE for you to use if you do not earn any rewards on your own. It is located in the right sidebar.

Our monthly subscription to Paper Pumpkin is affordable and flexible. The cost is less than $25 monthly. Check out the Kits Collection for more options at varying prices.

Join Me and become part of a team. Check out the benefits and decide if it is for you.

Please share, like, pin, tweet, or comment. Don't forget to FOLLOW and SUBSCRIBE to my blog.

HAPPY STAMPING!

Sunday, February 11, 2024

Jeweled Flowers

This Layered Floral 3D embossing folder stands out beautifully when you brush on a bit of color. Thoughts? 


Stamps:
   None

Paper:
   Sweet Sugarplum A-2
   Basic Black 5-3/8 x 4-1/8
   Basic White 5-1/4 x 4 (2)

Ink:
   Berry Burst
   Daffodil Delight
   Lavender Lace
   Parakeet Party
   Sweet Sugarplum

Technique:
   Dry Embossing
   Blending Brushes/Sponging

Accessories:
   Layered Florals 3D Embossing Folder
   Iridescent Rhinestone Basic Jewels
   Blending Brushes
   Adhesive

First, I took a Basic White panel and dry embossed it, using the Layered Florals 3D embossing folder.

I then brushed on various colors on the florals. I used all of the colors listed under ink. You can simply choose your favorite colors.

Next, I added a few Iridescent Rhinestones. Remember that less is always more. 

I then adhered the panel onto a Basic Black matte, and then onto the Sweet Sugarplum card front.

Lastly, I adhered a Basic White panel to the inside of the card.

Thank you so much for stopping by here. Please Contact Me if you have any questions regarding Stampin' Up!

Take a few moments and Shop Now or click on any of the headers above for more information.

Don't forget to share, like, pin, tweet, or comment. I would appreciate it if you chose to FOLLOW or SUBSCRIBE to my blog.

HAPPY STAMPING!

Wednesday, January 24, 2024

Sweet Valentine

Send Valentine's Day cards to everyone! Receiving mail that does not have a due date is definitely a cause for smiling. Make it happen! Thoughts? 


Stamps:
   Sweet Conversations

Paper:
   Gorgeous Grape A-2
   Basic White 3-1/4 x 5/8, 5-1/4 x 4 (2)
   Basic Black 3-1/8 x 3-3/8
   Sweet Talk DSP 2 x 5-1/4, 3 x 3-1/4

Ink:
   Real Red

Technique:
   Dry Embossing

Accessories:
   Gingham Embossing Folder
   Iridescent Rhinestone Jewels
   Dimensionals
   Adhesive

First, I dry embossed a Basic White panel, using the Gingham Embossing Folder.

I then adhered the striped DSP to the center of the panel.

Next, I adhered the DSP hearts to the Basic Black matte.

I then adhered the matted panel to the center of the embossed/striped panel. I used liquid adhesive to make sure it was adhered securely onto the embossed panel.

I then adhered the entire panel to the Gorgeous Grape card front.

Next, I stamped and cut the sentiment, using Real Red ink and my paper snips.

I attached the sentiment, using dimensionals.

Lastly, I added a few rhinestones and adhered the other Basic White panel to the inside of the card.

Thank you for being here! Contact Me if you have questions or need anything that is Stampin' Up! related.

Check out each of the headers above and see the fabulousness that is Stampin' Up! If you become a buyer, there is a HOST CODE located in the right sidebar for your use.

Please take a minute to share, like, pin, tweet, or comment. Plus, you want to take the time to FOLLOW and SUBSCRIBE to my blog.

HAPPY STAMPING!

Sunday, December 24, 2023

Vellum Stars

I don't use vellum often enough because I find it difficult to hide the glue marks. I used vellum tape on this one, but I can still see the residue. Thoughts? 


Stamps:
   Stars at Night

Paper:
   Misty Moonlight A-2
   Vellum 5-1/4 x 4
   O Holy Night DSP 1-1/2 x 4
   Copper Clay 1-3/4 x 3-1/4
   Basic White 5-1/4 x 4 (Inside)

Ink:
   Tuxedo Black Memento

Technique:
   Dry Embossing
   Die Cutting

Accessories:
   Stars at Night Hybrid Embossing Folder
   Stars at Night Dies
   Night of Navy & Gold Ribbon - 6"
   Adhesive-Backed Star Trinkets
   Vellum Tape
   Adhesive

First, I dry embossed the vellum panel, using the Stars at Night Hybrid Embossing Folder.

I then added the ribbon to the center of the DSP strip. I wrapped it around to the back and adhered the ends on the back.

Next, I adhered the DSP panel with the ribbon to the bottom of the embossed vellum panel.

I then stamped and die cut the sentiment. 

Next, I adhered the vellum panel to the Misty Moonlight card front. I used vellum tape, but you can use liquid adhesive or glue dots.

I then added the sentiment at the bottom. I used liquid adhesive, but you can also adhere it with dimensionals.

Lastly, I added a star trinket and adhered a Basic White panel to the inside of the card.

Thanks for stopping by and taking a quick peek. Contact Me for more information on my cards or Stampin' Up!

Click on the headers above and satisfy your curiosity.

Please share, like, pin, tweet, or comment. Please take the time to FOLLOW and SUBSCRIBE to my blog.

HAPPY STAMPING!

Thursday, July 20, 2023

Pearly Red Heart

Create your own background by dry embossing a panel of aluminum foil. It is so easy and looks amazing! What do you think? 


Stamps:
   Blessed by God

Paper:
   Real Red A-2, 3" Sq.
   Basic White 5-1/4 x 4 (2)
   Aluminum Foil 5-1/2 x 4-1/4 (must cover the entire Basic White panel)

Ink:
   Archival Basic Black

Technique:
   Die Cutting
   Dry Embossing

Accessories:
   Embossing Folder
   Hearts a Flutter Dies
   Basic Pearl Jewels
   Aluminum Foil
   Adhesive

First, I covered a Basic White panel with aluminum foil. You can secure it on the back with tape if you want. I just folded mine over and it held just fine.

I then placed it inside an embossing folder and ran it through the embossing machine. I chose a folder that had birds and vines on it. You can choose any design you like for your background.

I then adhered it to the Real Red card front.

Next, I stamped and die cut a heart, using the Hearts a Flutter Dies. I attached it with adhesive, but you may choose to add dimensionals or leave it flat.

Lastly, I added some pearls and adhered the other Basic White panel to the inside of the card.

Thank you for being here and taking the time to look at my blog entry. Contact Me if you need anything related to Stampin' Up!

If you would like to Shop Now, you can check out all that is new, current, and on-sale! I have included a HOST CODE in the right sidebar, if you would like to use it.

Notice that we offer a monthly subscription called Paper Pumpkin. Check it out and see if it is for you. The Kits Collection also offers a variety of kits at varying prices.

In order to get the most value for your dollar, you will want to Join Me and become part of my team. Click on the link and see if you are interested.

I would love for you to take a few minutes and share, like, pin, tweet, or comment. Don't forget to FOLLOW and SUBSCRIBE to my blog.

HAPPY STAMPING!

Monday, May 8, 2023

Shelling Sympathy

Create texture on this beautiful sympathy card with an embossing folder. The recipient will find comfort in the feel of the card. Thoughts?


Stamps:
   Seaside Bay

Paper:
   Petal Pink A-2, 2-1/4" Sq., 5 x 3-3/4, Scrap
   Balmy Blue 5-1/4 x 4
   By the Bay DSP 2-3/4 x 5
   Basic White 5-1/4 x 4 (Inside)

Ink:
   Petal Pink
   VersaMark

Technique:
   Dry Embossing
   Heat Embossing
   Die Cutting
   Sponging

Accessories:
   Seashells 3D Embossing Folder
   Layering Circles Framelits
   Seaside Bay Dies
   Balmy Blue & White Ribbon 20"
   White Embossing Powder
   Gold Embossing Powder
   Sponge
   Glue Dots
   Dimensionals
   Adhesive

First, I adhered the DSP panel onto the 5 x 3-3/4" Petal Pink panel.

Next, I placed it into the Seashells 3D embossing folder and ran it through the Die Cutting & Embossing machine.

I then wrapped the blue & white ribbon around it and tied a bow in the lower part of the panel.

I adhered this embossed panel onto the Balmy Blue panel and then onto the Petal Pink card front.

I then took a scrap of Petal Pink and stamped a seashell, using VersaMark. I added some White Embossing Powder and heat embossed it. I die cut it using the matching die cut from the Seaside Bay Dies.

Next, I took the 2-1/4" square of Petal Pink and die cut a circle, using the Layering Circles Framelits.

I then stamped the sentiment with VersaMark, added Gold Embossing Powder and heat embossed it.

Next, I sponged the circle with a bit of Petal Pink ink. I added the white embossed seashell using glue dots.

I then attached this sponged circle to the top center of the card front.

Lastly, I added the Basic White panel to the inside of the card.

Thank you so much for stopping by here and spending a few minutes of your day with me. I appreciate your time. Contact Me if you have any questions, need a demonstrator, or just want to stamp or share ideas.

Shop Now and enjoy browsing products and promotions. I have a HOST CODE in the right sidebar in case you did not earn your own rewards.

Do not miss the opportunity to Join Me and become the newest member of my team.

Paper Pumpkin should not be ignored. I enjoy putting my kit together monthly.

Take a few more minutes and share, like, pin, tweet, or comment. I would love to see what you really think. Do not forget to FOLLOW and SUBSCRIBE to my blog.

HAPPY STAMPING!

Have a look-see at the items that are still current in the new catalog: Shelling Sympathy