Saturday, December 25, 2021

Oh, Christmas Tree

 Merry Christmas Everyone! 


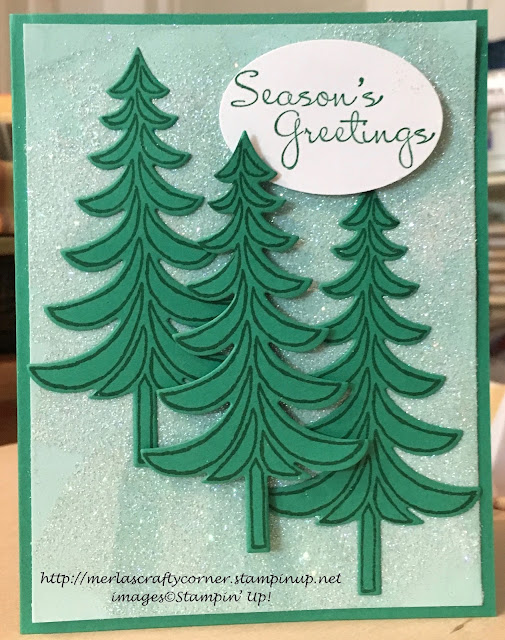
If you want to get messy today and spread glitter everywhere, this is the technique for you. It is a faux suede technique with a twist. It is called Iced Leather. Of course, I am speaking of only the background. What do you think?


Stamps:
   Santa's Sleigh
   More Merry Messages

Paper:
   Emerald Envy A-2, 4-1/4 x 2-1/2 (3)
   Basic White 1-3/4 x 2-1/4, 5-1/4 x 4 (Inside)
   Pool Party 5-1/4 x 4

Ink:
   Emerald Envy

Technique:
   Iced Leather

Accessories:
   Sanding Block
   Heat & Stick Powder
   Dazzling Diamonds Glitter
   VersaMark
   Santa's Sleigh Framelits Dies
   Extra-Large Oval Punch
   Dimensionals
   Adhesive

First, I made the background, Iced Leather. I took a sanding block and roughed up the Pool Party panel. This gave the panel the look of suede.

I then swiped the sueded panel with VersaMark. I tried to create some rough or hard edges along with some soft edges.

I then sprinkled some Heat and Stick Powder. I applied heat with my heat tool and quickly added the glitter. I tapped off the access and set it aside to cool.

I stamped and die cut three trees and a sentiment.

I arranged them all on the card and attached them using dimensionals.

Lastly, I adhered the basic white panel to the inside of the card.

Thank you so much for stopping by here. Contact Me if you have any questions.

Shop Now and buy your supplies to make your own cards. Take a peek today and find out what you can grab for FREE!

Join Me and become my new team member. Enjoy the best savings and opportunity offered today!

Subscribe to Paper Pumpkin and craft monthly for under $25. Don't forget to take a look at the All-Inclusive Kits!

If you liked my card, please share, like, pin, tweet, or comment. I would love for you to FOLLOW and SUBSCRIBE to my blog. Let me know what you think in the comments below.

HAPPY STAMPING!

Friday, December 24, 2021

Peek a Boo Celebrations

This designer series paper is so perfect, all I had to do was stamp a sentiment on the bottom and attach it to a card. It truly is picture perfect. Thoughts? 


Stamps:
   Something to Celebrate

Paper:
   Peek a Boo Peach A-2
   Basic Black 5-1/2 x 3-1/4
   Picture Perfect DSP 5-1/2 x 3
   Basic White 5-1/4 x 4 (Inside)

Ink:
   Tuxedo Black Memento

Technique:
   CAS

Accessories:
   2017-2019 In-Color Bitty Bows
   Adhesive

First, I stamped my sentiment on the bottom of the DSP panel, using Tuxedo Black Memento.

I then adhered the DSP panel onto the Basic Black panel and then onto the Peek a Boo Peach card front.

Next, I adhered a bitty bow in the middle of the party hat and added the Basic White panel to the inside of the card.

Here is another card, using a different color bow.

Peek a Boo Celebrations Too


Thank you for visiting. I do love company. Feel free to Contact Me if you have any questions.

Explore current products, promotions, and all of the opportunities. Just click on Shop Now. A HOST CODE is available in the right sidebar for those of you who do not earn your own rewards.

For those of you who like kits with everything you need to complete a project, we offer Paper Pumpkin. Your monthly cost is less than $25. Also, you might want to look at the new Kits Collection!

Join Me and become my newest team member. I look forward to meeting you.

Please take a minute to share, like, pin, tweet, or comment. Do not forget to FOLLOW and SUBSCRIBE to my blog.

HAPPY STAMPING!

Thursday, December 23, 2021

Fresh Fig Bow

Sometimes all you need is a simple thank you. I decided to add just a hint of color with an itty-bitty bow and a few sequins. What do you think? 


Stamps:
   Shaded Summer

Paper:
   Fresh Fig A-2
   Basic White 5-1/4 x 4 (2)

Ink:
   Tuxedo Black Memento

Technique:
   Die Cutting

Accessories:
   Summer Shadows Dies
   2017-2019 In-Color Bows
   Peaceful Poppies Sequins
   Basic Rhinestone Jewels
   Dimensionals
   Adhesive

First, I stamped and die cut the flowers, using Tuxedo Black Memento ink along with the Summer Shadows Dies. I attached them to the card front with dimensionals.

Next, I stamped my sentiment.

I then attached the Fresh Fig bow. It has its own adhesive.

I added a few rhinestones and sequins.

Lastly, I adhered the panel to the Fresh Fig card front and attached the other Basic White panel to the inside of the card.

Thank you so very much for being here. I appreciate you taking the time to glance at my work. Please Contact Me if I can be of service.

Are you interested in Stampin' Up! products to make your own cards? Shop Now and have a look-see. I placed a HOST CODE for you to use if you do not earn your own rewards. It is sitting in the right sidebar.

Do you like surprises? Subscribe to our Paper Pumpkin and receive all you need to complete the monthly project. The cost is less than $25. Check it out.

Join Me and become privy to everything Stampin' Up! Receive a discount on all of your personal orders. Personally, I love SALES!

Please share, like, pin, tweet, or comment. Do not forget to FOLLOW and SUBSCRIBE to my blog.

HAPPY STAMPING!

Tuesday, December 21, 2021

Thank You Ballad

These left-over paper pumpkin tags came preprinted. I like the font and the size. I'm also glad they left enough room to sponge or add embellishments if we choose. What do you think?


Stamps:
   Giftable Greetings - Paper Pumpkin (Aug/2017)

Paper:
   Pool Party A-2
   Bird Ballad DSP 5-1/4 x 4
   Tag - Paper Pumpkin Preprinted
   Basic White 5-1/4 x 4 (Inside)

Ink:
   None (Preprinted tag used Pool Party)

Technique:
   None

Accessories:
   Basic Rhinestone Jewels
   Adhesive

First, I adhered the DSP panel onto the Pool Party card front.

I then attached the oval tag to the center of the card.

Next, I added rhinestones at the base of the tag.

Lastly, I adhered a Basic White panel to the inside of the card.

I like to keep my cards simple, but you can easily blend some color onto the tag. You can round the corners or add a few butterfly die cuts or embellishments. The possibilities are endless. Mainly, you want to have fun!

Thank you so much for stopping by here and taking a quick look-see. If you have any questions or need my assistance, Contact Me.

Shop Now and take a look at all of our new products and current promotions. Please use the HOST CODE sitting in the right sidebar if you did not earn your own rewards.

If you want to craft, but keep your costs below $25 a month, check out Paper Pumpkin. It just might be what you are looking for at the moment.

Join Me and become the newest member of my team. Remember there are no hidden agendas or penalties for giving it a go. Don't pass this opportunity to save.

You've come this far, so please share, like, pin, tweet, or comment. I appreciate your time and efforts. Let me know your thoughts and leave all of your questions behind. Do not forget to FOLLOW and SUBSCRIBE to my blog.

HAPPY STAMPING!

Monday, December 20, 2021

Balloon Gallery

I stamped a sentiment on a left-over tag and then just put items from my stash together for this card. I especially like the party animal embellishments because they can be used as charms on a bracelet. Thoughts?


Balloon Gallery


Stamps:
   Art Gallery

Paper:
   Basic Black A-2
   Picture Perfect Party DSP 5-1/2 x 3
   Basic White 5-1/4 x 4 (Inside)
   Paper Pumpkin Tag (Left-Over)

Ink:
   Tuxedo Black Memento

Technique:
   CAS

Accessories:
   Party Animal Embellishments
   Star Designer Elements
   Glue Dots
   Dimensionals
   Adhesive

First, I cut and adhered my DSP panel onto the top of my Basic Black card front.

I then stamped a left-over Paper Pumpkin tag with my sentiment and attached it using dimensionals.

I added a party animal embellishment (balloon) using glue dots and adhered a star on each side of the sentiment.

Lastly, I adhered the Basic White panel to the inside of the card.

Here is another card using a party hat as an embellishment. 


Balloon Gallery Too


Thank you so much for stopping by here and spending a few minutes of your day with me. I appreciate your time. Contact Me if you have any questions, need a demonstrator, or just want to stamp or share ideas.

Shop Now and enjoy browsing products and promotions. I have a HOST CODE in the right sidebar in case you did not earn your own rewards.

Do not miss the opportunity to Join Me and become the newest member of my team.

Paper Pumpkin should not be ignored. I enjoy putting my kit together monthly.

Take a few more minutes and share, like, pin, tweet, or comment. I would love to see what you really think. Do not forget to FOLLOW and SUBSCRIBE to my blog.

HAPPY STAMPING!

Sunday, December 19, 2021

Cinnamon Cider Doily

The more I use Cinnamon Cider, the more I like it! Thoughts? Feelings? 


Stamps:
   Shaded Summer
   Expressions of Color (Paper Pumpkin 6/21)

Paper:
   Cinnamon Cider A-2
   Basic Black 5-3/8 x 4-1/8
   Basic White 2-1/4" Sq., 5-1/4 x 4 (Inside)

Ink:
   Cinnamon Cider
   Tuxedo Black Memento

Technique:
   Die Cutting

Accessories:
   Summer Shadows Dies
   Heart & Home Doilies
   Stars Designer Elements
   2020-2022 In-Color Enamel Dots
   Paper Pumpkin Left-Over Tag
   Basic Rhinestone Jewels
   Dimensionals
   Adhesive

First, I stamped and die cut the flower image using Cinnamon Cider ink on Basic White cardstock, along with the Summer Shadows Dies.

Next, I stamped a sentiment on a left-over Paper Pumpkin tag. I keep all extra tags in one box, so it is difficult to identify the original Paper Pumpkin Kit.

I then adhered the Basic Black panel onto the Cinnamon Cider card front.

I adhered the doily and attached the flower using dimensionals.

I then adhered the tag to the bottom of the Basic Black panel.

Lastly, I added a few enamel dots, a couple of star embellishments, and adhered a Basic White panel to the inside of the card.

Thank you so much for dropping by here. Contact Me if you have any questions.

Click on all of the tabs above and explore products, promotions, and opportunities.

Please take the time to share, like, pin, tweet, or comment. Do not forget to FOLLOW and SUBSCRIBE to my blog.

HAPPY STAMPING!

Saturday, December 18, 2021

Flirty Floral

The heavy strokes on this designer series paper gives the impression of an actual oil painting. I needed a congratulatory card, so I placed a tag on it. You can simply leave off the tag and determine its purpose by your written words inside. Thoughts? 


Stamps:
   Expressions of Color (Paper Pumpkin 6/21)

Paper:
   Flirty Flamingo A-2
   Fine Art Floral DSP 5-1/4 x 4
   Basic White 5-1/4 x 4 (Inside)

Ink:
   Tuxedo Black Memento

Technique:
   CAS

Accessories:
   Tag - Paper Pumpkin Left-Over
   Stars Designer Elements
   Adhesive

First, I stamped my sentiment on a left-over Paper Pumpkin tag. I keep all left-over tags together in a box, so it is difficult to identify the original kit.

I then adhered the DSP panel onto the card base.

Next, I adhered the tag and added some star embellishments.

Lastly, I adhered a basic white panel to the inside of the card.

Thank you so much for stopping by here. Contact Me if you have any questions.

Shop Now and buy your supplies to make your own cards. Take a peek today and find out what you can grab for FREE!

Join Me and become my new team member. Enjoy the best savings and opportunity offered today!

Subscribe to Paper Pumpkin and craft monthly for under $25. Don't forget to take a look at the All-Inclusive Kits!

If you liked my card, please share, like, pin, tweet, or comment. I would love for you to FOLLOW and SUBSCRIBE to my blog. Let me know what you think in the comments below.

HAPPY STAMPING!

Friday, December 17, 2021

Copper Stars

There are so many ways to use up left-over paper pumpkin supplies. These triangles made up a gift ornament. I decided to cut them apart and use them differently What do you think? 


Stamps:
   Picture Perfect Birthday

Paper:
   Chocolate Chip A-2
   Going Places DSP 5-1/4 x 4
   Basic White 5-1/4 x 4 (Inside)
   Triangles & Tag - Paper Pumpkin

Ink:
   Chocolate Chip

Technique:
   None

Accessories:
   Stars Designer Elements
   Glue Dots
   Adhesive

First, I cut up the triangles and adhered them together, using glue dots to hold them in place, one on top of the other.

I then adhered them to the top center of the DSP.

Next, I stamped and adhered a tag to the bottom center of the DSP panel. The tag was also left-over from a Paper Pumpkin kit.

I then adhered the DSP panel onto the Chocolate Chip card front.

Lastly, I added some Star Designer Elements to the card front and adhered a Basic White panel to the inside of the card.

Thank you for visiting. I do love company. Feel free to Contact Me if you have any questions.

Explore current products, promotions, and all of the opportunities. Just click on Shop Now. A HOST CODE is available in the right sidebar for those of you who do not earn your own rewards.

For those of you who like kits with everything you need to complete a project, we offer Paper Pumpkin. Your monthly cost is less than $25. Also, you might want to look at the new Kits Collection!

Join Me and become my newest team member. I look forward to meeting you.

Please take a minute to share, like, pin, tweet, or comment. Do not forget to FOLLOW and SUBSCRIBE to my blog.

HAPPY STAMPING!

Friday, December 10, 2021

Natural Congrats Ballad

I like all of the colors on this designer series paper (DSP). You can choose to highlight any one of them simply by choosing it as your card base. I chose Soft Suede on one card and Calypso Coral for another one. What color would you choose?


Stamps:
   Giftable Greetings: Paper Pumpkin, Aug., 2017

Paper:
   Soft Suede A-2, or Calypso Coral A-2
   Bird Ballad DSP 5-1/4 x 4
   Basic White 5-1/4 x 4 (Inside)
   Tag - Left-Over Paper Pumpkin

Ink:
   None

Technique:
   None

Accessories:
   Basic Rhinestone Jewels
   Expressions Natural Elements
   Glue Dots
   Adhesive

First, I adhered the DSP panel onto a card base.

Next, I adhered a tag onto the DSP. One tag was blank, and the other one was pre-printed in Calypso Coral.

I then attached a wooden Congrats from the Expressions Natural Elements. I used glued dots to attach it to the tag.

Lastly, I added rhinestones and a basic white panel to the inside of the card. 

Here is the other card showing Calypso Coral as the card base:

Congrats Ballad


Thank you for visiting. I do love company. Feel free to Contact Me if you have any questions.

Explore current products, promotions, and all of the opportunities. Just click on Shop Now. A HOST CODE is available in the right sidebar for those of you who do not earn your own rewards.

For those of you who like kits with everything you need to complete a project, we offer Paper Pumpkin. Your monthly cost is less than $25. Also, you might want to look at the new Kits Collection!

Join Me and become my newest team member. I look forward to meeting you.

Please take a minute to share, like, pin, tweet, or comment. Do not forget to FOLLOW and SUBSCRIBE to my blog.

HAPPY STAMPING!

Thursday, December 9, 2021

Birthday Bows

Here is a gender-neutral birthday card. Bows are for presents, and not people. Although, some people like to add them to their person during a birthday or some sort of party. Weird, I know. What do you think?


Stamps:
   Picture Perfect Birthday

Paper:
   Bermuda Bay A-2
   Picture Perfect Party DSP 5 x 3-3/4, 5 x 2-1/4
   Basic Black 5-1/4 x 4
   Basic White 5-1/4 x 4 (Inside)

Ink:
   Tuxedo Black Memento

Technique:
   Punching

Accessories:
   2017-2019 In-Color Bitty Bows
   2-1/4" Circle Punch
   Basic Rhinestone Jewels
   Adhesive

First, I stamped and punched out the sentiment, using Tuxedo Black Memento ink and the 2-1/4" Circle Punch.

Next, I adhered the DSP panel onto the Basic Black panel and then onto the card front.

I then adhered the sentiment to the card front.

Lastly, I added a bitty bow, a rhinestone, and adhered a Basic White panel to the inside of the card.

Here is another card using the same supplies, but with the smaller strip of DSP listed above.

Birthday Bows Too


Thank you so very much for being here. I appreciate you taking the time to glance at my work. Please Contact Me if I can be of service.

Are you interested in Stampin' Up! products to make your own cards? Shop Now and have a look-see. I placed a HOST CODE for you to use if you do not earn your own rewards. It is sitting in the right sidebar.

Do you like surprises? Subscribe to our Paper Pumpkin and receive all you need to complete the monthly project. The cost is less than $25. Check it out.

Join Me and become privy to everything Stampin' Up! Receive a discount on all of your personal orders. Personally, I love SALES!

Please share, like, pin, tweet, or comment. Do not forget to FOLLOW and SUBSCRIBE to my blog.

HAPPY STAMPING!