Saturday, August 31, 2019

Light & Peace

I like Designer Series Paper (DSP) that does all of the work for you. This Feels Like Frost DSP from our SU Holiday Catalog is so picturesque, all you have to do is stamp a sentiment, greeting, and/or add a card base. Here, I stamped directly onto it with an angel and a sentiment. What do you think?


Stamps: 
   Light & Peace

Paper: 
   Seaside Spray A-2 
   Feels Like Frost DSP 5 1/4 x 4

Ink: 
   Night of Navy

Technique: 
   CAS

Accessories: 
   Adhesive

I do caution you to be careful in cutting your DSP. You want to make sure you have the best scene of that 6 x 6 sheet. 

Thank you so much for stopping by here and taking a peek. I do appreciate your time and feedback. 

If you don't have a demonstrator, I would love the opportunity to step in and be of service. Contact me for further details. 

Today is the last day to sign up as a new demonstrator and receive an extra $30 in product + a $10 coupon code to be used next month. Click on Join Me above and check it out before it is too late. This is the BEST offer EVER!

HAPPY STAMPING!


Friday, August 30, 2019

Hugs

I like the soft colors on this card. I think it emits a nice warm and comforting state for the recipient.


Stamps: Elements of Style, Kindness & Compassion
Paper: Pink Pirouette A-2, Whisper White 3 1/4 x 4
Ink: Jet Black StazOn
Blendabilities: Pink Pirouette, Old Olive, Wild Wasabi, Crumb Cake
Accessories: Pink Striped Ribbon 4 1/4", Basic Pear Jewels, Tear & Tape, Adhesive

Although these stamps have been retired, I like the layout I used here. Basically, you can stamp any bouquet of flowers or other flower branches in your collection. 

Thank you all for dropping by and taking a peek. Shop Now for any of Stampin' Up!'s current products. I would love to become your demonstrator.

Our recruiting special runs out at the end of August. So, if you have ever thought about signing up and joining the SU (Stampin' Up!) family, now is the time. You receive $30 more than you normally would ($155) plus free business supplies to get you started, plus a $10 coupon code to be used the following month plus a 20% discount on all of your future orders! So you pay $99 and you get all of the above. Just click on Join Me above. 

HAPPY STAMPING!

Thursday, August 29, 2019

Tango's Notes

Thank you notes never go out of style. Here is one that is in the classic black and white colors and will fit a regular letter size envelope. This one is also a Christmas theme card. 


Stamps: Tag Time
Paper: Whisper White 6 x 7 scored @ 3 1/2, Scrap (tag), Basic Black 5 3/4 x 3 1/4, Scrap (Cat), Merry Music DSP 3 x 5 1/2, Black Glitter 3 x 1/2
Ink: Archival Basic Black
Technique: Punch
Accessories: Pretty Label Punch, Cat Punch, Black Rhinestone Jewels, Dimensionals, Adhesive

So often we are so busy exchanging gifts during Christmas and verbally thanking those who are so generous that we forget to follow up with a written thank you note. Of course, there is always the procrastinator who says, "I'll do it later." Then it is just too late to send it. Aye.

Masculine thank you notes are hard to find. Usually, all it has is a big thank you on the front. I thought this one added a little something extra.

Thank you all so much for stopping by here and taking a quick peek. Feel free to leave a little love behind in your comments. I do appreciate all of your feedback. 

HAPPY STAMPING!

Wednesday, August 28, 2019

Golden City

This card was created using die cut images. The only stamping is the sentiment. I also like the contrast in colors. Don't you?


Stamps: Night in Bethlehem
Paper: Barely Banana A-2, Blackberry Bliss 5 1/4 x 4, 5 x 2, Blush Blossom 5 x 3 3/4, Gold Foil 5 x 2 1/4, Scrap (Star), Basic Black Scraps (Figures)
Ink: Blackberry Bliss
Technique: Die Cutting
Accessories: Bethlehem Edgelits Dies, Dimensionals, Adhesive

I used dimensionals on the star and the Holy Family. The city is adhered directly onto the card stock. I do like the look of the gold foil behind the Rich Razzleberry. 

Here is another picture of the card where the gold shines a bit more:


Here is one more...


Thank you for stopping by and taking a peek. I welcome and appreciate your comments. 

HAPPY STAMPING!

Tuesday, August 27, 2019

Go Team

Here is a card for the soccer player or coach in the family. 


Stamps: I Love Soccer, Sporting
Paper: Whisper White A-2
Ink: Archival Basic Black
Markers: Soft Suede, Tangerine Tango, Smoky Slate, Daffodil Delight, Basic Black
Technique: CAS (Clean and Simple)
Accessories: None

This is a clean and simple card. This means there is still quite a bit of white space on the card. All you need is paper, stamps, and ink. Lastly, there is only one layer or none.

I hope you like this simple card. It is perfect for the soccer player or sportsman in the family. It can be given for any occasion to show encouragement, unity, or congratulations. 

Thank you for stopping by here and taking a peek. I appreciate your time and feedback. 

HAPPY STAMPING!


Monday, August 26, 2019

Hey, Circles

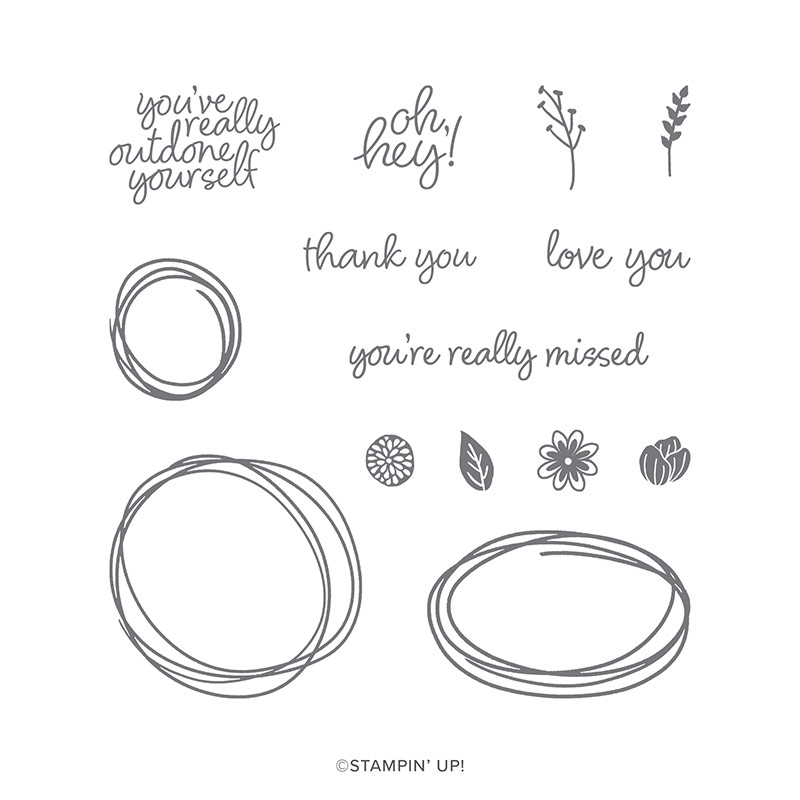
I cannot sit still. Consequently, when I am listening or talking on the phone, I am doodling. Here is a card that reminds me of some scribbles I make while my mind is on something else.


Stamps: Sweetly Swirled
Paper: Rich Razzleberry A-2, Very Vanilla 5 1/4 x 4 (2)
Ink: Mango Melody, Pineapple Punch, Rich Razzleberry, Shaded Spruce
Technique: CAS
Accessories: Brights Candy Dots, Basic Rhinestone Jewels, Adhesive

I placed flowers in the circles around the sentiment only to draw attention to it. Of course, this is a matter of preference. I like this stamp set with all of its possibilities. I have only used 3 stamps out of this set. 

Price: $21.00


There are two die sets that coordinate with this set as well: The Layering Ovals and The Layering Circles. Click on Shop Now above to order yours today.

Thank you so much for stopping by here and taking a peek. I welcome and appreciate all of your feedback.

HAPPY STAMPING!


Sunday, August 25, 2019

Metallic For You

I like the faux tin metal look on this card. It is an easy technique to do as long as you have all of the tools. There are You Tube videos out there for you to watch if you do not understand my instructions. 


Stamps: Mother's Love
Paper: Strawberry Slush A-2, 4 1/4 x 2 1/4, Mossy Meadow 4 1/2 x 2 1/2, Whisper White 4 x 2, Basic Black 5 1/4 x 4, Sahara Sand 8 1/2 x 2 3/4
Ink: Strawberry Slush, Mossy Meadow, Tuxedo Black Memento
Technique: Faux Tin Metal
Accessories: Silver Embossing Powder, 1 1/4" Square Punch, Versamark, Heat Tool, Finial Press Embossing Folder, Big Shot, Dimensionals, Adhesive

First, you want to create your 10 faux tin metal square tiles. 

Take the Sahara Sand strip and stamp it with Versamark on top of a scratch paper. Leave about a half inch at the end of it to hold it when you apply heat. 

You then remove the scratch paper and replace it with a clean scratch paper. Proceed to pour the silver embossing powder. 

Once it is covered apply heat with your heat tool. Move the heat tool around to avoid overheating. Overheating will warp or even burn your paper. 

Once it is cooled down, you may want to repeat the process to create a thick layer. 

You then punch out ten 1 1/4" squares. Place them in the Finial Press Embossing Folder (make sure it is facing up, with the SU logo on the bottom left and facing you) and run it through the Big Shot. 

You then place these on the Basic Black card stock leaving a little bit of room around each one to create the illusion of a tile with grout around it. Glue down the four corners first and then fill in the space using the other square tiles. The middle of the card does not need any tiles, since it is covered with an image and sentiment.

Lastly, you stamp the flower image and color it using this two step stamp set. Add the sentiment and put the card together. 

Thanks for stopping by here. I appreciate your time and feedback.

HAPPY STAMPING!

Saturday, August 24, 2019

Sheltering Tree Bookmark Card

Books are not obsolete. So, here is a card with a detachable bookmark for you to gift to someone special. I was inspired by Debbie Henderson's You Tube video that you can see HERE.


Stamps: Sheltering Tree, Hello There, Bliss
Paper: Old Olive 5 1/2 x 10 1/2, Whisper White 5 x 3 3/4 (2), 5 x 1 5/8
Ink: Old Olive, Early Espresso, Tangerine Tango, Summer Sun
Technique: Sponging
Accessories: Cherry Cobbler Baker's Twine, Glue Dot, Tag Punch, Hole Punch, Adhesive

Here is the inside of the card:


The Old Olive card stock was scored at 4 1/4". You then turn the paper to the other side and perforate it at the 2" mark. 

The Whisper White card stock is for the front and the inside of the card. The smaller piece is obviously for the bookmark. I first sponged the entire Whisper White card stock with my Summer Sun ink. (Any bright yellow will do.) I then stamped my images.

The bookmark folds inside the card. Do not open and close it too many times, or it may tear off. I liked the summer peaceful scene of the tree and swing. I used to climb the tree in our backyard and read for hours when I was a child. So, this brings back a few memories. 

Thank you so much for stopping by here and taking a quick peek. Feel free to leave any comments or questions. Contact me for any further information and don't forget to Shop Now for any of your SU crafting supplies.

If you would like to Join Me, you have until the end of August, 2019 to receive an extra $30 in product. That is $155 worth of merchandise for only $99. You will also receive a $10 coupon code to be used next month, and of course you will receive a 20% discount on all of your orders. Contact me for further details or click the Join Me button above. 

HAPPY STAMPING!


Friday, August 23, 2019

Golden Congrats

Here is a graduation card for the person whose school colors are maroon and gold, or for the one who loves this color combination. Of course without a graduation cap on the card, this particular "Congratulations" card may be used for any occasion. 


Stamps: Friendly Expressions, Swirly Frames
Paper: Cherry Cobbler A-2, Whisper White 5 1/4 x 4 (Inside)
Ink: Metallic Gold
Technique: Heat Embossing
Accessories: Embossing Buddy, Gold Embossing Powder, Heat Tool, Adhesive

You must remember to rub your card with an embossing buddy before you begin. Otherwise, you may wind up with gold embossed spots everywhere. Once you have prepared your card stock, you simply stamp and pour the embossing powder onto your card. Finally, you heat set it and let it dry for a couple of minutes. 

Thank you so much for stopping by and taking a peek. I appreciate your time and feedback. 

HAPPY STAMPING!


Thursday, August 22, 2019

Your Birthday

One way to avoid a black outline of your image is to color directly on the stamp with your markers. You then breathe onto the stamp. This will moisten the ink and prepare it to stamp. You then stamp, and your outline will be in color. An example of this is shown below.


Stamps: Life's Adventure, Well Scripted
Paper: Whisper White A-2, 2 x 4, Tempting Turquoise 5 3/8 x 4 1/8, Basic Black 3 x 4 1/8, Scraps of Basic Black and Whisper White
Ink: Tempting Turquoise
Markers: Cherry Cobbler, Basic Black, Pacific Point, Daffodil Delight, Tempting Turquoise
Technique: Dry Embossing
Accessories: Fancy Fan Embossing Folder, Chalk Talk Framelits Dies, Scallop Edge Punch, Dimensionals, Adhesive

I found that it was not necessary to color the image since the outline was already in color. Of course this is my preference. Also note that the embossing folder can be changed to any folder that you have on hand. This just gives the card a bit more texture and interest. 

Thank you so much for stopping by here and taking a look. I appreciate your time and welcome all of your feedback. Until next time...

HAPPY STAMPING!


Wednesday, August 21, 2019

Shelled Friendship

Sometimes we surprise ourselves by the company we keep. Friendships are formed for countless reasons, and they do not always make sense. The adage is, "Opposites attract." This is why I like this image of a turtle and a dog becoming friends.


Stamps: Bella & Friends, Sheltering Tree
Paper: Petal Pink A-2, Pear Pizzazz 5 1/4 x 4, Watercolor 5 x 3 3/4
Ink: Jet Black StazOn, Calypso Coral, Petal Pink, Pear Pizzazz, Stampin' Blends: Petal Pink, Calypso Coral
Techniques: 2-Step Stamping, Blending
Accessories: Adhesive

I used StazOn ink because the markers are alcohol based, and I intended to watercolor the image. The tree leaves were stamped in Petal Pink first and then in Calypso Coral. I repositioned the stamp for the second color.

I do like this fun, playful image. Don't you? Unfortunately, both of these stamp sets are no longer current, but feel free to shop my online store for current stamp sets. All of the colors and card stock are available.

There are only 10 days left to join my team and receive the best deal ever: Pay $99 and choose $155 worth of Stampin' Up! product. That is $30 more than ever before. PLUS you will receive business products to get you started for FREE! This includes things like your catalogs, order forms, post cards, etc. PLUS you will receive a $10 coupon code to use the following month! PLUS you will receive a 20% discount on all of your future orders. My oh my, if I was not a demonstrator already, I would join. Just click on Join Me above. 

Thank you so much for stopping by here. All of your time and feedback is appreciated. 

HAPPY STAMPING!

Monday, August 19, 2019

Toscana Vigneto

Can you imagine a Tuscan vineyard? You have to in order to appreciate this card. Unfortunately, the image is not as clear as I would like. I heat embossed it with black embossing powder. Consequently, until your eyes adjust, it looks like a black circle. See for yourself.


Stamps: Tuscan Vineyard, Healing Hugs
Paper: Daffodil Delight A-2, Basic Black 5 1/4 x 4, Watercolor 5 x 3 3/4
Ink: Gorgeous Grape, Versamark
Pigment Sprinkles: Daffodil Delight, Bermuda Bay, Melon Mambo, Granny Apple Green
Techniques: Heat Embossing, Watercolor
Accessories: Black Embossing Powder, 1" Circle Punch, Embossing Buddy, Dimensionals, Adhesive

The first step is to prepare the watercolor background with your pigment sprinkles. Tap a few sprinkles of each color around your paper. Spritz with water and maneuver the colors around until you are happy with it. Set this aside to air dry completely before stamping on it. 

I then took my dry background, used my embossing buddy to prepare it for embossing, and then stamped my image and sentiment with Versamark. I added the black embossing powder and heat set it.

I stamped the Toscana Vigneto stamp with Gorgeous Grape and punched it out using my 1" circle punch. I added it with dimensionals. 

Lastly, I layered the watercolor paper onto my black card stock and then adhered it to my Daffodil Delight card base.

Thank you so much for stopping here and taking a peek. Contact me with any questions concerns or comments.

I appreciate your time and feedback.

HAPPY STAMPING!