Showing posts with label Heat Embossing. Show all posts

Tuesday, June 17, 2025

Stylish Rounds

This layout can be used for a masculine card as well. What do you think? 


Stamps:
   Round We Go

Paper:
   Summer Splash A-2, 2" Sq. (2)
   Melon Mambo 2" Sq. (3), 3-7/8 x 5-1/8
   Basic White 3-3/4 x 5, 5-1/4 x 4 (Inside)

Ink:
   Summer Splash
   VersaMark

Technique:
   Die Cutting
   Heat Embossing

Accessories:
   White Baker's Twine (24")
   White Embossing Powder
   Round We Go Dies
   Stylish Shapes Framelits
   Brights Enamel Shapes
   2024-2026 In-Color Shimmer Gems
   Dimensionals
   Adhesive

First, I die cut the dotted circles on the 3-3/4 x 5 Basic White panel, using the Round We Go Dies. I did intertwine two of the circles.

I then stamped the sparkles around the Basic White panel, using Summer Splash ink.

Next, I adhered this panel onto its Melon Mambo matte. The circles then appear to be Melon Mambo dots.

I then wrapped the White Baker's Twine around the bottom of the panel and tied it off with a bow. I placed the bow to the left of the panel, and then adhered the panel onto the Summer Splash card front.

Next, I die cut the rest of the pieces, using both sets of dies. The stitched circle is from the Stylish Shapes Dies, and the others use the Round We Go Dies.

Using VersaMark and White Embossing Powder, I heat embossed the sentiment on the Stitched Circle. This is the only circle that was adhered with dimensionals. I then adhered the other circles, as shown above.

Lastly, I added embellishments and a Basic White panel to the inside of the card.

Thank you for taking a peek. Please Contact Me for further information on Stampin' Up! or if you have questions.

Shop Now and browse our current products and promotions.

Do you have the crafting bug? Subscribe to Paper Pumpkin and receive a monthly dose. The cost is affordable, and you can buy it, skip it, or stop it. I must warn you. It can be addictive! I can't seem to stop!

Join Me and become a member of my team. Check out the benefits and gain the best value for your money.

Don't forget to share, like, pin, tweet, or comment. Make sure to FOLLOW and SUBSCRIBE to my blog.

HAPPY STAMPING!

Saturday, October 26, 2024

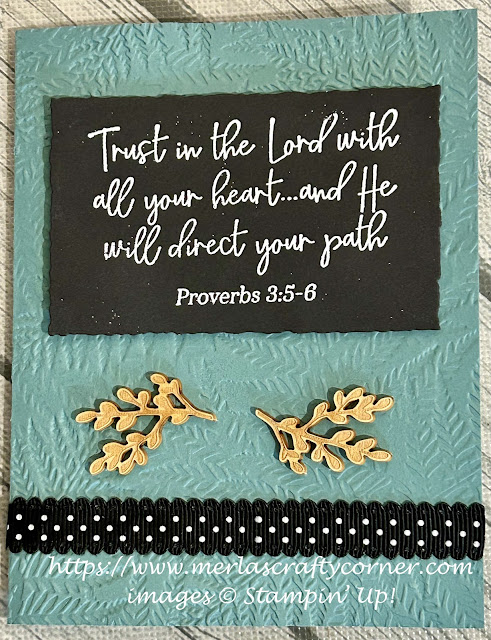
Proverbs

There are many techniques that can be used to make a card. My favorite is embossing. So, I heat and dry embossed on this card. What do you think? 


Stamps:
   You Are Beautiful

Paper:
   Lost Lagoon A-2
   Basic Black 2-1/2 x 3-7/8
   Basic White 5-1/4 x 4 (Inside)

Ink:
   VersaMark

Technique:
   Dry Embossing
   Heat Embossing

Accessories:
   White Embossing Powder
   Deckled Rectangles Dies
   Fern 3D Embossing Folder
   In Good Taste Elements
   Black Polka Dot Scalloped Ribbon 4-1/4"
   Embossing Buddy
   Dimensionals
   Mini Glue Dots
   Adhesive

First, I dry embossed the Lost Lagoon card front, using the Fern 3D Embossing Folder.

I then heat embossed the proverb on the Basic Black panel.
  1.    I rubbed down the panel with my embossing buddy.
  2.    I stamped the proverb, using VersaMark.
  3.    I applied white embossing powder to the panel.
  4.    I shook off the excess.
  5.    I applied heat with my heat tool.
  6.    I set it down to cool for a minute.

Next, I attached the heat embossed panel to the top of my card front, using dimensionals.

I then adhered the ribbon to the bottom of the card, using a strong adhesive. 

Next, I attached a couple of In Good Taste Elements, using glue dots.

Lastly, I added a Basic White panel to the inside of the card.

Thank you for stopping by here. Contact Me if you have questions or need anything Stampin' Up! related.

If you have a few minutes, Shop Now, and take a look at quality products and deals that may be happening today! There is a HOST CODE in the right sidebar, if you are interested.

If you like kits at your fingertips, then check out Paper Pumpkin and/or the Kits Collection. You will not regret it.

Want some company? Join Me and become a member of my team. I can't wait to meet you.

Please share, like, pin, tweet, or comment. Make sure you FOLLOW and SUBSCRIBE to my blog. This way you won't miss a thing! 

HAPPY STAMPING!

Friday, October 18, 2024

Golden Blessings

Create unique cards using alcohol inks. I have found that even if I use the same colors and application, each panel will still be different. Give it a try and have some fun. Thoughts? 


Stamps:
   More Merry Messages

Paper:
   Very Vanilla A-2, 5-1/4 x 4 (Inside)
   Early Espresso 5-1/4 x 4
   Glossy White 3-3/4 x 3-1/2
   Gold Foil 2-1/2" Circle

Ink:
   Metallic Gold

Alcohol Ink:
   Stream
   Wild Plum
   Butterscotch

Technique:
   Alcohol Inks Baubles
   Heat Embossing

Accessories:
   2-1/2" Circle Punch
   Gold Embossing Powder
   Embossing Buddy
   Holiday Ornaments Framelits Dies
   Sequins
   Dimensionals
   Adhesive

I followed the tutorial found at SCS for Alcohol Ink Baubles. There are written instructions along with a short video. Check it out.

I heat embossed the sentiment with Gold Embossing Powder on the bottom of the Early Espresso panel. Make sure to wipe the panel down with the embossing buddy before you begin.

I die cut ornaments from the alcohol ink backgrounds and adhered them onto the panel, and onto a gold foil circle.

Next, I adhered the Early Espresso panel onto the Very Vanilla card front. 

I added a few sequins and adhered a Very Vanilla panel to the inside the card.

Thank you for checking out my blog. I so appreciate your time. Contact Me if you have any questions or concerns regarding Stampin' Up!

Are you curious about what is trending, the cost of materials and other products, or do you just feel like shopping? Click on Shop Now and have some fun.

Subscribe to Paper Pumpkin or check out the Kits Collection if you want to stay on a budget or just keep it all low-key.

Join Me and reap all of the benefits of becoming a part of the Stampin' Up! family. Check it out and gain the best value for your money.

Share, like, pin, tweet, or comment. Don't forget to FOLLOW and SUBSCRIBE to my blog. 

HAPPY STAMPING!

Monday, September 30, 2024

Floating Lotus

I am constantly learning new techniques from so many who are willing to share their creativity with everyone. I do my best to follow their lead and create a likeness of their original idea. Still, no matter what, there is nothing like the original. Thoughts? 


Stamps:
   Lotus Blossom

Paper:
   Pool Party A-2
   Wisteria Wonder 5-1/4 x 4
   Basic White 5 x 3-3/4, 5-1/4 x 4 (Inside)

Ink:
   Pool Party
   Wisteria Wonder
   Strawberry Slush
   Smoky Slate

Markers:
   Pool Party

Technique:
   Emboss-Resist

Accessories:
   Basic Pearl Jewels
   VersaMark
   Clear Embossing Powder
   White Gel Pen
   Blender Pen
   Sponge
   Adhesive

Jan Tinklenberg came up with this idea and does a wonderful job showing and explaining her technique. Please take the time to watch and learn her process. Click on her video or link for Lotus Blossom on the Water:


Lotus Blossom on the Water 
by Jan Tinklenberg


I am so excited that you decided to pay me a visit. Please Contact Me if I can be of service.

Shop Now and enjoy looking at new products made especially for card making! There is a HOST CODE located in the right sidebar, if you care to use it.

If you are into kits, check out Paper Pumpkin and the Kits Collection. I am sure one of those will be right up your alley.

Still undecided? Join Me and find out what all the fuss is about. Check it out today.

Please share, like, pintweet, or comment. FOLLOW and SUBSCRIBE to my blog.

HAPPY STAMPING!

Saturday, August 24, 2024

Thank You Note

Step-up your card with a bit of heat embossing. Thoughts? 


Stamps:
   In My Thoughts
   Musical Note (Stampabilities)
   Piano Keys (Stampabilities)

Paper:
   Basic White 7 x 6 scored @ 3-1/2, Scraps, 3-1/4 x 5-3/4 (Inside)
   Basic Black 3-1/4 x 5-3/4

Ink:
   Tuxedo Black Memento
   VersaMark

Technique:
   Heat Embossing
   Die Cutting

Accessories:
   Starburst Framelits
   Chalk Talk Framelits
   Basic Rhinestone Jewels
   Black Embossing Powder
   Dimensionals
   Adhesive

First, I stamped, heat embossed, and cut the piano keyboard.

I then stamped the musical note on a scrap of Basic White and die cut it, using the Starburst Framelits.

Next, I stamped and die cut the sentiment, using the Chalk Talk Framelits.

I then adhered the Basic Black panel to the Basic White card front.

Next, I attached the musical note and sentiment to the top and bottom of the card front, using dimensionals.

I then adhered the keyboard in the center of the two.

Lastly, I added a couple of rhinestones to the sentiment and adhered a Basic White panel to the inside of the card.

Thank you so very much for taking the time to stop and glance at my work. If you have any questions or suggestions, please Contact Me. I do appreciate your time.

If you need any supplies, or you are curious to know just how much these products cost, click on Shop Now and satisfy your curiosity. A HOST CODE is available for you to use in case you did not earn your own rewards. You can find it in the right sidebar. 

Do you want the best value for your buck? Join Me and reap all of the rewards. I will be more than happy to assist you. Check it out and note that there are no hidden agendas. 

Wait! Don't leave. If you just want to try it and see, then subscribe to Paper Pumpkin. You will receive a kit with everything you need to create a project. Check out the Kit Collection for more choices.

I would love for you to take a minute to share, like, pin, tweet, or comment. Please FOLLOW and SUBSCRIBE to my blog. Let me know what you think below in the comments.

HAPPY STAMPING!

Monday, July 1, 2024

Almonds

I die cut and colored this gold embossed image from the Nature's Sweetness Designer Series Paper pack and made it the focal point. What do you think? 


Stamps:
   Lovely & Sweet

Paper:
   Petal Pink A-2
   Basic White 5-1/4 x 4 (3), 1/4 x 3
   Nature's Sweetness DSP 3-7/8 x 5-1/8, Die Cut Image
   Vellum 3-3/4 x 5

Ink:
   VersaMark

Blends:
   Soft Sea Foam
   Petal Pink
   Crumb Cake

Technique:
   Heat Embossing
   Die Cutting

Accessories:
   Lovely & Sweet Dies
   Garden Meadow Dies
   Lovely Layers Vellum
   Gold Embossing Powder
   Metallic Pearls
   Dimensionals
   Glue Dots
   Adhesive

First, I die cut an image from the gold embossed sheet included in the DSP pack.

I then colored it, using the blends listed above.

Next, I stamped and heat embossed the sentiment, using gold embossing powder.

I then die cut one of the Basic White panels, using the Garden Meadow dies. I saved the negative piece to use later on another card.

Next, I assembled the card, beginning with the gold designer series paper sheet onto a Basic White panel and then onto the Petal Pink card front.

I then added a few glue dots to the center areas of the vellum sheet (where the die cut will conceal them) and added it to the center of the card front.

Next, I added dimensionals to the arched die cut and the floral die cut.

I attached the floral die cut to the arched die cut and then added this panel onto the card front.

Next, I added a few glue dots to the sentiment and attached it to the bottom of the arched die cut, allowing the lines of the framing to show.

Lastly, I added a couple of Metallic Pearls to the two flowers and adhered a Basic White panel to the inside of the card.

Thanks so much for reading through my blog today. Contact Me if I can answer anything for you, or if you would like to buy any of my cards.

If you would like to buy your own products and make your own cards click on Shop Now and browse current merchandise. I have placed a HOST CODE for you to use if you do not earn any rewards on your own. It is located in the right sidebar.

Our monthly subscription to Paper Pumpkin is affordable and flexible. The cost is $25 monthly. Check out the Kits Collection for more options at varying prices.

Join Me and become part of a team. Check out the benefits and decide if it is for you.

Please share, like, pin, tweet, or comment. Don't forget to FOLLOW and SUBSCRIBE to my blog.

HAPPY STAMPING!

Thursday, June 13, 2024

Something Borrowed

The heat emboss resist technique is fun and easy to do. Have you tried it? 


Stamps:
   Botanicals for You

Paper:
   Basic White A-2, 5-1/4 x 4 (2)

Ink:
   VersaMark

Distress Ink:
   twisted citron
   blueprint sketch
   spiced marmalade
   mustard seed
   peacock feather
   picked raspberry

Technique:
   Heat Emboss Resist

Accessories:
   Black Embossing Powder
   Something Borrowed Embellishment
   Glue Dot
   Heat Tool
   Adhesive

First, I heat embossed the sentiment in the center of the Basic White panel. I used VersaMark, Black Embossing Powder and a heat tool.

I then let it cool down a bit.

Next, I added the background colors. I used the distress inks from my supplies. You can use any medium that you like. The embossed sentiment will resist any colors.

I then used a paper towel to make sure there was no ink waiting to be rubbed off on the sentiment.

Next, I adhered the panel onto the Basic White card front.

Lastly, I added an embellishment and adhered a Basic White panel to the inside of the card.

There is a tutorial for the Emboss Resist technique at SCS. Have fun.

Thank you so much for hanging out with me today. Contact Me if I can be of service.

Shop Now and browse some exciting new things. There is a HOST CODE in the right sidebar for you to use if you like.

Paper Pumpkin and the Kits Collection are two ways to get a quick fix for the Crafting Bug. Be careful, it is contagious, especially with family.

Join Me and flourish in the goodness that is Stampin' Up! I know you're thinking about it, or you would not have read this far. Check it out and let me know if you need anything.

Share, like, pin, tweet, or comment. FOLLOW and SUBSCRIBE to my blog.

HAPPY STAMPING!

Friday, May 31, 2024

Butterfly Glass

I need to play with this faux glass tile technique some more. Can embossing powder ruin over time? I don't know if there was something wrong with the powder, of if I just heated it too long. Watch the video and give it a try. 


Stamps:
   Butterfly Wishes

Paper:
   Fresh Freesia A-2
   Moody Mauve 5-3/8 x 4-1/8
   Basic White 5-1/4 x 4 (2), Scraps - 2-1/4" Sq. (4)

Ink:
   Fresh Freesia
   Moody Mauve
   Rococo Rose

Technique:
   Heat Embossing

Accessories:
   Stitched Shapes Framelits
   Butterfly Gems
   Stampin' Seal+
   Adhesive

I followed the You Tube tutorial by Natasha Foote at Large Faux Glass.

Thank you for checking out my blog. I so appreciate your time. Contact Me if you have any questions or concerns regarding Stampin' Up!

Are you curious about what is trending, the cost of materials and other products, or do you just feel like shopping? Click on Shop Now and have some fun.

Subscribe to Paper Pumpkin or check out the Kits Collection if you want to stay on a budget or just keep it all low-key.

Join Me and reap all of the benefits of becoming a part of the Stampin' Up! family. Check it out and gain the best value for your money.

Share, like, pin, tweet, or comment. Don't forget to FOLLOW and SUBSCRIBE to my blog.

HAPPY STAMPING!

Tuesday, May 21, 2024

Sympathy Layers

I added a heat embossed sentiment smack in the middle of this printed Lovely Layer Vellum panel. What do you think? 


Stamps:
   Seaside Bay

Paper:
   Tranquil Tide A-2
   Basic White 5-1/4 x 4 (2)
   Lovely Layers Vellum

Ink:
   VersaMark

Technique:
   Die Cutting
   Heat Embossing

Accessories:
   Deckled Rectangles Dies
   Embossing Buddy
   White Embossing Powder
   2017-2019 In-Color Bitty Bows
   Glue Dots
   Dimensionals
   Adhesive

First, I heat embossed the sentiment in the center of the Lovely Layers Vellum panel.

I then die cut a Basic White panel, using the Deckled Rectangle Dies to create a frame for the card front.

Next, I adhered the vellum panel to the back of the Basic White deckled frame, using glue dots.

I then attached the frame to the Tranquil Tide card front, using dimensionals.

Lastly, I added an In-Color Bitty Bow to the card front and adhered a Basic White panel to the inside of the card.

Thank you so much for stopping by here and taking a quick look-see. If you have any questions or need my assistance, Contact Me.

Shop Now and take a look at all of our new products and current promotions. Please use the HOST CODE sitting in the right sidebar if you did not earn your own rewards.

If you want to craft, but keep your costs at $25 a month, check out Paper Pumpkin. It just might be what you are looking for at the moment. 

Join Me and become the newest member of my team. Remember there are no hidden agendas or penalties for giving it a go. Don't pass this opportunity to save.

You've come this far, so please share, like, pin, tweet, or comment. I appreciate your time and efforts. Let me know your thoughts and leave all of your questions behind. Do not forget to FOLLOW and SUBSCRIBE to my blog.

HAPPY STAMPING!