Showing posts with label Thoughtful Journey DSP. Show all posts

Friday, June 20, 2025

Breathe

Add ink to your embossing folder and let your card front demand attention from all who feast their eyes upon it. Thoughts? 
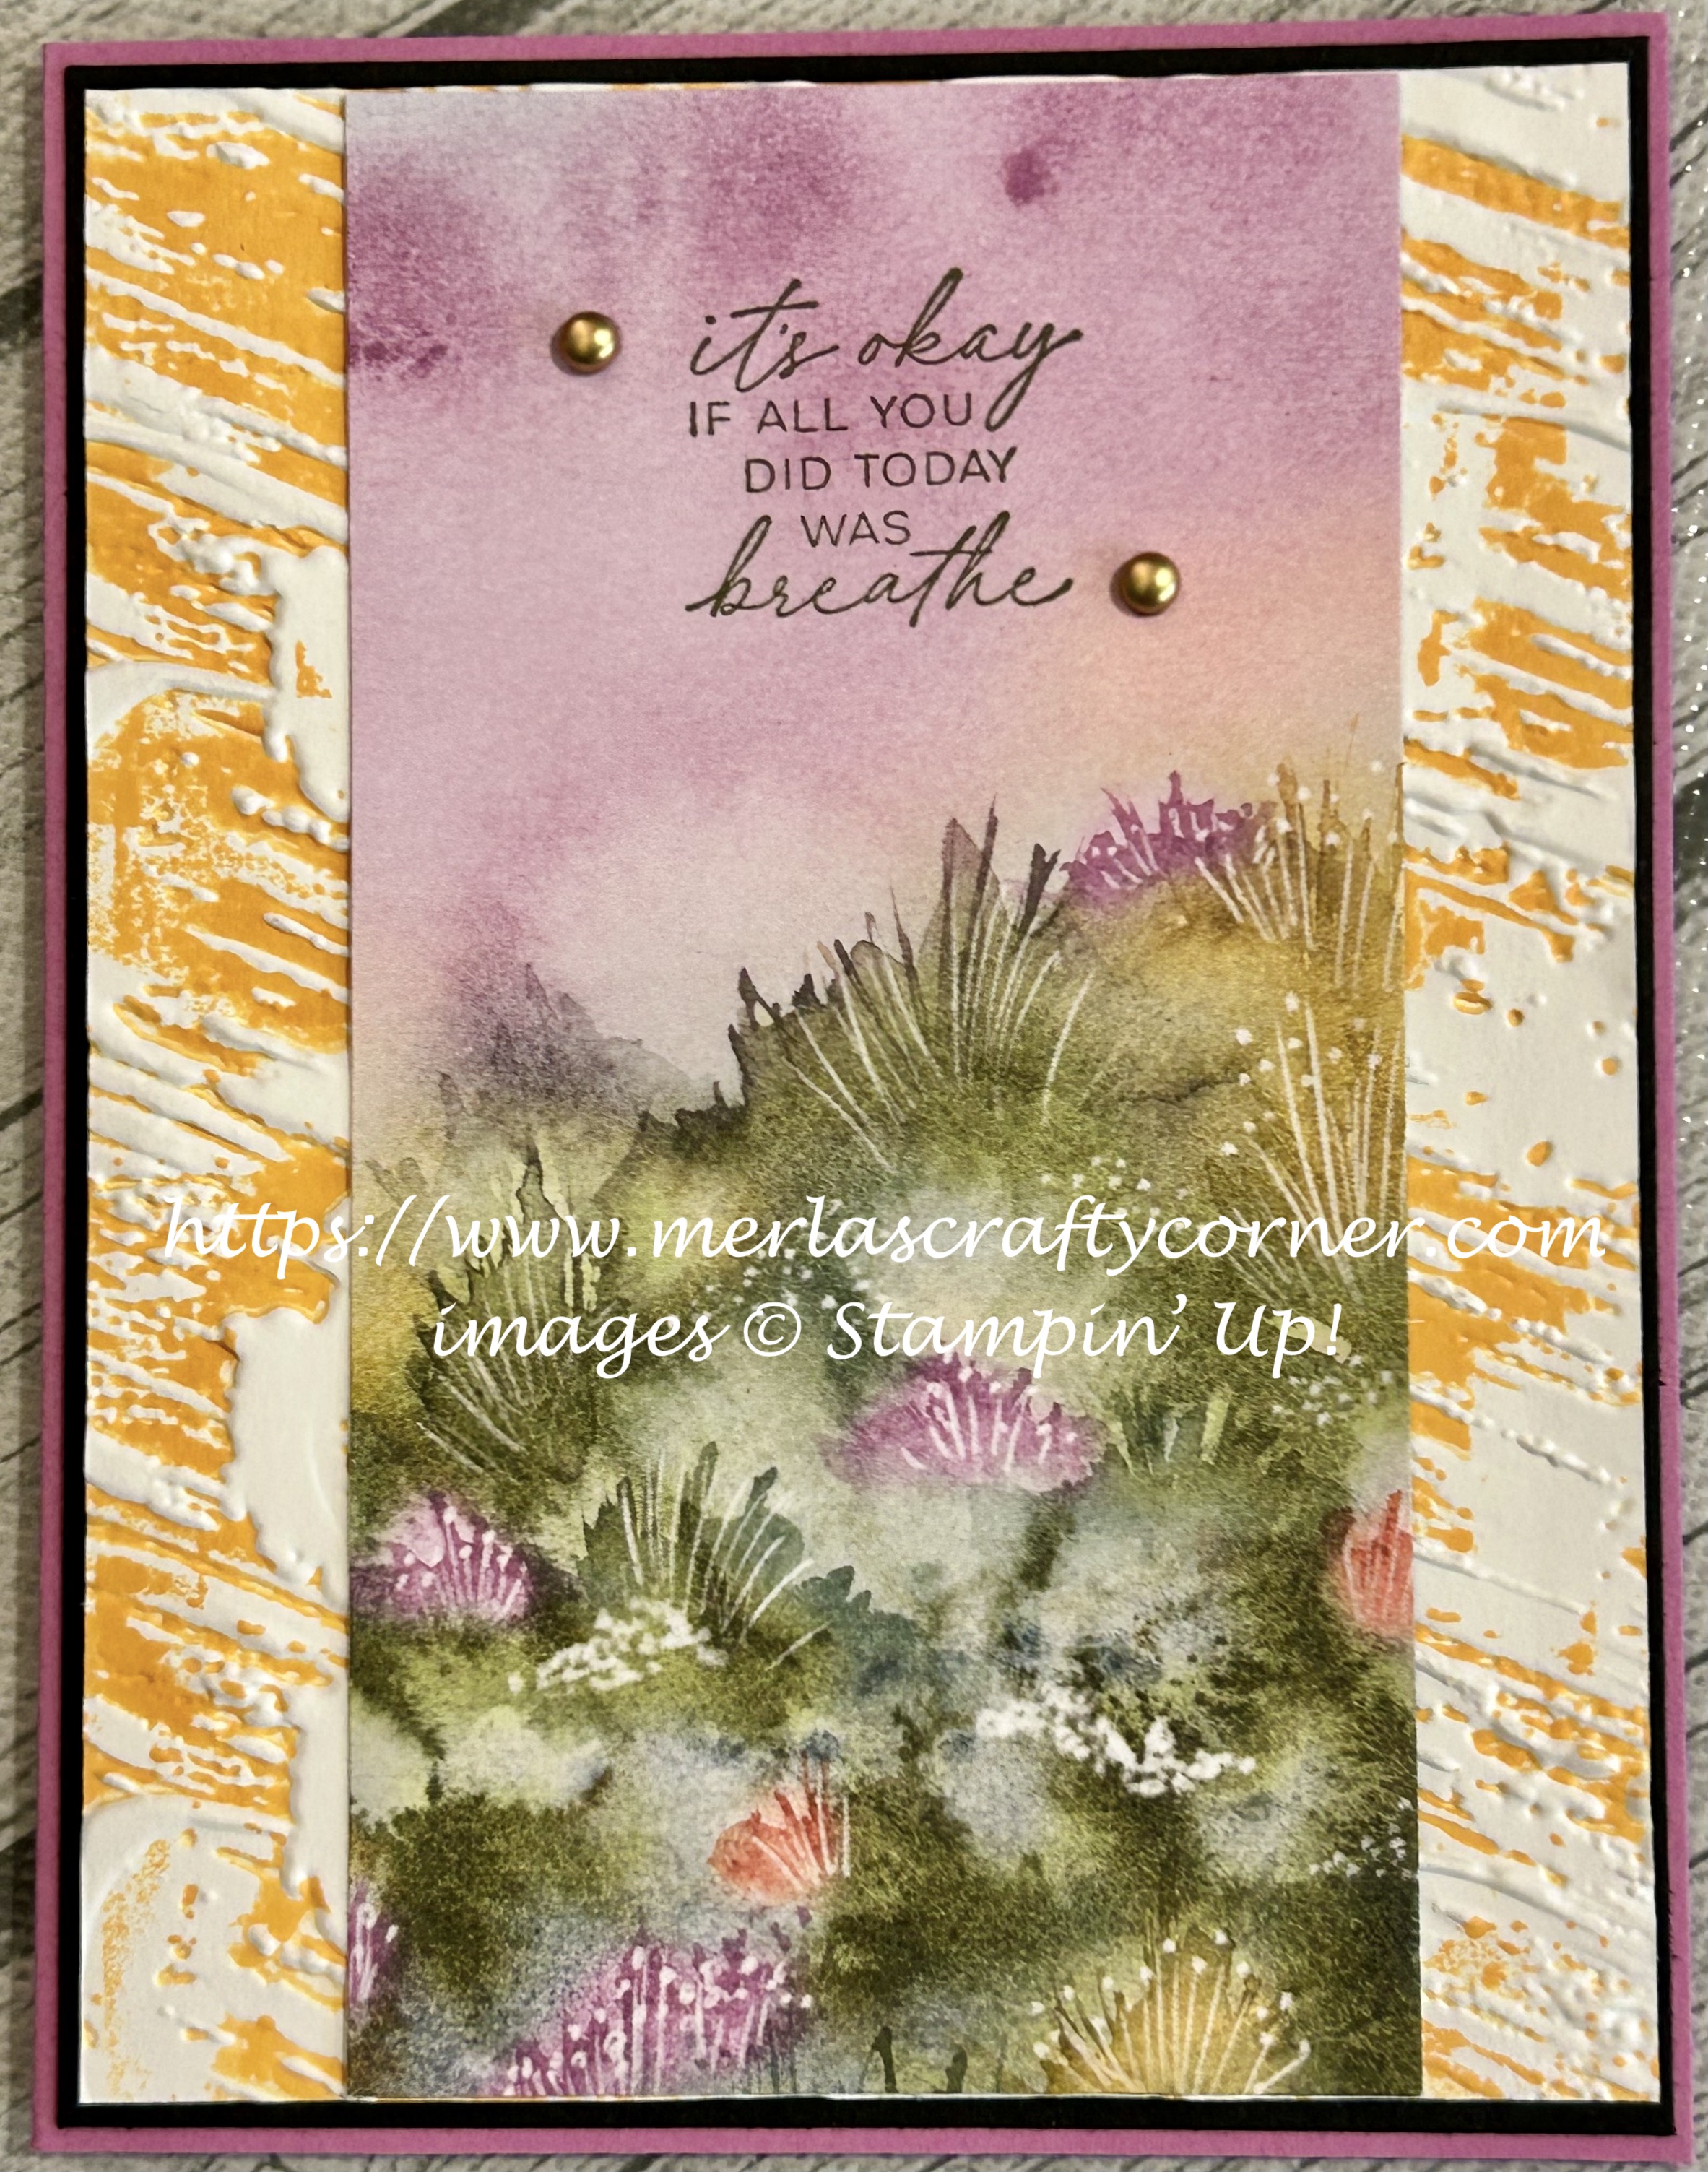


Stamps:
   Love & Strength

Paper:
   Petunia Pop A-2
   Basic Black 5-3/8 x 4-1/8
   Basic White 5-1/4 x 4 (2)
   Thoughtful Journey DSP 2-3/4 x 5-3/16

Ink:
   Mossy Meadow
   Peach Pie

Technique:
   Dry Embossing with Ink

Accessories:
   Plaster Painting 3D Embossing Folder
   Brushed Metallic Adhesive-Backed Dots
   Adhesive

First, I applied Peach Pie ink to the top panel of the Plaster Painting 3D embossing folder. You can gently swipe the ink pad across the panel, or gently tap it. 

I then carefully placed a Basic White panel inside the folder and carefully closed it and embossed it without moving the panel. I set the panel aside to dry and quickly rinsed the embossing folder under running water. You can let it drip dry or gently dry it yourself.

Next, I stamped the sentiment on the top of the Thoughtful Journey DSP panel, using Mossy Meadow ink.

I then adhered this panel onto the center of the embossed panel. 

Next, I adhered it onto a Basic Black matte and then onto the Petunia Pop card front.

Lastly, I added a couple of Brushed Metallic Dots to the card front and adhered a Basic White panel to the inside of the card.

Thank you kindly for stopping by here. Contact Me if I can be of service.

Take a quick look and Shop Now for new products and current sales.

If you just want a quick crafty fix, check out the Kits Collection or get a consistent dose with a Paper Pumpkin subscription.

Join Me and create a new friendship. We already have crafting in common!

Please take a few minutes to share, like, pin, tweet, or comment. Plus, you don't want to forget to FOLLOW and SUBSCRIBE to my blog.

HAPPY STAMPING!

Wednesday, June 4, 2025

Wonder

Here is another designer series paper panel that can be used with any sentiment. Thoughts? 


Stamps:
   Rose Wonder

Paper:
   Boho Blue A-2
   Basic Black 5-3/8 x 4-1/8
   Basic White 5-1/4 x 4 (Inside)
   Thoughtful Journey 6x6 DSP 5-1/4 x 4

Ink:
   Tuxedo Black Memento

Technique:
   CAS

Accessories:
   Adhesive

First, I stamped the bible verse on the top-center of the Thoughtful Journey DSP panel, using Tuxedo Black Memento ink.

Next, I adhered the panel onto a Basic Black matte and then onto the Boho Blue card front.

Lastly, I added a Basic White panel to the inside of the card.

You can easily add any embellishments that you wish: jewels, ribbon, die cuts, etc.. I chose to let the verse speak for itself.

Thank you so much for spending time with me here. Contact Me if you have any questions. 

Shop Now and take a look at all of our new products and current promotions.

Subscribe to Paper Pumpkin and keep your monthly cost low! Join Me and become my newest team member.

Either way, please share, like, pin, tweet, or comment. Do not forget to FOLLOW and SUBSCRIBE to my blog.

HAPPY STAMPING!

Friday, May 30, 2025

Heart & Soul Always

This Thoughtful Journey Designer Series Paper is so beautiful and picturesque. Simply change the sentiment to suit your needs. Thoughts? 


Heart & Soul Always


Stamps:
   So Sincere

Paper:
   Cajun Craze A-2
   Basic Black 5-3/8 x 4-1/8
   Wild Wheat 5-1/4 x 4
   Thoughtful Journey 6x6 DSP 3 x 5-1/4 
   Basic White 5-1/4 x 4 (Inside)
   Gold Foil Scrap

Ink:
   Mossy Meadow

Technique:
   Dry Embossing

Accessories:
   Cane Weave 3D Embossing Folder
   Cross of Hope Framelits
   Fine Tip Glue Pen
   Adhesive

First, I stamped my sentiment on the top of the Thoughtful Journey DSP panel, using Mossy Meadow ink.

I then used the Cane Weave 3D Embossing Folder to dry emboss the Wild Wheat panel.

Next, I adhered the DSP panel to the center of the embossed Wild Wheat panel. 

This was then adhered to a Basic Black matte and then onto the Cajun Craze card front.

Next, I die cut and adhered the frame of a gold foil cross beneath the sentiment.

Lastly, I adhered a Basic White panel to the inside of the card.

Since, the Thoughtful Journey DSP is a 6x6 panel, I adhered the other half on a card as well:

Heart & Soul Always Too


Thank you for dropping by here. Contact Me if you need anything.

Shop Now and take a look at items that are Exclusively Online! You do not want to miss them.

Did you know that Paper Pumpkin and the Kits Collection make the perfect gift? Heck, I say, gift yourself one today! Check them out.

Join Me and become part of my team. Take a look at today's offering and see if it is for you.

Please share, like, pin, tweet, or comment. Do not forget to FOLLOW and SUBSCRIBE to my blog.

HAPPY STAMPING!

Tuesday, May 20, 2025

Positive Collection

The shining rays behind the cross are optional. I decided to not use the traditional yellow or gold rays. What do you think? 


Stamps:
   Faith Collection
   Positive Thoughts

Paper:
   Petunia Pop A-2
   Basic Black 5-3/8 x 4-1/8
   Boho Blue 5-1/4 x 4 
   Basic White 5-1/4 x 4 (Inside)
   Thoughtful Journey 6x6 DSP 2 x 5-1/4

Ink:
   Tuxedo Black Memento
   Misty Moonlight
   Petunia Pop

Technique:
   CAS

Accessories:
   2024-2026 In-Color Shimmer Gems
   Adhesive

First, I adhered the Thoughtful Journey DSP panel onto the left side of the Boho Blue panel.

I then stamped a Misty Moonlight cross on the top right of the Boho Blue panel.

Next, I added some shining rays, using Petunia Pop ink.

I then stamped the sentiment below the cross, using Tuxedo Black Memento ink.

Next, I adhered the panel onto a Basic Black matte and then onto the Petunia Pop card front.

Lastly, I added some In-Color Shimmer Gems to the card front and adhered a Basic White panel to the inside of the card.

Thank you for taking a peek. Please Contact Me for further information on Stampin' Up! or if you have questions.

Shop Now and browse our current products and promotions.

Do you have the crafting bug? Subscribe to Paper Pumpkin and receive a monthly dose. The cost is affordable, and you can buy it, skip it, or stop it. I must warn you. It can be addictive! I can't seem to stop!

Join Me and become a member of my team. Check out the benefits and gain the best value for your money.

Don't forget to share, like, pin, tweet, or comment. Make sure to FOLLOW and SUBSCRIBE to my blog.

HAPPY STAMPING!

Friday, April 18, 2025

I'm Here

Choose any color from the designer series paper that you would like to highlight and add it to the embossing folder. Then emboss your Basic White panel and see it come alive. Thoughts? 


Stamps:
   Love & Strength

Paper:
   Petunia Pop A-2
   Basic Black 5-3/8 x 4-1/8
   Basic White 5-1/4 x 4 (2)
   Thoughtful Journey 6x6 DSP 3-1/4 x 5-3/16
   Gold Foil Scrap

Ink:
   Mossy Meadow
   Peach Pie

Technique:
   Dry Embossing With Ink
   Die Cutting

Accessories:
   Plaster Painting 3D Embossing Folder
   Cross of Hope Framelits
   Brushed Metallic Adhesive-Backed Dots
   Adhesive

First, I dry embossed a Basic White panel with Peach Pie ink:

   I added Peach Pie ink to the top panel of the Plaster Painting 3D Embossing Folder. 
   I rubbed the ink pad gently across the top panel of the embossing folder. 
   Note: The top panel is the one with the SU Logo on the outside. 
   Carefully, place the Basic White panel on the inside of the folder without ink on it and close the folder. 
   Emboss the panel. 
   Remove the panel and clean the folder. 

I then added the embossed panel onto a Basic Black matte and then adhered it to the Petunia Pop card front.

Next, I stamped the sentiment on the top of the Thoughtful Journey DSP panel, using Mossy Meadow ink.

I then adhered the panel onto the center of the card front.

Next, I die cut and adhered a gold cross, using the Cross of Hope Dies, gold foil, and a bit of adhesive.

Lastly, I added a couple of Brushed Metallic Dots on each side of the sentiment and adhered a Basic White panel to the inside of the card.

Thank you kindly for stopping by here. Contact Me if I can be of service.

Take a quick look and Shop Now for new products and current sales.

If you just want a quick crafty fix, check out the Kits Collection or get a consistent dose with a Paper Pumpkin subscription.

Join Me and create a new friendship. We already have crafting in common!

Please take a few minutes to share, like, pin, tweet, or comment. Plus, you don't want to forget to FOLLOW and SUBSCRIBE to my blog.

HAPPY STAMPING!

Wednesday, April 9, 2025

Pastel Journey

I added a bit of glimmer to each side of this beautiful paper. What do you do with your left-over strips? Thoughts? 


Pastel Journey


Stamps:
   Spotlight on Nature

Paper:
   Petunia Pop A-2
   Basic Black 5-3/8 x 4-1/8
   Basic White 5-1/4 x 4 (2)
   Thoughtful Journey DSP 5-1/4 x 3
   Myths & Magic 6x6 Glimmer 5-1/4 x 1/2 (2)

Ink:
   Tuxedo Black Memento

Technique:
   CAS

Accessories:
   Adhesive

First, I cut the Thoughtful Journey DSP panel to size, and I stamped the sentiment on the top of the panel, using Tuxedo Black Memento.

I then adhered a glimmer strip to the left side of a Basic White panel, followed by the DSP panel, and then the other strip of glimmer paper. 

Next, I added this panel onto a Basic Black matte and then adhered it to a Petunia Pop card front.

Lastly, I added a Basic White panel to the inside of the card.


Here is another card I made, using the other half of the DSP panel. I also changed the card base to Wild Wheat.

Pastel Journey Too


Following is another panel from the same pack. I switched the card base to Mossy Meadow.

Pastel Journey Tre


This last card is using the other half of the DSP panel. I changed the card base to Boho Blue and added the sentiment to a left-over Paper Pumpkin tag. 

Pastel Journey Quad


Thank you for stopping to take a peek. Contact Me if you have any questions.

Click on Shop Now and browse through all things Stampin' Up! Start your wish list or order your favorites today.

Join Me and get the best bang for your buck.

Do you want everything at your fingertips without having to look for it? Subscribe to Paper Pumpkin. Want more choices? Check out the Kit Collection.

One last thing, share, like, pin, tweet, and comment. Don't forget to FOLLOW and SUBSCRIBE to my blog. Okay, that was more than one thing.

HAPPY STAMPING!

Tuesday, April 8, 2025

Heartfelt Trust

If you are able to cut your 6x6 Designer Series Paper in half, then you can easily create two cards rather than one. Thoughts? 


Stamps:
   Courage & Faith

Paper:
   Petunia Pop A-2
   Basic Black 5-3/8 x 4-1/8
   Boho Blue 5-1/4 x 4
   Thoughtful Journey 6x6 DSP 5-1/4 x 2
   Basic White 5-1/4 x 4 (Inside)
   Gold Foil Scrap (1-1/4 x 1)

Ink:
   Tuxedo Black Memento

Technique:
   Die Cutting
   CAS

Accessories:
   Cross of Hope Framelits
   Adhesive-Backed Solid Gems
   Adhesive

First, I adhered the DSP panel onto the left side of the Boho Blue panel.

I then stamped the sentiment on the right side of the panel, using Tuxedo Black Memento ink.

Next, I die cut and adhered a small gold foil cross above the sentiment.

I then added three solid gems below the sentiment and adhered the panel onto a Basic Black matte and then onto the Petunia Pop card front.

Lastly, I added a Basic White panel to the inside of the card.

Thank you for taking the time to read this. I try my best to keep it short and sweet. Contact Me if you have questions or need anything Stampin' Up!

Shop Now and take a peek at quality products.

Join Me and become part of my team. I will be as involved as you like. Check out the advantages.

Are you curious, but undecided? Subscribe to Paper Pumpkin and try it. The kit will include everything you need, and it won't break the bank. Check out the Kit Collection for more all-inclusive kit choices.

Please share, like, pin, tweet, or comment. I would love for you to FOLLOW and SUBSCRIBE to my blog.

HAPPY STAMPING!

Tuesday, July 30, 2024

Thankful Journey

Choose colors from the Designer Series Paper as accents and card bases. Doing so, will highlight and draw attention to those images. Thoughts? 


Stamps:
   Thoughtful Wishes

Paper:
   Wild Wheat A-2
   Basic Black 5-3/8 x 4-1/8
   Basic White 5-1/4 x 4 (2)
   Thoughtful Designs DSP 1/2 x 5-1/4 (2)
   Thoughtful Journey DSP 3 x 5-1/4

Ink:
   Tuxedo Black Memento

Technique:
   CAS

Accessories:
   Basic Rhinestone Jewels
   Adhesive

First, I stamped a sentiment on the top right of the Thoughtful Journey DSP panel, using Tuxedo Black Memento ink.

I then adhered a strip of the Thoughtful Designs DSP to the left side of a Basic White panel.

Next, I adhered the Thoughtful Journey DSP panel next to the strip on the Basic White panel.

I then added the other strip of the Thoughtful Designs to the right of the Thoughtful Journey DSP. I use a panel to try and keep everything aligned, but I still messed it up a bit. Oops.

Next, I adhered the panel onto a Basic Black matte, and then added it to the Wild Wheat card front.

Lastly, I added a couple of Basic Rhinestone Jewels and adhered a Basic White panel to the inside of the card.

Thank you for taking a peek. Please Contact Me for further information on Stampin' Up! or if you have questions.

Shop Now and browse our current products and promotions. There is a HOST CODE located in the right sidebar if your order is less than $150. Of course, you do not have to use it, but I would appreciate it.

Do you have the crafting bug? Subscribe to Paper Pumpkin and receive a monthly dose. The cost is $25, and you can buy it, skip it, or stop it. I must warn you. It can be addictive! I can't seem to stop!

Join Me and become a member of my team. Check out the benefits and gain the best value for your money.

Don't forget to share, like, pin, tweet, or comment. Make sure to FOLLOW and SUBSCRIBE to my blog.

HAPPY STAMPING!