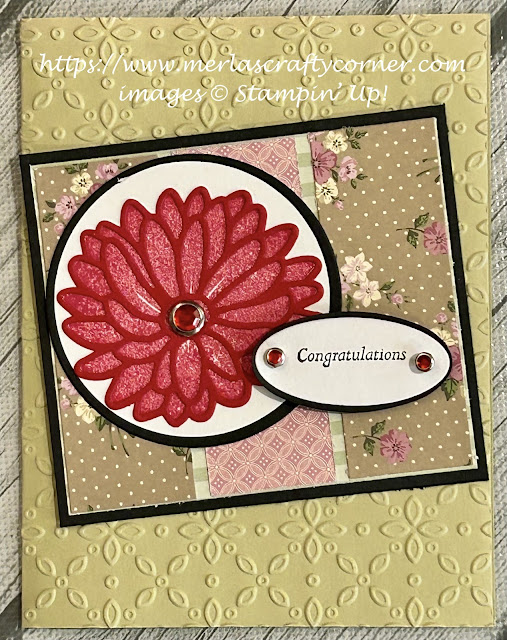
I like the vintage look and feel of this card. What do you think?
Stamps:
Special Reason
Paper:
River Rock A-2
Basic Black 3-7/8 x 3-3/8, 2-5/8" Circle, 1-3/4" Oval
Basic White 5-1/4 x 4 (Inside), 2-1/2" Circle, 1-7/8" Oval
Springtime Vintage DSP 1-1/8 x 3-1/8 (3), 3-3/4 x 3-3/16
Real Red 2-3/4" Sq.
Ink:
Rose Red
Tuxedo Black Memento
Technique:
Die Cutting
Dry Embossing
Punching
Accessories:
Eyelet 3D Embossing Folder
Layering Circles Framelits
Layering Ovals Framelits
Double Oval Punch
2-1/2" Circle Punch
Stylish Stems Framelits
Red Rhinestone Circle Brads (Large & Small)
Fine Tip Glue Pen
Dimensionals
Adhesive
I know the list is long and it does make everything seem complicated, but I assure you it is NOT. I have used quite a bit of products, but that is because they are part of my supplies. You, on the other hand, can keep it simple. For example, you can omit all of the paper layers and embellishments. Adhere 3 pieces of DSP directly on the card front. Add the floral and sentiment on the DSP. Keep the embellishments down to a rhinestone or dot of some sort. Now, on to what I did...
First, I dry embossed the card front, using the Eyelet 3D embossing folder.
Next, I adhered the three strips of DSP onto the 3-3/4 x 3-3/16 DSP piece.
I then matted this with a Basic Black matte. This panel was then adhered directly onto the card front by placing it at an angle.
I then stamped the floral image, using Rose Red ink, and punched it out with the 2-1/2" Circle punch.
Next, I die cut the matching floral framelit in Real Red and adhered it onto the floral image, using the Fine Tip Glue Pen.
I adhered it onto a Basic Black matte and then added a Red Circle Brad to the center. This was then adhered on top of the DSP panel as shown above.
Next, I stamped the sentiment, using Tuxedo Black Memento ink and punched it out, using the Double Oval Punch. I added this onto a Basic Black matte. I added a small red circle brad to each end and attached it to the card front, using dimensionals.
Lastly, I adhered a Basic White panel to the inside of the card.
Note: the Basic Black Circle and Oval mattes were die cut using the Layering Circle & Oval Framelits. If you do not have these, omit them, or fussy cut them.
Thank you immensely for your time. I know how precious it can be. Please Contact Me if you need anything Stampin' Up! or if you have questions.
Click on Shop Now and take a look at some quality products. Investing in your craft is a no-brainer.
Of course, the best value for your dollar is joining the Stampin' Up! family. Just click on Join Me and check out the benefits.
Let's not forget Paper Pumpkin. If you want to craft on the go, or you like to keep things small and low-key, check it out. The kit includes all you need.
Please take a minute or two to share, like, pin, tweet, or comment. Don't forget to FOLLOW and SUBSCRIBE to my blog.
HAPPY STAMPING!

No comments:
Post a Comment