Thursday, March 31, 2022

Swinging

This is a lovely scene that can be used to express any sentiment that you need. It can also work for various age groups too. What do you think?


Stamps:
   Expressions of Friendship

Paper:
   Flirty Flamingo A-2
   Basic Black 5-3/8 x 4-1/8
   Basic White 5-1/4 x 4 (2)

Ink:
   Tuxedo Black Memento

Watercolor Pencils:
   Balmy Blue
   Daffodil Delight
   Early Espresso
   Flirty Flamingo
   Garden Green
   Granny Apple Green
   Old Olive
   Whisper White

Technique:
   Watercolor - Blender Pen

Accessories:
   Blender Pen
   Enamel Shapes
   Adhesive

First, I stamped my image using the Tuxedo Black Memento.

I then colored the image using the watercolor pencils listed above.

Next, I used a Blender Pen to smooth and brighten up the color. 

I then stamped the sentiment I needed and added an enamel shape.

Lastly, I matted the image panel with Basic Black and then adhered it to the card front. I adhered the other Basic White panel to the inside of the card.

I am so excited that you stopped to read and check out my work. Thank you from the bottom of my heart. Contact Me and let me know if there is anything I can answer for you.

Do you have some time to browse? You do not want to pass up the opportunity to shop some quality products and see what is trending. Shop Now and take a peek. If you decide to place an order, I have included a HOST CODE in the right sidebar, if you do not earn any rewards on your own. Thanks in advance.

Are you undecided? Subscribe to Paper Pumpkin and give it a go. Let the products speak for themselves. The cost is less than $25 and you are completely in control. No small print for you to miss. Try it.

Join Me and gain the best value for your hard-earned money. Check it out now.

Share, like, pin, tweet, or comment. Come on, I dare you. Don't forget to FOLLOW and SUBSCRIBE to my blog.

HAPPY STAMPING!

Wednesday, March 30, 2022

Queen's Brass

Choose your favorite colors to make this Clean And Simple (CAS) card. My color choice was swayed by a color challenge presented at SCS. I think the combination works beautifully. What do you think?


Stamps:
   Queen Anne's Lace

Paper:
   Granny Apple Green A-2
   Basic Black 5-3/8 x 4-1/8
   Basic White 5-1/4 x 4 (2)

Ink:
   Balmy Blue
   Granny Apple Green
   Mango Melody
   Melon Mambo

Technique:
   Blending Brush/Sponging
   2-Step Stamping

Accessories:
   Blending Brush/Sponge
   Brushed Brass Butterflies
   Gold Baker's Twine
   Mini Glue Dots
   Adhesive

First, I applied Balmy Blue ink to the background using a blending brush. You can easily sponge it on as well.

I then stamped the stems using Mango Melody.

Next, I added the flower heads with Melon Mambo.

I stamped the sentiment, using Granny Apple Green.

Lastly, I attached a bow made of gold baker's twine, a brass butterfly, and I adhered the other Basic White panel to the inside of the card.

I did matte the stamped panel with Basic Black before adhering it to the Granny Apple Green card base.

Thank you for stopping to take a peek. Contact Me if you have any questions.

Click on Shop Now and browse through all things Stampin' Up! Start your wish list or order your favorites today. I included a HOST CODE for you to use if you like. Use it only if your product total is less than $150. You can find it in the right sidebar.

Join Me and get the best bang for your buck.

Do you want everything at your fingertips without having to look for it? Subscribe to Paper Pumpkin. Want more choices? Check out the Kit Collection.

One last thing, share, like, pin, tweet, and comment. Don't forget to FOLLOW and SUBSCRIBE to my blog. Okay, that was more than one thing.

HAPPY STAMPING!

Tuesday, March 29, 2022

Congratulations Garden

This is a beautiful design that fills the entire card front. All you have to do is come up with the sentiment and place it in the center of the leafy wreath. What do you think? 


Stamps:
   Happy & Heartfelt

Paper:
   Soft Succulent A-2, 1-1/4 x 4
   Ever Eden DSP 5-1/2 x 4-1/4
   Ever Eden Cotton 5-1/4 x 4
   Basic White 5-1/4 x 4 (Inside)

Ink:
   Evening Evergreen

Technique:
   Die Cutting

Accessories:
   Eden Dies
   Garden Gems
   Dimensionals
   Adhesive

First, I cut my Designer Series Paper (DSP) and adhered it to my card front.

Next, I die cut the wreath, using the Eden Dies on the Ever Eden Cotton Paper. I did treat this paper gently because I did not want to accidentally tear it.

I then adhered it to the center of the card front.

Next, I stamped and die cut the sentiment. I attached it to the center of the card using dimensionals.

Lastly, I adhered the Basic White panel to the inside of the card and added a few embellishments to the card front.

Thank you for taking the time to read this. I try my best to keep it short and sweet. Contact Me if you have questions or need anything Stampin' Up!

Shop Now and take a peek at quality products. There is a HOST CODE if your product total is less than $150. You do not have to use it, but I would appreciate it. It is located in the right sidebar. 

Join Me and become part of my team. I will be as involved as you like. Check out the advantages.

Are you curious, but undecided? Subscribe to Paper Pumpkin and try it. The kit will include everything you need, and it won't break the bank. Check out the Kit Collection for more all-inclusive kit choices.

Please share, like, pin, tweet, or comment. I would love for you to FOLLOW and SUBSCRIBE to my blog.

HAPPY STAMPING!

Monday, March 28, 2022

The Clearing

Use new sentiments with your discontinued stamps. I enjoy mixing the new with the old. Since I keep my stamps until they are useless, (BTW: This never happens.) I mix and match all of the time. Here I used an old-time favorite and paired it with a new set. What do you think?


Stamps:
   Noble Deer
   Wildlife Wonder

Paper:
   Crushed Curry A-2
   Glossy White 5-1/4 x 4
   Basic White 5-1/4 x 4 (Inside), Scrap

Ink:
   Crushed Curry
   Tuxedo Black Memento

Re-Inkers:
   Crushed Curry
   Garden Green
   Island Indigo
   Night of Navy
   Rose Red

Technique:
   Cling Wrap
   Punching
   Sponging

Accessories:
   Cling Wrap
   Water Mister
   Sponge
   Banners Pick a Punch
   Dimensionals
   Adhesive

First, I created my Cling Wrap Background. You can follow the tutorial from SCS found at: Cling Wrap Tutorial 

I let the panel dry overnight. At first, I thought I had ruined the whole panel because it looked very dark. The Night of Navy seemed to take over the whole thing. Fortunately, the longer I left it, the lighter it became. Note to self: Never throw it out!

Once the background was completely dry, I stamped directly on it.

I then stamped my sentiment on a scrap of Basic White. 

I used the Banners Pick a Punch to clip the ends and then sponged it using Crushed Curry.

I attached it using dimensionals.

Lastly, I adhered the panel to the card front and added the Basic White panel to the inside of the card.

Thank you immensely for your time. I know how precious it can be. Please Contact Me if you need anything Stampin' Up! or if you have any questions.

Click on Shop Now and take a look at some quality products. Investing in your craft is a no-brainer. I have included a HOST CODE for those of you who enjoy ordering only one or two items. It is located in the right sidebar. Of course, if your product total is more than $150, enjoy your rewards.

Of course, the best value for your dollar is joining the Stampin' Up! family. Just click on Join Me and check out the benefits.

Let's not forget Paper Pumpkin. If you want to craft on the go or you like to keep things small and low-key, check it out. The kit includes all you need.

Please take a minute or two to share, like, pin, tweet, or comment. Don't forget to FOLLOW and SUBSCRIBE to my blog.

HAPPY STAMPING!

Sunday, March 27, 2022

Congrats Flowers

Congratulate someone with flowers that will last longer than a couple of days or weeks. There is no special food required, and if the recipient really takes care, these paper flowers can last for an infinite amount of time. What are your thoughts?


Stamps:
   Happy & Heartfelt

Paper:
   Pool Party A-2
   Hand-Penned DSP 5-1/4 x 4, 3/4 x 4
   Basic White 5-1/4 x 4 (Inside)

Ink:
   Cinnamon Cider

Technique:
   CAS

Accessories:
   Frosted Flower Embellishments
   In Good Taste Elements
   Glue Dots
   Adhesive

First, I stamped the sentiment onto the center of the DSP (Designer Series Paper) strip.

I then adhered the strip to the center of the DSP panel.

This was then adhered to the Pool Party card front.

I added a wooden element, using a glue dot, and adhered a flower embellishment on the other side for balance.

Lastly, I adhered the Basic White panel to the inside of the card.

Thank you so much for giving me a bit of your time. Please Contact Me if I can return the favor.

Check out all of the options by clicking on the headers above.

Do not forget to FOLLOW and SUBSCRIBE to my blog. Please share, like, pin, tweet, or comment. I look forward to reading your thoughts and possible ideas for improvements. 

HAPPY STAMPING!

Tuesday, February 8, 2022

Horizons

This pack of New Horizons Designer Series Paper does all of the work for you. The possibilities are unlimited. You can stamp on it, or you can choose to simply adorn your card front with it. Below are four different cards I made using only one sheet from the pack. What do you think? 


Happy Birthday Horizon


Relax Horizon


Thinking of You Horizon


Thank You Horizon


Stamps:
   On the Horizon
   Best Year
   Grassy Grove

Paper:
   Basic White A-2, 5-1/4 x 4 (Inside)
   Basic Black 3-1/8" Sq.
   New Horizons DSP 3" Sq.

Ink:
   Tuxedo Black Memento

Technique:
   CAS

Accessories:
   Basic Rhinestone Jewels
   Basic Pearl Jewels
   Dimensionals
   Adhesive

First, I cut my 6x6 DSP sheet into 3" Squares.

I then stamped each of the squares. The trees on the Thank You card are from the Grassy Grove Stamp Set. All of the other images are from On the Horizon Stamp Set.

I matted the four squares using Basic Black and attached them with dimensionals.

Next, I stamped the sentiments. The birthday and thank you sentiments are from the Best Year Stamp Set. The others use On the Horizon Stamp Set.

Lastly, I added rhinestones or pearls to the card fronts and adhered a Basic White panel to the inside of each card.

Thank you so much for stopping by here and taking a quick look-see. If you have any questions or need my assistance, Contact Me.

Shop Now and take a look at all of our new products and current promotions. Please use the HOST CODE sitting in the right sidebar if you did not earn your own rewards.

If you want to craft, but keep your costs below $25 a month, check out Paper Pumpkin. It just might be what you are looking for at the moment.

Join Me and become the newest member of my team. Remember there are no hidden agendas or penalties for giving it a go. Don't pass this opportunity to save.

You've come this far, so please share, like, pin, tweet, or comment. I appreciate your time and efforts. Let me know your thoughts and leave all of your questions behind. Do not forget to FOLLOW and SUBSCRIBE to my blog.

HAPPY STAMPING!


Monday, February 7, 2022

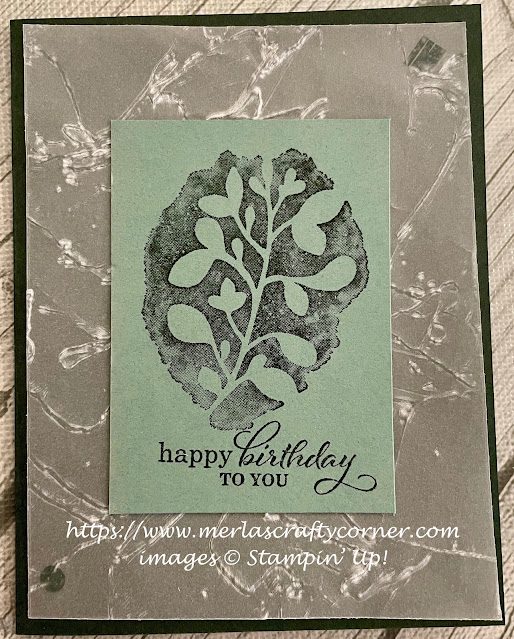
Textured Birthday

Dry emboss a panel of vellum and be amazed at the results. As the fibers are broken up by the embossing, the vellum turns white. I really like the look and feel that is created. What do you think? 


Stamps:
   Amazing Silhouettes
   Best Year

Paper:
   Evening Evergreen A-2
   Vellum 5-1/4 x 4
   Soft Succulent 2-1/2 x 3-1/2
   Basic White 5-1/4 x 4 (Inside)

Ink:
   Evening Evergreen

Technique:
   Dry Embossing

Accessories:
   Painted Texture 3D Embossing Folder
   Genial Gems
   Stampin' Seal+
   Adhesive

First, I dry embossed a vellum panel.

I then stamped my image and sentiment on a piece of Soft Succulent.

I adhered the stamped panel to the center of the vellum panel.

Next, I applied Stampin' Seal+ to the back of the vellum behind the Soft Succulent piece and added it to the card front. This will keep the marks left by the adhesive hidden from view.

Lastly, I added a few gems and adhered the Basic White panel to the inside of the card.

Thank you so much for stopping by here and spending a few minutes of your day with me. I appreciate your time. Contact Me if you have any questions, need a demonstrator, or just want to stamp or share ideas.

Shop Now and enjoy browsing products and promotions. I have a HOST CODE in the right sidebar in case you did not earn your own rewards.

Do not miss the opportunity to Join Me and become the newest member of my team.

Paper Pumpkin should not be ignored. I enjoy putting my kit together monthly.

Take a few more minutes and share, like, pin, tweet, or comment. I would love to see what you really think. Do not forget to FOLLOW and SUBSCRIBE to my blog.

HAPPY STAMPING!

Sunday, February 6, 2022

Valentine's Wish

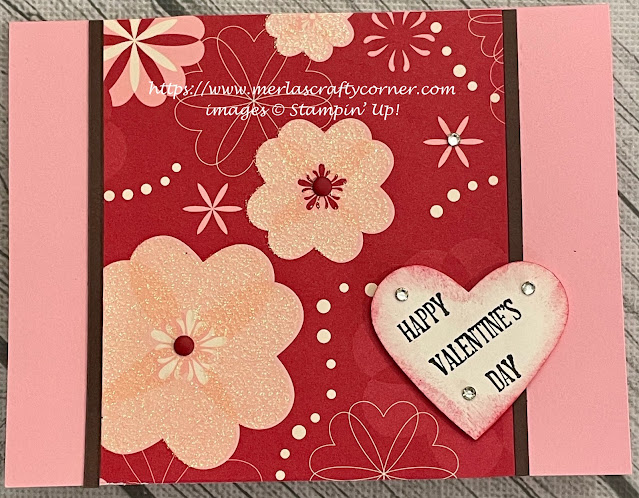
 Valentine's Day reminds us to show and tell others how special they are to us. Sometimes we send flowers, chocolates or other small tokens of love. My question is: Why wait? Shout it TODAY! Thoughts?


Stamps:
   A Wish for Everything

Paper:
   Pretty in Pink A-2
   Sending Love DSP 3-3/4 x 4-1/4
   Chocolate Chip 1/8 x 4-1/4 (2)
   Very Vanilla 5-1/4 x 4 (Inside), Scrap

Ink:
   Real Red
   Chocolate Chip

Technique:
   Sponging
   Punching

Accessories:
   Heart Punch
   Basic Rhinestone Jewels
   Real Red Candy Dots
   Sponge
   Dimensionals
   Adhesive

First, I stamped, punched, and sponged the heart. I stamped on a scrap of Very Vanilla and used Chocolate Chip and Real Red inks. You can easily switch to Early Espresso if you do not have Chocolate Chip, or choose another accent color.

Next, I adhered the Sending Love DSP onto the card front and added two Chocolate Chip strips to frame it.

I attached the heart using dimensionals and added a few Real Red Candy Dots and rhinestones. 

Lastly, I added the Very Vanilla panel to the inside of the card.

Thank you so much for dropping by here. Contact Me if you have any questions.

Click on all of the tabs above and explore products, promotions, and opportunities.

Please take the time to share, like, pin, tweet, or comment. Do not forget to FOLLOW and SUBSCRIBE to my blog.

HAPPY STAMPING!

Saturday, February 5, 2022

Valentine Hearts

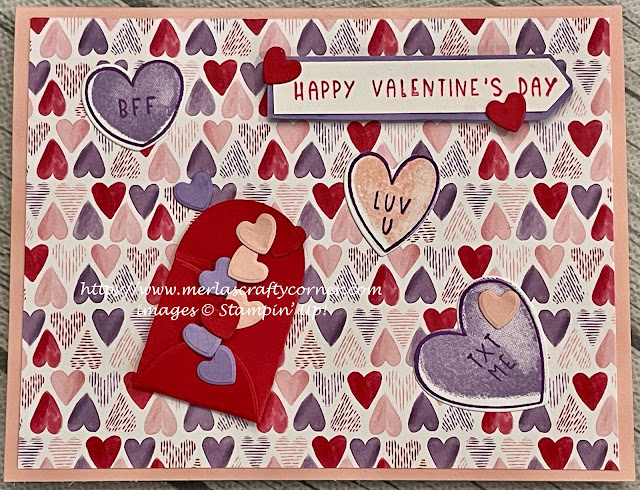
Stamp and die cut your own hearts to place on your card. I like making my own valentine cards and sending them to my grandchildren. It is always nice to put a small package together for them. Surprises are always fun! Don't you think? What was the last surprise you received? How did you feel? Tell me about it. 


Stamps:
   Sweet Conversations

Paper:
   Blushing Bride A-2, Scraps
   Sweet Talk DSP 5-1/4 x 4
   Basic White 5-1/4 x 4 (Inside), Scraps
   Real Red 2-3/4" Sq., Scraps
   Highland Heather Scraps

Ink:
   Blushing Bride
   Gorgeous Grape
   Highland Heather
   Real Red

Technique:
   Die Cutting

Accessories:
   Sweet Hearts Dies
   Dimensionals
   Glue Dots
   Adhesive

First, I took scraps of Basic White and stamped the words and outlines of the various hearts using Gorgeous Grape. I then stamped the inside fillers with Highland Heather and Blushing Bride.

Next, I stamped the sentiment on a strip of Basic White. I used my snips to cut it down to size. I added a Highland Heather matte from a scrap. I attached the sentiment using dimensionals.

I then die cut the various hearts. I used scraps of Blushing Bride, Real Red, and Highland Heather to cut the smaller hearts. 

I also die cut the small envelope and used a glue dot to hold the flaps closed. 

Lastly, I put the card together. The DSP was adhered first to the card front. I then arranged the various hearts and envelope. I used my liquid adhesive to hold them in place. I also added a couple of hearts around the sentiment. The Basic White panel was added to the inside of the card.

Thank you so much for taking the time to stop and glance at my work. If you have any questions or suggestions, please Contact Me. I do appreciate your time.

If you need any supplies, or you are curious to know just how much these products cost, click on Shop Now and satisfy your curiosity. A HOST CODE is available for you to use in case you did not earn your own rewards. You can find it in the right sidebar.

Do you want the best value for your buck? Join Me and reap all of the rewards. I will be more than happy to assist you. Check it out and note that there are no hidden agendas.

Wait! Don't leave. If you just want to try it and see, then subscribe to Paper Pumpkin. You will receive a kit with everything you need to create a project. Check out the Kit Collection for more choices.

I would love for you to take a minute to share, like, pin, tweet, or comment. Please FOLLOW and SUBSCRIBE to my blog. Let me know what you think below in the comments.

HAPPY STAMPING!